
How to Replace Lower Control Arm Pontiac G6: Practical Guide
A worn front lower control arm can make a Pontiac G6 feel loose, noisy, or unsettled even when the tires and steering parts look normal. The arm connects the front suspension to the vehicle’s subframe, while its bushings absorb movement and its ball joint lets the steering knuckle pivot. When either the bushings or ball joint wears out, braking and cornering can become less predictable.
Replacing the arm is a realistic driveway repair for a careful beginner, but it is not a job to rush. The vehicle must be supported securely, the correct replacement must match the G6’s year and engine, and the inner fasteners should be tightened with the suspension at normal ride height so the new bushings are not preloaded.
This guide explains how to replace lower control arm Pontiac G6 assemblies from preparation through final inspection. You will learn how to identify the correct part, separate the ball joint and mounting points, install the arm without damaging the bushings, and decide when an alignment or professional inspection is necessary.
At a glance
- Support the G6 with jack stands before removing any suspension fastener.
- Match the replacement arm to the vehicle’s side, year, and suspension configuration.
- Get a front-end alignment after the repair if the steering wheel or tire angles change.
How to replace lower control arm Pontiac G6 safely
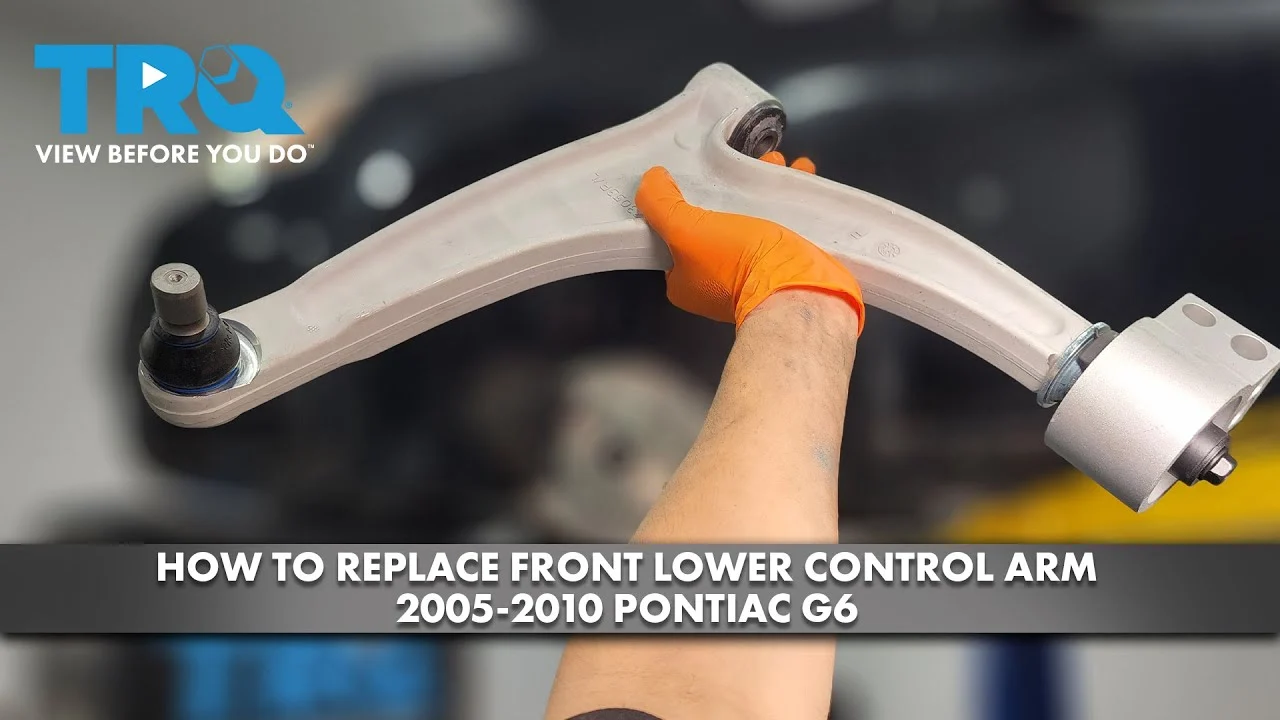
The Pontiac G6 uses a front lower control arm on each side. The arm generally attaches to the subframe at inner pivot points and to the steering knuckle through a ball joint. Depending on the model year and replacement design, the ball joint may be built into the new arm or supplied as a separate service part.
Use the procedure below as a practical method, but confirm bolt locations, torque specifications, and whether a fastener is one-time-use in a repair manual for your exact G6. Do not rely on a generic torque value for suspension hardware when the factory specification is available.
Tools you will need
- Floor jack and four properly rated jack stands for lifting and supporting the vehicle
- Wheel chocks to prevent movement
- Socket set, ratchet, extensions, and suitable combination wrenches
- Breaker bar for stubborn suspension fasteners
- Torque wrench that covers the vehicle’s suspension torque range
- Replacement lower control arm that matches the correct side and G6 configuration
- Penetrating oil and a wire brush for corroded threads
- Ball-joint separator or suitable puller, if the joint will not release with light mechanical force
- Optional: pry bar, paint marker, and replacement nuts or bolts specified by the service information
Step 1 Confirm the part and inspect the suspension before lifting
Park on a level, hard surface and compare the replacement arm with the installed part before disassembling anything. Check the left-versus-right designation, the position of the bushings, the ball-joint stud angle, and the mounting-hole spacing. Some replacement arms include a ball joint and hardware; others require you to transfer or install a separate joint.
Look for clues that the arm is actually the source of the problem. Torn rubber bushings, fluid leakage from a hydraulic bushing, a visibly damaged arm, or movement at the ball joint support replacement. A clunk can also come from a sway bar end link, strut mount, tie-rod end, or worn wheel bearing, so replacing the arm without checking can leave the original noise untouched.
Read the repair information before starting and identify the factory torque values. Pay special attention to the ball-joint fastener, inner pivot bolts, and any pinch bolt or retaining nut. If the arm is badly rusted into the subframe or you cannot identify the correct attachment hardware, stop before applying force and get experienced assistance.
Step 2 Loosen the wheel hardware and raise the G6 securely
With the vehicle still on the ground, loosen the front wheel lug nuts slightly. Do not remove them yet. Set the parking brake, place chocks behind the rear wheels, and keep people away from the vehicle’s opposite side while lifting.
Lift the front of the G6 at an approved jacking point, then place jack stands under solid structural support points identified in the owner’s or service information. Lower the vehicle gently onto the stands and shake the body lightly at a safe location to confirm that it is stable. Keep the jack under a suitable support point as a secondary aid, but never use a hydraulic jack as the only support.
Important
Never work under a Pontiac G6 supported only by a jack. If the stands cannot sit flat, the support point is unclear, or severe rust weakens the structure, stop and have the vehicle inspected before continuing.
Step 3 Remove the wheel and document the original arm
Remove the lug nuts and wheel, then slide the wheel under a strong part of the vehicle as an additional precaution. Turn the steering as needed for access, but avoid putting strain on the brake hose or letting the caliper hang from it.
Take clear photos of the arm before removing anything. Mark the position and direction of eccentric washers or alignment-related hardware if your vehicle has them, and note how the sway bar link, ball-joint stud, and pivot bolts are oriented. Paint marks help with reassembly, but they do not replace a final alignment.
Inspect the brake hose, ABS wiring, CV axle boot, tie-rod end, and subframe while access is open. A damaged wire or boot should be addressed now rather than hidden behind the replacement arm.
Step 4 Disconnect components that prevent the arm from moving
Depending on the exact G6 suspension layout, you may need to disconnect the sway bar end link from the control arm or move another component out of the way. Remove only the hardware necessary for access. Support any part that could become strained, and do not use the brake rotor, ABS sensor, or brake hose as a lever point.
Clean exposed threads with a wire brush and apply penetrating oil if corrosion is present. Allow it time to work. Use a correctly fitting socket and a breaker bar rather than rounding a nut with an undersized or adjustable wrench.
If the sway bar link spins with its nut, hold the stud using the designed wrench surface or hex feature while turning the nut. Do not clamp locking pliers onto the polished stud unless the part is being replaced, because damaged threads can prevent proper tightening.
Step 5 Separate the ball joint from the steering knuckle
Remove the ball-joint nut or retaining hardware according to the service information. If the stud is tapered, the knuckle may remain tightly clamped to it even after the nut is removed. Support the steering knuckle so it cannot drop and pull on the brake hose or CV axle.
Use a ball-joint separator or puller when necessary. A few controlled blows to the side of the knuckle near the tapered socket can help release the taper, but do not strike the threaded stud, the brake rotor, or the aluminum portions of the steering assembly. Avoid driving a wedge into a sealing surface that must remain undamaged.
A useful way to approach how to replace lower control arm pontiac g6 is to check your progress after each stage.
Once separated, check that the knuckle is supported and that the ball-joint stud is fully free. If the replacement arm includes a new ball joint, compare the old and new joint orientation before discarding the original.
Step 6 Remove the inner pivot fasteners and take out the old arm
Support the control arm with the jack before removing its inner bolts. The arm may shift or drop when the final fastener is released. Remove the inner pivot nuts and bolts in a controlled order, noting the direction of each bolt and the location of washers or spacers.
Some bolts may be difficult to withdraw because the arm or subframe carries suspension load. Adjust the supporting jack by a small amount rather than forcing a bolt sideways. Never place fingers between the arm and subframe while manipulating the assembly.
With the bolts removed, lower the arm and compare it with the replacement. Verify that the new bushings face the same direction, the ball-joint stud points correctly, and no shipping sleeve or protective cap remains in a mounting hole. A replacement arm that does not sit naturally in the original position is usually the wrong part or is not oriented correctly.
Step 7 Position the new control arm and install fasteners loosely
Raise the new arm into the subframe and install the inner pivot bolts and nuts by hand. Start every fastener several turns before tightening any of them. If the holes do not line up, adjust the support jack slightly; do not pull the arm into place by cross-threading a bolt.
Reconnect the ball joint to the steering knuckle and install its retaining nut or bolt. Reattach the sway bar end link and any other parts removed for access. Route the ABS wire and brake hose exactly as they were originally routed, with enough slack for steering movement and no contact with the tire.
Leave the inner pivot hardware only snug until the arm is positioned at normal ride height. Tightening rubber-bushed pivots while the suspension hangs can twist the bushings permanently and shorten their life.
Step 8 Set the suspension at ride height and torque the hardware
Before final tightening, support the control arm or raise the steering knuckle until the suspension reaches approximately its normal loaded position. The safest exact method depends on the G6’s support points and the service instructions. Keep the vehicle securely supported; do not place yourself under an unstable vehicle while using the jack to simulate ride height.
With the arm in its loaded position, torque the inner pivot fasteners, ball-joint hardware, sway bar link, and wheel-related hardware to the exact specifications for your model. Use a torque wrench and follow the specified sequence. If the manual calls for a new prevailing-torque nut, cotter pin, or torque-to-yield bolt, install a new one rather than reusing the old piece.
Where a castellated nut and cotter pin are used, tighten to the specified torque and continue only as directed to align the slots; never loosen a torqued suspension nut just to make a cotter pin fit. Do not hammer a cotter pin into place if the nut is not seated correctly.
Helpful tip
For rubber control-arm bushings, the important detail is not simply “tighten it later.” The pivot must be tightened with the arm at the specified ride-height position, or the bushing can be twisted before the car ever moves.
Step 9 Reinstall the wheel and lower the vehicle
Check that every removed component is back in place, then install the wheel and hand-tighten the lug nuts. Remove tools from beneath the vehicle and raise it slightly to remove the jack stands. Lower it to the ground gradually and finish tightening the lug nuts in a star pattern to the vehicle’s specified wheel torque.
Turn the steering from lock to lock while watching the repaired side. The tire should not touch the control arm, sway bar, brake hose, ABS wire, or inner fender. If anything binds, stretches, or contacts the tire, do not drive the car until the cause is corrected.
Step 10 Perform a stationary safety check and a cautious road check
Before starting the engine, compare the repaired side with the opposite side. Confirm that the ball-joint hardware, pivot nuts, sway bar connection, wheel lugs, brake hose, and ABS wiring are present and properly seated. Press the brake pedal several times if the caliper or brake components were moved, and make sure the pedal feels firm before moving.
Begin with a short, slow drive in a quiet area. Listen for sharp knocks, observe whether the vehicle pulls, and check that the steering wheel returns normally. Avoid hard braking, high-speed cornering, and rough roads during the first check.
After the short drive, park safely and inspect the fasteners and component clearances again. A loose bolt, shifted bushing, or new contact mark is a reason to stop driving and recheck the installation. Understanding how to replace lower control arm pontiac g6 also means recognizing the limits of the method.
What makes the control arm replacement safe and correct
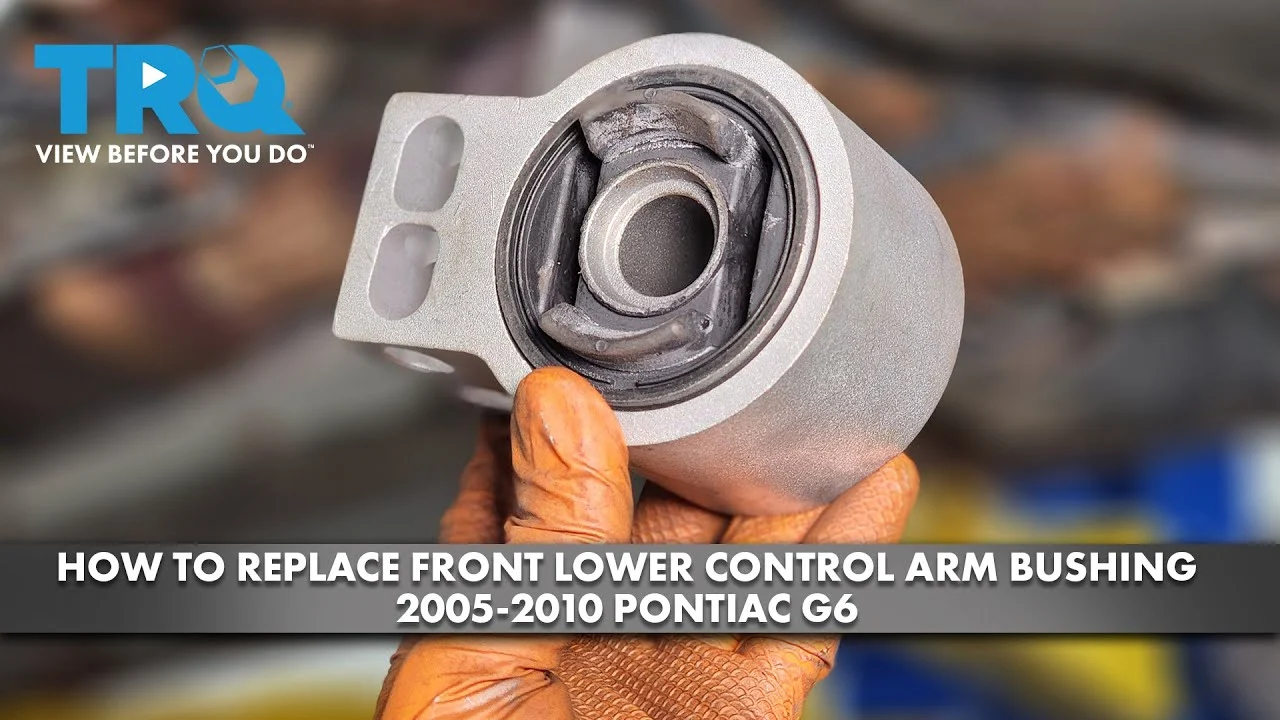
The control arm is more than a simple metal link. Its inner bushings control how the arm moves against the subframe, and the ball joint transfers wheel loads while allowing the steering knuckle to pivot. A part can look installed correctly yet still be under harmful stress if its bushing bolts were tightened with the suspension hanging.
How to identify a worn lower control arm
Common symptoms include a clunk over bumps, vague steering, pulling during braking, uneven front tire wear, or visible cracking and separation in a bushing. A worn ball joint may also produce looseness when the wheel is lifted, although wheel-bearing and tie-rod problems can feel similar.
Use a careful inspection rather than assuming every front-end noise comes from the arm. With the vehicle safely supported, compare movement on both sides and have an assistant watch the ball joint and bushings while the wheel is gently moved. Do not place any part of your body under a suspended wheel while checking looseness.
Why an alignment usually matters afterward
Removing and replacing a control arm can alter camber, caster, or toe even if you reinstall the same style of part. Alignment describes the angles at which the wheels contact the road. A steering wheel that is off-center, a vehicle that pulls, or tire wear that begins after the repair indicates that the angles should be measured.
Some Pontiac G6 versions have limited adjustment at the front, but an alignment machine can still reveal whether the suspension is within specification and whether another bent or worn part is present. Do not try to correct a pull by changing tire pressure unevenly or by moving alignment hardware without measurement.
When replacing one side versus both sides makes sense
Replace only the failed side when the opposite arm is in good condition and the parts are not being replaced as a matched pair. Consider replacing both sides when both bushings are cracked, the vehicle has similar mileage-related wear on each side, or the replacement manufacturer recommends paired installation.
Even when only one arm is replaced, inspect the opposite ball joint, bushings, sway bar links, and tie-rod ends. One failed suspension component does not prove that every nearby part needs replacement, but it is a useful opportunity to find related wear.
How to verify the repair before normal driving
A successful installation should produce a quiet, predictable front end with no interference through the full steering range. Verification is more than checking whether the wheel turns; it confirms that the fasteners, brake components, and alignment-related behavior are all acceptable.

- Confirm the replacement arm is on the intended side and that its bushings and ball joint face the correct direction.
- Check that all inner pivot bolts, ball-joint hardware, sway bar hardware, and lug nuts were torqued to the correct specifications.
- Make sure the brake hose and ABS wire are clipped and routed away from moving or rotating parts.
- Turn the steering fully left and right and look for tire, hose, wire, or arm contact.
- Check the brake pedal before driving if any brake component was moved or allowed to hang.
- Take a slow test drive, then listen for knocks and look for fresh marks or shifted hardware.
- Arrange a four-wheel alignment or front alignment check when specified for the vehicle or when steering and tire behavior changes.
Check your result
The repair passes the basic stationary check when the steering moves freely lock to lock, the brake pedal is firm, no hose or wire is stretched, and every fastener is accounted for and torqued.
Troubleshooting common problems
Most difficulties come from corrosion, stored suspension load, or a part mismatch. Do not compensate for an incorrect part by bending the arm, enlarging a mounting hole, or omitting a spacer. Those shortcuts can change suspension geometry and create a dangerous failure.
| What you notice | Likely area to inspect |
|---|---|
| Clunk over bumps | Loose pivot or sway bar hardware, a ball-joint issue, or another worn suspension component |
| Vehicle pulls or steering wheel is crooked | Alignment, tire condition, mismatched ride height, or a bent suspension part |
| Grinding or rubbing while turning | Brake hose, ABS wire, tire, dust shield, or control-arm clearance |
| Bolt will not pass through the arm | Suspension load, incorrect arm orientation, or a shifted subframe position |
| New bushing fails quickly | Pivot bolts tightened at full suspension droop or an incorrect replacement part |
What to do when the ball joint will not separate
Make sure the retaining nut is removed or backed off only as directed, and support the knuckle before applying force. Use a proper separator or puller rather than repeatedly striking the stud. Heat near brake components, wheel bearings, rubber boots, and ABS wiring can cause additional damage, so use it only with suitable experience and protection.
When corrosion changes the repair
Surface rust can often be cleaned from threads, but deep rust, flaking subframe metal, seized bolts, or a damaged mounting hole changes the job from ordinary part replacement to structural repair. A control arm must mount to sound metal. If a fastener spins without tightening or the subframe moves, stop and seek professional inspection.
When to stop and get help
Stop if the vehicle cannot be supported securely, the suspension fastener is damaged beyond removal, the ball joint or knuckle is cracked, or you cannot determine the correct torque and hardware. Also stop if the car pulls sharply, the brake pedal is soft, or a wheel contacts another component after installation.
A professional shop can inspect the suspension, use an alignment rack, and remove severely seized hardware with equipment that is less likely to damage the subframe. That is a safer choice than driving an uncertain repair to test it.
Frequently asked questions
These questions cover the decisions that most often trouble a beginner working on a Pontiac G6 front suspension.
Can I replace the lower control arm without replacing the ball joint?
Only if the replacement arm does not include a ball joint and the existing joint passes inspection, or if a separate serviceable joint is being installed as directed. Many replacement arms include the ball joint, so compare the parts before disassembly and follow the manufacturer’s installation instructions.
Do I need to remove the spring or strut?
Usually, replacing the front lower control arm does not require removing the coil spring or strut assembly. The spring remains part of the strut assembly, but the control arm can still carry suspension load through the knuckle. Support the arm or knuckle as needed and never loosen spring-retaining hardware unless the service procedure specifically requires it.
Can I use an impact wrench to tighten the control-arm bolts?
An impact wrench can help remove stubborn hardware, but final tightening should be done with a torque wrench. An impact tool can over-tighten a bolt, damage a bushing, or make it difficult to tell whether a corroded fastener is actually clamping correctly.
How do I know whether the replacement arm fits my G6?
Confirm the model year, engine or suspension configuration if the parts catalog distinguishes them, and the installation side. Compare the bushing shape, mounting-hole spacing, ball-joint orientation, and included hardware with the original arm before installing it.
Is an alignment required after this repair?
An alignment check is strongly recommended because control-arm removal can change front suspension angles. It is especially important if the steering wheel is no longer centered, the vehicle pulls, or the front tires show unusual wear.
Finish the repair with a careful inspection
Learning how to replace lower control arm Pontiac G6 parts is manageable when the job is treated as a suspension repair rather than a simple bolt-on swap. Use secure jack-stand support, verify the replacement arm before installation, protect the brake and ABS components, and tighten the pivot bushings at the correct suspension position.
After the vehicle is back on the ground, complete the clearance and brake checks, take a cautious test drive, and arrange an alignment when needed. If corrosion, damaged mounting metal, uncertain hardware, or poor handling remains, leave the car parked and have the repair inspected before normal driving.






