
How to Assemble Coilovers: A Safe Step-by-Step Guide
Learning how to assemble coilovers starts with one simple rule: do not guess. Coilovers look simple, but small parts can have a big effect on safety, fit, and suspension travel. The exact design also changes from one brand and car to another.
Before you begin, read the instructions that came with your kit. Check the part numbers, spring rate, mount type, and hardware. If the kit uses a compressed spring or a part that requires a special tool, stop and use the tool and procedure specified by the manufacturer.
A clean work area helps a lot. Lay every part on a bench in the order you expect to use it. Take photos before disassembly if you are rebuilding an older unit. This simple habit can prevent a washer, spacer, or isolator from going back in the wrong place.

What Are Coilovers and How Do They Work?
A coilover combines a coil spring and a shock absorber in one suspension unit. The spring supports the vehicle, while the damper controls how fast the suspension moves. Many modern coilovers also let you change ride height, damping, or both.
Knowing the parts makes it much easier to understand how to assemble coilovers. Most kits have a damper body, coil spring, spring seat, locking collar, top mount or top hat, and several small pieces of hardware. Some kits also use helper springs, thrust bearings, camber plates, or special spacers.
The spring must sit square on its seat. The top mount must face the right way. The adjustment collars must lock correctly. A mistake in any of these areas can cause noise, poor handling, damage, or unsafe suspension movement.
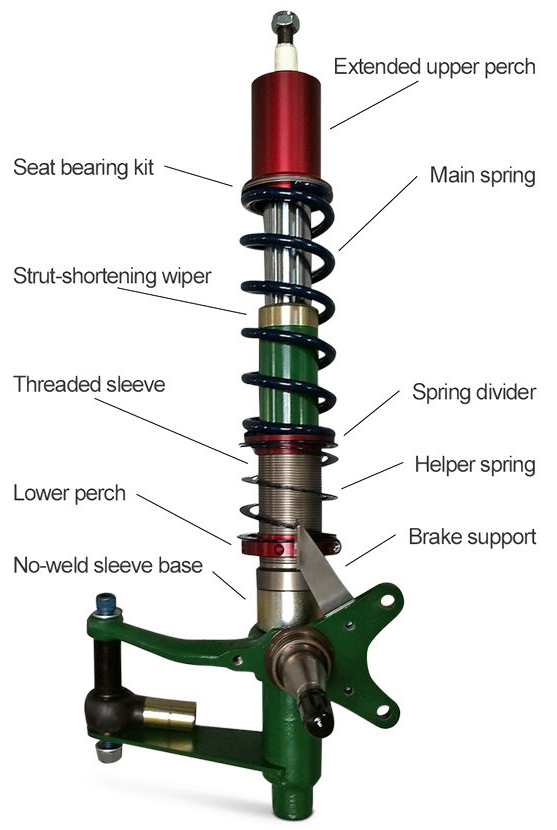
- ✦ Damper
The damper controls suspension motion. Its shaft and body must remain free from damage and contamination.
- ✦ Main spring
The main spring carries the vehicle’s load. Its length and spring rate must match the coilover design.
- ✦ Spring seat
The spring seat supports the lower end of the spring and may move to set preload or ride height.
- ✦ Locking collar
The collar locks the spring seat or adjustment position. Follow the maker’s locking method rather than relying on guesswork.
- ✦ Top mount
The top mount connects the coilover to the vehicle. It may be a fixed mount, rubber mount, pillow-ball mount, or adjustable camber plate.
Spring Preload vs. Ride Height
These two settings are often confused. Spring preload is the amount the spring is compressed when the suspension is at its unloaded position. Ride height is the height of the vehicle once it sits on its wheels.
Some coilovers use a threaded body that lets you change ride height without changing spring preload. Others use a simpler threaded spring perch. Follow the design of your specific kit because the adjustment method is not the same on every coilover.
- ✦ Preload
Preload changes how the spring is held in the assembly. Do not use a random preload setting as a substitute for the manufacturer’s setup instructions.
- ✦ Ride height
Ride height changes the vehicle’s position. After a meaningful change, check suspension travel, tire clearance, and alignment.
Tools and Parts You Need Before Assembly
The safest way to learn how to assemble coilovers is to prepare before touching the hardware. Use a sturdy workbench, good lighting, and clean tools. Keep dirt away from threaded parts and damper shafts.
You may need different tools depending on the kit. Some coilovers use special spanner wrenches, while others need hex keys, sockets, or manufacturer-specific tools. Never assume that a standard wrench is safe for a special locking ring.
A torque wrench is important for final assembly. Suspension hardware can be damaged by too much torque, yet loose hardware can also create a serious safety problem. Use the torque values supplied by the coilover maker or vehicle manufacturer for the exact fastener.

- ✦ Basic tools
Prepare suitable sockets, wrenches, hex keys, spanner wrenches, a torque wrench, and a clean work surface.
- ✦ Safety equipment
Wear eye protection and suitable work gloves. Keep loose clothing and fingers away from areas where springs or tools can move.
- ✦ Manufacturer instructions
Keep the coilover manual beside you. It is the primary source for assembly order, torque values, preload, and adjustment limits.
- ✦ Replacement hardware
Replace damaged, bent, badly worn, or missing hardware with the correct parts. Do not substitute random nuts, washers, or spacers.
When a Professional Should Handle the Job
A coil spring can store a large amount of energy. If your assembly requires compressing or removing a spring with a separate compressor, use a tool made for that job and follow its instructions. If you do not have the right equipment, a suspension shop is the safer choice.
Do not loosen a coilover’s top nut or remove a spring retainer just because it looks simple. If you are unsure whether the spring is safely contained, stop. A professional can identify the correct procedure before a stored-energy part is released.
- ✦ Stop if the spring is not secure
Do not continue when a spring can move freely or when you cannot confirm how the manufacturer expects it to be restrained.
- ✦ Use the correct special tool
A homemade spring compressor, pipe wrench, or improvised clamp can slip or damage parts.
How to Assemble Coilovers Step by Step
The following process explains the general method for how to assemble coilovers. It is not a replacement for the instructions for your exact kit. Part shapes, thread direction, mount designs, and spring-retention methods vary.
Start with the damper and identify every part before assembly. Compare the hardware with the maker’s diagram. This is especially important when several washers or spacers look almost the same.

- ✦ 1. Inspect the damper
Check the damper body, shaft, threads, seals, and mounting points. Do not assemble a unit with a bent shaft, damaged threads, leaking fluid, or other clear damage.
- ✦ 2. Clean the threads
Remove dirt from threaded adjustment areas with the method approved by the manufacturer. Avoid damaging the threads or contaminating the damper.
- ✦ 3. Install the lower spring hardware
Place the lower spring seat or perch in the correct position. Install the locking collar as shown in the maker’s diagram.
- ✦ 4. Position the spring
Set the spring onto its seat. Make sure the spring end matches the shape of the perch and sits fully against the intended stop.
- ✦ 5. Add helper or tender springs if supplied
If the kit includes a helper or tender spring, place it in the exact order shown by the manufacturer. These springs have a specific purpose and are not interchangeable with the main spring.
- ✦ 6. Install the upper spring hardware
Fit the upper seat, isolator, thrust bearing, or related parts in the specified order. Do not omit a washer or spacer because it appears optional.
- ✦ 7. Install the top mount
Install the top hat, pillow-ball mount, or camber plate as directed. Check its orientation before tightening the center hardware.
- ✦ 8. Tighten the center hardware safely
Use the manufacturer’s procedure for holding the damper shaft and tightening the nut. Do not clamp or grip a polished damper shaft in a way that can damage its sealing surface.
- ✦ 9. Set the initial adjustment
Set preload, ride height, and damping to the manufacturer’s starting values or the setup specified for your use. Keep both sides of an axle consistent unless a documented setup calls for a difference.
- ✦ 10. Lock the adjustment collars
Once the setting is correct, lock the collars using the supplied method. Confirm that the collars fully engage and cannot turn by hand when they should be locked.
Check the Assembly Before Installing It
Look at the finished coilover from top to bottom. The spring should sit squarely on both seats, and no washer, spacer, or isolator should look out of place. Turn the adjustment hardware only within the range allowed by the maker.
Compare the left and right units. They should use the correct matching parts and settings for that axle. If one side looks different, stop and check the parts diagram before installation.
- ✦ Spring seating
Confirm that the spring end is fully seated and that the spring does not bind against nearby parts.
- ✦ Thread engagement
Confirm that threaded collars and nuts have the required engagement specified by the manufacturer.
- ✦ Hardware order
Compare every washer, spacer, bearing, and mount with the assembly diagram.
How to Set Coilover Preload and Ride Height
After learning how to assemble coilovers, the next task is setting them correctly. Do not simply lower the spring perch until the car looks low. A very low setting can reduce useful suspension travel and may cause contact between suspension parts, tires, or the chassis.
Measure the car before making changes. A simple baseline helps you track what changed. Measure from a repeatable point, such as the wheel center to the fender edge, and record the result for each corner.
Many adjustable coilovers use separate controls for ride height and spring preload. If your kit uses a threaded lower mount, ride height can often be changed at the body without changing spring preload. If it uses a spring perch for ride height, the adjustment may work differently.

- ✦ Start with the maker’s setting
Use the supplied setup range as your starting point. Avoid copying a random internet setting from another car.
- ✦ Keep axle settings consistent
Use matching settings on the left and right side unless the vehicle setup specifically requires otherwise.
- ✦ Check spring tension
The spring must remain properly retained through the full intended suspension range. Follow the manufacturer’s minimum preload or retention instructions.
- ✦ Check travel
Make sure the suspension has adequate bump and rebound travel after the height is set.
- ✦ Recheck after settling
After installation, the suspension may settle. Recheck ride height and fasteners according to the manufacturer’s instructions.
Why Too Much Preload Can Be a Problem
More preload does not automatically make a coilover better. It changes how the spring is positioned and can affect available travel, depending on the coilover design.
A good setup balances spring retention, ride height, and usable suspension travel. If you need a setting outside the manufacturer’s adjustment range, ask the manufacturer or a qualified suspension specialist rather than forcing the adjustment.
- ✦ Do not chase a ride height with random preload
Use the adjustment method intended by the coilover design.
- ✦ Watch for coil bind
The spring must not become fully stacked before the suspension reaches the intended end of travel.
Common Coilover Assembly Mistakes to Avoid
Many coilover problems come from small assembly errors. The most common mistake is treating every coilover as if it uses the same design. Even two kits made for the same car can use different mounts, adjustment systems, and spring hardware.
Another common mistake is tightening parts by feel. Critical suspension fasteners need the correct torque value and tightening method. A torque wrench helps, but it must be used with the correct specification and setup.
When learning how to assemble coilovers, take your time at the first unit. Once you understand the parts and confirm the correct order, the second unit usually becomes much easier.

- ✦ Installing parts in the wrong order
A washer, spacer, bearing, or isolator in the wrong position can change the way the mount works.
- ✦ Using the wrong spring
Spring length, inner diameter, and rate must suit the coilover. Do not substitute a spring based only on appearance.
- ✦ Ignoring torque values
Use the correct torque specification for each fastener. If the maker gives a special tightening sequence, follow it.
- ✦ Damaging the damper shaft
Do not use gripping tools on the polished shaft unless the manufacturer provides a specific safe method.
- ✦ Setting the car too low
A low stance can reduce travel and create clearance issues. Check tires, steering, brake lines, and suspension movement.
- ✦ Skipping an alignment
Changing ride height can alter suspension geometry. A proper alignment is an important part of the final setup.
Signs That Something Is Wrong
Stop and inspect the assembly if you hear a new sharp clunk, see a loose collar, notice a spring moving when it should remain retained, or find contact between the spring and another part. Do not assume a new noise will disappear on its own.
Also check for fluid leaks, damaged threads, unusual tire wear, or a sudden change in vehicle height. These signs can point to an assembly, adjustment, installation, or component problem.
- ✦ New clunk or knock
Inspect mounts, fasteners, spring seats, and related suspension parts before continued driving.
- ✦ Uneven ride height
Confirm measurements, spring seating, adjustment positions, and installation before making more changes.
- ✦ Visible damper leak
Do not treat a significant fluid leak as normal. Contact the manufacturer or a qualified suspension shop.
Final Checks After Coilover Assembly
The job is not finished when the coilovers look assembled. Before driving, inspect every connection and compare the completed units with the installation manual. Make sure the spring is secure and that no brake hose, ABS wire, tire, or suspension part can rub against the coilover.
Install the coilovers using the vehicle and kit instructions. Support the vehicle correctly, use suitable jack stands, and never work under a vehicle supported only by a jack. Torque the mounting hardware to the correct specification.
After installation, lower the vehicle carefully and check ride height on level ground. Turn the steering from lock to lock where appropriate and inspect for contact. A professional wheel alignment should follow changes that affect suspension geometry.

- ✦ Fastener check
Confirm that critical suspension fasteners have the correct torque and that locking hardware is installed as specified.
- ✦ Clearance check
Check the tire, wheel, brake line, ABS wire, spring, damper, and nearby suspension components for interference.
- ✦ Ride-height check
Measure all corners on level ground and compare them with your planned settings.
- ✦ Alignment
Get a professional alignment after installation or significant ride-height changes.
- ✦ Short inspection drive
If the installation manual permits a road test, drive slowly in a safe area first and listen for unusual noises before normal driving.
- ✦ Reinspection
After the initial drive and again after the manufacturer’s recommended interval, inspect the hardware, collars, mounts, and clearances.
Track Use and Street Use Are Not the Same
A coilover setting that works on a track may not suit a daily driver. Street cars need enough travel and clearance for potholes, driveways, speed bumps, and uneven roads. Track setups may use different spring rates, damping settings, ride heights, and alignment targets.
For a U.S. street car, also check local rules and inspection requirements before making major suspension changes. Requirements can vary by state and vehicle type.
- ✦ Daily driving
Prioritize safe clearance, useful suspension travel, predictable handling, and a ride height that works on normal roads.
- ✦ Performance driving
Use a documented setup that matches the car, tires, track, spring rates, and damper range.


