
How to Tell If Control Arm Is Bent: Simple Checks at Home Safely
A bent control arm can be difficult to identify because several suspension problems produce the same first symptoms: the car pulls to one side, the steering wheel no longer sits straight, or one tire wears faster than the other. A curb strike or pothole may have caused the damage, but the control arm can also look normal until you compare its position with the opposite side.
If you are wondering how to tell if control arm is bent, the safest beginner approach is to combine a driving history with a careful visual inspection and a comparison of both sides. You may be able to spot obvious deformation, shifted wheel position, damaged bushings, or fresh contact marks. A home inspection can narrow down the problem, but it cannot replace a proper alignment check or a professional inspection when steering or braking feels unsafe.
This guide explains how to inspect the control arm without removing it, how to separate a bent arm from a worn bushing or ball joint, and how to check your findings. You will also learn when to stop driving, which observations are meaningful, and why an alignment reading is often the final confirmation rather than the first test.
At a glance
- Compare the suspected side with the matching control arm and wheel position on the other side.
- A bent arm often follows an impact and may change wheel position, alignment, or ride height.
- Do not drive normally if the wheel is visibly displaced, a joint is loose, or the car has unstable steering.
How to Tell If Control Arm Is Bent: A Safe Inspection Method
A control arm, sometimes called a wishbone, connects the steering knuckle or wheel hub area to the vehicle’s frame or subframe. It guides the wheel through its up-and-down movement while bushings and a ball joint allow controlled movement. Because suspension designs differ, the arm may be straight, curved, stamped from steel, or made from aluminum; the important question is whether its shape and position match the undamaged side.
Perform the inspection on level ground with the vehicle supported correctly. Begin with the vehicle parked, then raise only the affected corner if you need to inspect underneath. Never rely on a jack alone while placing any part of your body under the vehicle.
Tools you will need
- Vehicle owner’s manual, to identify safe lifting points and the control-arm layout
- Flashlight, for viewing bends, cracks, scrape marks, and leaking or torn bushings
- Ruler or tape measure, for comparing wheel position and ride height
- Floor jack and correctly rated jack stands, only if an underside inspection is needed
- Wheel chocks, to prevent the vehicle from rolling
- Optional: straightedge or long piece of rigid material, for comparing visible arm alignment without touching moving parts
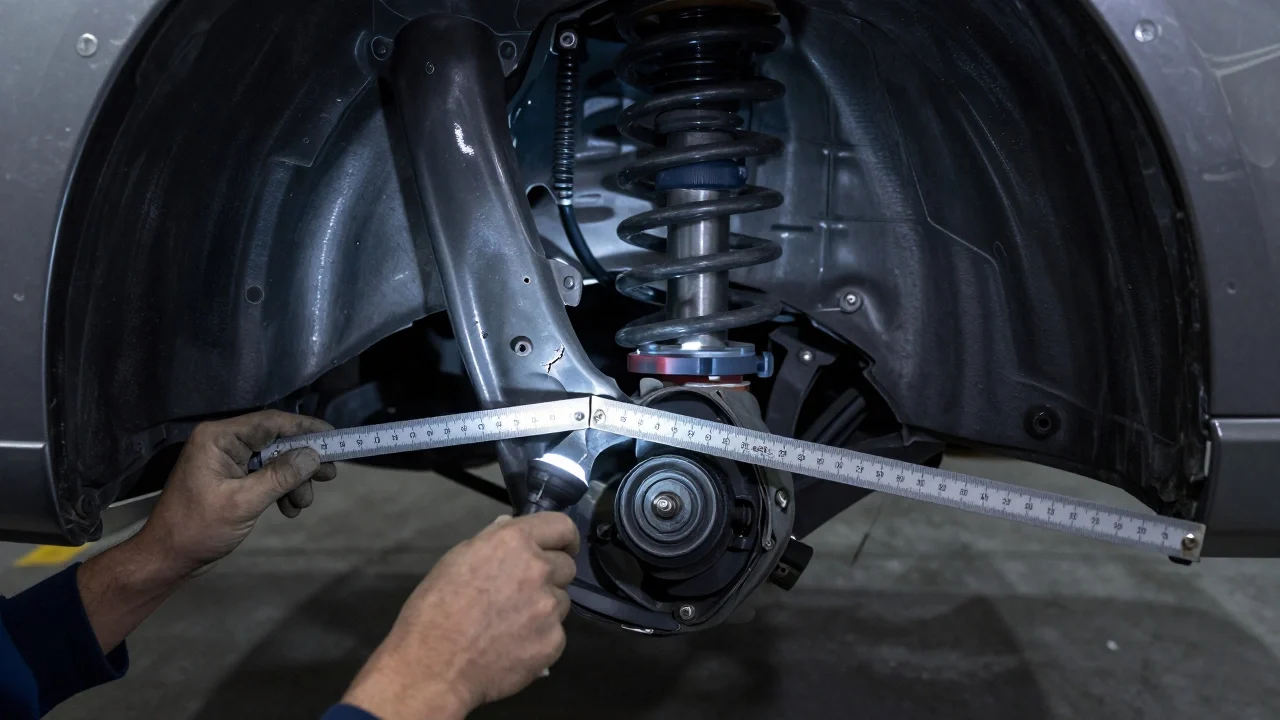
Step 1 Review the impact and driving history
Start by asking what happened immediately before the symptoms appeared. A hard impact with a curb, pothole, parking block, or road debris raises suspicion of a bent control arm, especially if the steering wheel became crooked or the car began pulling immediately afterward.
Note whether the problem is present during braking, acceleration, cornering, or ordinary cruising. A sudden change after one impact is more consistent with collision damage than a gradual clunk that developed over months, although worn bushings and ball joints can also become noticeable after an impact.
Look at the tire and wheel involved in the incident. A fresh scrape on the rim, a bulge in the tire sidewall, or a bent wheel can create symptoms that resemble suspension damage. Record the affected corner and inspect that area first, but keep in mind that force can damage more than one component.
Step 2 Check the vehicle’s stance on level ground
Park on a flat, hard surface, select Park or first gear, set the parking brake, and place the steering wheel as straight as possible. Stand several feet in front of the vehicle and compare the left and right front wheels, then repeat from behind for the rear suspension if the vehicle has rear control arms.
Look for one corner sitting lower, one wheel appearing farther forward or backward in the wheel opening, or one tire leaning noticeably inward or outward. A difference can indicate a bent control arm, damaged spring, shifted subframe, failed bushing, or another suspension problem, so this check identifies an abnormality rather than proving the arm is bent.
Measure from the center of each wheel hub to the lower edge of the fender on the same axle if the body design allows a fair comparison. Measure on both sides using the same points. Unequal ride height is useful evidence, but it can also come from a broken or sagging spring, different tire pressure, or a sloped parking surface.
Check your result
Success check: The vehicle is on level ground, the tire pressures are reasonably equal, and both sides have been compared from the same viewing angles and measurement points.
Step 3 Inspect the control arm from outside the vehicle
Use the flashlight to look through the wheel spokes and around the inner edge of the tire. Depending on the design, you may see the control arm running from the wheel knuckle toward the subframe. Compare its contour, direction, and clearance with the matching arm on the other side.
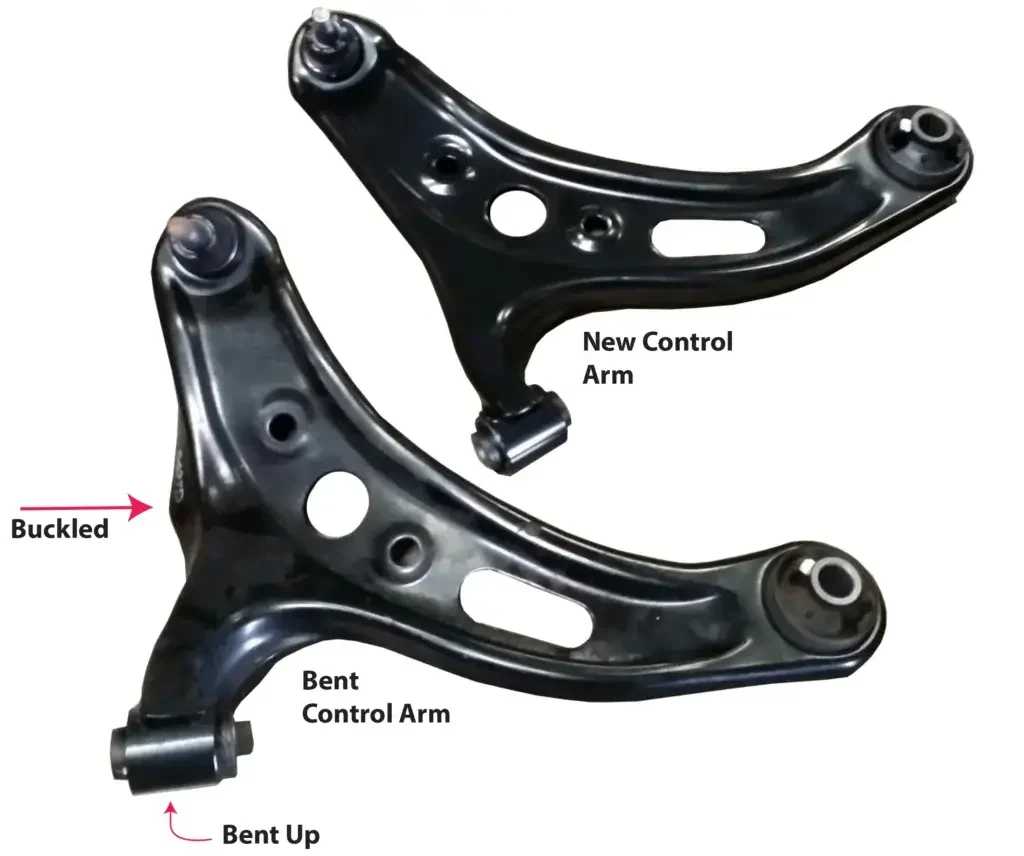
Look for a sharp kink in a normally smooth arm, a crushed section, a stretched or torn mounting area, fresh bare metal, or paint that has cracked along a bend. Scrape marks or bright metal can show where the arm contacted a curb or another component. A symmetrical factory stamping or curve is normal; an isolated crease or flattened section is not.
Check whether the arm has moved unusually close to the tire, wheel, subframe, sway bar, or brake hose. Do not confuse normal clearance differences caused by steering angle with damage. If possible, compare the wheels with the steering centered, and do not put your fingers into a gap that could close if the vehicle moves.
Do not hammer, pry, or heat the arm during this inspection. A control arm can contain stressed metal, and attempting to straighten it may weaken it or alter the suspension geometry. A visibly deformed arm is generally replaced rather than repaired at home.
Step 4 Inspect the bushings and ball joint
Most control arms have rubber or rubber-like bushings at the body end and a ball joint at the wheel end. A bushing is a flexible mount that allows limited movement while isolating vibration. A ball joint is a pivot that lets the steering knuckle move as the wheel turns and the suspension travels.
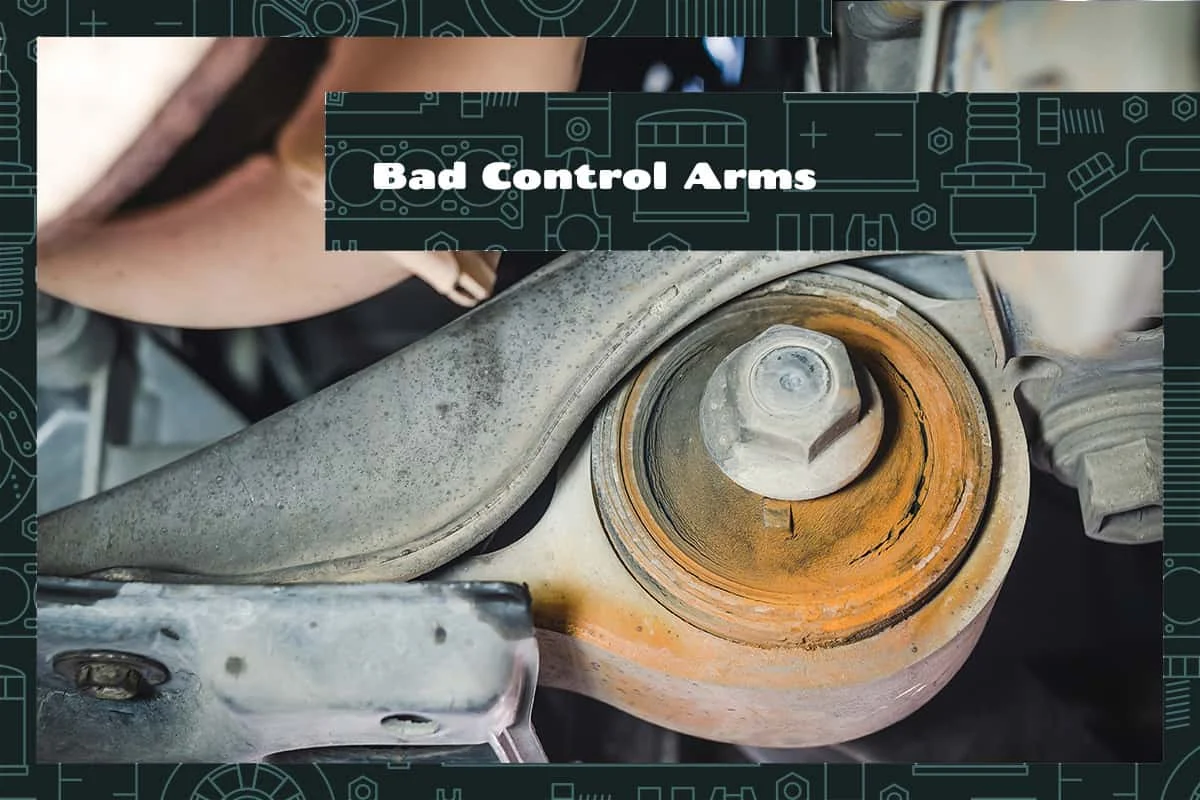
Look for a bushing that is torn, split, pushed out of its housing, or visibly offset compared with the opposite side. Small surface cracks in older rubber do not automatically mean the arm is bent, but a bushing that has separated from its sleeve or allows the arm to sit out of position needs attention. A useful way to approach how to tell if control arm is bent is to check your progress after each stage.
Inspect the ball-joint dust boot for a tear, missing grease, or signs that the joint has separated from its normal position. A failed ball joint can cause clunks, wandering, uneven tire wear, and wheel-angle changes that look like a bent arm. Do not rely on a visual check alone to declare a ball joint safe; looseness requires the correct hands-on test for that vehicle.
Some control arms are sold as a complete assembly with bushings and ball joint installed. In other designs, individual parts can be replaced. The repair choice depends on the vehicle and the condition of the arm, so identify the failed part before ordering anything.
Step 5 Compare wheel position and alignment clues
With the steering centered, compare how far forward or backward each front wheel sits inside its wheel opening. A wheel that is clearly shifted toward the front or rear of the fender opening can indicate a bent control arm, damaged bushing, shifted subframe, or bent steering knuckle.
View the car from directly in front and behind, not from a sharp angle. Compare the apparent top tilt of the tires. The inward or outward tilt of a wheel is called camber.
A major difference in camber after an impact is a strong reason to inspect the control arm and related suspension parts, although a bent strut, knuckle, or subframe can produce the same result.
Check for tire wear patterns. Wear concentrated on one inner or outer edge suggests an alignment problem, while feathered tread can indicate toe misalignment. These patterns support the conclusion that the wheel is not tracking correctly, but they do not identify the damaged component by themselves.
A control arm may be bent without an obvious visual kink. If the wheel sits in a different position, the vehicle pulls, or the alignment cannot be brought into specification after other parts are checked, the arm may have changed length or angle enough to affect geometry.
Step 6 Raise the vehicle only when an underside view is needed
If the outside inspection is inconclusive, consult the owner’s manual for the lifting points. Park on a level surface, chock the wheels that remain on the ground, loosen nothing unless instructed, and raise the vehicle only high enough to place properly rated jack stands at approved support points.
Once the vehicle is supported, inspect the control arm from below without placing your body beneath an unsupported vehicle. Look for a bent mounting ear, distorted bolt hole, shifted bushing sleeve, cracked weld near the subframe, or contact marks that are not present on the opposite side.
Use a light touch only for observing whether a loose shield or plastic liner is moving. Do not pull hard on the control arm, stand on it, or use a pry bar unless a service procedure specifically calls for that test. Excessive force can move a suspension part or damage a bushing and can make a safe diagnosis more difficult.
If the vehicle uses a separate spring mounted near the control arm, be especially cautious. Coil springs and other suspension components can store substantial energy. Do not remove bolts, disconnect the ball joint, or loosen spring-related hardware as part of a basic inspection.
Step 7 Check for looseness using the vehicle-specific procedure
Wheel movement can reveal a loose ball joint, bearing, tie-rod end, or control-arm bushing, but the correct test varies by suspension design. Some vehicles require the wheel to be supported in a particular way; supporting the wrong component can hide or create movement.
For that reason, use the service information for your exact year, make, model, and suspension layout before attempting a shake test. If you do not have that information, stop at the visual inspection and arrange a professional check rather than guessing from wheel play.
Any movement accompanied by a clunk, visible joint separation, or a change in the wheel’s position is a reason not to continue normal driving. A loose joint can progress from a noise to a loss of steering control.
Step 8 Use an alignment check to confirm the suspicion
An alignment measurement is the most useful confirmation when the control arm does not look obviously damaged. Ask for the readings before adjustment and request that the technician inspect the suspension if camber, caster, or toe is substantially different from side to side. Understanding how to tell if control arm is bent also means recognizing the limits of the method.
Caster describes the steering pivot’s forward or backward angle and can be affected by a control arm that has changed the wheel’s fore-and-aft position. Camber describes the wheel’s inward or outward tilt, and toe describes whether the tires point slightly inward or outward when viewed from above.
If the alignment is out of specification, a shop should inspect for bent or loose parts before simply adjusting it. Alignment equipment can measure the result, but it cannot always identify which part caused the geometry to change. If the settings return to specification and remain stable, the control arm may not be bent; if one angle cannot be corrected or quickly changes, further suspension diagnosis is needed.
Take photographs of visible damage and keep the alignment printout. The combination of impact history, photos, wheel-position measurements, and alignment readings gives a technician much better information than a general report that the car “feels wrong.”
What the Inspection Can and Cannot Prove
A bent control arm is one possible cause of a wheel sitting out of place, but the suspension works as a system. The same symptom may come from a ball joint, bushing, tie rod, steering knuckle, strut, spring, wheel bearing, subframe, or wheel itself. A careful inspection should identify evidence and narrow the possibilities rather than force every symptom into one diagnosis.
Signs that make a bent arm more likely
- A curb or pothole impact was followed immediately by a crooked steering wheel or changed handling.
- The arm has a visible crease, flattened tube, distorted mounting point, or fresh scrape that the opposite arm does not have.
- One wheel sits noticeably farther forward or backward in the wheel opening.
- One side has a major camber or caster difference that cannot be corrected normally.
- The arm, bushing, or mounting area has shifted while the surrounding components appear intact.
Symptoms that point to other or additional faults
- A humming noise that changes with road speed can suggest a wheel bearing rather than a control arm.
- A torn ball-joint boot or confirmed joint play points to the ball joint, whether or not the arm is also damaged.
- A spring that is broken or sagging can explain a low corner without a bent arm.
- A wheel that is visibly bent or has lost its balance can cause vibration and pulling.
- A loose tie-rod end can affect steering and toe alignment without changing the control arm’s shape.
Control-arm bushings deserve particular attention because they can fail gradually and may not leave an obvious mark. A worn bushing often produces clunks during braking or acceleration, delayed steering response, or a wheel that shifts slightly under load. A bent arm and failed bushing can also occur together after one impact.
Important
Do not drive at normal speed if the tire rubs the body, the wheel is visibly tilted, the steering changes suddenly, a ball joint appears separated, or the vehicle wanders or pulls strongly. Arrange a tow or an immediate qualified inspection.
How to Verify the Result Before Repair
The best verification combines an unchanged visual observation with a measurement or professional finding. If you see a suspected bend, photograph it beside the matching side and note the wheel position and ride-height difference. This prevents normal curved-arm geometry from being mistaken for damage.
Check tire pressure before comparing handling or ride height. A severely underinflated tire can pull, alter the apparent wheel angle, and create uneven wear. Correct pressure does not repair suspension damage, but it removes an easy source of misleading evidence.
Ask a repair facility to inspect the entire corner before approving an alignment or replacing a control arm. A proper diagnosis should account for the arm, bushings, ball joint, wheel bearing, steering linkage, strut, spring, wheel, tire, and subframe as applicable to the vehicle.
After a control arm or related suspension part is replaced, the vehicle normally needs a wheel alignment. The fasteners for rubber-bushed control arms may also need to be tightened at a specified suspension position, depending on the design. That detail matters because tightening a bushing at the wrong position can preload it and shorten its life.
After the repair and alignment, the steering wheel should remain centered on a straight, level road, the vehicle should track normally, and no new clunk or tire rubbing should occur. Recheck the tire condition and look for fresh contact marks after the first few drives. If the symptom remains, the original diagnosis may have missed another bent or loose part.
Common Inspection Mistakes and Better Alternatives
Beginners often look only for a dramatic crack. Many suspension arms bend without breaking, and some are naturally curved from the factory. Comparing the suspected arm with the opposite side is more reliable than expecting every control arm to be straight.
Another mistake is assuming that a successful alignment proves the arm is healthy. Some alignment angles can be adjusted into range even when a component is slightly damaged, while other vehicles have limited adjustment. A stable alignment result is reassuring, but it should agree with the physical inspection and driving behavior.
| Observation | Possible causes | Next check |
|---|---|---|
| Wheel sits farther forward or backward | Bent control arm, bushing, subframe, or knuckle | Compare both arms and obtain alignment readings |
| One tire leans noticeably | Control arm, ball joint, strut, knuckle, or alignment damage | Inspect for looseness and compare camber |
| Clunk during braking or acceleration | Control-arm bushing, ball joint, tie rod, or other mount | Use the vehicle-specific looseness test |
| Pulling with no visible damage | Tire pressure, tire defect, alignment, brake drag, or suspension damage | Check pressures, tire condition, and alignment |
Do not compare wheel position while the steering is turned sharply, because the inside and outside wheels naturally occupy different positions. Do not measure from a damaged body panel or an uneven driveway. Use matching reference points and repeat a measurement if the result seems surprising.
Frequently Asked Questions
Can I tell if a control arm is bent without removing it?
Often, yes. A visual comparison can reveal a kink, flattened section, shifted mounting point, or unusual wheel position without removing the arm. However, a small bend or hidden deformation may require alignment measurements and a professional inspection.
Will a bent control arm always make a noise?
No. A control arm can be bent without making a clunk, particularly when the damage changes alignment but does not create looseness. Noise is more commonly associated with a damaged bushing, ball joint, or another component, although those parts can be damaged at the same time.
Is it safe to drive with a suspected bent control arm?
Only a limited, slow trip for inspection may be reasonable when the vehicle steers normally, the wheel is not visibly displaced, and no joint is loose or separated. Do not continue driving if it pulls strongly, wanders, rubs a tire, has unstable braking, or shows a severely tilted wheel; have it towed.
Can an alignment shop identify a bent control arm?
An alignment machine can show that the wheel geometry is incorrect, and the technician may identify the bent arm during the inspection. The machine itself measures angles rather than diagnosing every damaged part, so a physical suspension inspection is still necessary.
Can a control arm be straightened instead of replaced?
Replacement is generally the safer repair for a visibly bent control arm. Straightening can weaken the metal, alter its strength, or leave the mounting points inaccurate. Follow the vehicle manufacturer’s repair guidance and use a correctly matched replacement part.
Confirm the Damage Before You Order Parts
Learning how to tell if control arm is bent starts with the event that caused the symptom, then moves to a level-ground comparison, visual inspection, wheel-position check, and careful review of bushings and ball joints. A visible crease or displaced wheel is strong evidence, but an alignment report and full suspension inspection are often needed when the damage is subtle.
Use the inspection to decide whether the vehicle can be driven safely to a shop, not to take the place of a qualified diagnosis. If the wheel is loose or badly misaligned, stop driving and arrange a tow. Once the damaged component is confirmed, complete the repair with the required alignment and verify that the steering, tracking, tire clearance, and ride height are normal.






