
How to Replace Rear Upper Control Arm Jeep Grand Cherokee Safely
Replacing a rear upper control arm can restore the quiet, controlled feel of a Jeep Grand Cherokee when a worn bushing or damaged arm is allowing the rear wheel to shift. The job is manageable for a careful home mechanic, but it is not simply a matter of removing one part and tightening another. The suspension must be supported correctly, the replacement must match the Grand Cherokee’s generation and suspension design, and the final fastener torque matters.
This guide explains how to replace rear upper control arm jeep grand cherokee models using a safe, general approach that applies to many WK and WK2 vehicles. Exact bolt access, arm shape, hardware, and torque specifications vary by year, drivetrain, and whether the vehicle has standard or special suspension equipment, so the factory service information for your VIN remains the authority.
You will learn how to identify the correct arm, raise and support the Jeep, disconnect the old component without disturbing the coil spring, install the new arm at the correct suspension position, and check the result. If a bolt is seized, the suspension is damaged, or you cannot confirm the correct torque, stop rather than guessing.
At a glance
- Support the Jeep by the frame or approved body points, not by the suspension arm you are removing.
- Match the replacement arm to the exact Grand Cherokee generation, drivetrain, and suspension configuration.
- Final-tighten rubber-bushed fasteners at normal ride height or the manufacturer’s specified loaded position.
How to replace rear upper control arm jeep grand cherokee
The rear upper control arm is a suspension link that helps locate the rear axle or rear knuckle, depending on the Grand Cherokee generation. Its rubber bushings isolate movement and noise. When a bushing tears or the arm bends, symptoms may include clunks over bumps, wandering, uneven tire wear, or an axle that no longer sits in its intended position.
The procedure below is deliberately model-conscious rather than tied to one unverified bolt size. Before beginning, compare the new part with the old one and check a repair manual for your year. Some Grand Cherokee models use a separate upper arm at each side, while others use a different rear suspension layout or a center-mounted upper link.
Do not assume a part listed for one generation fits another.
Tools you will need
- Replacement rear upper control arm and any specified new fasteners
- Floor jack and two or more properly rated jack stands
- Wheel chocks for the wheels remaining on the ground
- Socket set, breaker bar, ratchet, and suitable extensions
- Torque wrench that covers the required fastener range
- Wire brush and penetrating oil for exposed threads
- Optional: second floor jack to support and slightly reposition the axle
- Optional: pry bar for alignment only, never as a substitute for safe support

Step 1 Confirm the replacement part and inspect the suspension
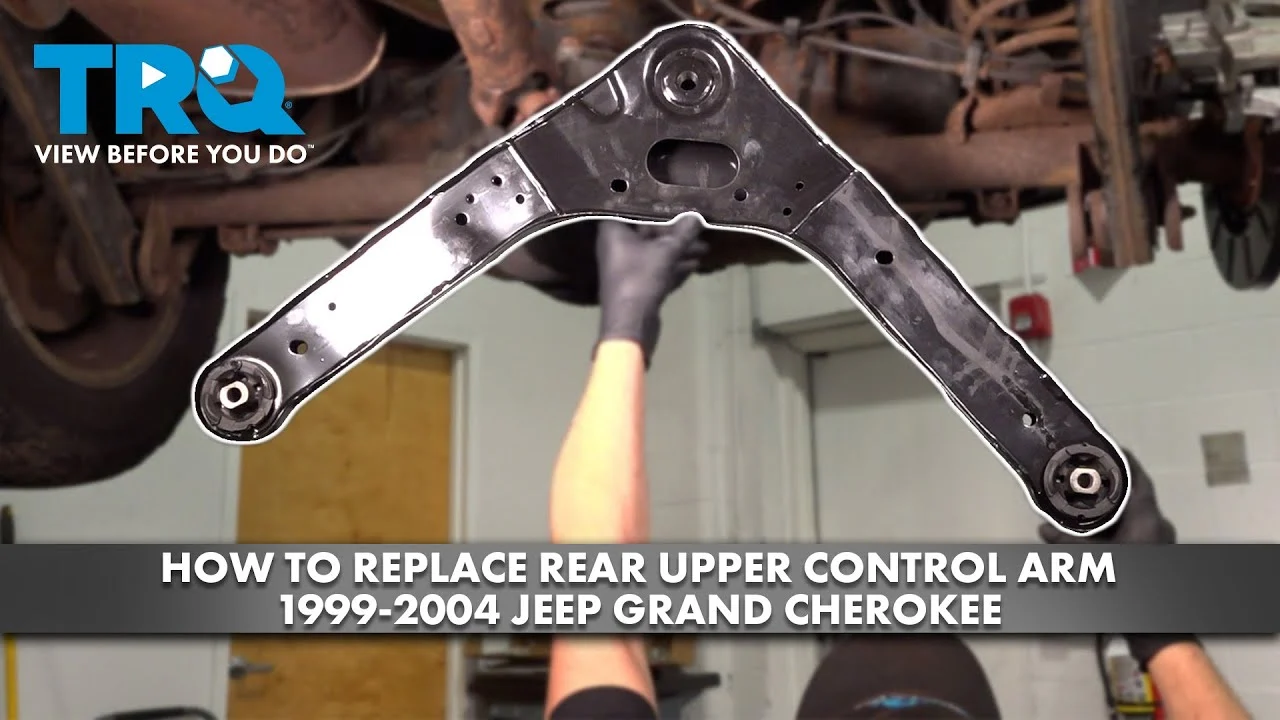
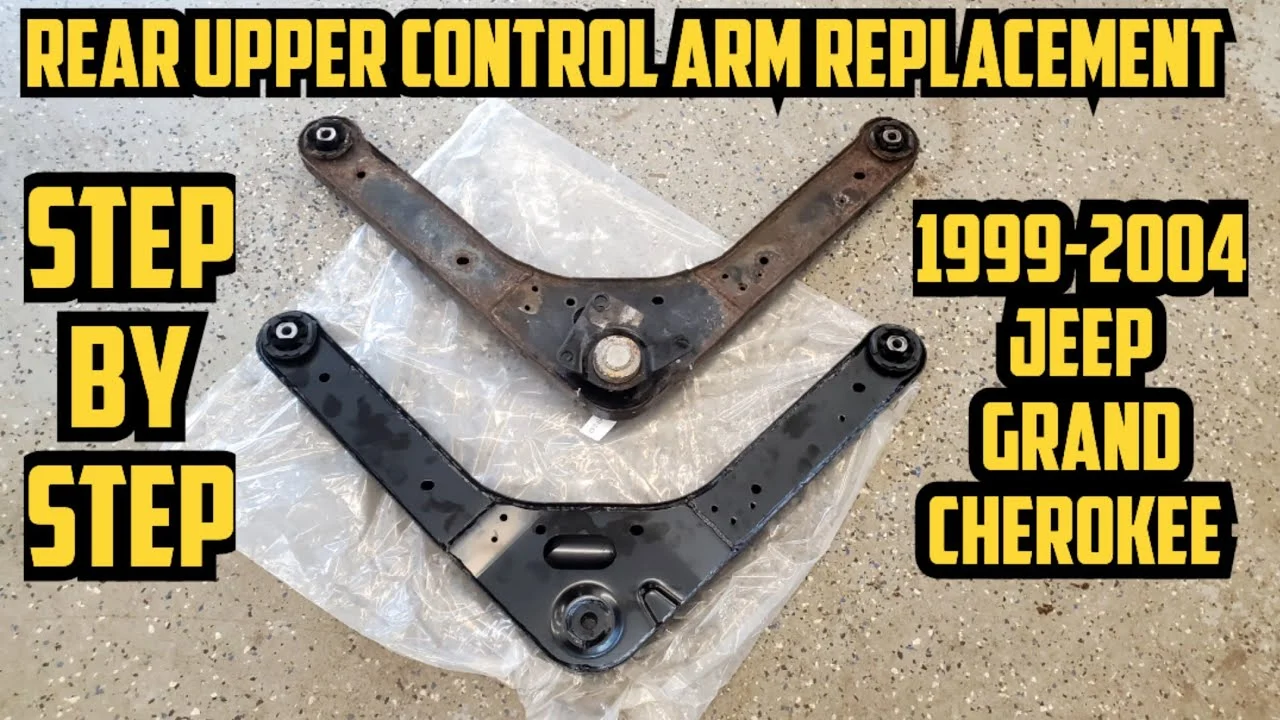
Park on a firm, level surface and compare the new control arm with the installed arm before lifting the Jeep. Check the length, bends, bushing locations, mounting-hole size, and any markings or directional labels. Confirm whether the part is for the left or right side, or whether it is designed for either side.
Look at the surrounding components while the vehicle is still safely accessible. Inspect the other rear control arms, coil spring, shock absorber, track bar or lateral link, brake hose, axle housing, and mounting brackets. A damaged bracket or a badly worn neighboring bushing can cause the same noise as the upper arm.
Read the service information for the correct fastener torque and the required tightening position. Some rubber bushings must not be clamped fully with the suspension hanging because doing so twists the bushing at normal ride height. If the replacement kit includes new bolts or nuts, use them as directed rather than automatically reusing the originals.
Step 2 Loosen the wheel and arm hardware before lifting
Set the parking brake and place chocks securely at the wheels that will stay on the ground. Break the rear wheel lug nuts loose by a small amount while the Jeep is still on the ground, but do not remove them yet.
Locate the upper control arm’s inner and outer mounting bolts. Depending on the model, one end may attach to the vehicle body or suspension cradle and the other to the rear axle housing or knuckle. Spray penetrating oil on the exposed threads and allow it time to work, especially if the Jeep has seen road salt.
Do not remove the arm bolts while the suspension is unsupported. If a bolt is under load, loosening it can cause the arm or axle to move suddenly. A controlled movement of the axle with a second jack is safer than forcing a bolt out with a pry bar.
Step 3 Raise the rear and support the Jeep securely
Use the owner’s manual or service information to choose a safe lifting point. Lift the rear high enough to remove the wheel and access the control arm, then place jack stands under approved frame or unibody support points. Lower the Jeep slowly until it rests solidly on the stands, and leave the floor jack available as a support for the axle.
Shake the vehicle firmly at the body to check that it is stable before working underneath. The jack stands should be level and fully seated, with the Jeep supported by structural points rather than thin sheet metal, the axle, or the control arm being removed.
Important
Never rely on a floor jack alone under a vehicle. Keep your body out from under the Jeep while it is being raised or lowered, and do not work beneath it if the stands are shifting, overloaded, or placed at uncertain points.
Step 4 Remove the rear wheel and support the axle
Remove the lug nuts and wheel, then slide the wheel under a solid part of the vehicle as an additional precaution. Do not use the wheel as the primary support. Identify the upper control arm again and trace both ends to their mounting brackets.
Position the optional second floor jack under a strong, appropriate portion of the axle housing or another manufacturer-approved support location. Raise it only until it supports the axle’s weight; do not lift the Jeep off the stands. This support lets you make small height adjustments if the bolt holes are loaded or misaligned.
Observe the brake hose and wiring as the axle moves. They must not be stretched, pinched, or used as a guide for jack placement. If the Jeep has air suspension or another special rear suspension system, follow the manufacturer’s disablement and support procedure before continuing.
Step 5 Disconnect anything that blocks the control-arm bolts
Clean dirt from the bolt heads and nuts with a wire brush. If a brake line bracket, wiring clip, parking-brake cable, or sensor harness prevents socket access, release the clip or remove the small bracket fastener as the service instructions direct. Do not bend a brake line or pull on a wiring connector to create room.
A useful way to approach how to replace rear upper control arm jeep grand cherokee is to check your progress after each stage.
Take a photograph of the arm’s orientation and note which side of each washer, spacer, or eccentric feature faces outward. Some suspension links use special washers or alignment-related hardware. Put removed parts in order so they return to their original locations unless the replacement instructions specify a different arrangement.
Step 6 Relieve suspension load and remove the old upper arm
With the axle supported, remove the nut from one control-arm bolt while holding the bolt head with the correct tool. If the bolt will not slide out, adjust the axle jack in very small increments until the holes are no longer binding. The goal is to remove load from the bolt, not to force the axle into a new position.
Remove the second fastener in the same controlled way, then take out the old arm. If the arm is difficult to remove, check for tension, a bent mounting bracket, or a bolt that is seized inside the bushing sleeve. Avoid heating an area near fuel lines, brake components, rubber parts, or a pressurized shock absorber.
Do not hammer aggressively on a bolt while the suspension is unstable. If cutting is required because the bolt is seized, the job may need new hardware and possibly bracket repair. This is a reasonable point to stop and seek qualified help if you cannot cut or press the hardware without damaging the mounting structure.
Step 7 Inspect the mounts and prepare the new arm
Compare the removed arm with the replacement one one more time. Inspect each mounting bracket for cracks, elongation, separation from the body, or corrosion that has reduced the metal around the bolt hole. Check that the bolt passes through the new bushing sleeve without excessive looseness.
Clean the mounting faces and bolt surfaces, but do not remove material from the bracket or enlarge a hole. Do not grease a rubber bushing unless the component instructions specifically call for it. Petroleum grease can damage some rubber compounds, and lubricant can allow a bushing to rotate when it was designed to remain clamped.
Orient the new arm exactly as the original was installed, including any bend, offset, arrow, or stamped direction. A control arm that appears symmetrical may still have a designed installation direction or a different inner and outer end.
Step 8 Install the new rear upper control arm loosely
Place the new arm into the mounting brackets and install the original or supplied hardware by hand. Start both fasteners before tightening either one. If the holes do not line up, use the axle-support jack to make small height adjustments; do not draw the arm into place by tightening the bolt.
Install washers and nuts in their original order unless the service instructions say otherwise. Tighten the nuts only enough to hold the arm in place. Leaving the bushings loose at this stage allows the suspension to settle into its normal position before final torque.
If the bolt cannot pass through smoothly, stop and investigate. A mismatched part, reversed arm, shifted axle, damaged bracket, or incorrect washer arrangement can all create poor alignment. Forcing the bolt through can damage the bushing sleeve or distort the bracket.
Step 9 Set the suspension at the specified tightening position
Find the manufacturer’s stated position for final tightening. On many conventional rubber-bushed suspensions, this means supporting the axle so the control arm is near normal ride height while the vehicle remains safely supported. Some procedures specify a measured hub-to-fender dimension or a particular loaded condition instead.
Use the axle jack to raise or lower the axle gradually until the specified position is reached. Keep the jack stands carrying the vehicle and make sure the axle remains stable. If the service information requires the vehicle to be on its wheels, use a safe drive-on lift or another approved method rather than placing yourself beneath an unsupported vehicle.
Torque the inner and outer control-arm fasteners to the exact specification for your year and configuration. Use a calibrated torque wrench, hold the bolt head as needed, and follow any instruction about tightening sequence or one-time-use hardware. Never substitute a generic torque value because the bolt size looks similar.
Step 10 Reassemble the wheel and lower the Jeep
Reinstall any clips, brackets, wiring retainers, or brake-line supports that were moved. Confirm that the brake hose and sensor wiring have their original routing and cannot rub against the new arm, tire, spring, or axle through the suspension’s range of movement. Understanding how to replace rear upper control arm jeep grand cherokee also means recognizing the limits of the method.
Mount the wheel and thread the lug nuts by hand to avoid cross-threading. Snug them in a star pattern while the wheel is off the ground, then lower the Jeep until the tire just contacts the floor and torque the lug nuts in the manufacturer’s specified pattern and value.
Remove the jack and stands only after checking that no tools or parts remain underneath. Recheck the wheel installation and confirm that the vehicle sits normally. A noticeably uneven ride height, a shifted axle, or a control arm that is visibly contacting another part requires further inspection before driving.
Step 11 Perform a careful initial check before road testing
Press down on the rear of the Jeep several times and listen for a sharp clunk, metal contact, or binding. Look through the wheel opening while an assistant gently moves the vehicle, if safe, and verify that the arm and bushing move as intended without twisting in an abnormal direction.
Start with a slow drive in a quiet area. Test gentle braking, acceleration, and turns, then stop and listen again. The Jeep should track predictably without a new pull, repeated knocking, steering-wheel correction, or vibration.
After the short check, inspect the fasteners and surrounding parts for movement or contact marks. A new control arm can correct one source of looseness but may not correct alignment caused by another worn link or a bent suspension component.
Compatibility, suspension position, and alignment
The phrase “rear upper control arm” does not identify one universal Grand Cherokee part. WK and WK2 models differ, and variations in four-wheel drive, suspension package, rear axle, and production year can change the arm, bushing, fastener, and access method. Use the vehicle identification number, catalog fitment notes, and the old part’s shape together rather than relying on a generic photograph.
Control-arm bushings are designed to flex as the suspension moves. If their bolts are fully tightened while the arm hangs far below its normal position, the rubber may be preloaded when the Jeep is lowered. That can shorten bushing life, change ride behavior, and make the suspension sit incorrectly.
Replacing an upper arm can also alter rear suspension geometry, especially if the old bushing was badly worn or the new arm has adjustable features. A professional alignment check is sensible after the repair, even when the steering wheel appears straight. Ask for the rear toe, camber, and thrust angle to be checked where the vehicle’s design allows adjustment.
How to verify the repair
A successful repair is more than a quiet test drive. The arm should be the correct length and orientation, both ends should be clamped securely, and no nearby component should be strained or rubbing. The Jeep should also return to a normal ride height with no unexplained change in wheel position.
- Confirm both control-arm fasteners were torqued at the specified suspension position.
- Check that lug nuts are torqued and the wheel is fully seated against the hub.
- Inspect brake hoses, ABS wiring, parking-brake cables, and clips for correct routing.
- Look for fresh marks showing contact between the arm, spring, axle, tire, or body.
- Listen during slow acceleration, braking, turns, and bumps of different sizes.
- Arrange an alignment inspection if the vehicle pulls, the rear tires wear unevenly, or the steering wheel is no longer centered.
Check your result
After the first short drive, park on level ground and compare the repaired side with the other side. A loose nut, shifted washer, fresh bushing gap, or new contact mark is a reason to stop driving and correct the problem.
Common problems during the repair
Most difficulty comes from stored suspension load, seized hardware, or an incorrect part rather than from the arm itself. The following checks can help distinguish a normal access problem from a condition that needs more equipment or experience.
| What you observe | Likely concern and response |
|---|---|
| The bolt will not slide out | The axle may be loading the bolt, or the sleeve may be seized. Support and reposition the axle slightly; do not force the bolt while the vehicle is unstable. |
| The new arm does not line up | Check orientation, side, washers, and part fitment. Use only small controlled axle adjustments; do not pull the arm into alignment with the fastener. |
| A clunk remains after replacement | Inspect the other control arms, sway-bar links, shock mounts, track bar or lateral links, and exhaust. The original diagnosis may have identified only one worn part. |
| The Jeep pulls or tires wear unevenly | Have the rear suspension and alignment checked. A damaged bracket or bent link may remain, and alignment cannot be corrected by guessing at bolt positions. |
When a seized bolt changes the job
Penetrating oil and careful load adjustment are reasonable first measures, but they do not guarantee removal. If the bolt is rusted into the bushing sleeve, removal may require cutting equipment, a press, replacement hardware, or repair of a damaged bracket.
Stop if the jack cannot keep the axle stable, the mounting bracket begins to bend, or you are considering heat near fuel, brake, or electrical components. A professional shop can remove the hardware while preserving the suspension structure and can verify the alignment afterward.
Rear upper control arm replacement FAQs
These answers address common beginner questions, but the exact service instructions for the specific Grand Cherokee still control the repair.
Can I replace only one rear upper control arm?
Yes, if only one arm or bushing is damaged and the other side passes inspection. Replace both sides when both are worn, but do not replace a good arm merely because it is on the opposite side. Inspect the entire rear suspension before deciding.
Do I need a wheel alignment after replacing the arm?
An alignment check is recommended, particularly if the old bushing was loose, the arm is adjustable, the vehicle pulls, or tire wear changes. Some fixed-length arms have little direct adjustment, but a worn or shifted component can still affect rear toe, camber, or thrust angle.
Can I tighten the control-arm bolts with the Jeep on jack stands?
Only if the service procedure specifically gives a hanging-suspension tightening position. For many rubber-bushed arms, final torque should be applied near normal ride height or at a specified loaded measurement so the bushing is not permanently twisted.
Should I reuse the original control-arm bolts?
Follow the parts and service instructions. Reuse is acceptable for some conventional fasteners if they are undamaged, while other applications call for new, torque-to-yield, or otherwise specified hardware. Replace damaged, stretched, heavily corroded, or rounded hardware.
What if the new arm is shorter or shaped differently?
Do not install it until fitment is confirmed. A different bend or length may be intentional for another drivetrain, suspension package, or model generation, but it may also be the wrong part. Compare the catalog information and contact the supplier or consult the factory parts information.
How soon should I recheck the repair?
Perform a short, cautious test drive first and inspect for looseness or contact marks. If the service information calls for a follow-up inspection, follow it; otherwise, recheck the visible hardware and arrange alignment promptly if handling or tire wear is abnormal.
Finish the repair with a safety and alignment check
Learning how to replace rear upper control arm jeep grand cherokee models is mainly a matter of controlled support, correct fitment, and accurate final torque. The most important details are not rushing a loaded bolt, keeping the axle supported, installing the arm in its original orientation, and tightening rubber-bushed hardware at the specified suspension position.
Once the Jeep passes the slow road test, inspect it again and schedule an alignment check when symptoms or the service information call for one. If a seized fastener, damaged bracket, special suspension system, or uncertain torque specification makes the job unclear, stop there and use qualified help rather than turning a manageable suspension repair into a safety problem.






