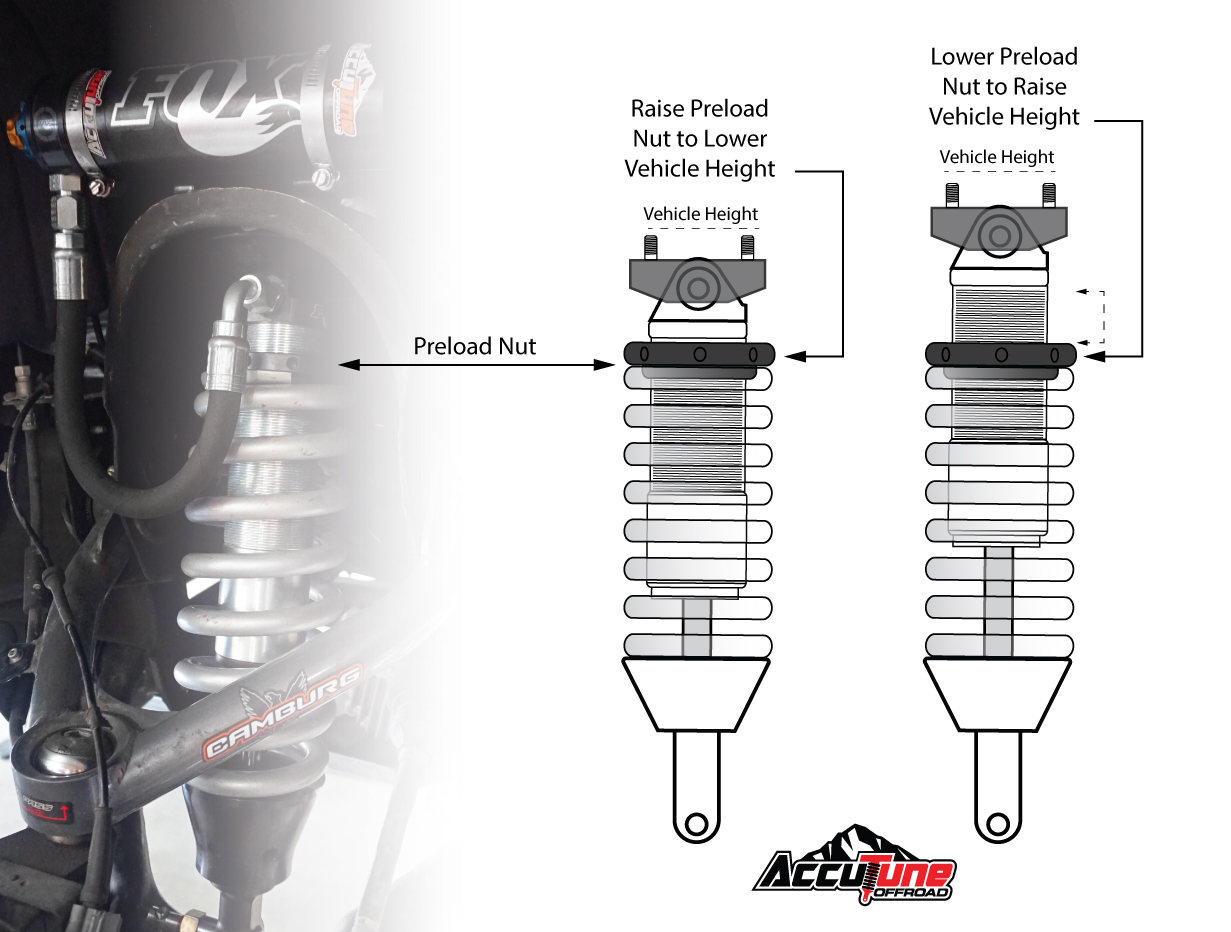
To increase shock absorber height, first identify the suspension type and the amount of lift you need. Adjustable coilovers may allow a height change, while some vehicles need compatible springs, lift components, or longer shocks. Do not use a longer shock or a spacer without checking suspension travel, mounting points, and manufacturer limits.
Drivers in the United States may want more ground clearance for rough roads, larger tires, off-road trails, or a motorcycle’s preferred stance. The right method depends on the vehicle, its suspension design, and whether the goal is to raise the body, change the shock’s working position, or increase the suspension’s usable travel. These are different jobs, and the same part cannot safely solve every one.
A shock absorber controls how quickly a spring compresses and rebounds. On many vehicles, the spring and suspension geometry determine most of the static ride height, while the shock controls movement within its available range. Some coilover units combine a spring and damper with adjustable spring perches or threaded bodies, but conventional shocks often have no height adjustment at all.
Before making changes, consult the vehicle service manual and the suspension manufacturer’s installation instructions. Confirm the permitted adjustment range, spring compatibility, wheel and tire clearance, brake hose movement, and alignment requirements. If the proposed lift affects steering geometry, load capacity, or suspension travel in ways you cannot verify, have a qualified suspension shop assess the setup.
Understand What Increasing Shock Absorber Height Means
Increasing shock absorber height can mean several different things. A driver may want the body to sit higher above the tires, need a longer damper to match a modified suspension, or want additional wheel travel over rough ground. These goals are related, but they are not interchangeable.
On a typical passenger car, the coil springs or other supporting elements carry the vehicle’s weight. The shocks control spring movement. Raising a car by fitting longer shocks alone can leave the suspension poorly supported or prevent the wheels from moving through their intended range.
On a motorcycle, the rear shock may influence ride height directly because the spring and damper form one assembly. Even then, a longer shock changes suspension geometry and can affect chain tension, steering response, and side-stand angle. The correct approach depends on the motorcycle model and its design.
Source: www.youtube.com
Ride height
The distance between a defined point on the vehicle body or chassis and the ground, measured under specified conditions. Use the same points and loading conditions for every comparison.
Shock length
The distance between the shock’s mounting points. Depending on the design, it may be measured at full extension, full compression, or another specified position.
Spring preload
The initial compression applied to a spring during assembly or adjustment. Changing preload can affect static ride height and sag, but it does not increase the spring’s physical free length or automatically add suspension travel.
Suspension travel
The range through which the wheel or suspension can move between its compression and extension limits. A lift that reduces this range may cause bottoming, topping out, or poor tire contact.
Why the distinction matters
Imagine that a car sits low because its springs have sagged with age. Raising the shock mounting position may hide the symptom without restoring proper spring support. Replacing worn springs with the correct parts may be the appropriate repair.
If a truck has been lifted with taller springs, it may need longer shocks with suitable compressed and extended lengths. In that case, a longer shock matches the suspension modification rather than serving as the sole means of lifting the vehicle.
If the vehicle has sagged
Inspect springs, mounts, bushings, and the load carried by the vehicle before deciding whether a lift is needed.
If the vehicle has been modified
Verify shock travel and mounting geometry against the suspension manufacturer’s specifications.
Identify Your Suspension Before Making Adjustments
Identify the suspension type before buying parts or turning an adjuster. A vehicle may use conventional shocks with separate springs, a combined coilover assembly, a strut, an air suspension system, or a specialized suspension with electronic controls. Each type has different adjustment limits and installation needs.
Start with the owner’s manual, service manual, and part information for your exact year, make, model, trim, and drivetrain. Modified vehicles may also need the specifications for the installed suspension kit. Do not assume that parts listed for a similar model will fit your vehicle.
Inspect the existing setup for damage, leaks, corrosion, bent mounts, and worn rubber bushings. A leaking damper or broken spring should be repaired before changing ride height. Raising a damaged suspension can make its underlying problems harder to diagnose.
Source: www.youtube.com
Conventional shock with a separate spring
Ride height is usually set by the spring, suspension geometry, and vehicle load. A replacement shock must match the suspension’s required travel and mounting design.
Adjustable coilover
Some coilovers have threaded spring perches, adjustable shock bodies, or both. Follow the maker’s instructions to determine which adjustment changes ride height and which changes spring preload.
MacPherson strut
A strut forms part of the suspension’s locating structure. Its replacement or adjustment must preserve the intended geometry and use compatible parts.
Air suspension
Ride height may be controlled by air springs, sensors, and electronic controls. Use the approved calibration and service procedure rather than adding mechanical extensions at random.
Motorcycle rear suspension
Check whether the shock has a supported preload or length adjustment and whether the maker permits a change in ride height.
Check the vehicle’s current condition
Park on a level surface, set the parking brake, and remove unusual cargo. Measure the ride height at the points specified by the manufacturer. Record tire pressure and the load in the vehicle because both can affect measurements or comparisons.
Compare the readings with the service specifications where available. If one corner sits lower than the others, look for a broken spring, worn mount, damaged component, uneven load, or other fault before attempting a lift.
Look for oil leaks
A wet shock body may indicate damper leakage, although dirt and spilled fluids can also leave residue. Confirm the source before replacing parts.
Check mounting points
Cracks, corrosion, loose fasteners, or bent brackets require proper repair before the suspension is modified.
Inspect tires and springs
Uneven tire wear, broken coils, or damaged leaf springs can point to problems that a height adjustment will not fix.
Choose a Suitable Method to Increase Ride Height
The correct method is the one that raises the vehicle within the limits of its suspension design. For a vehicle with adjustable coilovers, the manufacturer-approved height adjustment may be sufficient. A vehicle with fixed-height suspension may need a matched lift kit or suitable replacement springs instead.
Do not select a method only by the advertised lift amount. A part that raises the body by a stated amount may alter suspension angles, available travel, steering geometry, and the position of the tires inside the wheel wells. The manufacturer’s vehicle-specific fitment information matters more than a generic claim.
The following comparison explains common approaches. The suitable option depends on the vehicle, the current suspension condition, the desired height, and the manufacturer’s limits.
Source: ebay.com
Adjustable coilover settings
Suitable when the installed coilover is designed for ride-height adjustment and the requested height stays within its approved range.
Correct replacement springs
Suitable when sagging or damaged springs cause a low stance, or when a manufacturer-approved spring setup is designed to raise the vehicle.
Vehicle-specific lift kit
Suitable when the vehicle needs a planned increase in ride height and the kit addresses the required mounting, geometry, and clearance concerns.
Compatible longer shock absorbers
Suitable when a verified suspension setup requires a different shock length. Longer shocks should match the supporting springs, mounts, and available travel.
Shock extension brackets
Use only when the vehicle and suspension manufacturer explicitly approves the application. An extension can alter leverage and travel limits, so universal fit claims are not enough.
Method 1: Adjust an approved coilover system
If the vehicle already has height-adjustable coilovers, first read the instructions for that exact model. Some systems adjust height by moving a lower mounting body, while others use a spring perch. These designs do not behave the same way.
Measure the starting height and confirm the current settings. Use the correct adjustment tool and follow the manufacturer’s method, including any required procedure for unloading the suspension. Do not force a seized collar or turn an adjuster beyond its marked or documented range.
Make the permitted adjustment in small, measured steps. Keep left and right settings consistent where the manufacturer calls for matched settings. Reassemble the suspension, lower the vehicle safely, settle it as directed, and measure again under the same conditions.
If the spring becomes loose at full extension, the adjustment exceeds the permitted range, or the suspension loses required travel, stop. Return to an approved setting or consult the suspension manufacturer.
Signs of a suitable adjustment
The final ride height falls within the manufacturer’s range, the spring remains properly retained, and the suspension operates without binding or contact.
Signs to stop
A collar is damaged, a spring loses secure seating, the damper approaches a travel limit, or the manufacturer’s instructions do not support the proposed setting.
Method 2: Replace worn or unsuitable springs
When a vehicle sits low because of worn, broken, or incorrect springs, install the specified replacement springs or an approved alternative for the intended load and ride height. A shock adjustment cannot restore a damaged spring’s correct load-bearing function.
Spring replacement can involve stored energy. Coil springs may require a properly rated spring compressor and a documented procedure. Never loosen a loaded spring assembly or remove a retaining nut without understanding the stored force and the manufacturer’s disassembly steps.
After installation, check the seating of each spring, the condition of the mounts, and the specified fastener torque. Confirm the resulting ride height and obtain an alignment when required.
Use the correct spring rate
The spring must support the vehicle and intended load while maintaining suitable suspension movement.
Match the damper
A changed spring setup may require a damper with compatible valving, travel, and mounting dimensions.
Method 3: Install a matched lift system
A vehicle-specific lift system may use springs, spacers, brackets, control-arm components, or other parts designed to work together. The right kit depends on the vehicle’s suspension layout and the amount of lift supported by its manufacturer.
Read the complete kit instructions before disassembly. Confirm the included hardware, required tools, approved wheel and tire sizes, torque specifications, alignment requirements, and any limits on towing or load carrying. Some installations also require changes to steering or other components.
After installation, inspect the suspension through its permitted range. Verify that the wheels do not contact the body or suspension parts, the brake hoses remain free, and the steering works without binding. A qualified shop should complete any alignment and specialized checks required by the kit.
Prioritize complete compatibility
A lift kit should be approved for the exact vehicle configuration and should address the parts affected by the height change.
Do not exceed the stated lift range
More height is not automatically better. Excessive lift can create geometry and travel problems that require a different suspension design.
How to Increase Motorcycle Shock Absorber Height
To raise a motorcycle’s rear end, use an adjustment or replacement component approved for that exact motorcycle and suspension. Some motorcycles have adjustable shock preload, while others use fixed-length shocks or separate linkage systems. A taller shock or extension can change the motorcycle’s steering and suspension behavior.
First, check the owner’s manual and the shock manufacturer’s instructions. Identify the stock shock length, mounting arrangement, approved preload settings, and any ride-height adjustment feature. Do not assume that a generic motorcycle shock extension will fit or work safely because the bolt holes appear similar.
A change in rear height can steepen or otherwise alter steering geometry, change the angle of the swingarm, affect chain adjustment, and change the side-stand lean angle. Depending on the motorcycle, it can also affect the rear tire’s clearance and the suspension’s ability to reach full compression without contact.
Source: storage.googleapis.com
Check chain clearance
Verify chain slack throughout the positions specified by the motorcycle manufacturer, especially if suspension geometry has changed.
Check tire clearance
Confirm that the tire, fender, mudguard, and nearby components remain clear throughout the permitted suspension travel.
Check stand stability
A raised rear end may make the motorcycle lean differently on its side stand. Confirm that the stand remains stable on a suitable surface.
Check brake hose and wiring
Ensure that hoses and cables are not stretched, pinched, or pulled tight when the suspension extends or compresses.
Is a motorcycle shock height extender safe?
A shock height extender changes the effective mounting geometry and may increase leverage on the mounting points. Its suitability depends on the design, material, fasteners, shock angle, motorcycle model, and approved load.
Avoid unverified universal extenders, improvised metal plates, and modified bolts. A part that fits physically may still place excessive force on a mount or interfere with suspension travel. If the manufacturer does not approve the part for the motorcycle, choose a documented suspension solution or ask a qualified motorcycle suspension specialist to assess it.
After an approved change, verify the mounting hardware, chain adjustment, tire clearance, brake operation, and suspension movement before riding. A brief static check cannot establish that a modified suspension is safe under cornering, braking, or full compression.
Best first step
Confirm whether the motorcycle has an approved adjustment that can achieve the desired height without adding unverified hardware.
When to seek professional help
Get a suspension specialist involved if the change requires a different shock length, altered linkage, fabricated mounts, or geometry changes you cannot verify.
Tools and Preparation Before Changing Shock Height
Gather the correct tools and specifications before starting. The exact equipment depends on the vehicle and suspension design, but safe support, accurate measurement, and the right fasteners are essential for nearly every mechanical adjustment.
Work on a firm, level surface in a well-lit area. Follow the vehicle service manual for lifting and support points. A hydraulic jack can raise a vehicle, but it must not be the only support while someone works underneath it.
Do not begin if you lack the correct spring compressor, lifting equipment, or torque specifications for the job. A suspension assembly can store substantial energy, and incorrect support can cause serious injury.
Source: www.youtube.com > Modified junction
Vehicle service manual
Use it to identify safe lifting points, removal procedures, fastener torque, alignment requirements, and any electronic suspension service mode.
Suitable jack and rated stands
Support the vehicle at approved points on a stable surface. Use equipment rated for the vehicle and the intended load.
Correct hand tools
Use properly fitting sockets, wrenches, and adjustment tools to reduce the chance of damaging fasteners or adjusters.
Torque wrench
Tighten critical fasteners to the specifications for the exact application rather than guessing by feel.
Measuring tape
Record baseline and final measurements from the same defined reference points.
Eye protection and gloves
Use suitable protective equipment, while remembering that gloves and eye protection do not make an unsafe spring procedure safe.
Record a baseline measurement
Before making any change, park the vehicle on level ground and use the manufacturer’s specified loading and measurement conditions. Measure the ride height at the same points on each side and record the results.
For a car or truck, body-to-ground measurements can be affected by tire size and pressure. Where the service manual specifies a hub-center-to-fender measurement or another reference, use that method instead. For a motorcycle, follow the maker’s measurement and sag procedure.
Take photos of the existing adjuster settings and note any part numbers. These records help you return to the starting point if the adjustment fails to achieve the desired result.
Keep conditions consistent
Use the same ground surface, load, tire pressure, and measurement points for the before-and-after comparison.
Record the desired change
Set a realistic target based on the suspension’s approved range, rather than choosing a height that exceeds its documented limits.
How to Check the Result After a Height Adjustment
A successful height adjustment must do more than make the vehicle look taller. The suspension must remain within its approved travel range, the springs must stay properly seated, and the wheels must move without binding or contacting nearby parts.
Once the work is complete, lower the vehicle safely and settle the suspension according to the manufacturer’s instructions. Measure ride height again at the same reference points. Do not assume that the amount of adjuster movement equals the amount of body lift.
Some adjustments require a wheel alignment, and many lift installations require one to maintain suitable tire contact and steering behavior. Follow the kit and vehicle instructions to determine the required checks before driving.
Source: lazada.com.ph
Ride height
Compare the final measurements with the baseline and the permitted range. Check both sides for unexpected differences.
Suspension movement
Check for binding, contact, loose parts, spring movement, or signs that the shock is reaching a travel limit.
Steering and alignment
Arrange the required alignment and inspect for steering interference, abnormal tire position, or uneven wheel clearance.
Brake lines and cables
Verify that all flexible lines, wires, and hoses have enough safe movement without being stretched or pinched.
Fasteners and mounts
Confirm the specified torque and the correct installation of all required retaining hardware.
How much height can you safely add?
There is no universal safe lift amount for every vehicle or shock absorber. The permitted range depends on the suspension design, available travel, spring rate, shock length, mounting geometry, vehicle weight, and the manufacturer’s specifications.
Use a documented maximum for the exact suspension kit or adjustable shock. If the instructions specify a range, remain within it and complete all required alignment and clearance checks. Do not treat a number advertised for another vehicle as a safe target for yours.
A hypothetical example illustrates why measurement matters: if a vehicle’s specified reference point measures 15.0 inches before an adjustment and 15.75 inches afterward, the measured increase is 0.75 inch. That result describes the measurement under those conditions; it does not prove that the setup has enough suspension travel or is safe to drive.
Measure the actual change
Subtract the starting measurement from the final measurement using the same reference points and conditions.
Verify the full operating range
Use the manufacturer’s procedure to check the suspension limits and all required clearances.
Common Mistakes When Increasing Shock Absorber Height
The most common mistake is treating the shock absorber as the only part that determines ride height. A suspension system works as a group, so a change to one component can affect spring position, wheel travel, mounting loads, steering, and tire clearance.
Another mistake is choosing a part based on appearance or a general fit claim without confirming the exact vehicle application. Two shocks can have similar lengths and mounting holes but different damping characteristics, travel limits, or load requirements.
Avoid driving immediately after an unverified modification. If a spring is not seated correctly or a brake hose is stretched, the vehicle may be unsafe even when it looks level while parked.
Source: walmart.com
Using a longer shock to raise a stock vehicle
A longer shock does not necessarily support the vehicle at a higher ride height. It may allow the suspension to top out or fail to control the spring correctly.
Confusing preload with lift
Preload changes the spring’s initial compression and can affect sag, but it does not automatically provide more usable wheel travel or correct an unsuitable spring.
Over-tightening adjustment collars
Excessive force can damage threaded parts or lock collars. Use the correct tool and method specified by the manufacturer.
Ignoring alignment
A change in ride height can affect suspension angles and wheel alignment. Complete the required checks before normal driving.
Using improvised extensions
Unverified brackets, welded parts, and incorrect fasteners can fail under suspension loads. Use only a documented, compatible design.
Ignoring vehicle load
Cargo, passengers, towing, and added accessories change suspension loading. Choose parts and settings that support the intended use.
What if the vehicle still sits too low?
If the vehicle remains low after an approved adjustment, stop turning the adjuster. Recheck the part numbers, spring condition, installed settings, vehicle load, and measurements. Confirm that the adjustment actually controls ride height on your suspension design.
If the parts are correct but the target cannot be reached within the documented range, the suspension may require a different approved spring or lift system. Do not compensate by adding extra spacers or extending mounts beyond their design limits.
If the vehicle sits unevenly, inspect for damaged springs, worn bushings, bent components, or an uneven load. Persistent sagging or abnormal noises should be diagnosed before any further modification.
Recheck the setup
Compare the installed components and settings with the manufacturer’s documentation.
Correct the underlying fault
Repair damaged or worn suspension parts instead of using an adjustment to conceal the problem.
Get a professional inspection
Use a qualified technician when the vehicle remains uneven, the suspension binds, or the required lift exceeds the approved adjustment range.
Safety, Legal Requirements, and Maintenance
Any suspension modification should preserve the vehicle’s ability to steer, brake, carry its intended load, and keep the tires clear of the body. A change that raises the body but reduces control or creates a travel problem is not a successful modification.
In the United States, vehicle modification rules can vary by state and vehicle type. Check applicable state inspection requirements, equipment rules, and any relevant restrictions before changing ride height. Commercial vehicles may also have additional requirements based on their use and configuration.
Review the vehicle and component warranties before making changes. An aftermarket part or modification does not automatically void every warranty, but damage linked to an altered component may not be covered. Ask the vehicle or component manufacturer about the specific change when warranty coverage matters.
Source: jotqc.empireclaims.co.uk
Do not exceed rated loads
A suspension lift does not increase the vehicle’s certified payload, axle rating, tire load rating, or towing capacity.
Check alignment and handling
Complete required alignment work and watch for pulling, unusual tire wear, instability, or new suspension noises.
Inspect the modified system
Follow the component maker’s maintenance schedule and inspect fasteners, bushings, mounts, springs, and dampers as directed.
Stop if damage appears
Do not continue driving if a shock leaks heavily, a spring shifts, a mount cracks, a tire rubs, or steering and braking behavior changes unexpectedly.
When professional installation is the better option
Professional installation is advisable when the job involves compressed coil springs, air suspension calibration, modified control arms, altered linkages, or changes to structural mounting points. These systems can require special tools and vehicle-specific procedures.
A qualified suspension shop can verify the correct shock dimensions, spring compatibility, available travel, alignment settings, and required clearances. Ask for the specifications used to approve the setup and the checks completed after installation.
If you cannot confirm that the proposed parts match the vehicle or that the suspension stays within its designed range, do not proceed on guesswork. Correct fit and safe operation matter more than achieving a particular stance.
Before authorizing work
Ask which parts will change ride height, whether the shock remains within its operating range, and what alignment or clearance work is required.
After installation
Request confirmation of the final ride height, specified fastener torque, alignment results where applicable, and any maintenance requirements.
Frequently Asked Questions
Q
Can I increase shock absorber height without replacing the shocks?
Sometimes. If your vehicle has an adjustable coilover or another approved ride-height adjustment, you may be able to raise it without replacing the shock. Conventional shocks often have no height adjustment, so a different spring or compatible lift system may be required.
Check the instructions for the exact suspension model. Do not use an adjustment that exceeds its documented range or reduces safe suspension travel.
Q
Does increasing shock absorber preload raise ride height?
Increasing spring preload can raise static ride height on some suspension systems by reducing spring sag under the vehicle’s weight. The result depends on the spring, suspension geometry, load, and adjuster design.
Preload does not make the spring physically longer or automatically add suspension travel. On a motorcycle, set preload according to the maker’s sag procedure rather than using it as a substitute for the correct spring or shock length.
Q
Can longer shock absorbers lift a car or truck?
Longer shocks alone usually are not the correct way to raise a stock car or truck. Ride height is generally determined by the springs and suspension geometry, while the shocks control movement. A longer shock may be necessary after an approved lift, but it must match the suspension’s compression and extension limits.
Use a compatible spring or vehicle-specific lift system when a ride-height increase is required. Confirm mounting dimensions, alignment needs, and clearance before driving.
Q
Are shock absorber height extensions safe for motorcycles?
A motorcycle shock extension may be suitable only when its design and application are approved for the specific motorcycle and intended load. A generic extender can change leverage, stress mounting points, alter steering geometry, and affect chain or tire clearance.
Avoid improvised brackets and unverified hardware. Check the manufacturer’s guidance and have a qualified motorcycle suspension specialist assess any change that affects shock length or mounting geometry.
Q
How much can I raise my vehicle with adjustable shocks?
The permitted amount depends on the exact shock, spring, vehicle, suspension geometry, and manufacturer specifications. There is no universal safe lift amount that applies to all cars, trucks, and motorcycles.
Use the documented adjustment range and measure the final ride height under the same conditions as the initial measurement. Also confirm alignment, spring retention, tire clearance, and suspension travel.
Q
Will raising shock absorber height improve ground clearance?
A properly designed suspension lift can increase ground clearance at some parts of a vehicle, but the result depends on which components are raised. Raising the body does not necessarily raise every low point, such as the differential on a solid-axle vehicle.
Measure the clearance you actually need and choose a compatible solution. Check how the modification affects handling, wheel travel, steering geometry, and the vehicle’s rated load.
Q
Do I need a wheel alignment after increasing ride height?
Many vehicle suspension lifts and ride-height changes require an alignment because the change can affect camber, caster, toe, and steering behavior. Follow the vehicle and lift-kit instructions to determine the required procedure.
A motorcycle may not use a conventional four-wheel alignment, but its steering geometry, chain adjustment, and suspension setup still need appropriate checks. Do not assume that a visually level vehicle has correct geometry.
Q
Can I raise a vehicle with spacers above the shocks?
Only use spacers that are specifically designed and approved for the vehicle and suspension arrangement. A spacer can change mounting loads, available travel, and the position of the shock relative to its operating limits.
Do not stack generic spacers or fabricate mounting pieces without an engineered and verified design. A complete lift system may be the safer option when the intended height change affects multiple suspension components.
✦ Wrapping Up
Conclusion
The safest way to increase shock absorber height is to identify what controls ride height on your vehicle and use an adjustment or replacement component approved for that suspension. Adjustable coilovers may offer a direct setting, while vehicles with fixed-height suspension may need suitable springs or a matched lift system. Longer shocks are often needed to support an existing lift rather than to create one by themselves.
Measure the vehicle before and after the change, stay within the documented adjustment range, and confirm that the suspension retains proper travel and clearance. Inspect steering, brake lines, tires, springs, mounts, and fasteners, and complete any required alignment before normal use. If the installation involves stored spring energy or unverified changes to mounting geometry, seek qualified help.
💡 Key Takeaway
Before buying parts, record your vehicle’s year, make, model, suspension type, current ride height, and desired increase. Check the manufacturer’s specifications, select a compatible solution, and verify suspension travel, clearance, and alignment after installation.
Eric
Hi, I’m Eric Bennett, the person behind OffRoadTruckAccessories.com.
I created this blog to share my interest in trucks, off-road driving, automotive accessories, and DIY modifications. I enjoy learning how different truck accessories work, testing their usefulness, and understanding whether they are truly worth buying.
Shock absorbers are located near the wheels as part of the suspension system, usually between the vehicle’s body, frame, or subframe and a suspension component such as a control arm, axle, or wheel assembly. However, the exact answer to where are shock absorbers located on a car depends on the suspension design. Some vehicles have…
You should change shock absorbers when they are worn, leaking, damaged, or no longer controlling suspension movement properly. There is no single replacement interval that applies to every vehicle because shock absorber life depends on road conditions, vehicle weight, driving habits, suspension design, and component quality. If you are wondering when to change shock absorbers,…
A shock absorber is a suspension component that controls how quickly a vehicle’s suspension moves up and down after bumps, dips, braking, acceleration, and other road inputs. It works with the springs to prevent excessive bouncing and helps keep the tires in controlled contact with the road. So, what does a shock absorber do? It…
A gas shock absorber is a hydraulic shock absorber that uses pressurized gas, usually nitrogen, along with shock absorber oil to control suspension movement. The gas helps reduce oil foaming and keeps damping performance more consistent when the shock works repeatedly or under demanding conditions. If you are wondering what is a gas shock absorber,…