To fit shock absorbers to a trailer, choose a compatible shock kit, support the trailer securely, mount the shocks between suitable frame and suspension points, tighten all fasteners to the specified torque, and check for clearance through the suspension’s full travel. The correct parts and mounting method depend on the trailer design, axle layout, load rating, and suspension type.
In the United States, trailers face many road conditions, from smooth interstate highways to rough rural roads, bridge joints, and uneven campground entrances. These surfaces can make a loaded travel trailer, cargo trailer, or boat trailer bounce and vibrate. Suitable shock absorbers can help control suspension movement, but the trailer must have compatible suspension and proper mounting points for the upgrade to work as intended.
Installing trailer shocks is not simply a matter of drilling two holes and bolting on a pair of dampers. The shock must fit the available space, move through the required stroke, and attach to parts that can carry the added forces. A poor installation can cause binding, cracked brackets, damaged shock bodies, or interference with tires, brake lines, and other suspension parts.
Before starting, identify whether the trailer uses leaf springs, torsion axles, or another suspension system. Check the axle and trailer manufacturer’s instructions, then select a kit designed for that configuration. If the frame needs welding or drilling, or the trailer uses a specialized independent suspension, seek qualified help when the required structural work is outside your skills.
Trailer shock absorbers control how quickly the suspension moves after a bump. When a wheel rises over a road joint, the spring compresses and then releases. Without enough damping, the spring may continue moving up and down, causing repeated bouncing. A suitable shock resists that movement and helps the suspension settle sooner.
A shock absorber does not normally support the trailer’s static weight. The springs, torsion elements, or other suspension components carry the load. The shock controls motion, while the tires, suspension geometry, brakes, and hitch all play their own roles in towing stability.
Adding shocks may improve ride control and reduce some repeated suspension movement. The result depends on the trailer design, load, spring condition, tire pressure, speed, and road surface. Shocks cannot correct an overloaded axle, weak springs, poor weight distribution, damaged tires, or an unsuitable hitch setup.
Source: vehq.com
Reduced bouncing
Proper damping can help limit repeated up-and-down movement after bumps, which may reduce unnecessary movement of the trailer body and cargo.
Improved suspension control
Shocks can help the wheels and suspension respond more consistently to changing road surfaces when the components are correctly matched.
Potential cargo protection
Reducing excessive suspension movement may help limit some impacts and vibration, but it does not guarantee that fragile cargo will remain undamaged.
No replacement for correct loading
Shocks do not increase the trailer’s gross vehicle weight rating, axle rating, tire capacity, or legal carrying limit.
Which Trailers May Benefit From Shocks?
Travel trailers, camper trailers, enclosed cargo trailers, utility trailers, and some boat trailers may benefit from added damping if their suspension design supports it. The likely benefit depends on how the trailer is built and how it is used.
A trailer that bounces excessively should first be checked for worn springs, loose suspension hardware, incorrect tire pressure, uneven loading, and damaged components. Adding shocks before finding the cause can hide a symptom without fixing the underlying problem.
Travel and camper trailers
These trailers may use model-specific shock kits that fit the axle and frame layout.
Utility and cargo trailers
Some can accept aftermarket shocks, but many basic leaf-spring designs lack suitable factory mounts.
Boat trailers
Check the manufacturer’s design and corrosion protection needs, especially if the trailer is often exposed to fresh or salt water.
Check The Trailer Suspension Before Buying Shocks
Identify the suspension type before selecting any shock absorber. A kit for one axle or suspension layout may not fit another, even when both trailers have similar weight ratings. The axle maker, trailer maker, and shock-kit instructions are the best starting points for confirming compatibility.
Inspect the trailer with the wheels on the ground before lifting it. Look for bent hangers, cracked welds, loose U-bolts, damaged spring leaves, worn bushings, leaking dampers if already fitted, and signs that a tire has been rubbing against nearby parts. Repair defects before adding new equipment.
Measure the available space around each proposed shock location. Include the tire, wheel, axle tube, spring pack, frame, brake lines, wiring, and any moving linkage. The shock must not hit or pinch another component when the suspension compresses or extends.
Source: storage.googleapis.com
Suspension type
Determine whether the trailer uses leaf springs, rubber torsion elements, independent suspension, or another design.
Axle configuration
Record whether the trailer has one axle, two axles, or another arrangement, along with the axle model if available.
Trailer and axle ratings
Check the identification plates and manuals. These ratings help establish the application, but they do not by themselves prove that a shock kit will fit.
Existing mounting points
Look for factory shock mounts or a documented mounting kit. Do not assume that a convenient hole in the frame is suitable.
Leaf-Spring Suspension
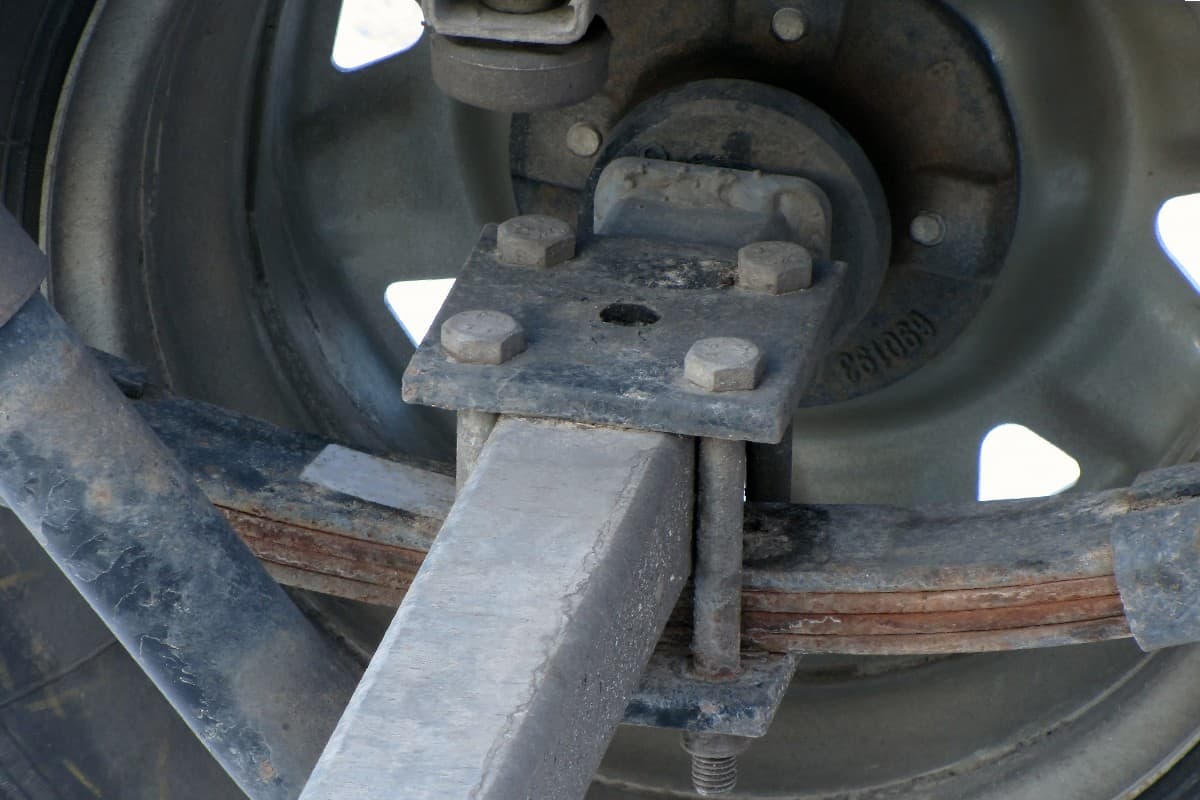
Leaf-spring suspension uses curved steel leaves to support the axle and allow controlled movement. A shock kit may attach between a bracket on the frame and a suitable point near the axle or suspension assembly. The exact layout depends on the kit design.
Check the spring pack, shackles, hangers, and U-bolts before installation. A shock bracket must not obstruct the spring’s movement or put unwanted loads on a thin or unsupported section of the frame.
Check spring clearance
Confirm that the spring pack and shackles can move without touching the shock or its brackets.
Check bracket position
Use the position specified by the kit maker rather than choosing a location based only on convenience.
Torsion And Independent Suspension
Torsion axles use internal rubber elements or another torsion mechanism rather than conventional leaf springs. Some models have dedicated shock provisions, while others require an approved kit or may not support a practical retrofit.
Independent suspension can have more complex motion and tighter packaging. Shock angle, stroke, and attachment points must match the suspension’s movement. If the manufacturer does not provide a documented installation method, ask the axle maker or a qualified trailer suspension shop before modifying the system.
Use model-specific guidance
Verify that the kit is approved for the exact axle or suspension assembly.
Avoid improvised mounts
Do not attach a shock to a control arm, axle part, or frame section without confirming that the location can handle the loads.
Choose The Right Trailer Shock Absorbers
Choose shocks by verified fitment, mounting dimensions, operating stroke, and intended use, not by appearance alone. A shock that bolts into place may still be too short, too long, or incorrectly damped for the suspension.
A trailer-specific kit often simplifies the job because it may include brackets, hardware, and application instructions. Confirm what the kit contains and whether it is intended for your axle, trailer frame, and loaded operating conditions. If the trailer manufacturer supplies an approved option, begin there.
Do not select a shock based only on trailer weight or the length of the old unit. The replacement must also match the mounting style, extended length, compressed length, and movement of the suspension. If a specification is unclear, ask the kit supplier for confirmation before installation.
Source: storage.googleapis.com
Mounting style
Check whether each end uses an eye, stud, sleeve, or another connection, and verify the required bolt and bushing dimensions.
Extended and compressed lengths
The shock must not reach its extension or compression limit before the suspension reaches its intended travel limits.
Damping characteristics
Use a damper intended for the trailer application. Excessive or insufficient damping can affect suspension response.
Corrosion resistance
For trailers exposed to rain, road salt, or water, consider the specified coating and hardware materials without compromising the kit’s design.
How Many Shocks Does A Trailer Need?
The required number depends on the suspension design and the kit instructions. Some systems use a shock at each wheel position, while others use a different arrangement designed by the manufacturer. Do not assume that every single-axle trailer needs two shocks or that every tandem-axle trailer needs four.
For a tandem-axle trailer, check how the kit accounts for both axles, equalizer movement, and the available mounting space. Use only the specified arrangement. Adding extra shocks without an engineering basis can change suspension behavior and increase loads on the mounting structure.
Follow the kit layout
Use the exact number and placement of dampers specified for the application.
Check left-to-right consistency
Where the design calls for matching shocks on both sides, install the correct matching parts and brackets.
Can Car Shock Absorbers Be Used On A Trailer?
Not automatically. A passenger-car shock may have unsuitable damping, mounting dimensions, stroke, corrosion protection, or load-cycle characteristics for a trailer. Similar dimensions do not establish compatibility.
Use a car shock only if the trailer or suspension manufacturer specifically approves that unit for the application. Otherwise, choose a trailer-specific part with documented fitment.
Verify the application
Check the part number and manufacturer fitment information rather than relying on visual similarity.
Tools And Materials Needed For Installation
Gather all tools before lifting the trailer. The exact list depends on the kit and whether it uses existing holes, approved bolt-on brackets, or a documented welding procedure. Read the complete installation instructions first so you can identify any special tools or hardware.
Work on a firm, level surface with enough room to reach both sides of the suspension. Keep children and bystanders away from the work area, and never rely on a hydraulic jack alone to support a trailer while you work beneath it.
Source: www.youtube.com > Lorries – Producer of Car Trailers
Safety equipment
Use correctly rated jack stands, wheel chocks, eye protection, suitable gloves, and any additional protective equipment required by the job.
Hand tools
Prepare the correct socket set, wrenches, breaker bar, and tools needed to remove existing hardware.
Torque wrench
Use a suitable torque wrench to tighten fasteners to the values specified by the kit or trailer manufacturer.
Measuring tools
Keep a tape measure, ruler, marker, and suitable angle-measuring tool available if the instructions require them.
Drilling or welding tools
Use these only when the kit specifically calls for the work and the frame material, reinforcement, and installation method are known. Structural welding may require a qualified professional.
Approved hardware
Use the supplied or specified bolts, nuts, washers, sleeves, and brackets. Do not substitute lower-grade hardware.
Prepare The Trailer Safely
Park the trailer on firm, level ground and disconnect it from the tow vehicle if the manufacturer’s procedure permits. Apply the parking brake on the tow vehicle before disconnecting, then secure the trailer against movement with wheel chocks on the wheels that remain on the ground.
Unload the trailer as directed by the installation instructions. If the procedure requires a particular suspension load or ride height, follow that requirement instead of assuming an empty trailer is always correct. Raise the trailer only at approved lifting points and place rated stands under suitable structural support points.
Never work under a trailer held only by a jack, and never place a stand beneath a thin floor panel or an unapproved suspension part. If you cannot identify safe lifting and support points, stop and consult the trailer manufacturer or a qualified shop.
Check stability
Before going underneath, verify that the trailer cannot roll, shift, or fall from its supports.
Keep hands clear
Do not put fingers between the spring, axle, frame, or bracket while the suspension is loaded or moving.
How To Fit Shock Absorbers To A Trailer Step By Step
The steps below describe the general process for a compatible bolt-on trailer shock kit. The kit instructions take priority because mounting positions, drilling requirements, shock orientation, and torque values vary by trailer and suspension. Do not use this general guide as a substitute for model-specific instructions.
Source: www.youtube.com > Lorries – Producer of Car Trailers
Step 1: Read The Kit Instructions And Check Every Part
Lay out the shocks, brackets, sleeves, bolts, nuts, washers, and other supplied parts. Compare them with the parts list and check for shipping damage, bent brackets, damaged threads, or incorrect components.
Confirm the part numbers and mounting dimensions before removing any original hardware. Review the required torque values, permitted mounting angles, and any instructions for the trailer’s loaded or unloaded condition. If a part is missing or the instructions do not match the trailer, resolve the issue before continuing.
Success check
Every required part is present, undamaged, and confirmed compatible with the suspension.
Step 2: Inspect And Mark The Mounting Locations
Identify the approved upper and lower mounting points. Many installations place one end on a frame bracket and the other on a suitable axle or suspension bracket, but the exact arrangement depends on the kit. Mark the locations only after confirming the measurements and clearances specified by the manufacturer.
Check both sides of the trailer for differences in frame shape, wiring, brake lines, and nearby suspension parts. Do not drill through a frame flange, structural member, or other restricted area unless the manufacturer explicitly permits that location and method.
If the instructions require welding, confirm the approved bracket position, weld procedure, material requirements, and any necessary reinforcement. Welding near axles, brake wiring, bearings, or other heat-sensitive parts can cause damage. Have structural welding done by a qualified person when required.
Success check
The proposed mounts match the kit instructions and provide clearance for the full movement of the suspension.
Step 3: Install The Mounting Brackets
Fit the supplied brackets in the specified locations. If the kit is designed to use existing holes, check that the holes and surrounding metal are in good condition. If new holes are permitted, use the specified diameter and placement, remove sharp burrs, and apply the required corrosion protection.
Install bolts, washers, spacers, and nuts in the order shown in the instructions. Keep the brackets aligned and do not force them into place by tightening hardware against a misaligned frame or suspension component. If the bracket does not sit as intended, stop and recheck the part numbers and measurements.
Tighten the bracket hardware to the specified value and sequence. Do not guess the torque or use an arbitrary value based only on bolt diameter. Some joints require a particular fastener grade, locking method, or final tightening procedure.
Success check
The brackets sit in their intended positions, the hardware is correct, and the mounts show no signs of distortion.
Step 4: Fit The Shock Absorbers
Check the shock body and shaft for damage before fitting each unit. Identify the correct upper and lower ends and any required orientation. Some dampers have specific mounting or operating requirements, so do not assume that every shock can be installed either way up.
Position the shock between the approved brackets. Align the mounting eyes or studs with the holes, then fit the specified sleeves, bushings, washers, and fasteners. The shock should align naturally with the mounting points rather than being twisted or bent into position.
If the holes do not line up, do not pull the shock into place with the bolts. Recheck the bracket positions and suspension condition. A mismatch may indicate an incorrect part, an incorrect mounting location, or a suspension position that does not match the installation instructions.
Tighten the shock fasteners according to the kit instructions. Rubber-bushed joints may require a specified tightening position or sequence. Follow the maker’s directions rather than applying a universal rule about tightening with the suspension hanging or loaded.
Success check
The shock sits straight in the intended orientation, its bushings are correctly fitted, and no fastener is forcing parts out of alignment.
Step 5: Check Shock Stroke And Suspension Clearance
This is one of the most important checks. A shock must not bottom out at full suspension compression or reach its extension limit before the suspension reaches its intended limit. Either condition can make the damper act as an unintended suspension stop and damage the shock or its mounts.
Follow the manufacturer’s method for checking compression and extension. This may require moving the suspension through its travel with the trailer safely supported, using specified measurements, or following a kit-specific procedure. Do not force the axle or spring assembly beyond its normal travel limits.
Check clearance around tires, wheels, springs, shackles, brake lines, electrical wiring, and the frame. Look for potential contact as the suspension moves, not only in the resting position. A shock that clears everything while parked may still interfere when the suspension compresses or articulates.
Success check
The shock operates within its specified stroke and no part binds, rubs, pinches, or strikes nearby components.
If clearance fails
Do not tow the trailer. Correct the fitment using the approved instructions or have the installation inspected by a qualified trailer suspension technician.
Step 6: Complete The Installation And Lower The Trailer
Inspect every bracket and fastener before removing the support stands. Confirm that locking nuts, cotter pins, or other retention devices are installed where specified. Check that no tools, loose parts, or temporary supports remain in the work area.
Lower the trailer carefully using the approved lifting procedure. Remove the stands and chocks only when the trailer is stable and the relevant steps allow it. If the kit requires final tightening at normal ride height, complete that step as directed.
If you removed wheels, reinstall them using the wheel manufacturer’s or trailer manufacturer’s tightening sequence and torque specification. Wheel fastener torque is separate from shock-mount torque. Follow any required wheel-fastener recheck procedure before towing.
Success check
The trailer rests normally, the shocks remain aligned, and all required fasteners have been tightened and checked.
Important Measurements Before You Tow
The key measurements are the shock’s extended length, compressed length, available mounting distance, and permitted stroke. These values determine whether the damper can move with the suspension without reaching its mechanical limits. Use the actual kit specifications rather than estimating the measurements from a photograph.
The following table shows what each measurement means and why it matters. It is a decision aid, not a set of universal dimensions for all trailers.
Source: www.youtube.com > JOHNNY’S WEEKENDS-Power Your World! Solar & More!
Shock Measurement Reference
Measure between the shock’s mounting centers or other reference points specified by its manufacturer. Eye-to-eye, stud-to-eye, and other mounting styles may use different measurement methods. Make sure the measurement method matches the published specification.
Extended length
The shock’s length at its permitted extension. The suspension must not pull the shock to this limit before reaching its intended extension limit.
Compressed length
The shock’s length at its permitted compression. The suspension must not force it shorter than this limit during normal permitted travel.
Installed length
The distance between the mounting points at a defined suspension position, measured using the kit manufacturer’s method.
Operating stroke
The permitted difference between the shock’s extended and compressed positions. The available suspension travel must fit within this operating range as specified by the kit maker.
Mounting angle
The shock’s angle relative to the frame or suspension. The permitted angle depends on the shock design and installation instructions.
Common Installation Mistakes To Avoid
Most installation problems come from incorrect parts, poor mount placement, insufficient clearance, or fasteners that were not installed as specified. A shock that looks secure at rest may still fail if it binds or reaches the end of its stroke while towing.
Inspect the installation methodically before the trailer returns to service. If a bracket bends, a bolt loosens, or a shock makes contact with another component, stop using the trailer until the cause is corrected.
Source: homemade.ftempo.com
Choosing a shock by length alone
Matching the old shock’s length does not confirm that the replacement has suitable damping, stroke, mounting hardware, or application approval.
Drilling without approval
An incorrectly placed hole can weaken a frame or damage a structural member. Follow the permitted drilling locations and reinforcement requirements.
Using weak or incorrect fasteners
Unapproved bolts, washers, nuts, or sleeves can fail under repeated suspension loads. Use the specified hardware and torque.
Ignoring the full suspension travel
A shock that bottoms out or tops out can transmit damaging loads to its mounts.
Mounting the shock at an unapproved angle
The wrong angle can affect the shock’s operation, clearance, and available stroke.
Overlooking brake lines and wiring
Moving parts can pinch or abrade a brake line or wire even when the shock itself fits.
Assuming shocks fix every towing problem
Excessive sway, overloaded tires, worn springs, poor tongue weight, and incorrect tire pressure need their own diagnosis.
When Should You Stop And Get Professional Help?
Stop if the trailer frame is cracked, bent, badly corroded, or too thin for the proposed mounting method. Structural changes should not proceed until a qualified person confirms that the design can support the new loads.
Professional help is also appropriate when a torsion or independent suspension lacks clear retrofit instructions, when welding is required, or when you cannot safely support the trailer. A trailer suspension shop can assess the mounting points, available travel, and compatibility before a damaged component causes a roadside failure.
Structural damage
Have cracks, deformation, damaged welds, or serious corrosion assessed before fitting new brackets.
Unclear fitment
Ask the trailer or axle manufacturer to confirm compatibility when the part number or mounting method is uncertain.
Unsafe lifting conditions
Use a properly equipped service facility if the trailer cannot be supported safely at home.
How To Test Trailer Shock Absorbers After Installation
Complete a stationary inspection before any road test. Look for loose hardware, damaged bushings, twisted brackets, fluid leakage, and contact marks. Confirm that the suspension can move as intended and that no component is under unusual strain.
If the manufacturer permits a road test, start with a short trip at a safe, moderate speed in a controlled setting. Listen for knocking, scraping, or repeated clunks. Pay attention to unusual bouncing, a change in handling, or signs that the shock or bracket is moving against another part.
Do not deliberately hit potholes, swerve, or make abrupt maneuvers to test the installation. These actions can put the trailer and other road users at risk. If handling changes unexpectedly, slow down safely, stop in a suitable place, and inspect the trailer before continuing.
Source: www.youtube.com > Javi Lee
Check the mounts
Look for movement, shifted hardware, cracked paint around a bracket, fresh metal marks, or other signs of loosening or stress.
Listen for noise
New knocking or scraping can point to loose hardware, poor clearance, a damaged bushing, or a mismatched shock.
Observe ride behavior
Excessive bouncing may indicate a fitment issue or another suspension problem. Shocks alone cannot diagnose every cause.
Follow reinspection instructions
Recheck fasteners and wheel hardware at the intervals specified by the relevant manufacturers.
What If The Trailer Still Bounces?
If bouncing continues after installation, verify that the shocks are the correct parts and that their mounts have not shifted. Check for binding, incorrect orientation, damaged bushings, and a shock that reaches its travel limit too early.
Next, inspect the springs, axle, tires, and load. Worn or damaged springs, excessive load, incorrect tire pressure, and poor weight distribution can affect ride behavior even when the shocks are correctly installed.
If the trailer sways, wanders, or feels unstable, do not assume that stronger shocks will solve the issue. Review loading, tongue weight, hitch setup, tires, and axle alignment as appropriate. Seek a qualified trailer technician if the cause is not clear.
Recheck compatibility
Compare the installed part numbers and dimensions with the approved kit specifications.
Inspect other suspension parts
Look for worn bushings, loose fasteners, damaged springs, and axle problems.
Stop if handling is unsafe
Do not continue towing a trailer with unexplained instability, metal-on-metal contact, or visibly damaged mounts.
Maintenance After Fitting Trailer Shocks
Inspect trailer shocks during routine suspension checks and before long trips. Look for fluid leaks, dents, corrosion, damaged bushings, loose fasteners, and bent brackets. A shock with visible damage or a mount that has moved needs attention before the trailer is used again.
Trailers often sit outdoors for long periods. Water, road salt, dirt, and repeated vibration can affect exposed metal and hardware. Clean the area as needed and maintain corrosion protection according to the manufacturer’s instructions, especially around drilled or welded areas where the coating may have been disturbed.
There is no single replacement interval that fits every trailer shock. Service life depends on the damper, road conditions, load, climate, storage, and use. Follow the shock maker’s inspection and replacement guidance, and replace a unit that is damaged or no longer controls suspension movement as intended.
Source: www.youtube.com > Scottyz Buildz
Inspect before travel
Check for loose mounts, leaks, corrosion, tire rubbing, and other visible suspension problems.
Recheck after initial use
Follow the kit maker’s instructions for checking mounting hardware after the first trip or initial operating period.
Replace damaged parts
Do not straighten a bent shock rod or continue using a cracked bracket as a temporary repair.
Keep records
Record part numbers, installation dates, inspection findings, and any torque or service requirements provided by the manufacturer.
Should Both Shocks Be Replaced Together?
When a kit uses matching shocks on both sides, replacing them as a matched set is often sensible if one has failed or the other has similar wear. Matching components help preserve the damping balance intended by the kit design.
Follow the manufacturer’s replacement guidance for your specific system. Do not mix different shock models or damping characteristics unless the manufacturer explicitly permits that combination.
Use matching components
Confirm that replacement shocks share the required specifications and approved application.
Cost And Time To Fit Trailer Shock Absorbers
The cost depends on the trailer, shock kit, brackets, hardware, and amount of fabrication required. A kit that uses approved factory mounting points may take less work than a retrofit that requires new brackets or structural changes. Labor rates and parts prices also vary across the United States.
A reliable estimate requires the trailer make and model, axle type, suspension design, and intended kit. Without those details, a single price or installation time would be misleading. Ask a supplier or repair shop to quote the parts and labor separately and identify any required frame work.
Before approving the job, confirm whether the quote includes brackets, fasteners, corrosion protection, alignment or clearance checks, and any follow-up inspection. A low parts price does not necessarily mean a low total cost if the kit requires extra fabrication.
Source: www.youtube.com > Lorries – Producer of Car Trailers
Parts
The shock kit, brackets, hardware, and any approved reinforcement or corrosion protection.
Labor
Time needed to lift and support the trailer, install brackets, fit the shocks, and verify suspension travel.
Additional repairs
Damaged springs, worn bushings, corroded frame sections, or other defects may need correction before installation.
Inspection
Allow for the required checks, fastener reinspection, and any manufacturer-directed setup.
Can You Fit Trailer Shocks Yourself?
A competent home mechanic may be able to install a documented bolt-on kit with ordinary tools, safe lifting equipment, and clear manufacturer instructions. The task becomes more complex when the installation needs structural drilling, welding, suspension disassembly, or custom bracket design.
The deciding factor is not only mechanical skill. You also need a safe work area, a reliable way to support the trailer, the correct tools, and a verified installation procedure. If any of those are missing, a qualified trailer shop is the safer option.
DIY may suit
A straightforward approved kit with clear instructions, existing mounting points, and adequate tools.
Professional installation may suit
A custom retrofit, a damaged frame, a complex suspension, or a job requiring structural welding.
Next-Question Gap Map For Trailer Shock Installation
Readers who are preparing to fit trailer shocks usually need answers about compatibility, safe mounting, travel limits, and post-installation checks. These questions follow directly from the work described above; they are practical inferred next needs, not claims about measured search demand.
No live competitor-page audit or verified search-question dataset is represented here. The following map records the basis for each question and the evidence needed to answer it without claiming that the topic is absent from other websites.
Source: homemade.ftempo.com
Will shocks fit my trailer axle?
Reader stage: before buying. Basis: inferred next need from suspension compatibility. Reviewed competitor coverage: not checked. Benefit: prevents purchasing a mismatched kit. Evidence: trailer, axle, and shock-kit specifications. Priority: high. Placement: compatibility section.
How do I know the shock is not too short?
Reader stage: installation. Basis: inferred next need from suspension travel. Reviewed competitor coverage: not checked. Benefit: helps prevent the damper from becoming an unintended travel stop. Evidence: specified compressed and extended lengths and suspension travel procedure. Priority: high. Placement: measurement and clearance sections.
Can I drill or weld my own shock mounts?
Reader stage: installation planning. Basis: inferred next need from mounting requirements. Reviewed competitor coverage: not checked. Benefit: clarifies structural risks and the need for approved methods. Evidence: frame specifications and kit instructions. Priority: high. Placement: bracket installation and professional-help sections.
What should I inspect after the first trip?
Reader stage: after installation. Basis: inferred next need from repeated suspension loads. Reviewed competitor coverage: not checked. Benefit: helps identify loose hardware, contact, or bracket movement early. Evidence: manufacturer inspection instructions. Priority: high. Placement: testing and maintenance sections.
Will shocks stop trailer sway?
Reader stage: troubleshooting. Basis: inferred next need from towing stability concerns. Reviewed competitor coverage: not checked. Benefit: prevents relying on shocks to correct a separate handling problem. Evidence: trailer loading, hitch, tire, axle, and suspension checks. Priority: high. Placement: troubleshooting section.
Frequently Asked Questions
Q
Can I add shock absorbers to any trailer?
No. Some trailers have approved shock mounting points or compatible retrofit kits, while others do not have a suitable mounting design. Check the trailer and axle manufacturer’s guidance before making changes.
A custom installation may require engineered brackets or structural work. Do not drill or weld the frame without confirming that the proposed method is suitable.
Q
Do trailer shock absorbers make towing safer?
Suitable shocks can help control suspension movement, which may improve ride behavior in the right application. They do not automatically make every trailer safer or correct poor loading, worn tires, bad brakes, an overloaded axle, or incorrect hitch setup.
Use shocks as part of a properly maintained suspension system. Keep the trailer within its ratings and follow the towing vehicle and trailer manufacturers’ instructions.
Q
Should trailer shock absorbers be mounted vertically?
Not always. The permitted angle depends on the shock design, bracket layout, and kit instructions. Some systems use angled dampers to fit the available space and control suspension movement.
Follow the specified mounting angle and orientation. An improvised position may affect performance, clearance, or available stroke.
Q
Can I fit trailer shocks without welding?
Yes, if a compatible bolt-on kit is designed for your trailer and provides approved mounting points or brackets. Some installations can use existing holes, while others may require drilling where expressly permitted by the manufacturer.
If the only proposed solution involves custom structural welding or uncertain frame modifications, have the design assessed by a qualified trailer suspension professional.
Q
How long do trailer shock absorbers last?
There is no universal service life. Wear depends on the shock design, road conditions, trailer load, exposure to water or road salt, and frequency of use.
Inspect the shocks and mounts regularly. Replace damaged, leaking, or ineffective components according to the manufacturer’s guidance rather than relying only on age or mileage.
Q
Will adding shocks increase my trailer’s load capacity?
No. Shock absorbers control suspension movement but do not increase the trailer’s gross vehicle weight rating, axle rating, tire capacity, wheel capacity, or frame rating.
Never use a shock upgrade as a reason to carry more weight than the trailer is rated to handle.
Q
Why does my trailer still bounce after fitting shocks?
Possible causes include incorrect shock fitment, poor mounting geometry, worn springs or bushings, improper tire pressure, excessive loading, or a suspension problem. The shocks may also be unsuitable for the application or may not be moving through their intended stroke.
Inspect the installation and other suspension parts before towing again if the movement is severe or unusual. If the cause remains unclear, arrange an inspection by a qualified trailer technician.
Q
Do I need to install shocks on both sides of the trailer?
Install the number and arrangement specified by the approved kit. Some designs use matching shocks on both sides, but the required layout depends on the suspension and trailer configuration.
Do not add or remove dampers based on a general rule. Confirm the correct arrangement with the kit or axle manufacturer.
✦ Wrapping Up
Conclusion
Fitting shock absorbers to a trailer starts with choosing a compatible kit, checking the suspension, and confirming that the frame and axle can support the proposed mounts. The actual installation involves securing the trailer, fitting approved brackets, attaching the shocks in the specified orientation, and tightening all hardware to the correct torque.
The most important final check is suspension travel. Each shock must operate within its permitted stroke without binding, bottoming out, or reaching its extension limit too early. Check clearance around tires, springs, brake parts, wiring, and the frame before putting the trailer back on the road.
If the trailer still bounces or handles poorly, inspect the whole suspension and towing setup instead of assuming that more damping will solve every problem. Correct loading, sound tires, healthy springs, working brakes, and a suitable hitch remain essential.
💡 Key Takeaway
Before buying parts, identify your trailer’s suspension and axle model, then confirm a compatible shock kit with its manufacturer. Follow the kit instructions for safe support, mounting, torque, and full-travel checks. If the job requires unapproved frame changes or complex welding, use a qualified trailer suspension shop.
Eric
Hi, I’m Eric Bennett, the person behind OffRoadTruckAccessories.com.
I created this blog to share my interest in trucks, off-road driving, automotive accessories, and DIY modifications. I enjoy learning how different truck accessories work, testing their usefulness, and understanding whether they are truly worth buying.
Shock absorbers are located near the wheels as part of the suspension system, usually between the vehicle’s body, frame, or subframe and a suspension component such as a control arm, axle, or wheel assembly. However, the exact answer to where are shock absorbers located on a car depends on the suspension design. Some vehicles have…
You should change shock absorbers when they are worn, leaking, damaged, or no longer controlling suspension movement properly. There is no single replacement interval that applies to every vehicle because shock absorber life depends on road conditions, vehicle weight, driving habits, suspension design, and component quality. If you are wondering when to change shock absorbers,…
A shock absorber is a suspension component that controls how quickly a vehicle’s suspension moves up and down after bumps, dips, braking, acceleration, and other road inputs. It works with the springs to prevent excessive bouncing and helps keep the tires in controlled contact with the road. So, what does a shock absorber do? It…
A gas shock absorber is a hydraulic shock absorber that uses pressurized gas, usually nitrogen, along with shock absorber oil to control suspension movement. The gas helps reduce oil foaming and keeps damping performance more consistent when the shock works repeatedly or under demanding conditions. If you are wondering what is a gas shock absorber,…