
How to Align Lower Control Arm: Step-by-Step Alignment Guide
If you are searching for **how to align lower control arm** parts, there is one important point to understand first. On most cars and trucks, you do not simply move the lower control arm until the wheel looks straight. The arm must sit correctly in its mounts, while the vehicle’s alignment hardware controls the final wheel angles.
This matters after replacing a lower control arm, ball joint, bushing, steering knuckle, or other front suspension part. Even a small change in the arm’s position can alter camber, caster, and toe. The vehicle may then pull, wander, wear tires unevenly, or feel different while braking.
For a typical U.S. DIY repair, you can handle the mechanical installation at home if you have the right tools and service data. The final precision alignment is usually best done on an alignment rack. This guide explains how the process works, what you can adjust yourself, and what should be checked before the vehicle returns to normal driving.

What Lower Control Arm Alignment Actually Means
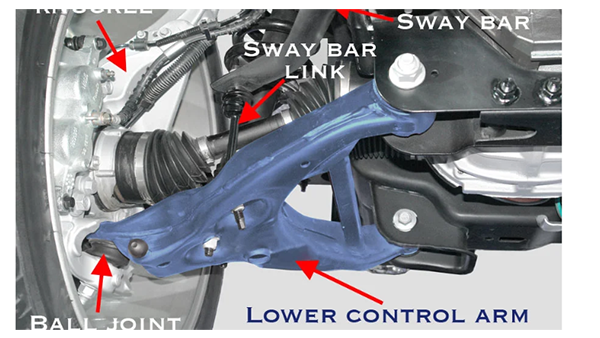
Before learning **how to align lower control arm** components, it helps to separate control arm position from wheel alignment. The lower control arm connects the chassis or subframe to the steering knuckle through a ball joint. Its location helps determine where the wheel sits as the suspension moves.
A properly installed control arm places the suspension close to its designed geometry. The alignment process then measures and corrects wheel angles such as camber, caster, and toe. Some vehicles let you change these angles at the lower control arm, while others use upper arms, strut mounts, tie rods, shims, or dedicated adjustment hardware.
That is why there is no single lower control arm adjustment method for every vehicle. A pickup with eccentric cam bolts may have obvious adjustment points. A compact car may have no factory camber or caster adjustment at the lower arm at all.

- ✦ Camber
Camber is the inward or outward tilt of the tire when viewed from the front of the vehicle.
- ✦ Caster
Caster describes the steering axis tilt when viewed from the side. It affects steering feel, stability, and return-to-center.
- ✦ Toe
Toe shows whether the fronts of the tires point slightly toward or away from each other. Tie rods usually control toe.
- ✦ Ride Height
Ride height affects suspension geometry. A sagging spring or altered suspension can change alignment readings even when the control arm is installed correctly.
Does the Lower Control Arm Control Camber?
It can. On vehicles with slotted mounts or eccentric control arm bolts, moving the lower arm inward or outward can change camber. On other designs, camber may be fixed or adjusted somewhere else.
- ✦ Check the Service Manual
Confirm the factory adjustment method before loosening bolts or moving suspension parts.
Does the Lower Control Arm Affect Caster?
Yes. Moving the front or rear pivot point of the arm can change the fore-and-aft position of the lower ball joint. That changes caster on suspension designs that allow this movement.
- ✦ Keep Both Sides Balanced
Large left-to-right caster differences may cause the vehicle to pull or feel less stable.
Tools You May Need Before Aligning a Lower Control Arm
The tools needed for **how to align lower control arm** parts depend on the suspension design. Basic hand tools are enough for some installation checks, but accurate wheel alignment needs measuring equipment.
At minimum, use a level work area, quality jack stands, wheel chocks, and the correct sockets and wrenches. A torque wrench is essential. Suspension fasteners carry large loads, so tightening them by feel is not a good approach.
For DIY measurements, a digital angle gauge or camber gauge can provide a rough camber reading. Toe plates or strings can help estimate toe. These methods can get a vehicle closer to specification, but they do not replace a calibrated alignment rack when accuracy matters.
- ✦ Floor Jack and Jack Stands
Use equipment rated for the vehicle’s weight and support the vehicle at approved lift points.
- ✦ Torque Wrench
Use the manufacturer’s torque specification for control arm bolts, ball joint hardware, and wheel fasteners.
- ✦ Sockets and Wrenches
You may need large sockets, breaker bars, or specialty tools for suspension fasteners.
- ✦ Alignment Measuring Tools
A camber gauge, toe plates, strings, or professional alignment equipment helps verify wheel position.
- ✦ Paint Marker
Marking the starting location of eccentric washers can help you track adjustments.
How to Align Lower Control Arm Step by Step
The correct method for **how to align lower control arm** hardware begins with a proper installation. Do not try to correct alignment by forcing the arm into a position that does not match the vehicle’s mounting points.
The following process works as a general guide for many passenger cars, SUVs, and light trucks. Exact bolt locations, adjustment methods, torque values, and alignment specifications vary by model.
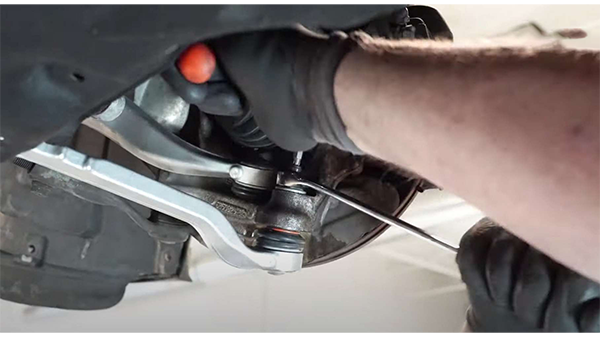
- ✦ Step 1: Park on a Level Surface
Set the parking brake when appropriate, block the wheels, and work on solid, level ground.
- ✦ Step 2: Inspect the Suspension
Check the control arm, bushings, ball joint, tie rod ends, wheel bearing, strut, spring, and mounting points before making adjustments.
- ✦ Step 3: Check the Control Arm Installation
Make sure each bushing sleeve, bolt, washer, eccentric, and ball joint sits in the correct position.
- ✦ Step 4: Leave Bushing Bolts Slightly Loose When Required
If the design uses bonded rubber bushings, final tightening may need to occur at normal ride height. Follow the service procedure for your vehicle.
- ✦ Step 5: Bring the Suspension to Normal Ride Height
Lower the vehicle onto ramps or use another safe method that loads the suspension while still allowing access to the required fasteners.
- ✦ Step 6: Torque Pivot Bolts
Tighten the control arm pivot bolts to the exact factory torque specification while the suspension is at the required position.
- ✦ Step 7: Set Adjustable Cam Hardware Near Its Starting Position
If the vehicle uses eccentric cam bolts, place both sides near their original marks or a neutral position before measuring alignment.
- ✦ Step 8: Measure Camber and Caster
Use proper alignment equipment and compare the readings with the factory specification for the exact vehicle.
- ✦ Step 9: Adjust the Lower Control Arm if the Design Allows It
Rotate eccentric bolts or move the arm within its slots in small steps. Recheck readings after each change.
- ✦ Step 10: Set Toe Last
Camber and caster changes can affect toe, so adjust toe only after the other alignment angles are correct.
- ✦ Step 11: Tighten and Recheck
Torque all adjustment hardware, settle the suspension, and measure the angles again before driving.
Why Normal Ride Height Matters
Many rubber control arm bushings are bonded to an inner sleeve. Tightening them while the suspension hangs can lock the rubber in a twisted position. Once the car returns to the ground, the bushing may remain under constant stress.
- ✦ Reduce Bushing Preload
Final tightening at the specified suspension height can help the bushing rest near its designed neutral position.
- ✦ Improve Service Life
Correct installation can reduce unnecessary twisting that may shorten the life of a bonded rubber bushing.
Make Small Alignment Changes
Do not rotate an eccentric adjuster through a large range at once. Small movements can create meaningful changes at the wheel. Adjust, settle the suspension, and measure again.
- ✦ Record Each Change
Marking the adjuster position makes it easier to reverse an adjustment that moved the reading in the wrong direction.
How Eccentric Cam Bolts Align a Lower Control Arm
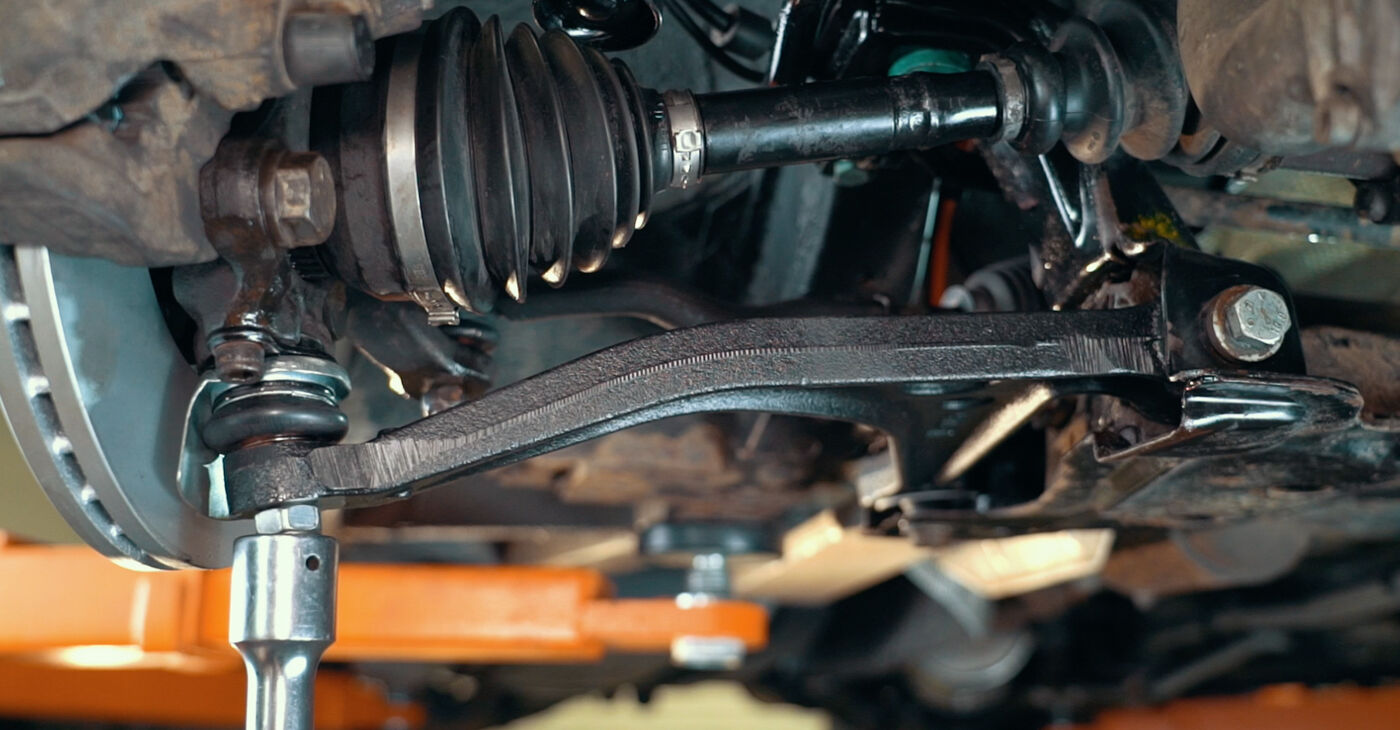
Many trucks and SUVs use eccentric cam bolts at one or both inner lower control arm pivots. The bolt passes through an offset washer or cam. Turning the hardware changes where the control arm sits inside the mounting slot.
This movement can shift the lower ball joint slightly in, out, forward, or backward. That is how the system changes camber and caster. The exact effect depends on which pivot you move and the design of the suspension.
When learning **how to align lower control arm** cam bolts, do not assume both cams should point in the same direction. Alignment technicians move the front and rear adjusters as a system to reach the correct camber and caster readings.

- ✦ Front and Rear Cams Work Together
Changing both equally may move camber while causing less caster change on some suspension designs.
- ✦ Opposite Movements Can Change Caster
Moving the front and rear pivots in different directions may shift the lower ball joint forward or backward.
- ✦ Adjustment Range Is Limited
If the required specification cannot be reached within the normal adjustment range, another suspension problem may exist.
- ✦ Torque Is Critical
Loose cam bolts can let the arm move after alignment, which can quickly change the wheel angles.
Should You Copy the Old Cam Bolt Marks?
Old marks can provide a useful starting point after replacing the same type of control arm. They should not be treated as a final alignment setting because the new part, bushings, ride height, or previous wear can change the geometry.
- ✦ Use Marks Only as a Baseline
Final settings should come from actual alignment measurements, not visual marks alone.
How to Check Camber After Lower Control Arm Work
Camber is one of the easiest alignment angles to notice after suspension work. If the top of the tire leans inward, it has negative camber. If it leans outward, it has positive camber.
A digital camber gauge can provide a useful home check, but the vehicle must sit on a level surface. Tire pressure should be correct, the suspension should be settled, and the steering wheel should be close to straight.
When following a DIY **how to align lower control arm** procedure, compare your reading only with specifications for your exact vehicle. Do not assume zero degrees is correct. Many vehicles are designed to operate with a small amount of positive or negative camber.
- ✦ Set Tire Pressure First
Uneven tire pressure can change ride height and make your measurements less useful.
- ✦ Settle the Suspension
Roll the vehicle or follow the alignment equipment procedure so the suspension is not bound.
- ✦ Measure Both Sides
The difference between left and right can matter as much as the individual readings.
- ✦ Look for Damage if Adjustment Runs Out
A bent arm, damaged knuckle, shifted subframe, weak spring, or crash damage can prevent the correct camber setting.
How to Check and Adjust Caster
Caster is harder to measure accurately at home because it is calculated while the wheels turn through specific angles. Professional alignment equipment measures it much more easily.
Correct caster helps the steering wheel return toward center after a turn and supports straight-line stability. A large difference between the left and right sides can also contribute to pulling.
On vehicles that use lower control arm cams, technicians may move one pivot farther than the other to change caster. This is another reason **how to align lower control arm** parts cannot be reduced to matching marks or centering every bolt.
- ✦ Use Factory Specifications
Caster targets vary by suspension and vehicle, so use model-specific alignment data.
- ✦ Check Ride Height
Sagging springs, lifted suspension, or leveling kits can change caster.
- ✦ Inspect for Bent Parts
A caster reading far outside the available adjustment range can point to damage or incorrect components.
Why Toe Must Be Checked After Lower Control Arm Alignment
Toe is usually adjusted with the steering tie rods, not the lower control arm. However, changing camber or caster can alter the position of the steering knuckle. That can change toe even when you never touch a tie rod.
For this reason, a complete **how to align lower control arm** job should finish with a toe check. Driving with incorrect toe can scrub the tires across the road and create rapid tread wear.
A steering wheel that sits off-center after suspension work can also point to a toe or steering-center issue. Do not simply remove and reposition the steering wheel to hide the symptom.

- ✦ Adjust Toe Last
Complete camber and caster corrections before making the final toe adjustment.
- ✦ Center the Steering Wheel
Keep the steering gear centered while setting toe so the steering wheel remains straight during normal driving.
- ✦ Check Total and Individual Toe
Professional equipment can show how much each wheel contributes to the total toe reading.
Common Mistakes When Aligning a Lower Control Arm
Most problems during lower control arm work come from installation errors rather than the alignment machine itself. Catching these issues before the final alignment can save time, protect new parts, and prevent another repair.
One of the most common mistakes is tightening bonded rubber bushings while the suspension hangs at full droop. Another is assuming that placing eccentric bolts back on old marks makes an alignment unnecessary.
A good **how to align lower control arm** process treats the entire suspension as a system. Bushings, ball joints, springs, struts, wheel bearings, steering joints, tires, and subframe position can all affect the final result.

- ✦ Tightening Bushings at the Wrong Position
This can preload bonded rubber bushings and may reduce their service life.
- ✦ Skipping the Alignment
The vehicle can still be out of specification even if it drives straight at first.
- ✦ Using Visual Tire Angle as the Final Test
Small alignment errors are difficult to see without measuring equipment.
- ✦ Ignoring Worn Steering Parts
Loose tie rods or wheel bearings can make accurate alignment difficult or impossible.
- ✦ Guessing Torque Values
Suspension hardware requires the correct specification. Too little or too much torque can create safety and durability problems.
- ✦ Forcing the Arm Into Place
If the new arm does not fit correctly, verify the part number, mounting points, and surrounding components before applying force.
Do You Need an Alignment After Replacing a Lower Control Arm?
Yes, a wheel alignment is strongly recommended after replacing a lower control arm. The replacement can change the position of the ball joint and suspension pivots even when the new component appears identical to the old one.
New bushings also hold the suspension more firmly than worn bushings. That alone can change the resting wheel position. Manufacturing tolerances, subframe position, and installation differences can add more change.
This is especially important if the control arm uses eccentric alignment bolts. Removing those bolts normally disturbs their previous positions. Knowing **how to align lower control arm** parts mechanically does not remove the need to verify the final geometry.
- ✦ Alignment Protects the Tires
Correct camber and toe help prevent rapid wear on the inner or outer tread.
- ✦ Alignment Improves Stability
Correct caster and toe help the vehicle track predictably at highway speeds.
- ✦ Alignment Confirms the Repair
Readings that remain far outside specification may reveal another worn, bent, or incorrectly installed component.
Can You Drive to an Alignment Shop After Replacing the Arm?
A short drive may be reasonable only if the suspension is fully assembled, all fasteners are torqued correctly, the wheels are secure, and the alignment is not obviously extreme. If the tire is visibly tilted, the steering binds, the vehicle pulls hard, or anything feels loose, do not treat it as normal road-ready condition.
- ✦ Safety Comes First
If you are unsure about assembly or alignment, have the vehicle transported rather than taking a risky test drive.
Signs the Lower Control Arm or Alignment Is Still Wrong
After you finish the repair, pay attention to how the vehicle behaves. A correct lower control arm installation should not create new clunks, binding, severe pulling, or unusual tire angles.
Some symptoms point to alignment, while others suggest a loose or damaged part. Do not keep adjusting the alignment to hide mechanical play. Alignment measurements only stay accurate when the suspension and steering components are solid.
- ✦ Vehicle Pulls Left or Right
Incorrect camber, caster, toe, tire pressure, tire condition, or brake drag can cause pulling.
- ✦ Steering Wheel Is Off-Center
This often indicates a toe or steering-center problem.
- ✦ Inside or Outside Tire Wear
Incorrect camber or toe can wear one edge of a tire much faster than the rest.
- ✦ Clunking From the Suspension
Check control arm bolts, ball joints, sway bar links, bushings, and nearby components for looseness or incorrect installation.
- ✦ Vehicle Wanders
Caster, toe, worn steering parts, tires, or loose suspension components may affect straight-line stability.
- ✦ Alignment Will Not Stay Set
Loose eccentric bolts, worn bushings, damaged mounting slots, or structural movement can let the geometry change after adjustment.
When a Professional Alignment Is the Better Choice
You can learn the basics of **how to align lower control arm** parts at home, but modern alignment machines offer much better precision. They measure all four wheels and show how one adjustment changes several angles at the same time.
Professional help is especially useful after collision damage, suspension lifts, lowering, subframe work, or repeated tire wear. It is also smart when the adjustment is already at its limit and the wheel angle remains outside specification.
Ask for a before-and-after alignment printout when possible. The report lets you see camber, caster, and toe values for each wheel. It can also help identify an issue that needs more mechanical work.
- ✦ Choose Professional Alignment After Major Suspension Work
Replacing control arms, steering knuckles, struts, subframes, or several suspension parts can change multiple angles.
- ✦ Use a Shop for Modified Suspension
Lifted or lowered vehicles may need special targets, added adjustment hardware, or aftermarket control arms.
- ✦ Investigate Out-of-Range Readings
If factory adjustment cannot bring the vehicle into specification, look for damaged parts, incorrect ride height, or structural issues.
Practical Tips for a Better Lower Control Arm Alignment
The best results come from doing the mechanical work carefully before touching alignment adjustments. Clean mounting surfaces, install the correct parts, and confirm that bushings and washers face the correct direction.
A useful rule when learning **how to align lower control arm** hardware is to change one thing at a time. Measure the result, note the direction of change, and continue in small steps. This is much easier than making several large adjustments and then trying to understand what happened.
Also check the simple things. Correct tire pressure, matching tire sizes, normal ride height, and a centered steering system all help you get meaningful alignment readings.
- ✦ Photograph Original Adjuster Positions
Pictures taken before disassembly can provide a useful reference during reassembly.
- ✦ Mark Eccentric Washers
A paint mark can show your starting point and make small changes easier to track.
- ✦ Use the Correct Part
Control arms can look almost identical while having different bushing positions, ball joint angles, or dimensions.
- ✦ Check Both Sides
Compare left and right components if one side sits differently after installation.
- ✦ Recheck Fasteners
Follow the manufacturer’s service procedure for any required fastener inspection or recheck after installation.






