
How to Tighten Upper Control Arm Bolts Safely and Correctly
Learning **how to tighten upper control arm bolts** is about more than making the fasteners feel tight. These bolts may secure the control arm bushings, hold alignment cams, or do both jobs at once. The correct method helps the suspension move freely while keeping the control arm firmly attached to the frame.
One of the most important practical lessons in suspension work is to avoid final-tightening bonded rubber bushings while the suspension hangs at full droop. Doing so can lock the rubber in a twisted position. Once the vehicle returns to normal ride height, that twist can place constant stress on the bushing and may shorten its life.
There is also no safe universal torque number for every upper control arm. Specifications change by vehicle, bolt location, suspension design, model year, and sometimes even two-wheel-drive versus four-wheel-drive versions. This guide explains **how to tighten upper control arm bolts** correctly while showing you where torque specifications, ride height, alignment hardware, and safe lifting practices matter.

Why Upper Control Arm Bolt Tightening Matters
The upper control arm helps locate the wheel and steering knuckle as the suspension moves. Its inner mounting points often use bolts that pass through bushings and attach the arm to the frame or a mounting bracket. Those fasteners must stay secure while still allowing the suspension to work as designed.
Correct bolt tension creates enough clamping force to keep the joint stable. Too little torque can allow movement, noise, alignment changes, or damaged hardware. Too much torque can stretch a bolt, damage threads, distort mounting parts, or make future removal difficult.
Knowing **how to tighten upper control arm bolts** is especially important after replacing the control arm, bushings, alignment cams, or related suspension hardware. The final tightening step can affect both bushing life and wheel alignment.
- ✦ Loose fasteners
Loose bolts may let the control arm shift and can cause clunks, uneven tire wear, or changing alignment.
- ✦ Over-tightened fasteners
Excess torque may damage threads, deform parts, or overstress the bolt.
- ✦ Wrong bushing position
Final tightening at full suspension droop can preload some bonded rubber bushings.
- ✦ Alignment changes
Vehicles with cam bolts or slotted mounts may lose camber or caster settings if the hardware moves.
What the Upper Control Arm Bolts Actually Do
On many vehicles, the inner bolts clamp the control arm bushing sleeves against the mounting brackets. The bolt does not normally act like a free-spinning hinge. Instead, suspension movement occurs through the bushing or bearing.
Some trucks and SUVs also use eccentric washers or cam bolts at these mounting points. Turning or moving these parts can change wheel alignment. Marking their original position before disassembly can provide a useful reference, but it does not replace a proper alignment.
- ✦ Bushing mount
The bolt clamps the bushing sleeve to the chassis mounting point.
- ✦ Alignment adjustment
Cam bolts may also set camber or caster on some suspension designs.
Tools and Information You Need Before Tightening
Before learning **how to tighten upper control arm bolts**, get the correct tools and the exact service information for your vehicle. A torque wrench is essential. An impact wrench may help with removal, but it should not replace a torque wrench for the final tightening step unless the manufacturer gives a specific procedure.
You also need a safe way to support the vehicle and position the suspension near normal ride height. Depending on the vehicle, this may involve ramps, a drive-on lift, or a floor jack placed under an approved suspension point while the vehicle remains securely supported.
Look up the torque specification by year, make, model, drivetrain, and bolt location. Do not copy a torque number from a different vehicle simply because the bolts look similar.

- ✦ Torque wrench
Use a wrench that covers the required torque range and is in good condition.
- ✦ Correct socket and wrench
Use fully fitting tools to avoid rounding bolt heads or nuts.
- ✦ Jack and jack stands
Use equipment rated for the vehicle and support it only at approved lifting points.
- ✦ Service information
Find the exact torque, tightening sequence, and any one-time-use fastener instructions.
- ✦ Paint marker
A marker can help record alignment cam positions before work begins.
Why the Correct Torque Specification Is Essential
Torque creates controlled tension in the bolt. The correct value depends on bolt size, thread pitch, strength grade, coatings, joint design, and manufacturer requirements. That is why one universal upper control arm torque specification does not exist.
Use the factory service manual, a trusted professional repair database, or official service information for your exact vehicle. If the procedure calls for an initial torque plus an additional angle, follow both steps.
- ✦ Do not guess
A bolt that feels tight may still have too little or too much clamping force.
- ✦ Check special procedures
Some bolts require torque-plus-angle tightening or replacement after removal.
How to Tighten Upper Control Arm Bolts Step by Step
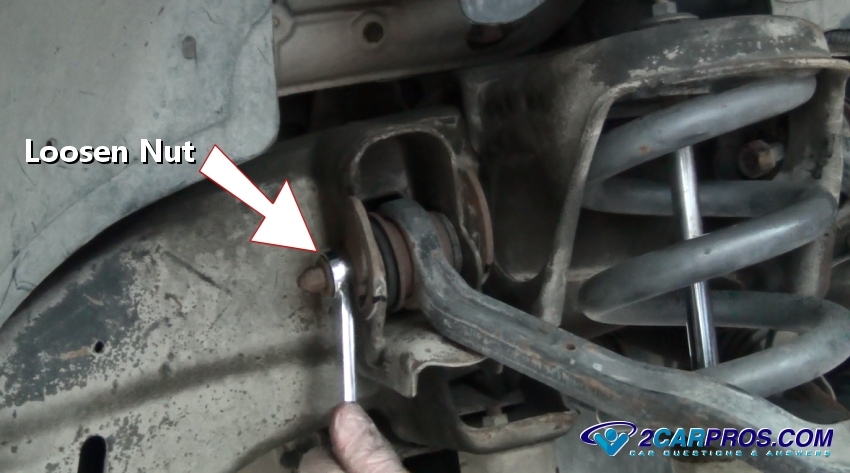
The exact procedure varies by vehicle, but the basic method is similar on many suspensions. Start by confirming that the control arm, bushings, washers, cams, nuts, and bolts are installed in the correct direction. Thread the hardware by hand before applying significant force.
When learning **how to tighten upper control arm bolts**, separate initial assembly from final torque. You often want the bolts snug enough to hold the components in place while still allowing the arm or alignment hardware to move as needed. Final torque comes only after the suspension is positioned correctly and any required alignment adjustments are considered.
Never work beneath a vehicle supported only by a hydraulic jack. Use proper stands or another approved support method before placing any part of your body under the vehicle.

- ✦ Step 1: Inspect the hardware
Check the bolts, nuts, washers, bushings, and mounting holes for rust, damage, stretched threads, or distortion.
- ✦ Step 2: Install the bolts correctly
Place all hardware in the same orientation required by the vehicle’s service procedure.
- ✦ Step 3: Start the threads by hand
Turn the nut or bolt several threads by hand to reduce the risk of cross-threading.
- ✦ Step 4: Snug the fasteners
Remove obvious free play without performing the final torque yet when ride-height tightening is required.
- ✦ Step 5: Set normal ride height
Load the suspension to its normal resting position before final tightening when the bushing design requires it.
- ✦ Step 6: Set alignment cams
Return marked cam hardware near its original position or follow the required alignment procedure.
- ✦ Step 7: Apply final torque
Set the torque wrench to the specified value and tighten smoothly until the wrench indicates the target torque.
- ✦ Step 8: Recheck the installation
Confirm that all hardware is secure and that brake hoses, ABS wires, and nearby parts are routed correctly.
How to Use the Torque Wrench Correctly
Use slow, steady force on the torque wrench. Avoid sharp jerks because they can make it harder to reach the target torque accurately. Stop when a click-type wrench gives its clear first click.
Hold the wrench at its normal handle position. Adding a pipe to the handle changes how you apply force and can damage the tool. If an adapter or extension changes the effective wrench length, follow the tool maker’s correction instructions.
- ✦ Pull smoothly
A slow pull gives better control than a sudden snap.
- ✦ Stop at the indication
Repeatedly clicking the wrench can add extra torque.
- ✦ Use the correct range
Choose a torque wrench that comfortably covers the required specification.
Should You Hold the Bolt or the Nut?
Follow the vehicle’s service procedure when it states which side should turn. In many joints, one wrench holds the bolt head while the torque wrench turns the nut. Other designs may call for tightening the bolt.
This detail can matter when alignment cams, special washers, coated threads, or locking nuts are involved. Avoid assuming that either end can always be turned without affecting the joint.
- ✦ Prevent unwanted movement
Hold the opposite side securely so the alignment hardware does not shift while tightening.
Why Final Tightening at Ride Height Can Be Important
Ride height is one of the most important parts of **how to tighten upper control arm bolts** when the arm uses bonded rubber bushings. These bushings often flex by twisting their rubber rather than allowing the inner sleeve to rotate freely. The position in which you clamp the sleeve can become the bushing’s neutral position.
If you torque the bolts while the wheel hangs far below normal ride height, the bushing may already be twisted when the vehicle sits on the ground. The rubber then remains under stress during normal driving. That may lead to early cracking, tearing, or unusual suspension behavior.
Not every upper control arm uses the same bushing design. Some use spherical bearings, free-pivoting sleeves, or other joints with different procedures. Always give the manufacturer procedure priority over a general rule.

- ✦ Bonded rubber bushings
These commonly benefit from final tightening at the specified ride-height position.
- ✦ Bearing-style joints
These may use a different method, so check the instructions for the exact control arm.
- ✦ Aftermarket control arms
Follow the control arm maker’s instructions when its joints differ from the original equipment design.
How to Put the Suspension at Normal Ride Height
One simple method is to use drive-on ramps if they provide safe access to the mounting bolts. A drive-on lift is another good option because the vehicle rests on all four wheels while you work underneath.
When those options are not available, a technician may safely support the vehicle and use a floor jack under an approved suspension point to raise that corner toward its normal loaded position. The exact support point varies by suspension design, so check the service procedure before lifting a control arm or knuckle.
- ✦ Ramps
Ramps can keep the suspension loaded while providing more room beneath the vehicle.
- ✦ Drive-on lift
This keeps the vehicle at a natural resting height and provides excellent access.
- ✦ Controlled suspension loading
A jack may load the suspension when used at an approved point with the vehicle already secured.
How Tight Should Upper Control Arm Bolts Be?
Upper control arm bolts should be tightened to the exact specification published for the vehicle or supplied with the replacement control arm. There is no single foot-pound value that is safe for every car, pickup, or SUV. Even vehicles from the same brand may use different bolts and torque values.
This is a key point when researching **how to tighten upper control arm bolts** online. A torque number from another model can look believable but still be wrong for your suspension. Always match the specification to the exact model year, trim, drivetrain, and mounting location.
Some service procedures give torque in pound-feet, while others may list newton-meters or require torque plus a measured angle. Use the listed unit carefully. Mixing pound-feet and pound-inches can cause a serious error.

- ✦ Check the exact model
Torque may change between generations, drivetrain layouts, and suspension packages.
- ✦ Check front and rear bolts
Two mounting bolts on the same arm do not always share the same specification.
- ✦ Confirm the unit
Make sure you know whether the specification uses lb-ft, lb-in, or N·m.
- ✦ Watch for torque-angle instructions
A procedure may require an initial torque followed by an additional number of degrees.
Can You Tighten Upper Control Arm Bolts by Feel?
You can snug a fastener by feel during assembly, but you should not rely on feel for the final torque. Human judgment is too inconsistent for an important suspension fastener. A calibrated torque wrench gives far better control.
This is especially true when using a long breaker bar or impact wrench. Both can apply much more force than expected in a very short time.
- ✦ Use feel only for initial assembly
Hand tightening helps seat parts before the controlled final torque step.
- ✦ Use a torque wrench for final tightening
The specified torque provides a repeatable target instead of a guess.
Upper Control Arm Cam Bolts and Wheel Alignment
Many trucks and SUVs use upper control arm bolts as part of the wheel alignment system. Eccentric cams or washers move the control arm inward, outward, forward, or backward as the bolt position changes. That movement can alter camber and caster.
If your vehicle uses this design, **how to tighten upper control arm bolts** includes controlling the position of the alignment cams. Tightening the nut without holding the cam in place can move the setting. The steering wheel may then sit off-center, the vehicle may pull, or the tires may wear unevenly.
Marking the cam position before removal can help you get close to the old setting. It is not a precise substitute for measuring alignment angles. A professional wheel alignment is a smart final step after upper control arm replacement or after disturbing adjustable mounting bolts.

- ✦ Mark before removal
Paint marks provide a reference for the original cam positions.
- ✦ Hold the cams while tightening
Prevent eccentric washers from rotating away from the intended position.
- ✦ Check alignment afterward
An alignment machine can verify camber, caster, and toe against specifications.
Do You Need an Alignment After Tightening Upper Control Arm Bolts?
You should strongly consider an alignment if you replaced the upper control arm, moved eccentric cam bolts, changed suspension ride height, or disturbed an adjustable mount. The old marks may help with assembly, but they cannot confirm the final angles.
If you only rechecked torque without allowing adjustable parts to move, alignment may not always change. Even so, unusual steering, pulling, or new tire wear deserves an alignment inspection.
- ✦ Alignment is especially important after replacement
New control arms and bushings can slightly change the wheel’s position.
- ✦ Do not ignore tire wear
Feathering or uneven wear can indicate an alignment problem.
Common Mistakes When Tightening Upper Control Arm Bolts
Most problems with **how to tighten upper control arm bolts** come from skipping small but important steps. The bolt may look simple, yet its torque, bushing position, hardware order, and alignment setting can all matter. Taking a few extra minutes during assembly can prevent repeat repairs.
A common mistake is using an impact wrench until the fastener appears tight. An impact tool gives poor feedback about final bolt tension and can quickly exceed the required torque. Use it only where appropriate, then perform the final tightening with the specified method.
Another mistake is adding oil, grease, thread locker, or anti-seize without checking the service instructions. Lubrication changes friction and can alter the bolt tension produced at a given torque. Use thread products only when the manufacturer or part supplier calls for them.

- ✦ Guessing the torque
Look up the exact specification instead of copying a value from a different vehicle.
- ✦ Torquing rubber bushings at full droop
This can preload bonded bushings when the suspension returns to normal height.
- ✦ Using an impact for final torque
Impact tools can easily apply more torque than the fastener needs.
- ✦ Moving alignment cams
Cam rotation can change caster or camber during tightening.
- ✦ Reusing damaged hardware
Replace bolts or nuts with damaged threads, heavy corrosion, stretching, or other defects.
- ✦ Adding lubricant without instructions
Thread condition affects the relationship between torque and bolt tension.
- ✦ Ignoring one-time-use bolts
Replace torque-to-yield or single-use fasteners when the service information requires it.
Should You Use Thread Locker?
Do not automatically apply thread locker to upper control arm bolts. Many suspension joints use locking nuts, prevailing-torque nuts, special coatings, or other retention methods. Adding a chemical product can change the expected friction and removal procedure.
Use the thread treatment listed by the manufacturer. If replacement control arm instructions provide a different requirement for supplied hardware, follow those instructions unless they conflict with a safety-related vehicle procedure.
- ✦ Follow the specified thread condition
Dry, lubricated, coated, and thread-locked fasteners can require different tightening procedures.
How to Check Your Work After Tightening
After learning **how to tighten upper control arm bolts**, inspect the whole repair before driving. Make sure each fastener sits correctly and no washer or alignment cam is trapped at an angle. Check that the control arm has clearance through its expected range of motion.
Look around the repair area for brake hoses, ABS sensor wires, and other lines that may have moved while the suspension was apart. They should not be stretched, pinched, twisted, or rubbing against the tire or control arm.
After the vehicle is safely back on the ground, check its stance and listen during a careful low-speed test drive. Stop and inspect the suspension if you hear a new clunk, feel unstable steering, or notice the vehicle pulling.
- ✦ Visual check
Confirm correct hardware placement and make sure the bolt fully engages the nut.
- ✦ Clearance check
Make sure the control arm and nearby components have safe clearance.
- ✦ Hose and wire check
Inspect brake hoses and sensor wiring for tension, rubbing, or incorrect routing.
- ✦ Road test
Start with a slow drive and pay attention to noises, pulling, steering feel, or vibration.
- ✦ Alignment check
Schedule an alignment when adjustable bolts or suspension geometry have been disturbed.
Signs an Upper Control Arm Bolt May Still Be Loose
A loose mounting bolt may cause a clunk when braking, steering, or driving over bumps. You may also see movement around the mounting point, witness marks where hardware has shifted, or a sudden change in wheel alignment.
Do not keep driving if you suspect an upper control arm mounting bolt is loose. Suspension mounting failures can affect steering and wheel control. Inspect the hardware and correct the problem before normal road use.
- ✦ Clunking noise
A knock from the upper suspension area can indicate movement at a mounting point.
- ✦ Changing alignment
A shifting control arm can change steering feel and tire position.
- ✦ Visible hardware movement
Fresh marks around cams, washers, or bolt heads can show that the joint has slipped.
When to Let a Professional Tighten the Upper Control Arm Bolts
Knowing **how to tighten upper control arm bolts** does not mean every vehicle is a good DIY job. Rust, limited access, unusual suspension designs, air suspension, seized cam bolts, or damaged mounting brackets can make the repair much harder. A professional shop also has access to service data and alignment equipment.
Professional help is a good choice if you cannot find a reliable torque specification, cannot safely load the suspension at ride height, or discover damaged threads. The same applies if an alignment cam will not move or the mounting hole appears enlarged.
Suspension hardware directly affects vehicle control. If you are unsure whether the installation is secure, avoid normal driving until the repair has been checked.
- ✦ Seized bolts
Heavy corrosion can require heat, cutting, or replacement hardware.
- ✦ Damaged mounting points
Bent brackets or enlarged holes need more than simple bolt tightening.
- ✦ Unknown torque specification
Do not guess when accurate service information cannot be confirmed.
- ✦ Alignment problems
A shop can measure camber, caster, and toe and make precise corrections.
What to Tell the Repair Shop
Tell the technician what parts you replaced and whether you moved any alignment cams. Mention any noise, pulling, steering change, or uneven tire wear you noticed before or after the repair.
If you installed aftermarket upper control arms, bring the manufacturer’s instructions when possible. Adjustable arms or non-stock joints may have their own torque and setup requirements.
- ✦ Share the repair history
Clear details help the technician inspect the correct mounting points and alignment settings.






