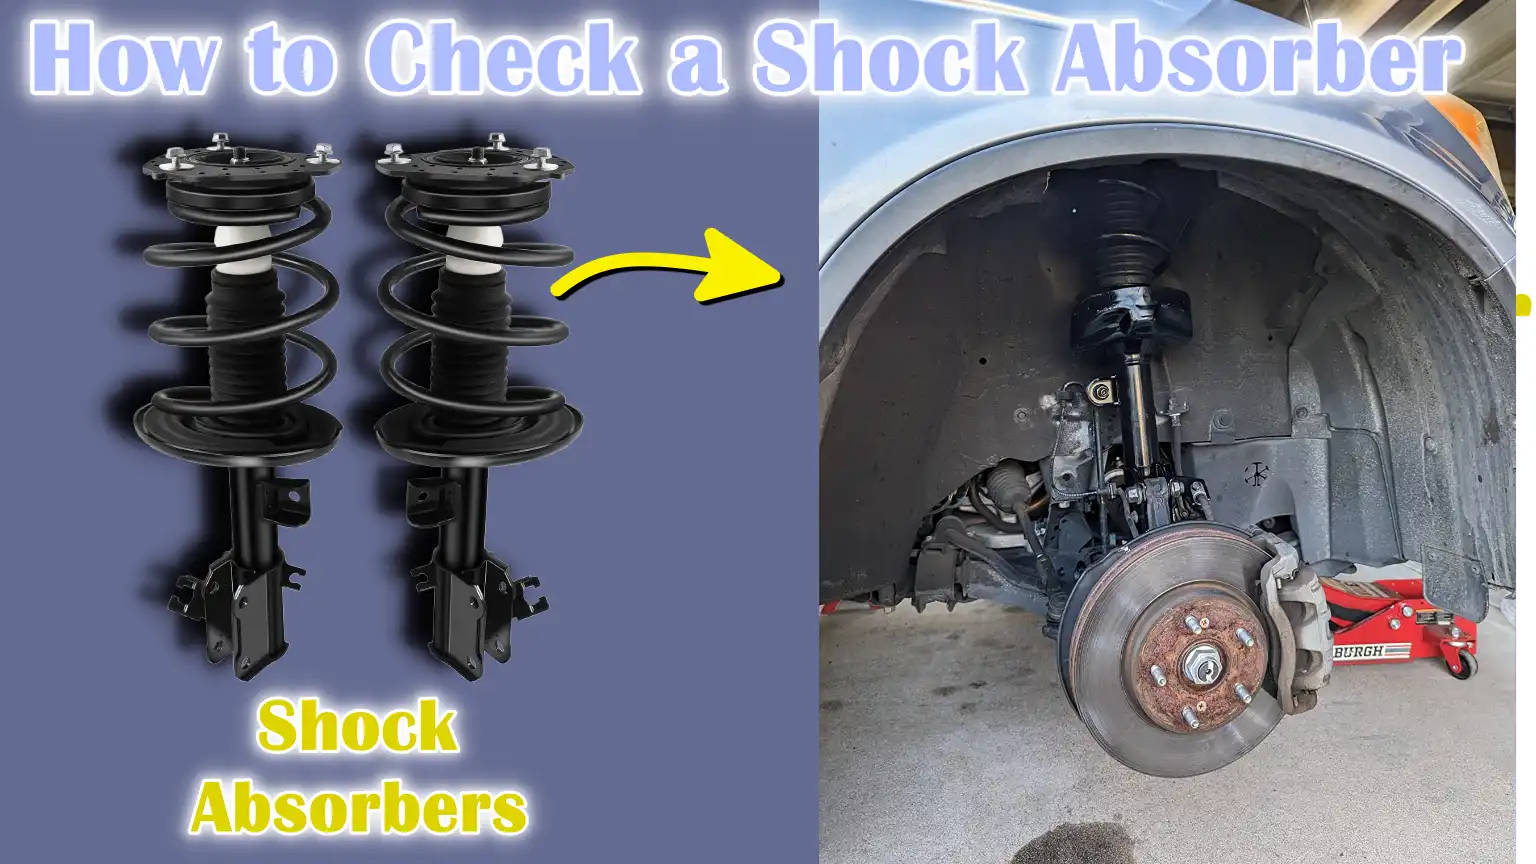
You can diagnose a bad shock absorber by checking for fluid leaks, uneven tire wear, loose suspension parts, excessive bouncing, and poor vehicle control. A bounce test can help, but no single symptom or test confirms every shock failure. Combine a visual inspection with a careful road assessment and, when needed, a professional suspension inspection.
Drivers across the United States rely on their vehicle suspension to handle potholes, rough pavement, highway expansion joints, and sudden changes in road conditions. Worn shock absorbers can make a car or truck feel unstable, increase tire wear, and reduce control when braking or turning. These changes may develop slowly, so a vehicle can feel normal even when its shocks are losing their ability to control suspension movement.
Learning how to diagnose a bad shock absorber starts with noticing changes in how the vehicle rides and handles. You can perform several basic checks in your driveway without removing any parts. However, modern suspension systems vary by vehicle, and some symptoms can come from worn struts, tires, springs, bushings, or other components rather than the shock absorbers themselves.
This guide explains how to inspect shocks, perform a basic bounce test, identify common failure signs, and decide when professional help is needed. It also explains the limits of home testing so you can avoid replacing good parts or overlooking a serious suspension problem.
A shock absorber controls the movement of a vehicle’s suspension spring. When a wheel hits a bump, the spring compresses and then tries to return to its original position. The shock absorber slows this movement so the vehicle does not keep bouncing after the road impact.
Shock absorbers also help the tires maintain contact with the road. This matters during braking, cornering, and driving over uneven pavement. When a shock loses its damping ability, the suspension may continue moving after a bump, which can make the vehicle feel unsettled.
A conventional shock absorber is often a separate part mounted near a suspension spring. A strut is a structural suspension component that also provides damping. Many people use the word shocks to describe both, but shocks and struts are not interchangeable in every vehicle.
Some vehicles use electronically controlled dampers or adaptive suspension systems. These may have electrical connectors, sensors, or specific diagnostic procedures. Check the service information for your exact make, model, and year before inspecting or replacing these parts.
Source: nbmaxauto.com
Shock absorber
Controls spring movement and helps reduce repeated bouncing after a bump.
Strut assembly
Combines damping with a structural role in the suspension on vehicles designed for struts.
Suspension spring
Supports vehicle weight and absorbs much of the initial impact from road bumps.
Mounts and bushings
Connect suspension parts and help limit unwanted movement, noise, and vibration.
Common Symptoms of a Bad Shock Absorber
The most useful starting point is to look for a combination of symptoms rather than relying on one clue. A worn shock may cause extra body movement, but a damaged tire, weak spring, or loose suspension joint can create similar behavior.
Note when each symptom occurs. For example, repeated bouncing after a speed bump points toward a damping problem, while a clunk over bumps may suggest a loose mount or another worn suspension part. These clues help narrow the cause before parts are replaced.
Source: i.ytimg.com
Excessive bouncing
The body continues moving up and down after the wheels pass over a bump. This can indicate weak damping, although spring and suspension faults must also be considered.
Nose dive under braking
The front of the vehicle dips more than usual during braking. Worn shocks may contribute, but braking technique, springs, brakes, and other suspension parts can affect the same movement.
Excessive body roll
The body leans noticeably during turns or changes direction. Worn dampers may contribute, but damaged anti-roll bar links, springs, or other parts can also cause excessive movement.
Poor road stability
The vehicle feels unsettled over bumps or needs more correction to maintain a steady path. Tire pressure, alignment, steering components, and suspension wear should also be checked.
Uneven tire wear
Repeated dips or scalloped patches across a tire tread may be linked to poor wheel control. Incorrect alignment, tire imbalance, and worn bushings are other possible causes.
Fluid leakage
Wet oil residue running down the shock body can indicate a failed seal. A light film or dirt-stained surface may not prove failure, so compare it with the manufacturer’s inspection criteria.
Clunking or rattling
Noise over bumps may come from shock mounts, bushings, loose fasteners, sway bar links, or other suspension parts. The noise alone does not identify the failed component.
Can You Drive With a Bad Shock Absorber?
A damaged shock absorber can affect tire contact, vehicle stability, and braking behavior. The level of risk depends on the severity of the damage, road conditions, vehicle load, and whether other suspension components are also worn.
If the vehicle has severe bouncing, a loose suspension component, a visibly damaged mounting point, or a sudden change in handling, stop driving when safe and arrange professional inspection or towing. Do not use a highway test to see whether a suspected bad shock is getting worse.
Stop and arrange help
Do this if the vehicle becomes difficult to control, a suspension part appears loose or broken, or a wheel makes severe impact noises.
Arrange a prompt inspection
Do this for persistent bouncing, leaking shocks, or unusual tire wear even if the vehicle remains driveable.
Tools and Preparation Before Testing Shocks
Most initial checks require little equipment. A flashlight, a tire pressure gauge, a clean cloth, and a phone camera can help you record visible conditions. A vehicle service manual is useful for identifying the correct suspension layout and any special inspection steps.
Park on firm, level ground, switch off the engine, set the parking brake, and place the transmission in Park or in gear as appropriate. Let hot parts cool before reaching near the wheels or suspension. Keep hands clear of pinch points and moving components.
You do not need to remove a wheel to perform a basic visual check if the shock is visible from outside the vehicle. If a closer inspection requires lifting the vehicle, follow the manufacturer’s lifting points and use properly rated jack stands. Never rely on a hydraulic jack alone.
Helps rule out incorrect tire pressure as a contributor to poor handling or uneven wear.
Service manual
Provides vehicle-specific inspection instructions, lift points, and suspension warnings.
Safety equipment
Use eye protection and gloves when appropriate, and never work beneath a vehicle without secure support.
Step 1: Inspect the Shock Absorbers for Visible Damage
Start with a visual inspection because it can reveal clear damage without driving the vehicle or dismantling the suspension. Inspect each accessible shock absorber and compare its condition with the unit on the opposite side of the vehicle.
Look for wet oil tracks, a bent shock body, deep corrosion, cracked rubber bushings, damaged mounting hardware, and signs that the shock has contacted another component. A badly damaged housing or loose mount needs prompt attention.
Not every damp-looking shock has failed. Some designs can show a thin surface film during normal service, while active leakage may leave a wet trail or collect dirt around the seal. Use the vehicle manufacturer’s criteria to distinguish normal residue from a replacement condition.
Source: msg.equipment
Check for oil leakage
Look around the shaft seal and down the shock body. Fresh oil running from the seal is more concerning than a small, dry stain.
Check the mounting points
Look for torn bushings, missing hardware, visible gaps, or movement that should not be present.
Look for physical damage
A bent housing, severe corrosion, or impact damage may prevent the shock from working correctly.
Compare both sides
A clear difference in leakage, damage, or mounting condition can help identify a local fault, but both shocks may be worn.
What Does a Leaking Shock Absorber Look Like?
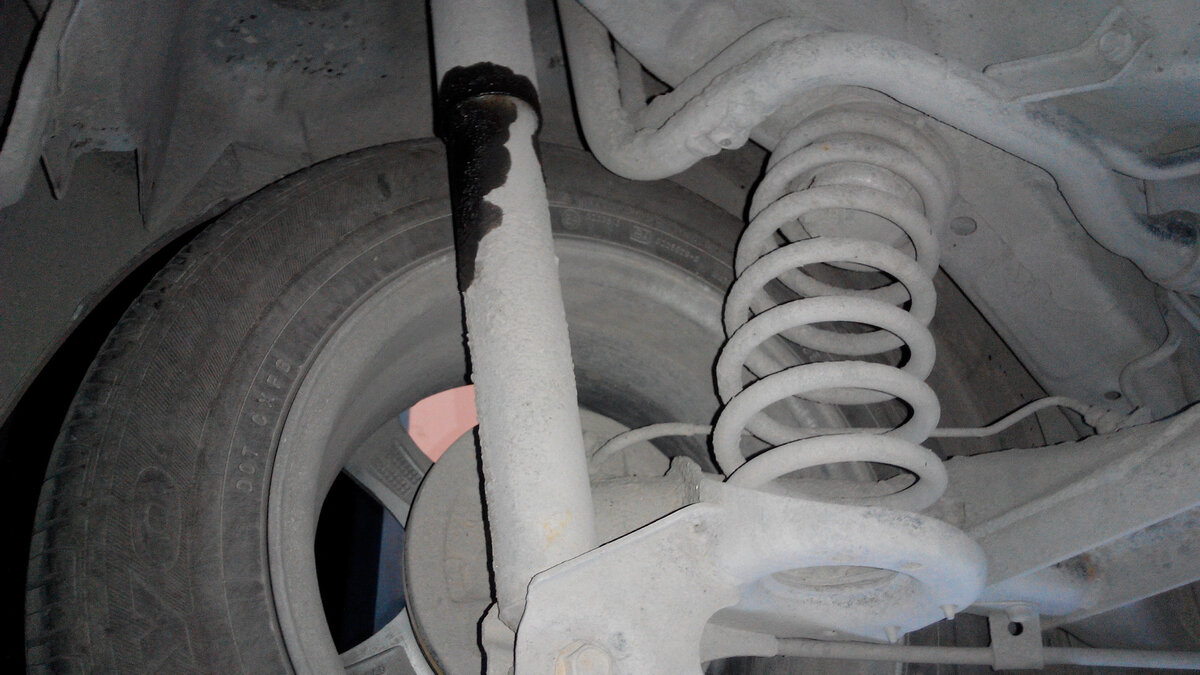
A leaking shock may have oil around the shaft seal or streaks running down its outer tube. Road dust can stick to the fluid and form a dark, dirty patch. The location and amount of fluid matter more than the presence of dirt alone.
If the shock is visibly wet and fluid continues to spread, arrange an inspection. Do not touch an exposed shaft or try to tighten a sealed shock body. Most conventional shocks are sealed units and are replaced rather than opened for routine repair.
Likely concern
Fresh fluid that emerges from the shock seal and leaves a clear trail down the housing.
Needs closer inspection
A light oily film, old grime, or residue whose source is uncertain.
Step 2: Perform a Basic Bounce Test
A bounce test is a simple screening check for some conventional suspension systems. It can help you notice excessive body movement, but it cannot reliably measure the full damping performance of every shock absorber. Some modern vehicles use suspension designs that make a manual bounce test less useful.
Park the vehicle on level ground and make sure the parking brake is set. Choose a firm body panel area above a wheel only if the vehicle owner’s manual permits applying pressure there. Do not push on glass, plastic trim, a spoiler, or a panel that could bend.
Press down firmly but carefully, then release the body. Observe how the suspension returns to its normal height. Repeat on the opposite side under similar conditions so you can compare the response.
Source: i.ytimg.com
Normal-looking response
The body returns toward its resting position without obvious repeated oscillation. This does not prove that the shock is in good condition.
Possible damping problem
The body continues to rise and fall several times after release. Inspect the shock and related suspension parts more closely.
Unequal side-to-side response
One side moves much more freely than the other. This can indicate a difference in damping, but spring condition and suspension geometry also matter.
Why the Bounce Test Can Give a False Result
A stiff spring, low vehicle mass, suspension friction, and the design of the suspension can affect how much the body moves by hand. A shock may also lose performance under repeated heat or road load without showing dramatic bouncing in the driveway.
Use the bounce test alongside visual checks and handling symptoms. If the result is unclear, a shop can inspect the suspension and may use a dedicated suspension tester where available. A professional road assessment or manufacturer-specific diagnostic procedure may also be needed.
Do not use a fixed bounce count as proof
A rule such as one bounce or two bounces is not a universal specification for all vehicle suspension systems.
Do not bounce the vehicle aggressively
Excessive force can damage body panels or cause injury, especially near an unstable vehicle.
Step 3: Check Tire Wear and Tire Pressure
Tire condition can provide useful clues about suspension performance. A worn shock may allow the wheel to bounce repeatedly over uneven pavement, which can contribute to irregular tread wear. However, tire wear is not a shock-specific diagnosis.
Check all four tires for unusual wear patterns, cuts, bulges, and uneven tread depth. Use a tire pressure gauge when the tires are cold, and compare the readings with the pressure listed on the vehicle’s tire information placard or in the owner’s manual rather than the maximum pressure printed on the tire sidewall.
Scalloped or cupped wear consists of repeated high and low areas around the tread. It can be associated with weak damping, but wheel imbalance, alignment problems, loose suspension parts, and tire defects can also contribute. If the tire has a bulge, exposed cords, or severe damage, do not continue driving on it.
Source: i.ytimg.com
Cupped tread
Repeated dips around the tread may suggest wheel hop or poor damping, but further inspection is required.
Wear on one edge
Often points toward alignment, camber, toe, or tire pressure issues rather than proving shock failure.
Incorrect tire pressure
Can change ride quality and handling, so correct it before judging suspension behavior.
Step 4: Assess Handling Symptoms Carefully
If the visual inspection does not reveal a clear fault, consider how the vehicle behaves during normal driving. Do not deliberately drive fast over bumps, brake hard, or make sharp turns to provoke a symptom. A suspected suspension fault should not be tested through risky maneuvers.
Pay attention to repeated bouncing on ordinary roads, a vehicle that feels unsettled after a small bump, unusual body movement during routine turns, or a change in stability on familiar routes. Note whether the problem occurs at one corner or across the whole vehicle.
Handling symptoms alone cannot confirm a bad shock absorber. Tire condition, wheel alignment, steering joints, springs, control arm bushings, anti-roll bar links, and braking components can create overlapping symptoms. A technician should inspect these parts before deciding what needs replacement.
Source: i.ytimg.com
Repeated movement after bumps
Supports further investigation of damping performance, especially when paired with leakage or a failed bounce test.
Steering wander or pulling
Can be caused by tires, alignment, steering parts, brakes, or suspension damage. Do not attribute it to shocks without inspection.
Unusual braking movement
May involve dampers, but brake condition, tire grip, and suspension geometry also affect the result.
Noise over road joints
May indicate a worn shock mount or loose hardware, but other suspension joints should be checked.
Is a Clunking Noise Proof of a Bad Shock?
No. A clunk over a pothole or driveway entrance can come from a shock mount, worn bushing, loose fastener, sway bar link, ball joint, or control arm component. A damaged shock can make noise, but the sound itself does not establish the cause.
Avoid reaching under a vehicle while someone rocks it unless the procedure is specifically designed for that inspection and the vehicle is safely supported. A qualified technician can check for play and identify the source of the noise using the correct lifting and testing method.
Listen for the conditions
Record whether the sound occurs over small bumps, during turns, or when braking, without deliberately provoking unsafe behavior.
Inspect related parts
Ask for the mounts, bushings, links, joints, and fasteners to be checked before replacing the shock solely because of a noise.
Step 5: Inspect Mounts, Bushings, Springs, and Struts
A useful diagnosis includes the parts around the shock absorber. A new shock will not correct a broken spring, loose control arm, damaged mount, or worn steering joint. Related faults can also damage replacement parts if they are left in place.
With the vehicle safely parked and the suspension visible, look for cracked or displaced rubber bushings, broken spring coils, loose-looking mounts, damaged dust boots, and signs of metal-to-metal contact. Do not dismantle a strut assembly at home unless you have the correct tools, training, and service instructions.
Coil springs store substantial energy. Removing a strut or loosening a spring-retaining component without the proper spring compressor and procedure can cause severe injury. Have a qualified technician handle spring-loaded assemblies when you lack the required equipment or experience.
Source: i.ytimg.com
Spring damage
A broken or sagging spring can change ride height and mimic some symptoms of worn shocks.
Damaged mounts
Worn or broken mounts can cause clunks, vibration, and unwanted movement.
Worn suspension joints
Loose ball joints, bushings, or links can affect handling and create noises over bumps.
Damaged protective boots
A torn dust boot can expose a shaft to dirt and moisture, potentially shortening component life.
Step 6: Use Professional Testing When Home Checks Are Inconclusive
If the symptoms suggest worn shocks but the visual inspection and bounce test are inconclusive, arrange a suspension inspection. A technician can check the mounting hardware, suspension joints, springs, tire condition, and damping performance using methods appropriate for the vehicle.
Some repair facilities use suspension testers that measure wheel or suspension response under controlled conditions. The result must be interpreted according to the equipment, vehicle design, tire condition, and test procedure. There is no single numerical threshold that applies to every car and truck.
Vehicles with adaptive dampers may store diagnostic trouble codes when an electronic fault occurs. A suitable scan tool and vehicle-specific service information may be needed to check these systems. A normal scan does not automatically prove that the mechanical damping components are healthy.
Source: i.ytimg.com
Suspension inspection
Useful when leaks, noise, uneven wear, or handling symptoms do not identify the failed part.
Dedicated suspension test
Can provide additional information about wheel or suspension response when the vehicle and test equipment are compatible.
Electronic diagnostics
May help identify faults in electronically controlled dampers, wiring, sensors, or suspension control modules.
What Should You Tell the Technician?
Describe the symptoms in clear terms and explain when they started. Mention whether the vehicle recently hit a pothole, carried an unusually heavy load, had suspension work, or developed uneven tire wear.
Ask the shop to identify the evidence for a failed shock and distinguish it from related problems. A useful diagnosis should explain which component is defective and whether mounts, springs, tires, alignment, or other suspension parts also need attention.
Share your observations
Report fluid leaks, repeated bouncing, noise, uneven tire wear, or changes in stability.
Request a clear finding
Ask which part failed, how the fault was confirmed, and whether another problem contributed.
How to Interpret Your Inspection Results
Use the results of the checks together to decide what to do next. A visible leak, physical damage, or a loose mounting point is stronger evidence than a vague feeling that the ride is too soft. Even strong evidence should be checked against the vehicle’s design and service criteria.
The following table summarizes common findings and the next sensible step. It is a practical screening aid, not a substitute for the manufacturer’s repair instructions or a full suspension inspection.
Source: msg.equipment
Common Mistakes When Diagnosing Bad Shocks
The most common mistake is replacing shock absorbers based on one symptom. Poor ride quality can result from low tire pressure, damaged tires, worn springs, or loose suspension parts. Checking these possibilities can prevent unnecessary repairs.
Another mistake is assuming that a shock is healthy because it passes a bounce test. The test is limited, and some dampers lose performance without causing obvious repeated body movement when pressed by hand.
Do not confuse normal suspension movement with a failure, and do not ignore a clear safety concern because the vehicle still drives. A shock that is physically damaged or leaking heavily needs assessment even if the symptoms are mild.
Source: dondodicarcustoms.com
Relying only on the bounce test
Use visual checks, tire inspection, and symptom history as well.
Ignoring tire pressure
Incorrect pressure can change handling and make a suspension fault harder to assess.
Replacing only the visibly wet part without inspection
Check the opposite side and related suspension components to determine the correct repair scope.
Working under an unsupported vehicle
Never place any part of your body beneath a vehicle held up only by a jack.
Using unsafe road tests
Do not use high speeds, abrupt swerves, or hard braking to reproduce a suspected shock problem.
Should You Replace One Shock or Both?
When a shock absorber is confirmed to have failed, replacement decisions should account for the vehicle’s design, the condition of the opposite unit, and the manufacturer’s recommendations. Replacing shocks in axle pairs is common because similar damping performance on both sides helps maintain balanced handling.
If one shock leaks or is damaged, the opposite shock on the same axle may have a similar amount of wear even if it looks dry. A visual match does not guarantee equal performance. Ask the technician to assess both units before deciding on the repair.
Some vehicles have specific requirements for adaptive dampers, struts, or complete suspension assemblies. Confirm part compatibility and any calibration or alignment requirements before starting work. If struts or other geometry-affecting components are replaced, an alignment check may be necessary.
Source: i.ytimg.com
Consider replacing in pairs
Replacing both shocks on the same axle can help maintain similar damping characteristics.
Inspect related parts
Check mounts, boots, springs, bushings, and fasteners for damage or wear.
Follow vehicle-specific guidance
Use the correct parts and procedures for the exact vehicle, suspension type, and equipment level.
Next-Question Gap Map
The following editorial map covers practical questions that naturally follow from diagnosing a bad shock absorber. These are inferred reader needs based on the task, not verified search-volume findings or confirmed gaps across the entire web.
No live competitor pages, search results, or community discussions were inspected for this article. Therefore, competitor coverage is marked not checked rather than describing an omission as a verified industry-wide gap.
Source: i.ytimg.com
Can I drive with a leaking shock absorber?
Reader stage: after inspection. Basis: inferred next need. Competitor coverage: not checked. Benefit: helps the reader judge urgency. Evidence: the severity of leakage, physical damage, and handling symptoms should guide professional assessment. Priority: high. Placement: symptoms and safety sections.
Does a bounce test prove a shock is bad?
Reader stage: during diagnosis. Basis: inferred next need. Competitor coverage: not checked. Benefit: prevents false conclusions. Evidence: suspension design and damping characteristics limit the test. Priority: high. Placement: bounce-test section.
Should both shocks be replaced together?
Reader stage: repair planning. Basis: inferred next need. Competitor coverage: not checked. Benefit: supports a balanced repair decision. Evidence: axle-pair replacement is common, but vehicle-specific requirements matter. Priority: medium. Placement: replacement section.
Can uneven tire wear mean bad shocks?
Reader stage: symptom interpretation. Basis: inferred next need. Competitor coverage: not checked. Benefit: avoids replacing shocks when alignment or tire faults are responsible. Evidence: several suspension and tire problems can cause similar wear. Priority: high. Placement: tire inspection section.
When is professional testing needed?
Reader stage: after inconclusive home checks. Basis: inferred next need. Competitor coverage: not checked. Benefit: provides a clear next action. Evidence: specialist inspection can assess related components and vehicle-specific systems. Priority: high. Placement: professional testing section.
Frequently Asked Questions
Q
How do I know if my shock absorber is bad?
Look for fluid leaking from the shock, repeated bouncing after bumps, unusual tire wear, damaged mounts, or a change in vehicle stability. These symptoms support further investigation but do not all prove shock failure. A combination of visual evidence and a professional suspension inspection provides a more reliable diagnosis.
Q
Can I test a shock absorber without removing it?
Yes. You can inspect visible surfaces and mounting points, check tire wear, and perform a basic bounce test on many conventional vehicles. These methods can identify warning signs without removing the shock. However, they cannot measure every aspect of damping performance, and some failures require specialized testing.
Q
Does a bad shock absorber always leak oil?
No. A shock can lose damping performance without an obvious external leak. Internal wear, damaged valves, or other internal faults may reduce its ability to control suspension movement. A dry housing does not guarantee that the shock is healthy.
Q
Can bad shock absorbers cause uneven tire wear?
Yes. Weak damping can allow a wheel to bounce and contribute to irregular or cupped tire wear. However, incorrect alignment, wheel imbalance, tire defects, and worn suspension joints can produce similar patterns. Inspect the tires and suspension together before deciding which part needs repair.
Q
How often should shock absorbers be replaced?
There is no universal replacement interval for every vehicle and driving condition. Shock life depends on vehicle design, mileage, road quality, load, climate, and component condition. Follow the manufacturer’s maintenance guidance and arrange an inspection when symptoms or visible damage appear rather than relying on mileage alone.
Q
Should I replace shock absorbers in pairs?
Replacing both shocks on the same axle is common when one has failed because similar damping performance on both sides helps preserve balanced handling. The right decision depends on the vehicle, the condition of the opposite shock, and the manufacturer’s recommendations. Ask for both sides to be assessed before approving the repair.
Q
Will a bad shock absorber make my car pull to one side?
A suspension fault can contribute to unstable handling, but pulling to one side is not a specific sign of a bad shock. Tire pressure, tire damage, wheel alignment, brake drag, and steering or suspension problems are also possible causes. Have the vehicle inspected promptly if the pull is sudden, strong, or accompanied by other safety symptoms.
✦ Wrapping Up
Conclusion
Diagnosing a bad shock absorber starts with a careful visual inspection, a review of tire wear, and attention to changes in ride and handling. A bounce test can help identify excessive suspension movement, but it should never be the only test used to judge shock condition.
Check for active fluid leaks, damaged housings, worn mounts, broken springs, and other faults that can produce similar symptoms. If the evidence is unclear, a professional inspection can help identify the failed component and determine whether related repairs are needed. Stop driving and arrange assistance if the vehicle has severe handling problems or visibly damaged suspension parts.
💡 Key Takeaway
Park on level ground, inspect all accessible shock absorbers for leakage and damage, check tire pressure and tread wear, and perform a gentle bounce test only if appropriate for your vehicle. Record your findings and arrange a professional suspension inspection if any warning signs appear.
Eric
Hi, I’m Eric Bennett, the person behind OffRoadTruckAccessories.com.
I created this blog to share my interest in trucks, off-road driving, automotive accessories, and DIY modifications. I enjoy learning how different truck accessories work, testing their usefulness, and understanding whether they are truly worth buying.
Shock absorbers are located near the wheels as part of the suspension system, usually between the vehicle’s body, frame, or subframe and a suspension component such as a control arm, axle, or wheel assembly. However, the exact answer to where are shock absorbers located on a car depends on the suspension design. Some vehicles have…
You should change shock absorbers when they are worn, leaking, damaged, or no longer controlling suspension movement properly. There is no single replacement interval that applies to every vehicle because shock absorber life depends on road conditions, vehicle weight, driving habits, suspension design, and component quality. If you are wondering when to change shock absorbers,…
A shock absorber is a suspension component that controls how quickly a vehicle’s suspension moves up and down after bumps, dips, braking, acceleration, and other road inputs. It works with the springs to prevent excessive bouncing and helps keep the tires in controlled contact with the road. So, what does a shock absorber do? It…
A gas shock absorber is a hydraulic shock absorber that uses pressurized gas, usually nitrogen, along with shock absorber oil to control suspension movement. The gas helps reduce oil foaming and keeps damping performance more consistent when the shock works repeatedly or under demanding conditions. If you are wondering what is a gas shock absorber,…