To change front shock absorbers, park on level ground, secure the vehicle, remove the front wheel, support the suspension as needed, disconnect the old shock, install the correct replacement, tighten all fasteners to the vehicle manufacturer’s specifications, and check the suspension before driving. The exact process depends on whether the vehicle uses separate shocks or struts.
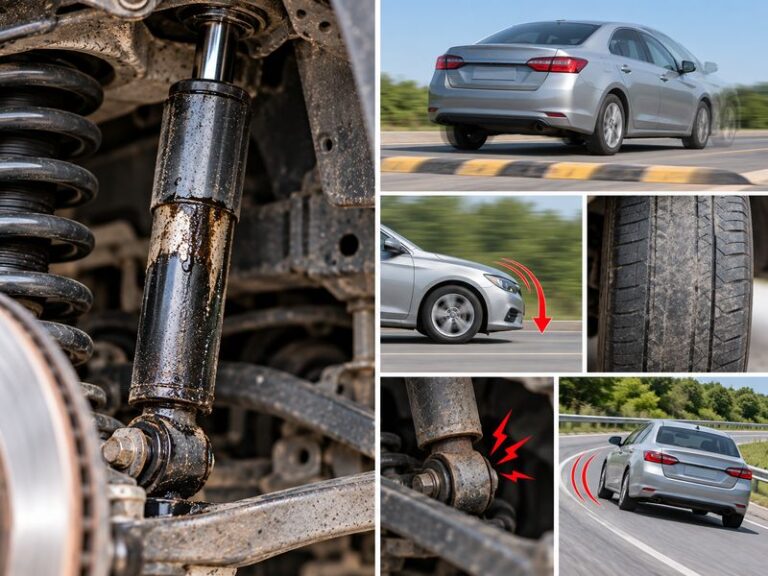
Front shock absorbers help control how a vehicle moves after hitting bumps, dips, and rough patches. In the United States, worn front shocks can make daily driving on city streets, rural roads, and interstate highways less stable and less comfortable. Common warning signs include fluid leaks, repeated bouncing, uneven tire wear, and reduced control over rough surfaces.
Replacing front shock absorbers can be a manageable home repair on vehicles with a simple shock-and-spring setup. However, some front suspensions use MacPherson struts, which support the vehicle and contain a compressed coil spring. These assemblies require a different procedure and can be dangerous to take apart without the correct equipment.
Before starting, identify the suspension design for your exact year, make, model, and trim. Get the correct replacement parts, a reliable repair manual, and the required torque values. If the job involves removing a loaded coil spring or separating a strut assembly, use a qualified repair shop unless you have the proper tools and training.
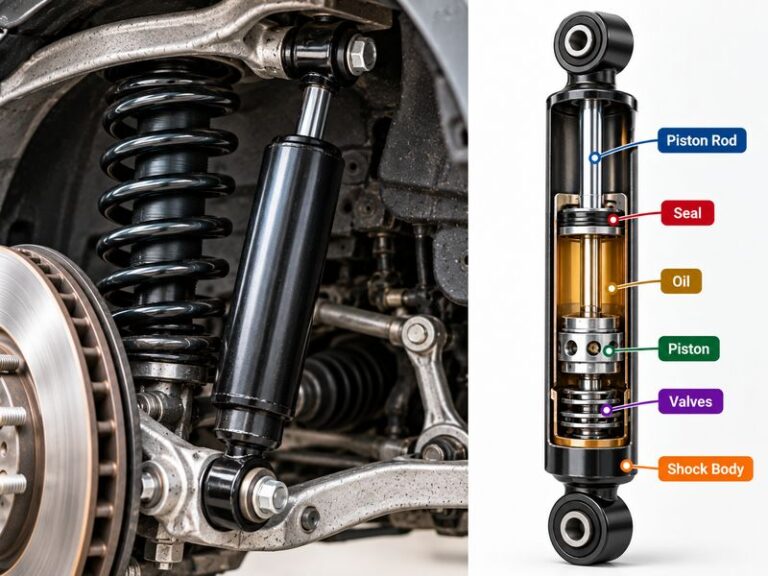
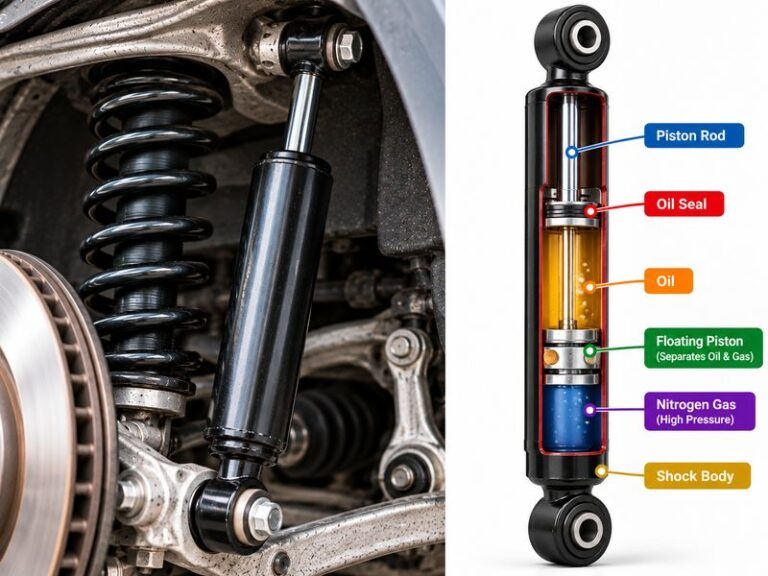
Front shock absorbers control suspension movement by resisting the motion of a piston moving through hydraulic fluid. This damping action helps the tires stay in contact with the road while limiting body bounce after a bump. Shocks also help control pitching during braking and movement when the vehicle changes direction.
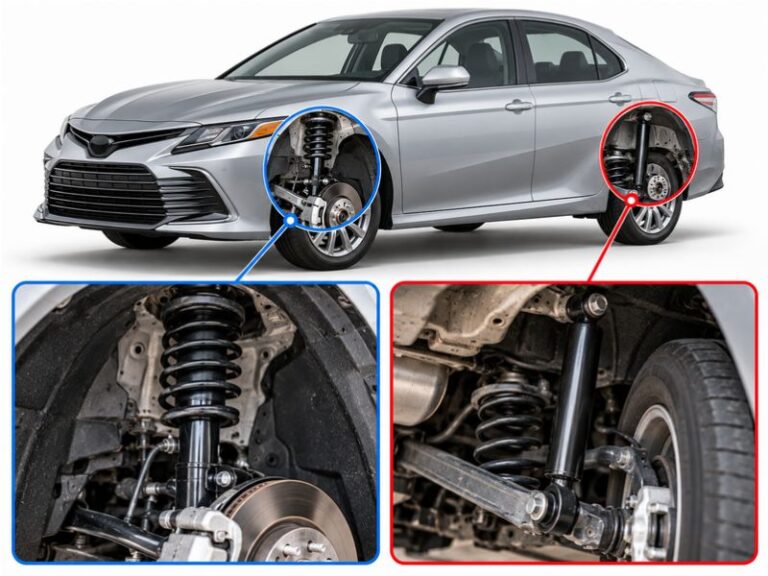
A shock absorber does not normally carry the vehicle’s weight by itself. The springs support the body and absorb much of the initial impact, while the shocks control how quickly the suspension moves afterward. Some suspension designs combine the shock and spring into one structural unit called a strut.
The distinction matters when planning a replacement. A separate shock can often be removed without disturbing the coil spring. A strut may support the steering knuckle and vehicle body, so removing it can affect suspension geometry and may require a wheel alignment.
Source: pmmonline.co.uk
Separate shock absorber
A standalone damper attached to the suspension and body or frame. Replacement often requires removing mounting bolts while supporting the relevant components.
MacPherson strut
A structural suspension assembly that combines damping with a spring and often provides a steering pivot. Spring removal and strut disassembly require special care.
A replacement unit supplied with key components already assembled. It can reduce the need to compress and transfer a coil spring, but compatibility and installation requirements still need to be verified.
Why Front Shocks Wear Out
Repeated suspension movement gradually wears internal seals, valves, and other parts. Potholes, heavy loads, rough roads, corrosion, and frequent driving over broken pavement can increase the stress on suspension components. Age and mileage also matter, but there is no single replacement interval that applies to every vehicle.
A leaking shock, damaged mounting point, or loss of damping can justify replacement. However, noise and poor handling can also come from worn ball joints, control-arm bushings, tie rods, tires, or strut mounts. Inspect the full system before assuming the shock is the only fault.
Fluid leakage
A wet, oily film or clear trail down the shock body may indicate a failed seal. Light surface residue alone is not always proof of failure, so compare the condition with the manufacturer’s inspection guidance.
Excessive bouncing
Repeated body movement after a bump can indicate weak damping, although spring and tire problems can affect the same symptoms.
Unusual tire wear
Cupping or scalloped tread wear can be associated with poor damping, but incorrect alignment, imbalance, and worn steering parts must also be checked.
Tools and Parts Needed for Front Shock Replacement
Gather all parts and tools before lifting the vehicle. The exact list depends on the suspension design, the location of the shock mounts, and the fasteners used by the manufacturer. A repair manual for the exact vehicle is the best source for torque values and removal instructions.
Use tools that fit the fasteners correctly. Rounded bolt heads, damaged threads, and improvised support methods can turn a routine repair into a serious problem. If a fastener is badly corroded or a mounting point appears cracked, stop and assess the condition before applying more force.
Source: club.autodoc.co.uk
Replacement shocks or struts
Match the parts to the vehicle identification number, model year, engine, trim, drivetrain, and suspension package where applicable.
Floor jack and jack stands
Use equipment with suitable ratings and approved lifting and support points listed in the vehicle manual.
Wheel chocks
Block the wheels that remain on the ground to reduce the risk of vehicle movement.
Socket and wrench set
Choose the correct metric or SAE sizes for the vehicle and keep extensions and breaker bars available where appropriate.
Torque wrench
Use a suitable torque wrench to tighten fasteners to the specified values rather than guessing by feel.
Penetrating oil and cleaning supplies
These can help with rusty fasteners and dirty mounting areas. Keep oil and grease away from brake friction surfaces.
Eye protection and gloves
Protect your eyes from rust, dirt, and debris. Wear suitable work gloves without allowing them to interfere with tool control.
Check the Replacement Parts Before Installation
Compare the new and old units before fitting the replacement. Check overall length, mounting style, bushing size, stud diameter, bracket shape, and any included washers or sleeves. A part that looks similar may still have a different travel range or mounting arrangement.
Check whether the kit includes new nuts, bolts, bushings, washers, dust boots, and bump stops. Reuse hardware only when the vehicle and component manufacturers permit it and the hardware is in suitable condition. Some fasteners are designed for one-time use.
Verify part fitment
Use reliable catalog information and the vehicle’s exact configuration rather than relying on appearance alone.
Review instructions
Read the shock manufacturer’s installation sheet before removing the original part, especially if the replacement uses different hardware.
Safety Checks Before You Start
Work on a hard, level surface with enough room to open doors, position a jack, and move tools safely. Set the parking brake, switch off the engine, remove the key, and follow any manufacturer-specific precautions. Keep children and pets away from the work area.
Never place any part of your body under a vehicle supported only by a hydraulic jack. Raise the vehicle at the approved lifting point, place jack stands at the specified support points, and confirm that the vehicle is stable before removing a wheel. Do not use bricks, loose blocks, or improvised supports in place of proper stands.
A coil spring stores substantial energy when compressed. If you are removing a strut assembly that contains a loaded spring, do not loosen the center shaft nut or attempt to release the spring by hand. Use the specified spring-compression equipment and procedure, or have a qualified technician handle the assembly.
Source: club.autodoc.de
Confirm the suspension type
Consult the service information to establish whether the front unit is a separate shock, a strut, or another suspension design.
Identify lifting points
Use the exact jacking and support locations stated in the owner’s manual or repair information.
Inspect the work area
Remove clutter, keep tools within reach, and ensure the vehicle cannot roll.
Stop when damage is found
Cracked brackets, severely corroded mounting points, damaged brake hoses, or loose steering joints require assessment before proceeding.
When Professional Help Is the Safer Choice
Choose a repair shop if the job requires spring compression and you do not have the proper equipment, if the mounting bolts are seized in a way that threatens nearby components, or if the vehicle has a specialized adaptive suspension system you cannot safely service. A professional should also inspect structural rust or damaged suspension mounting points.
If the vehicle uses electronic suspension controls, air suspension, or a manufacturer-specific procedure, follow the required disabling, depressurizing, and calibration steps. Do not assume that a conventional shock replacement method applies to every vehicle.
Loaded spring assembly
Do not dismantle it without approved spring-compression equipment and the correct service procedure.
Severe corrosion
Stop if a mounting bolt, bracket, or structural support begins to deform or break apart.
Electronic or air suspension
Use vehicle-specific service information for safe isolation, support, and any required system setup.
How to Change Front Shock Absorbers Step by Step
The following steps describe a common replacement process for a vehicle with separate front shock absorbers. Some vehicles require different mounting sequences, support locations, or additional component removal. Always follow the service instructions for the exact vehicle rather than treating this outline as a universal procedure.
Replace both front shocks as a pair when practical, unless the manufacturer specifies a different repair approach. Matching damping performance across the front axle helps maintain more consistent handling, especially during braking and on uneven roads.
Source: www.youtube.com > TRQ
Step 1: Park and Prepare the Vehicle
Park on level, firm ground and select Park for an automatic transmission or the appropriate gear for a manual transmission. Apply the parking brake and place wheel chocks securely against the wheels that will remain on the ground.
If the wheel fasteners require loosening before the vehicle is raised, break them loose slightly while the tire is still on the ground. Do not remove them fully at this stage. Follow the vehicle manual if it specifies a different sequence.
Check the replacement plan
Confirm that you have the correct parts, service information, torque values, and tools.
Step 2: Raise and Support the Front of the Vehicle
Position the floor jack at the approved lifting point and raise the vehicle carefully. Install jack stands at the designated support points, then lower the vehicle onto the stands in a controlled manner. Check stability before proceeding.
If the repair manual requires the opposite side of the vehicle to be raised or the suspension to be supported in a particular position, follow that procedure. Suspension position can affect the load on the shock mounts and the ease of removal.
Verify stability
The vehicle must rest securely on the stands. Never rely on the jack as the sole support.
Step 3: Remove the Front Wheel
Finish removing the loosened lug nuts and lift the wheel off the hub. Store the wheel and fasteners where they cannot roll away or become contaminated. Keep the removed wheel clear of the area beneath the vehicle.
Inspect the exposed suspension and nearby brake components. Look for torn boots, cracked rubber bushings, leaking fluid, damaged brake hoses, loose wiring, and heavy rust. Record any additional faults so they can be addressed before the vehicle returns to service.
Protect the brake system
Do not allow the brake hose or wiring to carry the weight of a suspension component. Keep tools and penetrating oil away from brake pads, rotors, and other friction surfaces.
Step 4: Locate and Loosen the Shock Mounts
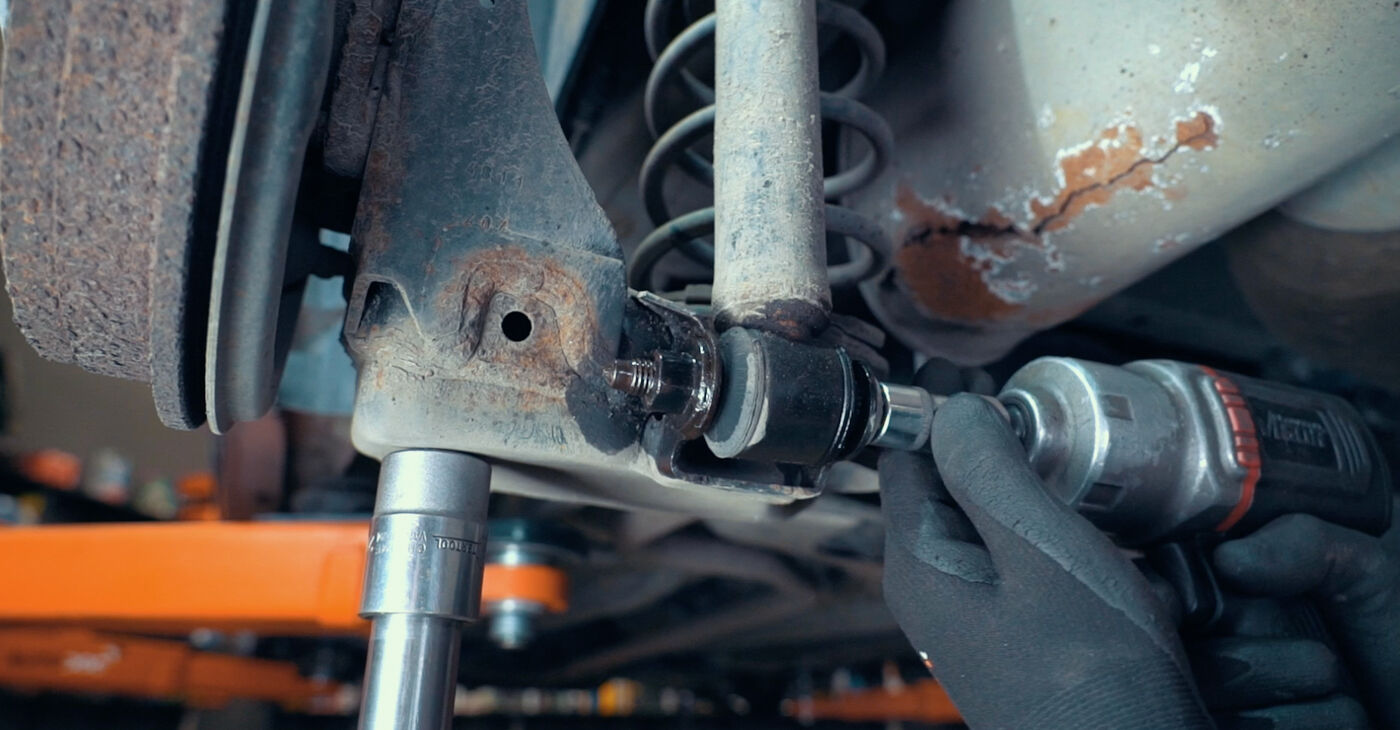
Identify the upper and lower shock mounts using the service manual. Depending on the design, the upper mount may be accessible from the engine compartment, behind a trim panel, or beneath the vehicle. The lower mount may attach to a control arm, axle housing, or another suspension component.
Apply penetrating oil to corroded fasteners when suitable and allow it time to work. Use the correct socket or wrench to loosen the mounting hardware. Do not confuse the shock’s mounting nut with a strut shaft nut that retains a compressed spring assembly.
Support the suspension if required
Use an approved support method when the service procedure requires control of the suspension arm or other components as the shock is disconnected.
Keep track of hardware
Note the position of washers, sleeves, spacers, and bushings so they can be installed in the specified order.
Step 5: Remove the Old Shock Absorber
Once the shock is safely supported as required, remove the specified mounting fasteners. Depending on the design, it may be necessary to loosen one end first and keep the other end attached until the unit can be controlled during removal.
Guide the shock out of its mounting points without bending brackets or forcing nearby suspension parts. If the shock is trapped under load, stop and check the manufacturer’s procedure for suspension support and fastener removal. Do not use excessive force to pull a loaded component free.
After removal, compare the old unit with the new part. Inspect the old shock for fluid leakage, damaged bushings, corrosion, bent mounting eyes, or a loose shaft. These observations can help confirm the condition, but the diagnosis should also consider other suspension faults.
Inspect mounting points
Check for cracks, elongated holes, damaged threads, or rust that has weakened the mounting structure.
Keep components organized
Set reusable hardware aside in order and discard any fasteners that the manufacturer says must be replaced.
Step 6: Install the New Front Shock
Confirm the new shock matches the removed unit and the vehicle’s fitment requirements. Install any supplied bushings, sleeves, washers, and spacers in the specified orientation. Do not add lubricant to rubber bushings unless the component instructions permit it.
Position the shock in the mounting points and start the fasteners by hand where the design allows. Starting threads by hand helps reduce the risk of cross-threading. Make sure the shock sits correctly and that the bushings are not pinched, twisted, or displaced.
Tighten the fasteners in the order and to the torque values stated in the vehicle or component instructions. Some rubber-bushed mounts require final tightening at a specified normal ride-height position rather than with the suspension hanging. Follow the exact procedure for your vehicle.
Use the correct torque
There is no single torque specification for all front shock absorbers. Use the exact value for each mounting fastener and the specified hardware condition.
Check clearance
Verify that the shock, brake hose, wiring, and surrounding suspension parts are correctly positioned and do not rub or bind.
Step 7: Repeat on the Other Side
Repeat the removal and installation procedure for the other front shock when replacing the pair. Compare both sides as you work, but do not assume the mounting arrangement is identical if the vehicle has side-specific parts or equipment.
Use the same correct replacement specification on both sides of the axle. If one side reveals damaged bushings, worn ball joints, or corrosion that was not apparent earlier, inspect the opposite side for related wear.
Match the installation
Confirm that hardware order, bushing position, mounting orientation, and torque values are correct on each side.
Step 8: Reinstall the Wheels and Lower the Vehicle
Refit each wheel and hand-start the lug nuts. Tighten them in the recommended sequence until the wheel is seated, then lower the vehicle according to the owner’s manual and jack instructions. Do not allow the wheel to remain loose while the vehicle is moved.
Use a torque wrench to tighten the lug nuts to the manufacturer’s specified value and sequence. The correct torque varies by vehicle and wheel type, so do not rely on a generic number or on the resistance of an impact wrench.
Before removing tools, check that all fasteners are accounted for, the wheels are seated, and no wiring, brake hose, or suspension component has been left out of place.
Torque the lug nuts correctly
Use the vehicle’s specified torque value and tightening pattern.
Remove support equipment safely
Follow the correct sequence for raising the vehicle, removing the stands, and lowering it to the ground.
How to Replace Front Struts Instead of Separate Shocks
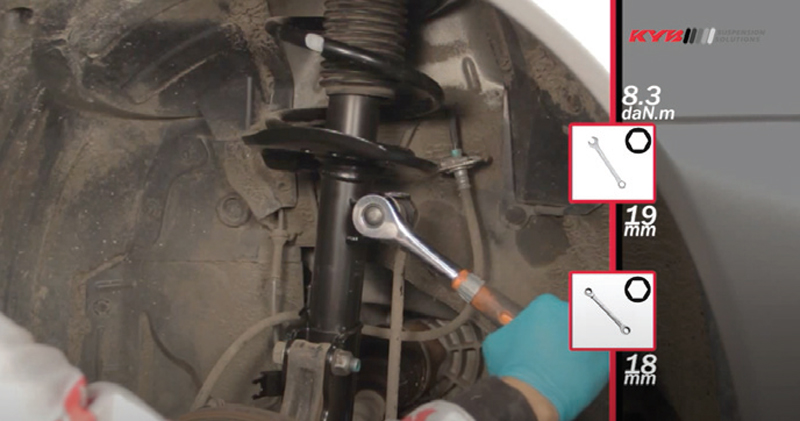
If your vehicle uses MacPherson struts, the repair may involve removing a structural suspension assembly rather than a simple damper. The strut may attach to the steering knuckle, upper body mount, brake hose brackets, and wheel-speed sensor wiring. The exact layout varies by vehicle.
A complete preassembled strut can reduce the need to transfer the coil spring, but it does not remove every risk. The strut assembly may still be heavy, the steering knuckle may need support, and some vehicles require alignment or electronic system checks afterward.
If replacing only the strut cartridge or transferring a spring, use the manufacturer-approved procedure and a suitable spring compressor. A spring under compression can release energy suddenly and cause severe injury. Never attempt to release the spring by loosening its center retaining nut.
Source: storage.googleapis.com
Key Differences in a Strut Replacement
The technician or experienced DIY mechanic must control the steering knuckle, protect brake hoses and sensor wiring, and preserve the correct position of all mounting hardware. Some vehicles require specific procedures for separating the strut from the knuckle or for handling alignment-related bolts.
After installation, check whether the service manual calls for a wheel alignment. Removing or moving strut-to-knuckle connections can change camber or toe, depending on the design. A vehicle that pulls to one side or has a crooked steering wheel should be checked rather than driven for an extended period.
Use vehicle-specific instructions
Follow the specified disconnection order, support points, fastener replacements, and torque settings.
Do not improvise spring compression
Use suitable approved equipment or have the spring and strut serviced by a qualified shop.
Check alignment requirements
Arrange an alignment when required by the manufacturer or when suspension geometry has been disturbed.
Common Mistakes When Changing Front Shock Absorbers
Most avoidable problems come from using the wrong part, skipping a safety step, or tightening hardware without checking the service procedure. A careful inspection before and after installation can prevent damage and help identify faults that new shocks will not fix.
Do not assume that a bolt is safe to reuse because it looks intact. Threads can stretch or corrode, and some suspension fasteners are designed for one-time use. Follow the manufacturer’s hardware replacement requirements.
Source: www.youtube.com > crackover
Working under a jack-supported vehicle
A jack can shift or fail. Support the vehicle with correctly positioned jack stands before removing a wheel or working beneath it.
Removing the wrong nut
A strut shaft nut may retain a compressed spring. Identify each fastener before loosening it.
Guessing torque values
Overtightening can damage threads or bushings, while undertightening can allow movement or separation. Use the exact specifications.
Reusing damaged bushings
Cracked, distorted, or incorrectly sized bushings can cause noise and poor fit. Replace them when required or supplied with the kit.
Replacing only one worn shock
Different damping performance from side to side can affect handling. Replace the pair on the axle when practical and follow the manufacturer’s recommendations.
Ignoring related suspension faults
Worn control-arm bushings, ball joints, tires, and steering parts can produce symptoms similar to worn shocks.
Skipping the final inspection
Incorrect hardware placement, a loose wheel, or a hose routed against a moving part can create serious problems after the repair.
What to Do If a Shock Will Not Come Out
A shock may remain stuck because of rust, a seized sleeve, a loaded suspension arm, or limited clearance. First, confirm that every required fastener and retaining clip has been removed. Check the service manual for any special release method or required support position.
Use an appropriate penetrating product on a corroded fastener if permitted, and allow it to work. Do not heat a shock, pressurized component, or nearby part without a manufacturer-approved procedure, especially where fuel lines, brake components, rubber parts, or flammable residues are present.
If the mounting bolt is seized inside a bushing sleeve, the bracket starts to bend, or the suspension remains under uncontrolled load, stop. Further force can damage the control arm or mounting point and increase the cost and risk of repair.
Recheck the procedure
Confirm the fastener locations, support requirements, and any model-specific removal steps.
Avoid uncontrolled force
Do not strike a loaded spring assembly or use an improvised tool that could slip.
Get help when needed
A shop may have the appropriate extraction tools and replacement hardware for seized suspension parts.
How to Check the Installation Before Driving
A successful installation means more than fitting the new shock. All fasteners must be tightened to specification, suspension parts must move without interference, and the vehicle must sit correctly. Perform a careful visual inspection before lowering the vehicle completely and again once it is on the ground.
Do not use a short road test as a substitute for a proper safety check. If you notice loose hardware, a displaced bushing, a damaged brake hose, or an unexpected change in steering, do not continue driving until the cause is found and corrected.
Source: 1aauto.com
Pre-Drive Inspection Checklist
Review each side of the vehicle in good light. Compare the installed parts with the service instructions and make sure no tool, loose fastener, or support equipment remains in the work area.
Mounting hardware
Confirm that all shock or strut fasteners are installed in the correct locations and tightened to specification.
Bushings and washers
Check that all sleeves, washers, spacers, and bushings are seated in the required order.
Brake hoses and wiring
Make sure hoses and sensor wires are secured in their original routing and cannot rub against the tire or suspension.
Wheel fasteners
Verify the lug nuts are tightened to the correct torque using the required pattern.
Ground clearance and stance
Check for an unexpected change in ride height or visible misalignment.
Conduct a Cautious Functional Check
If the pre-drive inspection is satisfactory, begin with a short, low-speed drive in a safe area with little traffic. Listen for clunks, rattles, scraping, or repeated bouncing, and pay attention to steering response. Avoid high speeds, hard braking, and aggressive turns during the initial check.
If the vehicle pulls, wanders, makes a sharp metallic noise, or feels unstable, stop in a safe location. Have the suspension and alignment inspected before continuing normal use. Do not attempt to correct a mechanical fault by simply driving farther.
Listen for new noises
Clunks can indicate loose hardware, worn mounts, or another suspension fault that needs investigation.
Watch for steering changes
Pulling, wandering, or a steering wheel that no longer sits straight may point to an alignment or installation issue.
Recheck according to instructions
Follow any specified post-installation inspection or retorque requirements rather than applying an arbitrary retightening schedule.
Do Front Shock Absorbers Need a Wheel Alignment?
Replacing a separate shock absorber does not automatically require a wheel alignment on every vehicle. If the shock mounts do not locate the steering knuckle or change suspension geometry, the alignment settings may remain unchanged. The correct answer depends on the suspension design and the manufacturer’s service instructions.
Replacing a MacPherson strut often involves connections that can affect wheel alignment. If the strut-to-knuckle bolts are removed or the mounting position changes, an alignment may be needed. Some fasteners use adjustment slots or other features that affect camber or toe.
Check the service manual rather than deciding from the name of the part alone. An alignment is also worth checking if the steering wheel is off-center, the vehicle pulls, or the tires show unusual wear after the repair.
Source: www.youtube.com > TRQ
Separate shock replacement
An alignment may not be necessary when no alignment-related connection or setting is disturbed, but the vehicle’s service procedure takes priority.
Strut replacement
Check alignment requirements because removing or moving strut mounting points can change suspension geometry.
Symptoms after repair
Pulling, an off-center steering wheel, or new tire wear should prompt an alignment and suspension inspection.
How Much Does It Cost to Change Front Shock Absorbers?
The cost of front shock replacement depends on the vehicle, parts, labor rates, and whether the repair involves separate shocks or struts. Trucks, performance vehicles, and vehicles with adaptive or specialized suspension systems may need different parts and procedures from a basic passenger car.
A useful estimate should separate the cost of parts from labor and any related work. Possible extra expenses include new mounting hardware, worn strut mounts, bump stops, dust boots, seized-bolt extraction, and wheel alignment where required. Prices vary by location and time, so obtain a current estimate for the exact vehicle rather than relying on a generic figure.
Source: pmmonline.co.uk
Parts
Confirm the correct part number and whether the price includes bushings, mounts, hardware, or a complete strut assembly.
Labor
Ask whether the quoted labor covers one side or both sides and whether corrosion or difficult access may increase the time required.
Related repairs
Request an explanation for any added work, such as damaged control-arm bushings, strut mounts, or steering components.
Alignment
Ask whether an alignment is required for the specific suspension design and whether it is included in the estimate.
Should You Replace Both Front Shocks at Once?
Replacing both front shocks is generally a sound approach when one has failed from normal wear and the other has similar age and mileage. Matching units can provide more consistent damping across the axle and reduce the chance of having to repeat the same labor soon.
However, the correct repair depends on the vehicle manufacturer’s recommendations, the cause of the failure, and the condition of the opposite unit. If damage is limited to one component because of an unusual impact, inspect both sides and follow the specified repair guidance.
Pair replacement
Often appropriate for aging shocks to maintain balanced performance between the left and right sides.
Inspect both sides
Check the opposite shock, mounts, bushings, tires, and suspension components even if only one side shows an obvious leak.
How to Choose the Correct Replacement Front Shocks
Choose replacement shocks that match the vehicle’s exact suspension requirements and intended use. The correct part must fit the mounting points and provide the specified travel and damping characteristics. A part that physically bolts on is not necessarily suitable for the vehicle.
Use the vehicle identification number and an accurate parts catalog to confirm fitment. Check for differences linked to drivetrain, cab or body style, engine, trim, towing package, and factory suspension options. These differences can matter on American pickups and SUVs as well as passenger cars.
Source: 1aauto.com
Original-equipment specification
A suitable choice when you want the replacement to follow the vehicle’s intended stock configuration, provided the exact part is confirmed.
Standard aftermarket replacement
May be appropriate for routine repair when the part is verified for the vehicle and maintains suitable specifications.
Performance-oriented shock
May change ride firmness or body control. Check compatibility with the existing springs, tires, vehicle load, and intended use before choosing one.
Heavy-duty application
Can suit certain work or load conditions when specifically approved for the vehicle. A stiffer shock is not automatically better for every driver or road.
Check Compatibility Before Ordering
Confirm whether the vehicle has a standard suspension, a factory sport package, adjustable damping, or another specialized setup. Also verify whether the shock is sold individually or as part of a pair, and whether replacement mounting hardware is included.
If the vehicle has been modified with a lift kit, lowering springs, or nonstandard wheels and tires, the original factory fitment may no longer be sufficient. Check the modification manufacturer’s specifications and confirm that the shock has suitable compressed and extended lengths.
Verify suspension configuration
Use the exact vehicle details and any documented modifications to select a compatible part.
Confirm travel limits
The replacement must not bottom out or overextend during the suspension’s intended movement.
Frequently Asked Questions
Q
Can I change front shock absorbers myself?
Yes, if the vehicle uses separate shocks, you have the correct tools, and the service procedure does not require work beyond your skill level. You must support the vehicle securely and follow the specified torque values. If the job involves a loaded coil spring, a complex strut assembly, or specialized suspension controls, professional help may be the safer option.
Q
How long does it take to replace front shock absorbers?
The time varies with the vehicle’s design, the condition of the fasteners, and your experience. A straightforward separate-shock replacement may take a few hours for a home mechanic, while a strut replacement or a job involving seized bolts can take longer. Use a vehicle-specific labor guide for a more reliable estimate.
Q
Do I need to replace both front shock absorbers?
Replacing both front shocks at the same time is generally recommended when they have similar age and wear. This helps maintain more consistent damping between the left and right sides. Inspect both units and follow the vehicle manufacturer’s guidance, especially if one shock failed because of a specific impact.
Q
How do I know whether my front shocks are bad?
Common signs include fluid leakage, repeated bouncing after bumps, reduced stability, unusual tire wear, and clunking from worn mounts or related suspension parts. These symptoms are not exclusive to shocks. Inspect the suspension and tires, and obtain a professional diagnosis if the cause is unclear.
Q
Do I need an alignment after changing front shocks?
Not always. Replacing a separate shock may leave alignment settings unchanged, depending on the design. Replacing a strut can affect alignment when steering or knuckle connections are disturbed. Follow the manufacturer’s instructions and arrange an alignment if required or if the vehicle pulls or the steering wheel sits off-center.
Q
Can I drive with worn front shock absorbers?
Worn shocks can reduce body control and tire contact on uneven roads, so delaying repair can affect handling and braking stability. If a shock is badly damaged, a mount is loose, a tire is rubbing, or the vehicle feels unstable, do not continue driving. Have the vehicle inspected and repaired before normal use.
Q
Should I replace the strut mounts and bump stops too?
Replace these parts when they are worn, damaged, required by the service procedure, or included in a complete replacement assembly. A worn strut mount can cause noise or steering problems, while a damaged bump stop or dust boot may leave the shock or strut less protected. Inspect these components during disassembly and follow the manufacturer’s recommendations.
✦ Wrapping Up
Conclusion
Learning how to change front shock absorbers starts with identifying the suspension design and choosing the correct parts. A separate shock replacement can be a practical DIY repair when the vehicle is supported safely and the correct procedure is followed. A strut replacement may require more tools, careful control of the steering knuckle, and special equipment for handling the coil spring.
Take your time during removal and installation. Inspect the mounts, bushings, brake hoses, wiring, and nearby suspension parts, then tighten every fastener to the correct specification. Check whether an alignment is needed, and do not ignore unusual noises or changes in handling after the repair.
💡 Key Takeaway
Before starting, confirm the exact suspension type for your vehicle, obtain the correct replacement parts and torque specifications, and make sure you have suitable lifting and support equipment. If the job involves a loaded spring or a damaged mounting point, have a qualified technician handle that part of the repair.
Eric
Hi, I’m Eric Bennett, the person behind OffRoadTruckAccessories.com.
I created this blog to share my interest in trucks, off-road driving, automotive accessories, and DIY modifications. I enjoy learning how different truck accessories work, testing their usefulness, and understanding whether they are truly worth buying.
Shock absorbers are located near the wheels as part of the suspension system, usually between the vehicle’s body, frame, or subframe and a suspension component such as a control arm, axle, or wheel assembly. However, the exact answer to where are shock absorbers located on a car depends on the suspension design. Some vehicles have…
You should change shock absorbers when they are worn, leaking, damaged, or no longer controlling suspension movement properly. There is no single replacement interval that applies to every vehicle because shock absorber life depends on road conditions, vehicle weight, driving habits, suspension design, and component quality. If you are wondering when to change shock absorbers,…
A shock absorber is a suspension component that controls how quickly a vehicle’s suspension moves up and down after bumps, dips, braking, acceleration, and other road inputs. It works with the springs to prevent excessive bouncing and helps keep the tires in controlled contact with the road. So, what does a shock absorber do? It…
A gas shock absorber is a hydraulic shock absorber that uses pressurized gas, usually nitrogen, along with shock absorber oil to control suspension movement. The gas helps reduce oil foaming and keeps damping performance more consistent when the shock works repeatedly or under demanding conditions. If you are wondering what is a gas shock absorber,…