
How Tight Should Control Arm Bolts Be? Torque Guide
If you are asking how tight should control arm bolts be, the safest answer is not a universal number. Control arm fasteners carry major suspension loads, and their torque can vary a lot between cars, trucks, SUVs, and even different bolt positions on the same vehicle. A lower control arm frame bolt may use a very different specification from an upper control arm bolt, ball joint fastener, or alignment cam bolt.
In suspension work, I treat the service manual torque value as a requirement rather than a rough suggestion. Tightening a control arm bolt until it simply feels tight can leave it loose or put too much load on the bolt, bushing sleeve, or mounting bracket. That can lead to noise, alignment changes, damaged bushings, or unsafe suspension movement.
Another key point is when you tighten the bolt. On many suspensions with bonded rubber control arm bushings, the pivot bolts should receive their final torque with the suspension close to normal ride height. Tightening those bolts while the wheel hangs down can preload the rubber bushing and shorten its life.

How Tight Should Control Arm Bolts Be?
So, how tight should control arm bolts be in practical terms? They should be tightened to the torque listed by the vehicle manufacturer for that exact fastener. There is no safe universal torque number that applies to every control arm.
Control arm pivot bolts are often large, high-strength fasteners. Many require substantial clamping force because they hold the control arm bushing sleeve firmly between mounting points. However, a bolt’s size alone does not tell you the correct torque.
The required torque can change based on bolt diameter, thread pitch, bolt grade, coating, mounting design, bushing type, and whether the threads should be dry or lubricated. Some fasteners also use a torque-plus-angle procedure instead of one final torque value.
For that reason, a generic chart should not replace vehicle-specific service data. Check the factory service manual, an approved repair database, or reliable manufacturer instructions before final tightening.
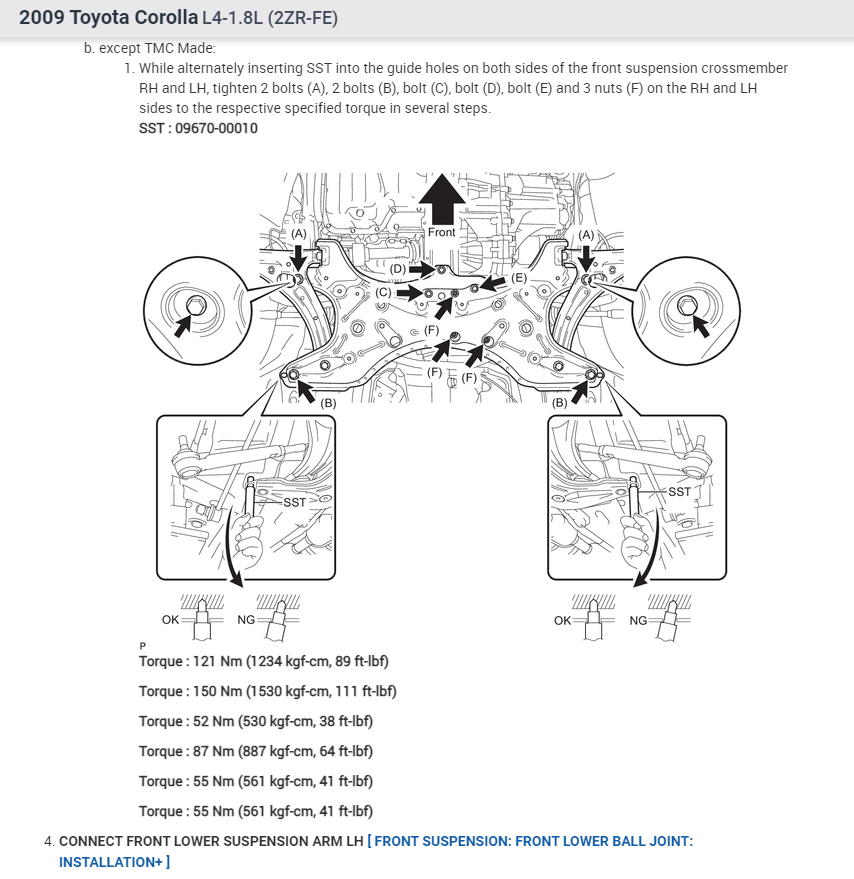
- ✦ Vehicle-specific specification
Use the torque value for your exact year, make, model, drivetrain, and suspension when possible.
- ✦ Exact bolt location
Front, rear, upper, lower, forward, and rearward control arm bolts can all have different specifications.
- ✦ Torque procedure
Check whether the fastener needs a simple torque value or a torque-plus-angle tightening sequence.
- ✦ Fastener replacement
Replace bolts and nuts when the repair information identifies them as one-time-use fasteners.
Why There Is No Universal Control Arm Bolt Torque
A compact front-wheel-drive car and a full-size pickup do not place the same loads on their suspension parts. Even two similar vehicles can use different fasteners or control arm designs. This is why answering how tight should control arm bolts be with one number can be misleading.
The same vehicle may also have several control arm fasteners with different torque values. Always identify the specific bolt before using a specification.
- ✦ Bolt size
Larger fasteners often handle more load, but size alone does not determine torque.
- ✦ Bolt material
Different bolt grades can safely handle different amounts of tension.
- ✦ Joint design
A bushing pivot, ball joint mount, and alignment cam connection may require different clamping forces.
Why Correct Control Arm Bolt Torque Matters
Correct torque creates the clamping force needed to keep suspension parts in the position intended by the manufacturer. The bolt should normally clamp the joint firmly rather than act like a loose hinge inside the mounting holes.
When the torque is too low, the control arm or inner bushing sleeve may move where it should not. That movement can create clunks, clicks, alignment changes, and wear around the mounting points.
Too much torque can also cause trouble. Excess force may stretch a bolt beyond its intended range, damage threads, crush a mounting bracket, distort a bushing sleeve, or make future service much harder.
This is why how tight should control arm bolts be is really a question about achieving the correct fastener preload. More torque is not automatically safer.

- ✦ Keeps alignment stable
Proper clamping helps hold suspension mounting points and alignment hardware in the intended position.
- ✦ Reduces unwanted movement
A correctly tightened joint limits slipping between the bushing sleeve and its mounting bracket.
- ✦ Protects fasteners
Correct torque avoids both insufficient preload and excessive bolt stretch.
- ✦ Protects bushings
Correct tightening procedure can reduce unwanted stress on bonded rubber bushings.
What Happens If Control Arm Bolts Are Too Loose?
A loose control arm bolt can allow movement between parts that should remain tightly clamped. You may hear a knock when braking, accelerating, turning, or driving over bumps.
The vehicle may also feel less stable. In severe cases, alignment can change because the control arm mounting point is no longer held firmly.
- ✦ Clunking noise
Loose mounting hardware may shift when suspension load changes.
- ✦ Uneven tire wear
Movement at a mounting point can alter suspension geometry and alignment.
- ✦ Unstable steering
The car may wander, pull, or feel less precise.
- ✦ Mounting damage
Repeated movement can enlarge holes or damage brackets over time.
What Happens If Control Arm Bolts Are Too Tight?
Overtightening can stretch or weaken a fastener. A severely overtorqued bolt may also damage threads or make the nut and bolt harder to remove later.
With some suspension designs, excessive clamping force can deform mounting parts. The risk is greater when a person uses a powerful impact wrench without checking the final torque.
- ✦ Bolt stretch
Excess torque can take a fastener beyond its intended elastic range.
- ✦ Thread damage
Overtightening can strip or distort threads.
- ✦ Broken fastener
A severely overloaded bolt can fail during installation or later use.
Should Control Arm Bolts Be Tightened at Ride Height?
This is one of the most important parts of control arm installation. On many vehicles with bonded rubber pivot bushings, the final tightening should occur with the suspension at or near normal ride height. Always confirm the procedure for your vehicle.
A bonded rubber bushing does not always rotate freely around its inner sleeve. Instead, the rubber twists as the suspension moves. If you lock the inner sleeve in place while the control arm hangs far below its normal position, the rubber may already be twisted when the car returns to the ground.
That constant twist can place extra stress on the bushing. The result may be shortened bushing life, altered ride height, or a suspension that does not settle naturally.
So when someone asks how tight should control arm bolts be, the answer also needs to cover when the final torque should be applied. Correct torque at the wrong suspension position can still create a problem.

- ✦ Support the suspension safely
Use an approved method to place the suspension close to its normal loaded position before final tightening when required.
- ✦ Do not rely on the hanging position
A fully extended suspension may place bonded bushings far from their normal resting angle.
- ✦ Follow model-specific procedures
Some designs use free-rotating bushings or different mounting methods and may not require the same process.
Why Bonded Rubber Bushings Need Special Care
Many rubber control arm bushings have an inner metal sleeve bonded to rubber. Once the bolt clamps that sleeve, suspension movement twists the rubber instead of letting the sleeve spin freely.
The goal is to clamp the sleeve near the suspension’s normal resting position. This leaves the bushing with a more balanced range of movement in both directions.
- ✦ Less static twist
Proper suspension position helps keep the rubber closer to its neutral position.
- ✦ Better bushing life
Reducing constant preload may help prevent early cracking or separation.
How to Simulate Normal Ride Height
Professional repair procedures may call for the vehicle to sit on a drive-on lift, alignment rack, or other setup that keeps the suspension loaded. In some repairs, a technician carefully supports the control arm or suspension with proper equipment until it reaches its normal position.
Never place yourself under a vehicle that is supported in an unsafe way. Suspension components can store force, so use rated lifting equipment and follow proper service procedures.
- ✦ Drive-on lift
This keeps the vehicle weight on the suspension while allowing access underneath.
- ✦ Alignment rack
An alignment rack can keep the vehicle at normal ride height during final checks.
- ✦ Controlled suspension support
Where approved, the suspension can be carefully raised to its specified position before final torque.
How to Find the Correct Control Arm Bolt Torque
The best way to answer how tight should control arm bolts be for your car is to identify the exact fastener and look up its factory specification. Start with the year, make, model, engine, drivetrain, and suspension type.
Then identify whether you are working on the front or rear suspension and the upper or lower control arm. A control arm can also have more than one inner pivot bolt, and those bolts may not always use the same procedure.
Factory service information is the preferred source because it can provide both the torque value and the installation sequence. It may also tell you whether to replace the hardware, tighten at ride height, use a torque angle gauge, or perform an alignment afterward.
Do not guess from a similar-looking vehicle. Small changes in suspension design or fastener material can result in a different specification.

- ✦ Factory service manual
This is usually the strongest source for exact torque and installation instructions.
- ✦ Manufacturer repair information
OEM procedures may list special fastener replacement or torque-angle requirements.
- ✦ Professional repair database
A reputable vehicle-specific repair database can provide specifications when factory manuals are not easy to access.
- ✦ Control arm manufacturer
Aftermarket instructions can matter when the replacement part uses hardware or procedures that differ from stock.
Information You Need Before Looking Up Torque
A torque search is much more reliable when you know exactly which fastener you are dealing with. Saying only lower control arm bolt may not be enough because one arm can have several mounting points.
- ✦ Vehicle year
Suspension hardware can change between model years.
- ✦ Make and model
Torque specifications are vehicle-specific.
- ✦ Drivetrain
Two-wheel-drive and four-wheel-drive versions may use different suspension components.
- ✦ Bolt position
Identify front or rear, upper or lower, and inner or outer mounting points.
Control Arm Pivot Bolts vs Ball Joint Fasteners
Not every fastener attached to a control arm serves the same purpose. An inner control arm pivot bolt usually secures the bushing sleeve to the chassis or subframe. A ball joint fastener connects a different type of joint and may use a separate torque specification.
This distinction matters because people often search how tight should control arm bolts be after replacing a complete control arm. A complete arm may require tightening several different fasteners, each with its own specification.
You may have inner pivot bolts, a ball joint stud nut, ball joint mounting bolts, sway bar link hardware, and alignment cam hardware in the same repair area. Never assume they all use the same torque.

- ✦ Inner pivot bolt
Clamps the control arm bushing sleeve at the body, frame, or subframe.
- ✦ Ball joint stud nut
Secures the tapered ball joint stud to the steering knuckle on many designs.
- ✦ Ball joint mounting bolts
Some ball joints bolt directly to the control arm and use their own specifications.
- ✦ Alignment cam bolt
May both secure the control arm and provide camber or caster adjustment.
Do Alignment Cam Bolts Need Special Attention?
Yes. Cam bolts and eccentric washers can affect wheel alignment as well as hold the control arm in place. Their position should be noted during removal when the repair procedure calls for it.
A wheel alignment is often wise after control arm replacement or after moving alignment adjustment hardware. Proper torque helps keep the adjustment from shifting.
- ✦ Mark the original position
Reference marks can help with reassembly, but they do not replace a proper alignment check.
- ✦ Torque after adjustment
The fastener needs the specified final clamping force once the alignment position is set.
Torque-to-Yield and Torque-Plus-Angle Control Arm Bolts
Some suspension fasteners are not tightened with one simple torque number. The repair procedure may specify an initial torque followed by an additional number of degrees of rotation. This is known as a torque-plus-angle method.
Some bolts tightened this way are designed for one-time use. They may stretch as part of the tightening process. Reusing a bolt that the manufacturer says to replace can change the final clamping force.
This is another reason a universal answer to how tight should control arm bolts be does not work. A specification such as an initial torque plus a defined angle must be followed as written rather than converted into a guessed final torque.

- ✦ Initial torque
The fastener is first tightened to the listed torque value.
- ✦ Angle stage
The bolt or nut is then turned through a specified number of degrees.
- ✦ New hardware when required
Do not reuse single-use bolts or nuts when the repair procedure says to replace them.
How to Recognize a Torque-Plus-Angle Specification
A service procedure may show a torque value followed by instructions such as tighten an additional number of degrees. That means a torque wrench alone may not be enough for the full procedure.
Use an angle gauge or an approved electronic torque wrench with angle measurement when required. Follow each tightening stage in order.
- ✦ Read the complete specification
Do not stop after the initial torque if an angle stage follows.
- ✦ Use the right measuring tool
A torque-angle procedure needs a reliable way to measure bolt rotation.
How to Tighten Control Arm Bolts Correctly
Once you know how tight should control arm bolts be for your vehicle, the next step is applying that specification correctly. Good preparation matters because dirt, damaged threads, incorrect hardware, or the wrong tool can affect the result.
Install the control arm and start fasteners by hand whenever possible. This reduces the risk of cross-threading. Keep pivot bolts loose enough for assembly and suspension positioning unless the manufacturer directs you to tighten them earlier.
If bonded rubber bushings require loaded tightening, place the suspension in its specified normal position before applying final torque. Then use a suitable torque wrench within its proper working range.
After the suspension work is complete, inspect the area before driving. Make sure all related fasteners, brake hose brackets, wheel speed sensor wires, and other parts disturbed during the repair are correctly installed.

- ✦ Confirm the specification
Know the exact torque and tightening method before applying final force.
- ✦ Inspect the hardware
Replace damaged, stretched, rusty, or single-use fasteners as required.
- ✦ Start threads carefully
Hand-start fasteners to reduce cross-threading risk.
- ✦ Set suspension position
Load bonded rubber bushings to the required ride-height position before final tightening.
- ✦ Use a torque wrench
Apply the specified torque smoothly with a properly sized tool.
- ✦ Complete angle stages
Use an angle gauge when the manufacturer specifies additional rotation.
- ✦ Check alignment
Consider or perform a wheel alignment when control arm replacement affects suspension geometry.
Should You Use an Impact Wrench for Final Tightening?
An impact wrench can be useful for removing stubborn suspension bolts or running hardware down during assembly when the repair procedure allows it. It should not replace measured final tightening.
Impact tools can apply force very quickly and may exceed the target torque before you realize it. Use a torque wrench for the final specification unless the manufacturer gives a different approved method.
- ✦ Impact for speed
It may help with removal or preliminary assembly when used correctly.
- ✦ Torque wrench for accuracy
Use measured final torque rather than relying on impact wrench settings or feel.
Should Control Arm Bolt Threads Be Lubricated?
Do not add oil, grease, or anti-seize unless the service information calls for it. Lubrication changes friction and can increase bolt tension at the same torque setting.
A torque value intended for clean, dry threads should be applied under those conditions. If the manufacturer specifies a lubricant, thread locker, or other compound, use the stated product and procedure.
- ✦ Dry specification
Keep threads clean and dry when the torque value assumes dry installation.
- ✦ Specified lubricant
Use lubrication only when the repair instructions require it.
Common Mistakes When Tightening Control Arm Bolts
Many control arm problems after replacement come from installation details rather than the new part itself. The most common mistake is using feel instead of a verified torque specification.
Another frequent error is applying final torque to bonded rubber pivot bushings while the suspension is hanging. The bolt may be technically tight, but the bushing can remain twisted once the vehicle sits back on its wheels.
Using old one-time-use hardware is another avoidable problem. So is lubricating threads without checking whether the specification assumes dry fasteners.
When deciding how tight should control arm bolts be, think about the complete procedure. Torque value, hardware condition, suspension position, thread condition, and tightening sequence all matter.
- ✦ Guessing torque
A bolt that feels tight is not proof that it has the correct clamping force.
- ✦ Tightening bushings while hanging
This can preload bonded rubber bushings on many suspension designs.
- ✦ Reusing single-use bolts
Previously stretched hardware may not provide the intended clamp load.
- ✦ Adding unapproved lubricant
Reduced thread friction can change bolt tension and lead to overclamping.
- ✦ Skipping alignment
Control arm work can affect camber, caster, or toe depending on the suspension design.
- ✦ Using the wrong specification
A torque value from another model or bolt position may not apply.
A Practical Lesson From Suspension Work
One useful habit in suspension work is to identify every fastener before taking the vehicle apart. Record which bolts control alignment, which fasteners are single-use, and which bushings need loaded final tightening.
This prevents a common situation where the new control arm is already installed but the technician still does not know the correct tightening sequence. Preparation makes the repair safer and reduces the chance of having to loosen and retighten parts later.
- ✦ Plan before removal
Gather torque data and replacement hardware before starting the job.
- ✦ Mark adjustable hardware
Reference the original cam positions when appropriate, then verify alignment afterward.
Signs a Control Arm Bolt May Not Be Tightened Correctly
If a suspension problem starts soon after control arm replacement, check the installation carefully. A new clunk, alignment shift, or unusual handling can point to a loose fastener, although several other suspension faults can cause similar symptoms.
Do not keep driving a vehicle that has obvious movement at a control arm mounting point. The control arm plays a major role in wheel position and suspension geometry.
A qualified technician can inspect the fasteners, mounting holes, bushings, ball joints, alignment hardware, and surrounding suspension parts. If a bolt has been loose for some time, simply tightening it may not repair damage already caused to the mounting area.
- ✦ Clunk after repair
A new knock over bumps or during braking can justify checking suspension fasteners.
- ✦ Steering pull
A shifted control arm mounting point can change alignment.
- ✦ Uneven steering feel
Unexpected wandering or instability should be inspected promptly.
- ✦ Visible bolt movement
Any obvious movement at a control arm mounting bolt needs immediate attention.
- ✦ Alignment changes
A steering wheel that becomes off-center after suspension repair may indicate an alignment issue.
Should You Retorque Control Arm Bolts Later?
Do not automatically loosen and retorque suspension bolts unless the manufacturer or part supplier calls for a recheck. Some fasteners, especially torque-to-yield types, should not be loosened and reused casually.
If the repair instructions specify a follow-up inspection or torque check, follow that procedure. If you suspect a bolt has loosened, identify why before simply tightening it again.
- ✦ Follow service instructions
Use a scheduled retorque only when the manufacturer calls for one.
- ✦ Investigate loose hardware
A fastener that loosens may point to damaged threads, incorrect hardware, mounting damage, or an installation problem.
Do You Need a Wheel Alignment After Tightening Control Arm Bolts?
A wheel alignment is often recommended after control arm replacement, especially when the repair changes or disturbs camber or caster adjustment points. Alignment needs vary by suspension design.
Some control arms mount with eccentric cam bolts that directly change alignment when rotated. Even when there is no obvious adjustment at the arm, replacing worn bushings or a bent control arm can change the wheel’s position.
Proper bolt torque is important because an alignment setting cannot stay reliable if the control arm hardware is loose. Complete the mechanical installation correctly before the final alignment.
If you replaced a control arm and the steering wheel is no longer centered, the vehicle pulls, or tire angles look different, have the alignment checked before putting many miles on the tires.
- ✦ Cam bolts were moved
Alignment should be checked because their position can directly affect camber or caster.
- ✦ Control arm was replaced
New bushings and geometry can change wheel position compared with worn parts.
- ✦ Vehicle pulls
A pull after suspension work is a good reason to inspect and measure alignment.
- ✦ Steering wheel is off-center
An off-center wheel can indicate that alignment needs correction.
Torque the Suspension Before the Alignment
All required control arm fasteners should be correctly installed and tightened before final alignment measurements are set. Otherwise, suspension movement can change the readings after the vehicle leaves the rack.
If bonded bushings require normal ride-height tightening, complete that step according to the repair procedure before treating the alignment as finished.
- ✦ Secure first
The suspension must be mechanically stable before alignment settings can be trusted.
- ✦ Align second
Set final wheel angles after the control arm and related hardware are installed correctly.
Can You Tighten Control Arm Bolts Without a Torque Wrench?
You may be physically able to tighten the bolts without a torque wrench, but that does not mean you can verify the correct clamping force. For an important suspension joint, guessing by feel is a poor substitute for measured torque.
Experienced mechanics can often sense whether a fastener feels unusually loose or tight, but human feel is not a reliable torque measurement. Long breaker bars and impact tools can also make it very easy to exceed the required torque.
If you are doing this repair at home, use a quality torque wrench that covers the required range. For torque-plus-angle specifications, you may also need an angle gauge.
If the correct tools or specifications are unavailable, having a professional finish the tightening is safer than guessing how tight should control arm bolts be.
- ✦ Use the right torque range
Choose a torque wrench designed to measure the required value accurately.
- ✦ Use an angle gauge when needed
Torque-plus-angle bolts require rotation measurement after the initial torque.
- ✦ Avoid guessing
Suspension fasteners are too important to tighten solely by feel.
Torque Wrench Tips for Better Results
Use the correct socket and keep the torque wrench as straight as practical on the fastener. Apply force smoothly rather than jerking the handle.
For a click-type wrench, stop when the wrench gives the proper signal. Do not keep pulling through repeated clicks to make the bolt extra tight.
- ✦ Smooth pull
Steady force helps produce a more consistent torque reading.
- ✦ Correct socket
Use a properly fitting socket to reduce the risk of slipping or damaging the fastener.
- ✦ Stop at the setting
Do not add extra torque after reaching the specified value.






