How to Replace Front Upper Control Arm Jeep Grand Cherokee
Learning **how to replace front upper control arm Jeep Grand cherokee** can save a skilled DIY owner a large part of the labor cost of suspension repair. The basic job is straightforward, but access can be tight. Rust, seized bolts, and differences between Jeep generations can make the work harder.
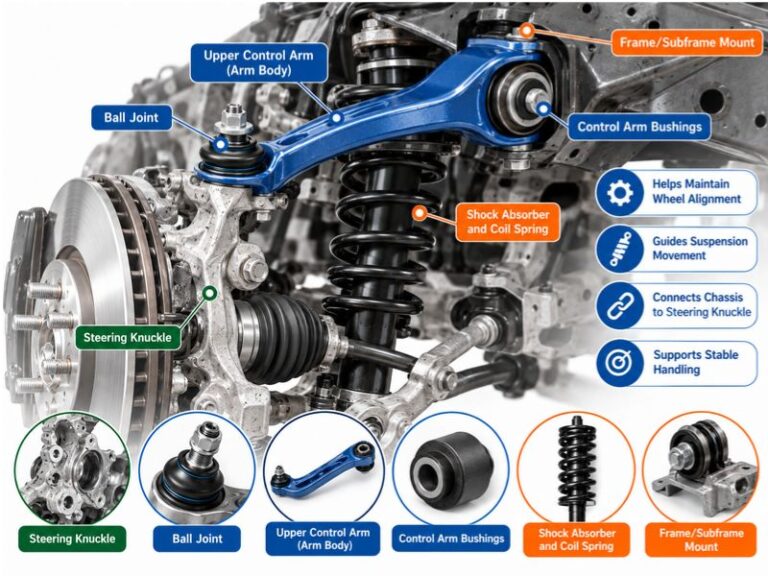
The upper control arm helps hold the steering knuckle in the correct position as the suspension moves. Many replacement arms include new bushings and an upper ball joint. This can make a complete arm replacement easier than pressing individual worn parts in and out.
The exact procedure changes with the model year. A 1999-2004 WJ does not use the same front suspension design as every later Grand Cherokee. Before starting, confirm that your replacement arm matches the year, drivetrain, suspension package, and left or right side of your Jeep.
This guide explains **how to replace front upper control arm Jeep Grand Cherokee** using a general shop-style process that applies to many models. It also covers tools, safety, ball joint separation, bolt installation, final tightening, alignment, and common mistakes.

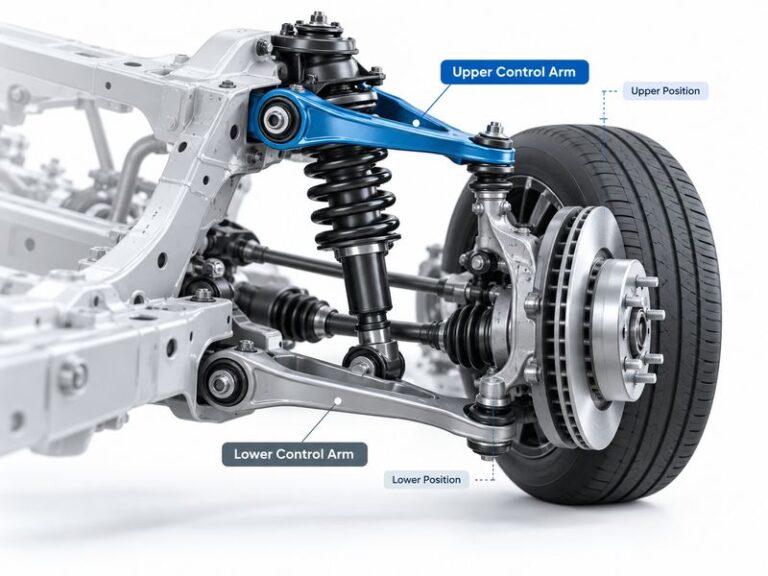
What the Front Upper Control Arm Does
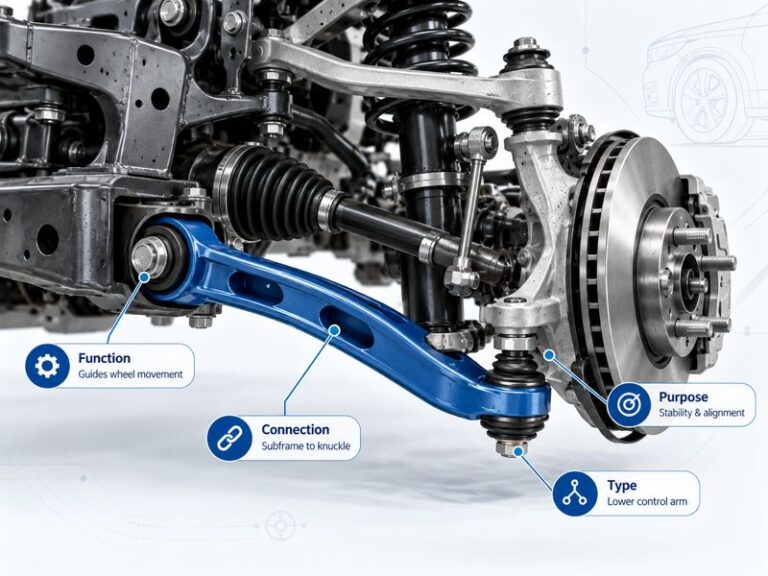
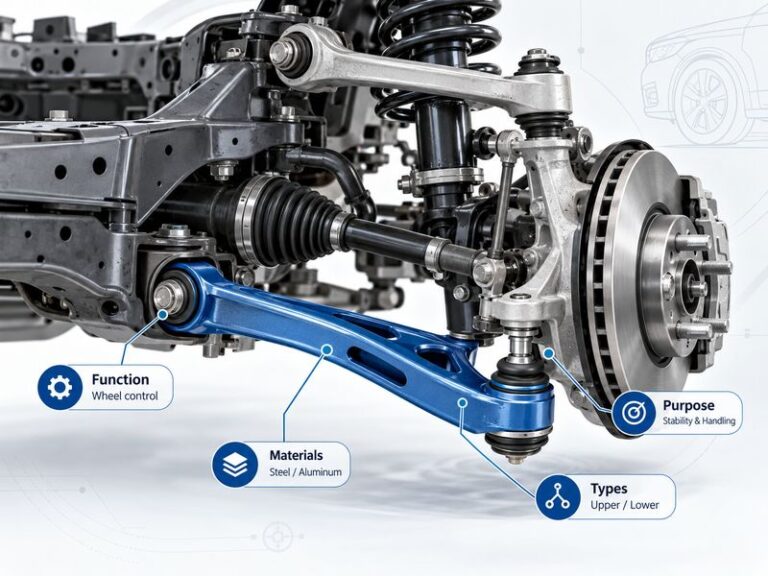
The front upper control arm is part of the suspension system. It connects the vehicle body or subframe area to the upper part of the steering knuckle. Bushings at the inner mounts let the arm move as the suspension travels.
At the outer end, the arm normally connects to the steering knuckle through an upper ball joint. The ball joint lets the wheel steer while still allowing the suspension to move up and down.
A worn arm can affect steering feel and tire contact. Bad bushings can let the arm shift. A loose ball joint can allow unwanted movement at the steering knuckle.
Understanding these parts makes **how to replace front upper control arm Jeep Grand Cherokee** much easier because you can see why both the inner bolts and outer ball joint must be handled correctly.

- ✦ Inner bushings
These isolate vibration and allow controlled suspension movement.
- ✦ Upper ball joint
This connects the outer end of the arm to the steering knuckle.
- ✦ Mounting bolts
These hold the control arm to the body or suspension mounting points.
- ✦ Steering knuckle
This supports the wheel hub and moves when you steer.
Signs Your Jeep Grand Cherokee Upper Control Arm May Need Replacement
Do not replace a control arm based on noise alone. Several front suspension parts can make similar sounds. Check the ball joint, control arm bushings, tie rods, sway bar links, wheel bearing, and lower suspension parts.
A worn upper control arm may cause a clunk when driving over bumps. Steering can also feel loose or less stable. Uneven tire wear may appear when suspension movement changes alignment.
Inspect the bushings for major cracking, separation, or excess movement. Check the upper ball joint for looseness according to the correct inspection method for your model. A torn boot also deserves attention because water and dirt can enter the joint.
- ✦ Clunking
You may hear a knock or clunk over bumps or during braking.
- ✦ Loose steering feel
The Jeep may feel less precise or may need more steering correction.
- ✦ Uneven tire wear
Suspension play can alter wheel alignment and tire contact.
- ✦ Damaged bushings
Rubber may crack, split, or pull away from its sleeve.
- ✦ Ball joint play
Excess movement at the upper joint may mean replacement is needed.
Should You Replace the Whole Upper Control Arm?
A complete control arm can be a practical choice when both the bushings and ball joint are old. Many aftermarket assemblies arrive with these wear parts already installed. That reduces the need for a press and can simplify the repair.
If only one serviceable part is worn, individual replacement may be possible on some Jeep generations. Compare part cost, labor, corrosion, and the condition of the whole arm before choosing.
Tools and Parts You May Need
Gather your tools before lifting the Jeep. This reduces the chance that you will leave the vehicle partly disassembled while looking for a socket or puller.
Socket sizes vary by Jeep Grand Cherokee generation. Do not buy tools from a generic size list without checking the fasteners on your vehicle.
A torque wrench is important. Suspension bolts and ball joint fasteners are safety-critical parts. Tightening them by feel is not a good substitute for the proper specification.
- ✦ Replacement upper control arm
Use the correct side and part number for your Jeep.
- ✦ Floor jack
Use one rated for the weight of the vehicle.
- ✦ Jack stands
Support the Jeep on stable, rated stands before working.
- ✦ Wheel chocks
Keep the vehicle from rolling while it is raised.
- ✦ Socket and wrench set
You will need tools that fit the wheel, control arm, and ball joint hardware.
- ✦ Breaker bar
This helps loosen tight or rusted suspension bolts.
- ✦ Torque wrench
Use it for final tightening to the correct specifications.
- ✦ Ball joint separator
A suitable separator can release the tapered joint from the knuckle.
- ✦ Penetrating oil
This can help with rusted hardware.
- ✦ Safety glasses and gloves
They help protect against rust, dirt, and slipping tools.
Prepare the Jeep Safely Before Starting
Safety is the first step when learning **how to replace front upper control arm Jeep Grand Cherokee**. Park on hard, level ground. Set the parking brake and place wheel chocks around wheels that will stay on the ground.
Loosen the front wheel lug nuts slightly before lifting the Jeep. Raise the vehicle at an approved lifting point. Place rated jack stands under the correct support points and lower the Jeep onto them.
Give the vehicle a gentle stability check before removing the wheel. Never place any part of your body under a Jeep that is supported only by a hydraulic jack.

- ✦ Level surface
Do not perform suspension work on soft dirt or a steep driveway.
- ✦ Stable support
Use rated jack stands on solid support points.
- ✦ Wheel removal
Remove the wheel only after the Jeep is stable.
- ✦ Protect brake parts
Do not pull, hang, or place strain on brake hoses and ABS wiring.
How to Replace Front Upper Control Arm Jeep Grand Cherokee Step by Step
The following steps explain the general process for **how to replace front upper control arm Jeep Grand Cherokee**. Your Jeep may have different bolt locations, shields, wiring clips, or access limits. Check model-specific service information before removing parts.
Take photos before disassembly if this is your first time doing the job. Photos can help you confirm bolt direction, wire routing, and control arm position during installation.

Step 1: Remove the Front Wheel
Finish removing the loosened lug nuts and take off the wheel. Set it flat in a safe place. You should now have a clear view of the steering knuckle and upper control arm.
Step 2: Inspect the Work Area
Locate the inner upper control arm mounting points and the outer ball joint connection. Look for ABS wiring, brake hoses, brackets, and other parts near your planned tool path.
Compare the new arm with the old one before removal. Check its shape, bolt locations, ball joint position, and left or right orientation.
Step 3: Support the Steering Knuckle if Needed
Use a jack or suitable support to control the knuckle and suspension assembly where needed. Do not lift the vehicle off its jack stands.
The goal is to prevent the knuckle from dropping or pulling on a brake hose when the upper ball joint is disconnected.
Step 4: Remove the Upper Ball Joint Fastener
Remove the nut or other retaining hardware that secures the upper ball joint to the steering knuckle. The exact fastener design varies by model year.
If a cotter pin is present, remove it first and replace it with a new one during assembly. Do not reuse damaged locking hardware.
Step 5: Separate the Ball Joint From the Steering Knuckle
Use a proper ball joint separator or the approved separation method for your Jeep. The tapered stud can be very tight even after the nut is removed.
Keep control of the steering knuckle as the joint releases. Avoid striking threaded areas or damaging the new mating surfaces.
- ✦ Protect the brake hose
Do not let the knuckle fall outward and pull on the hose.
- ✦ Protect ABS wiring
Make sure sensor wiring does not stretch or become trapped.
- ✦ Use the correct separator
A suitable tool reduces the risk of damaging nearby parts.
Step 6: Remove the Inner Upper Control Arm Bolts
Loosen and remove the bolts that hold the inner control arm bushings to their mounting points. Access may be limited, so a combination of sockets, extensions, and wrenches may help.
Note which direction each bolt faces. If alignment hardware, eccentric washers, or special spacers are present, record their original position before removal.
Step 7: Remove the Old Control Arm
Work the old control arm out of its mounting area. Avoid forcing it against brake lines, wiring, or other suspension parts.
Once removed, compare the old arm with the replacement again. A visible difference in mounting width, ball joint angle, or arm shape may mean you have the wrong part.
Step 8: Position the New Upper Control Arm
Place the new control arm into the mounting brackets. Install the inner bolts by hand first. Do not force a bolt through a bushing that is not lined up.
Leave the inner pivot bolts loose enough for the arm to move unless the service procedure for your exact Jeep says otherwise. Final bushing tightening may need to happen at normal ride height.
Step 9: Connect the Upper Ball Joint
Guide the new ball joint stud into the steering knuckle. Start the retaining nut by hand so the threads do not cross.
Tighten the joint using the correct procedure and torque specification for your Jeep. Install any required new cotter pin or locking hardware.
Step 10: Tighten the Control Arm Pivot Bolts
Rubber suspension bushings can be damaged if their pivot bolts are fully tightened while the suspension hangs at full droop. Many designs require final tightening with the suspension near normal ride height.
Use a suitable method to place the suspension at its normal loaded position if required by the service procedure. Then torque the pivot fasteners to the specification for your exact model.
Step 11: Reinstall the Wheel
Reinstall the wheel and start each lug nut by hand. Lower the Jeep safely. Tighten the lug nuts in the proper pattern to the correct wheel torque specification.
Never rely on an impact wrench alone for final lug nut torque.
Why Ride-Height Tightening Matters
This is one of the most important details in **how to replace front upper control arm Jeep Grand Cherokee**. Many control arm bushings use bonded rubber. The inner sleeve stays fixed while the rubber twists as the suspension moves.
If you fully tighten the pivot bolts while the suspension hangs down, the rubber may already be twisted when the Jeep returns to normal height. That can place extra stress on the bushing.
The correct method depends on the suspension design. Follow the repair procedure for your exact year. If ride-height tightening is specified, support the suspension so it sits close to its normal position before applying final torque.
- ✦ Less bushing preload
Correct tightening helps the rubber rest near its designed position.
- ✦ Better service life
Reducing constant twist may help prevent early bushing damage.
- ✦ Correct suspension movement
The arm can move through its normal range without excess rubber tension.
Torque Specifications: Why You Should Verify Them by Model Year
Do not use a single online torque number for every Grand Cherokee. Jeep has used several generations, suspension designs, fastener sizes, and control arm layouts.
The torque for an upper ball joint connection may differ from the torque for the inner control arm bolts. Wheel lug torque is another separate specification.
Use the factory service information, a trusted repair manual, or instructions from the part maker when they are specific to your vehicle. Match the specification to the model year, suspension configuration, and fastener location.
This approach is safer than guessing while following a generic **how to replace front upper control arm Jeep Grand Cherokee** guide.
- ✦ Verify the model year
A WJ, WK, WK2, and newer Grand Cherokee may use different hardware.
- ✦ Identify each fastener
Inner pivot bolts, ball joint hardware, and wheel lugs have different jobs.
- ✦ Use a calibrated torque wrench
Apply the specified torque instead of estimating by feel.
Common Problems You May Face During Replacement
Real suspension work is often harder than a clean step-by-step guide makes it look. Road salt can seize bolts in many parts of the United States. Dirt and corrosion can also make tapered ball joint connections difficult to release.
Do not turn a difficult bolt into a damaged bolt by using the wrong socket or poor tool angle. Clean exposed threads, use penetrating oil when appropriate, and give it time to work.

- ✦ Seized inner bolts
Rust can lock the bolt to the bushing sleeve or mounting point.
- ✦ Ball joint will not release
Use a proper separator rather than unsafe force on nearby suspension parts.
- ✦ Limited wrench space
Some mounting points have little room for a socket or long breaker bar.
- ✦ Wrong replacement arm
Compare the old and new parts before completing installation.
- ✦ Ball joint stud spins
The tapered stud may need to seat in the knuckle before the nut can tighten.
- ✦ Damaged mounting hardware
Replace badly corroded, stretched, or damaged hardware with the correct type.
What if the Ball Joint Stud Spins?
A tapered ball joint stud may spin if it has not seated firmly in the knuckle. Applying controlled upward pressure to seat the taper may help while the nut is started.
Do not damage the joint boot or use unsafe pressure points. Some replacement joints also provide a way to hold the stud while tightening.
What if a Bolt Is Seized Inside the Bushing?
This can turn a normal DIY repair into a difficult job. Penetrating oil and controlled force may help, but severe corrosion can require cutting tools or professional equipment.
Stop if the repair begins to risk damage to the mounting bracket, brake lines, wiring, or nearby structural parts.
Should You Replace Both Front Upper Control Arms?
You do not always have to replace both sides at the same time. If one arm was damaged by an impact and the other side is in good condition, replacing only the damaged arm can be reasonable.
On an older Jeep with similar mileage on both sides, inspect the opposite control arm closely. Bushings and ball joints on both sides have lived through similar heat, road conditions, and suspension cycles.
Replacing both sides at once can make sense when both show wear. It can also reduce the chance of paying for another alignment soon after replacing the second side.
- ✦ Replace one side
This can be reasonable when wear or damage is isolated.
- ✦ Replace both sides
Consider this when both arms show similar age, cracking, or joint wear.
- ✦ Inspect before deciding
Condition matters more than replacing parts only because they are paired.
Do You Need a Wheel Alignment After Replacing an Upper Control Arm?
An alignment check is strongly recommended after this repair. The upper control arm affects the position of the steering knuckle. Small changes in bushing position or arm geometry can change alignment.
Camber and caster can be affected depending on the suspension design. Toe may also need correction after suspension work.
Schedule an alignment if the steering wheel is off-center, the Jeep pulls, or the tires show uneven wear. Even if it drives normally, checking alignment helps protect the tires and confirms that suspension geometry is within specification.
For a complete **how to replace front upper control arm Jeep Grand Cherokee** repair, the job should not end until the vehicle has been checked for proper handling and alignment.

- ✦ Protect tire life
Bad alignment can wear expensive tires quickly.
- ✦ Restore steering feel
Correct alignment helps the Jeep track straight.
- ✦ Confirm suspension geometry
An alignment check can reveal an issue that is not easy to see by eye.
Checks to Make Before Driving
Do a full visual inspection after finishing **how to replace front upper control arm Jeep Grand Cherokee**. Make sure each fastener you removed has been installed and tightened correctly.
Check that the ball joint boot is not torn or pinched. Look at the ABS wire and brake hose to make sure neither one is stretched, twisted, trapped, or rubbing against the new arm.
Turn the steering wheel from side to side while the vehicle is safely positioned. Watch for contact between the new control arm and nearby parts.
Start with a slow test drive. Listen for clunks and note steering behavior. Stop and inspect the repair if anything feels loose, unstable, or unusual.
- ✦ Check all fasteners
Confirm that every nut and bolt is present and properly tightened.
- ✦ Inspect the ball joint boot
Make sure the boot is seated and free from damage.
- ✦ Check brake hoses
Verify that steering movement does not stretch or pinch a hose.
- ✦ Inspect ABS wiring
Make sure the wire is clipped into its normal route.
- ✦ Check tire clearance
Verify that nothing contacts the wheel or tire through steering movement.
- ✦ Plan an alignment
Have suspension geometry checked after the repair.
Common Mistakes to Avoid
Small mistakes can shorten the life of a new control arm or create a safety issue. Take your time and verify each step instead of rushing to finish.
One frequent mistake is assuming that every Jeep Grand Cherokee uses the same procedure. Another is tightening suspension hardware without checking the proper torque or bushing position.
- ✦ Working under a jack
Always use properly placed jack stands.
- ✦ Using random torque values
Verify specifications for your exact model.
- ✦ Overstretching the brake hose
Support the steering knuckle when the ball joint is disconnected.
- ✦ Damaging the ball joint boot
Keep separator tools away from the new rubber boot.
- ✦ Tightening bushings at full droop
Follow the specified ride-height tightening procedure when required.
- ✦ Skipping alignment
Suspension replacement can alter wheel geometry.
- ✦ Installing the wrong side
Some upper control arms are side-specific.
DIY or Professional Repair?
A capable home mechanic can often handle **how to replace front upper control arm Jeep Grand Cherokee** with basic suspension tools. The job becomes harder when bolts are badly rusted or access is poor.
You should also be comfortable lifting a heavy SUV safely and working with steering and suspension parts. A mistake in this area can affect vehicle control.
Professional help makes sense if mounting hardware is seized, a bracket is damaged, you do not have safe lifting equipment, or you are unsure about the ball joint connection.
Using a repair shop for the difficult part does not mean the whole DIY attempt failed. Suspension repairs are a poor place to take risks simply to finish the job at home.
- ✦ Good DIY candidate
You have safe lifting gear, proper tools, mechanical experience, and model-specific specifications.
- ✦ Consider a shop
Bolts are seized, mounting points are damaged, or you cannot safely support the vehicle.