
How to Get Lower Control Arm Bolt Out: Step-by-Step Guide
Learning how to get lower control arm bolt out can look simple until rust enters the picture. On many cars and trucks in the U.S., years of water, road salt, dirt, and corrosion can lock the bolt to the inner bushing sleeve. The nut may come off while the bolt refuses to move even one inch.
The key is to find out what is holding the bolt. A rusty thread needs a different fix than a bolt that has rusted to the steel sleeve inside the bushing. I have found that using more force too early often rounds the bolt head, damages the mounting bracket, or makes the repair much harder.
This guide explains how to get lower control arm bolt out using a safe step-by-step process. You will learn when to use penetrating oil, a breaker bar, an impact wrench, a hammer, heat, an air hammer, or a cutting tool. You will also learn what to do when the bolt spins but will not slide out.
Suspension work can involve heavy parts and stored spring force. Support the vehicle with rated jack stands on solid ground, never work under a vehicle held only by a floor jack, and check the repair procedure for your exact vehicle before releasing any control arm that supports a coil spring.

Why Is the Lower Control Arm Bolt So Hard to Remove?
Before deciding how to get lower control arm bolt out, figure out why it is stuck. The lower control arm sits low on the vehicle. That puts its hardware in the path of water, road grime, and winter salt.
Rust can form on the threads, under the bolt head, inside the mounting bracket, or between the bolt and the metal sleeve in the rubber bushing. Each type of corrosion creates a different problem.
The hardest case is usually a bolt rusted to the bushing sleeve. The bolt and sleeve can act like one solid piece. You may be able to turn the bolt while still being unable to pull or hammer it out.
Suspension load can also trap the bolt. If the control arm is pushing against the bolt, the bolt may bind in its holes even when there is little rust.

- ✦ Rust on the threads
The nut may be very hard to turn or may stop partway off.
- ✦ Bolt seized to the bushing sleeve
The bolt may rotate but refuse to slide out of the control arm.
- ✦ Suspension load
The control arm can press against the bolt and make removal difficult.
- ✦ Bent or damaged hardware
A bent bolt may bind inside the bracket even after the nut is removed.
- ✦ Cam bolt corrosion
Alignment cam bolts can seize to washers, sleeves, or mounting surfaces.
How to Tell Whether the Bolt Is Seized in the Bushing
Remove or loosen the nut and try to rotate the bolt. If the bolt turns but does not move outward when tapped, the inner sleeve may be turning with it. Watch the bushing closely while someone rotates the bolt if you can do so safely.
Another clue is rubber twisting around the bolt. That often means the bolt and sleeve have bonded together with rust.
- ✦ Bolt turns but stays in place
This strongly suggests corrosion between the bolt and the inner sleeve.
- ✦ Rubber twists
The seized sleeve may be forcing the entire bushing to move.
- ✦ Hammering has little effect
A solid rust bond inside the sleeve can resist normal hammer blows.
Tools You May Need to Remove a Stuck Control Arm Bolt
You do not need every tool listed below for every repair. Start with simple tools and move to stronger methods only when needed. This lowers the chance of damaging the mounting bracket or nearby parts.
A quality six-point socket matters. Twelve-point sockets can slip more easily on a rusty fastener. If the bolt head is already worn, clean it with a wire brush before fitting the socket.
An impact wrench is useful because its repeated shock can break rust bonds. A long breaker bar gives steady torque, but steady force can also round a weak or badly rusted bolt head if the socket does not fit well.
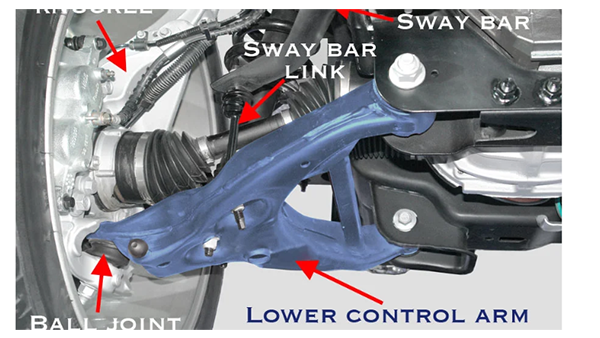
- ✦ Floor jack and jack stands
Use them to raise and safely support the vehicle and to position the control arm.
- ✦ Penetrating oil
Use a product made to creep into rusty fasteners rather than relying only on general-purpose lubricant.
- ✦ Six-point sockets
They grip rusty bolt heads and nuts better than many twelve-point sockets.
- ✦ Breaker bar
A long handle gives added leverage when loosening tight hardware.
- ✦ Impact wrench
Repeated impact can loosen corrosion more effectively than steady force.
- ✦ Hammer and punch
Use them to drive the bolt outward after the nut is removed.
- ✦ Air hammer
It can provide rapid impact when a normal hammer does not move the bolt.
- ✦ Reciprocating saw
A strong metal-cutting blade can cut a bolt that is permanently seized to the bushing sleeve.
What to Have Ready Before You Start
Have the replacement control arm, bushing, bolt, nut, or cam hardware ready if the job may require cutting. Once you cut a seized bolt, the vehicle will usually remain apart until new hardware is installed.
It is also wise to confirm the factory torque values before starting. Suspension bolt torque can vary greatly by vehicle.
- ✦ Replacement hardware
Use the correct size, grade, and design for the vehicle.
- ✦ Service information
Check bolt torque, spring precautions, and alignment instructions for the exact model.
How to Get Lower Control Arm Bolt Out Step by Step
The best way to learn how to get lower control arm bolt out is to work from the least aggressive method to the most aggressive one. Do not begin by cutting unless the bolt is clearly seized beyond normal removal.
Park on a level, solid surface. Set the parking brake and use wheel chocks where appropriate. Raise the vehicle at the specified lift point and place it securely on rated jack stands.
Remove the wheel if it blocks access. Then identify whether the control arm is carrying spring force on your vehicle. Some suspension layouts place a coil spring directly between the lower control arm and body, which requires extra precautions before the arm can be released.

- ✦ Step 1: Clean the hardware
Brush away dirt and loose rust so the socket can fully seat on the nut and bolt.
- ✦ Step 2: Apply penetrating oil
Spray the exposed threads and both sides of the bushing sleeve if accessible.
- ✦ Step 3: Support the control arm
Place a jack under a strong area of the arm and use light pressure to control its position.
- ✦ Step 4: Remove the nut
Use a six-point socket with a breaker bar or impact wrench while holding the bolt head if needed.
- ✦ Step 5: Relieve bolt tension
Move the jack slightly up or down until the bolt appears centered and free of side pressure.
- ✦ Step 6: Rotate the bolt
Turning the bolt can help break corrosion between it and the mounting surfaces.
- ✦ Step 7: Drive the bolt outward
Thread the nut loosely onto the end to protect the threads, then tap it with a hammer before using a punch.
- ✦ Step 8: Escalate carefully
If the bolt remains seized, move to impact, heat, an air hammer, or cutting as described below.
Use the Jack to Find the Bolt’s Neutral Position
This simple step is easy to miss. A control arm can put enough side load on a bolt to make a free bolt feel seized. Small changes in arm height can remove that load.
Apply light upward pressure with the jack, then test the bolt. Raise or lower the arm in small amounts until the bolt turns and slides with less resistance.
- ✦ Do not lift the vehicle off the stand
The jack should position the suspension part, not replace the vehicle’s main support.
Protect the Bolt Threads When Hammering
If you plan to reuse the bolt, avoid striking bare threads. Put the nut back on until it sits near the end of the bolt, then tap the nut and bolt together.
Once the bolt moves inward, remove the nut and use a punch against the center of the bolt. If the threads deform, replace the bolt rather than forcing a damaged fastener back into the suspension.
- ✦ Use controlled blows
Accurate hits work better than wild swings that can damage the bracket.
What to Do When the Lower Control Arm Bolt Is Rusted Solid
If basic tools do not work, the next goal is to break the rust bond. This is where patience matters. Penetrating oil often works better when it gets time to creep into the joint instead of being sprayed moments before maximum force is applied.
Apply penetrating oil where the bolt enters both sides of the bushing sleeve. If possible, let it soak and reapply it. Then rotate the bolt back and forth instead of trying only to turn it in one direction.
Repeated movement can open tiny paths through the corrosion. Once the bolt starts moving, keep adding penetrant while working it back and forth. Do not assume that one full rotation means the bolt is free to slide.
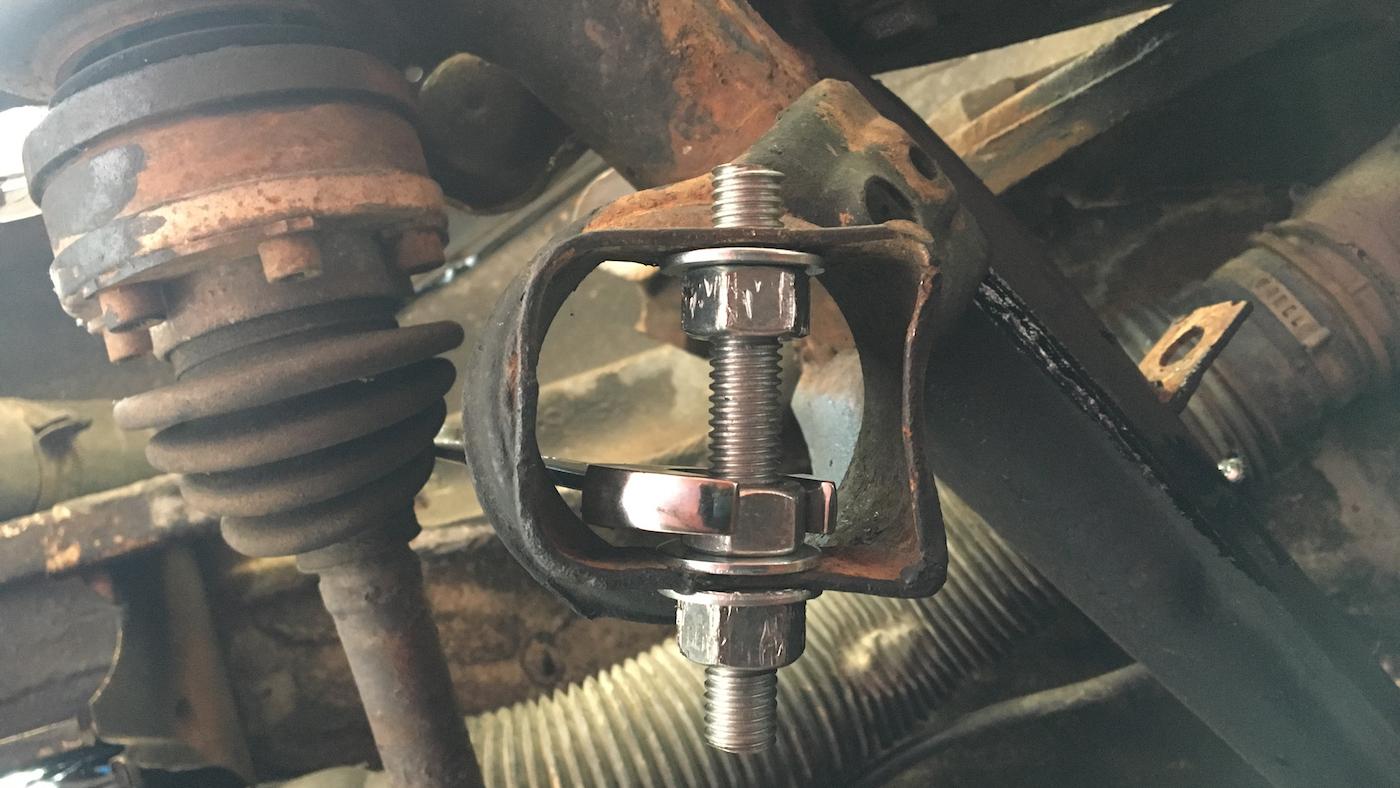
- ✦ Wire-brush exposed threads
Removing surface rust can make it easier for the nut to come off.
- ✦ Soak both ends
Penetrant needs access near the sleeve, not just on the exposed nut.
- ✦ Work the bolt both ways
Small back-and-forth movements can break rust more safely than one large pull.
- ✦ Use impact shock
An impact wrench can disturb corrosion that resists steady torque.
Should You Use Heat on a Control Arm Bolt?
Heat can help with a badly rusted fastener, but suspension areas contain rubber, grease, brake hoses, wiring, fuel lines, undercoating, and other materials that can burn or suffer heat damage. Open-flame work also creates a fire risk.
If heat is appropriate for the vehicle, the goal is normally to heat the surrounding metal rather than cook the rubber bushing or nearby parts. Keep a fire extinguisher close and stop if you cannot shield vulnerable components safely.
If you are not experienced with a torch around automotive suspension parts, cutting the bolt with the correct tools or taking the vehicle to a repair shop can be the safer choice.
- ✦ Check nearby parts
Look for brake hoses, fuel lines, wiring, rubber boots, grease, and undercoating before using heat.
- ✦ Expect bushing damage
Strong heat near a rubber bushing can ruin it, so plan for replacement when necessary.
How to Remove a Bolt Seized Inside the Control Arm Bushing
This is the situation that causes many DIY repairs to stall. If you are researching how to get lower control arm bolt out because the bolt spins but will not slide, the bolt may be rusted to the steel inner sleeve of the bushing.
Penetrating oil can help, but it may not reach the middle of a long sleeve. Hammering can also fail because the sleeve absorbs the force. In severe cases, the bolt, sleeve, and corrosion have effectively become one part.
Try rotating the bolt with an impact wrench while applying outward force. If there is safe access, an air hammer on the end of the bolt can add fast, repeated blows. A punch or air-hammer bit should stay centered so it does not damage the mounting bracket.

- ✦ Spin and push
Rotate the bolt while pushing or driving it outward to break the rust bond.
- ✦ Use an air hammer
Rapid impacts can move a bolt that resists ordinary hammer blows.
- ✦ Watch the bushing
If the inner sleeve rotates with the bolt, the sleeve and bolt are likely bonded together.
- ✦ Plan to replace the bushing
A severely seized bolt often means the old bushing will not survive removal.
Why a Spinning Bolt May Still Be Seized
A common mistake is thinking that a rotating bolt must be free. The inner metal sleeve can rotate with the bolt while the outer rubber twists around it. From outside, the bolt seems loose even though it remains locked to the sleeve.
If that happens, stop applying endless rotational force. Excess twisting can tear the bushing without helping the bolt slide out.
- ✦ Look for sleeve movement
Movement of the sleeve with the bolt is a strong sign that corrosion has bonded them.
When You Have to Cut the Lower Control Arm Bolt
Sometimes the practical answer to how to get lower control arm bolt out is to cut it. This is common when the bolt has fused to the inner bushing sleeve and there is no usable path for penetrating oil or impact force.
A reciprocating saw with a quality metal-cutting blade is often used when there is enough room between the control arm bushing and mounting bracket. The bolt is usually cut on one or both sides of the bushing so the control arm can come out.
Cutting requires care. The mounting ears must not be deeply cut or bent. Brake lines, wiring, CV boots, steering parts, and other nearby components must also stay clear of the blade.
Once you cut the bolt, replace it. Do not weld it back together or reinstall damaged hardware in a suspension mounting point.

- ✦ Use the right blade
Choose a blade designed for cutting hardened or heavy metal.
- ✦ Create safe clearance
Make sure the blade cannot contact brake lines, wiring, boots, or the vehicle body.
- ✦ Protect the bracket
Avoid cutting deeply into the control arm mounting ears.
- ✦ Replace the bolt
A cut, bent, stretched, or heavily corroded suspension bolt should not be reused.
Cutting One Side Versus Both Sides
If the bolt is seized through the sleeve, cutting only one side may not release the arm. The remaining bolt section can still trap the sleeve against the other mounting ear.
On many severe cases, technicians cut both sides between the bushing and bracket. The arm can then be removed with the seized center section still trapped in the old bushing.
- ✦ Check clearance first
The available space and suspension design determine where safe cuts can be made.
What to Check After the Bolt Comes Out
Getting the old bolt out is only half the repair. Inspect the mounting holes, bracket, bushing, and replacement parts before reassembly. Heavy corrosion can damage more than the bolt itself.
Look for elongated holes, bent mounting ears, cracks, deep saw marks, and severe rust. A damaged suspension mounting point can affect alignment and vehicle control.
If the old bolt was seized to the bushing sleeve, replacing the bushing or complete control arm is often the sensible repair. Do not install a new bolt through a badly damaged or torn bushing.
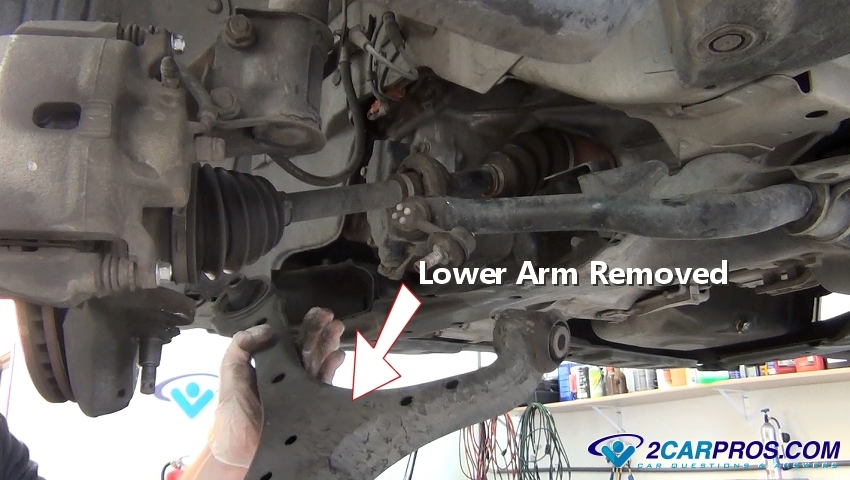
- ✦ Inspect the bracket
Check for bending, cracks, heavy rust, and cutting damage.
- ✦ Inspect the bushing
Replace it if the rubber is torn, separated, burned, or badly distorted.
- ✦ Check the mounting hole
The hole should not be stretched or badly worn.
- ✦ Compare new hardware
Confirm the replacement bolt has the correct diameter, length, grade, and thread.
Should You Lubricate the New Control Arm Bolt?
Do not add grease, oil, or anti-seize to suspension bolt threads unless the vehicle maker or hardware instructions call for it. Lubricated threads can change the relationship between torque and clamping force.
Some technicians protect the smooth shank or exposed areas from corrosion, but the exact method depends on the vehicle and fastener design. Follow the service information for your model.
- ✦ Follow factory guidance
Torque values may assume clean, dry threads unless the procedure says otherwise.
How to Install and Tighten the New Lower Control Arm Bolt
Clean loose rust and dirt from the mounting surfaces before installing the replacement arm or bushing. Slide the correct new bolt through the bracket and bushing without forcing it through a misaligned hole.
Use a jack to move the control arm until the holes line up. Do not use the bolt as a tool to pull severely misaligned suspension parts together because this can damage the threads or bracket.
Many rubber control arm bushings should receive their final torque near normal ride height. Tightening them while the suspension hangs can lock the rubber in a twisted position. Once the vehicle returns to normal height, that twist can shorten bushing life.
The exact procedure varies by suspension design, so follow the service information for your vehicle. Some designs allow the arm to be supported with a jack to simulate ride height while the vehicle remains safely on stands.
- ✦ Use correct hardware
Match the original bolt type and use new one-time-use hardware when required.
- ✦ Align the holes
Move the control arm rather than forcing the bolt through at an angle.
- ✦ Use the specified torque
Do not guess suspension fastener torque.
- ✦ Set bushing position correctly
Final tightening may need to occur at normal ride height.
- ✦ Get an alignment when required
Replacing a control arm or disturbing alignment cam bolts can change wheel alignment.
Why Ride-Height Torque Matters
Many bonded rubber bushings do not rotate freely around the bolt. Instead, the rubber flexes as the suspension moves. If you tighten the bushing with the suspension hanging, normal ride height can leave the rubber under constant twist.
Setting the suspension to the correct position before final torque helps the bushing rest close to its normal neutral position.
- ✦ Do not assume every design is the same
Check the repair procedure for your exact year, make, model, and suspension.
Common Mistakes When Removing a Lower Control Arm Bolt
Knowing how to get lower control arm bolt out is also about knowing what not to do. A simple stuck bolt can turn into damaged suspension hardware when too much force is used in the wrong place.
One common mistake is using a long breaker bar before cleaning the bolt head and fully seating the socket. Another is hammering a bolt that is under heavy side load from the suspension.
The biggest safety mistake is working under a vehicle supported only by a hydraulic jack. A floor jack is useful for lifting and positioning parts, but rated jack stands should support the vehicle.
- ✦ Using the wrong socket
A loose or twelve-point socket can round a rusty fastener more easily.
- ✦ Ignoring side load
A bound control arm can make a removable bolt feel completely seized.
- ✦ Damaging threads with a hammer
Protect reusable threads with the nut or use a suitable punch.
- ✦ Heating without checking surroundings
Heat can damage hoses, wiring, rubber, grease, coatings, and nearby parts.
- ✦ Reusing damaged hardware
Replace cut, bent, stretched, badly rusted, or thread-damaged suspension bolts.
- ✦ Skipping alignment checks
Control arm replacement or movement of cam bolts can alter wheel alignment.
When to Stop the DIY Repair
Stop if you find major mounting-bracket rust, a cracked subframe, badly damaged mounting holes, uncontrolled spring tension, or a fastener that cannot be removed without risking nearby brake or fuel components.
A professional shop may have a vehicle lift, induction heater, air tools, heavy-duty cutting tools, and replacement hardware that can turn a difficult job into a safer repair.
- ✦ Do not gamble with structural damage
Suspension mounting points affect vehicle control and deserve proper inspection and repair.






