
How to Replace Lower Control Arm Chevy Silverado: DIY Guide
Learning how to replace lower control arm Chevy Silverado parts can save a large amount of labor cost, but this is not a repair to rush. The lower control arm carries major suspension loads. It also connects the wheel assembly to the truck’s frame through bushings and a ball joint or related joint connection.
The basic job is simple to describe: raise the Silverado, remove the wheel, support the suspension, disconnect anything attached to the arm, separate the ball joint, remove the control arm mounting bolts, and install the replacement. The hard part is doing each step safely while dealing with heavy suspension parts, rusted bolts, and possible spring or torsion-bar load.
One key point is that Chevrolet has used different front suspension layouts across Silverado generations and configurations. A 1500 two-wheel-drive truck may not come apart the same way as a 4WD truck, 2500HD, 3500HD, or another model year. Use this guide as the overall process, then verify model-specific torque values and suspension procedures before you start.
This guide explains how to replace lower control arm Chevy Silverado assemblies in practical terms. You will learn what tools you need, how to remove the old arm, how to install the new one, what mistakes to avoid, and why an alignment should be part of the job.

What Does the Lower Control Arm Do on a Chevy Silverado?
The lower control arm is a strong suspension link between the frame and the steering knuckle or wheel assembly. Its bushings let the suspension move up and down while keeping the wheel in a controlled path. The ball joint allows the steering knuckle to move as the truck steers and the suspension travels.
On a Silverado, the control arm must handle braking force, cornering load, road impacts, and much of the weight transferred through the front suspension. That is why worn bushings, a loose ball joint, or a bent arm can affect steering feel, tire wear, alignment, and stability.
Many replacement lower control arms come as complete assemblies with new bushings already installed. Some also include a ball joint. This can make replacement easier because you do not have to press old bushings or a separate ball joint in and out of the original arm.
- ✦ Frame connection
Inner bushings and mounting bolts attach the control arm to the Silverado’s frame or suspension crossmember.
- ✦ Wheel connection
The outer part of the arm connects to the steering knuckle through the lower ball joint.
- ✦ Suspension movement
The arm guides wheel travel while helping maintain the correct suspension geometry.
- ✦ Alignment control
Control arm position and bushing condition can affect camber, caster, steering feel, and tire wear.
Signs Your Silverado Lower Control Arm May Need Replacement
Before learning how to replace lower control arm Chevy Silverado parts, make sure the arm or its attached parts are actually worn. A control arm itself may last a long time, but its bushings and ball joint can wear much sooner. Rust damage or an impact can also bend or weaken the arm.
A clunk over bumps is a common warning sign. You may also notice wandering, vague steering, uneven tire wear, vibration, or movement during braking. These symptoms can come from other suspension parts too, so inspect the front end before buying parts.

- ✦ Clunking or knocking
Worn bushings or a loose ball joint may create noise when the suspension moves over bumps.
- ✦ Uneven tire wear
A worn or damaged control arm can allow alignment angles to move out of specification.
- ✦ Loose steering feel
Excess movement at the control arm bushings or ball joint may make the truck feel less precise.
- ✦ Cracked bushings
Large cracks, separation, or obvious movement in the rubber bushings can indicate replacement is due.
- ✦ Ball joint play
A loose lower ball joint can be a serious safety problem and should be diagnosed promptly.
- ✦ Bent or damaged arm
Collision damage, severe pothole hits, and off-road impacts can bend a control arm.
Inspect the Entire Front Suspension First
Do not assume every front-end clunk comes from the lower control arm. Check the upper control arm, tie rods, sway-bar links, wheel bearings, shocks or struts, and related steering parts. Finding all worn parts before the repair can save you from paying for a second alignment soon after.
Tools and Parts Needed to Replace a Silverado Lower Control Arm
The exact socket sizes depend on the truck, but the basic tool list is similar for most Silverado lower control arm jobs. Rust can make the work much harder on trucks from areas that use road salt, so penetrating oil and a breaker bar are often useful.
Use a hydraulic floor jack to lift the truck and properly rated jack stands to support it. Never work under a Silverado that is supported only by a jack. The truck is heavy, and suspension work often requires substantial force.
- ✦ Replacement control arm
Confirm the part matches the correct year, trim, drivetrain, suspension package, and left or right side.
- ✦ Floor jack and jack stands
Use equipment rated for the weight of your Silverado.
- ✦ Socket and wrench set
You will need sizes that fit the control arm bolts, ball joint hardware, wheel lugs, and related fasteners.
- ✦ Breaker bar
Large suspension fasteners may require more leverage than a standard ratchet provides.
- ✦ Torque wrench
Use it during assembly so critical fasteners can be tightened to the specification for your truck.
- ✦ Ball joint separator
A suitable separator can release the tapered ball joint stud from the steering knuckle.
- ✦ Penetrating oil
Apply it ahead of time to rusty mounting hardware when needed.
- ✦ Pry bar
A pry bar can help guide the old arm out and position the replacement arm.
- ✦ Hammer
It may help with stubborn joints, but avoid damaging threads, boots, sensors, or nearby parts.
- ✦ Safety gear
Wear eye protection and gloves, especially when working around rust, dirt, and loaded suspension parts.
Check Whether the New Arm Includes a Ball Joint
Some Silverado lower control arm assemblies arrive with bushings and a ball joint already installed. Others do not. Check the new part before dismantling the truck so you know whether additional hardware or a ball joint is required.
Safety Steps Before Removing the Lower Control Arm
Safety is the most important part of how to replace lower control arm Chevy Silverado components. The front suspension can contain stored spring or torsion-bar force. Do not remove components blindly because the suspension layout varies between Silverado models.
Park on a hard, flat surface. Set the parking brake and block the wheels that will remain on the ground. Loosen the wheel lug nuts slightly before lifting the truck.
Lift the front of the Silverado at a correct lifting point and place it securely on jack stands. Remove the wheel. Keep a floor jack available to support the lower suspension assembly when the procedure calls for it.

- ✦ Confirm suspension type
Identify whether your truck uses coil springs, coil-over components, torsion bars, or another configuration before removing the arm.
- ✦ Support the truck correctly
Place jack stands under approved structural support points, not thin sheet metal or unstable suspension parts.
- ✦ Control stored energy
Never release a loaded spring or torsion-bar component unless the service procedure specifically explains how to unload it safely.
- ✦ Protect nearby parts
Watch brake hoses, ABS wiring, CV axle components, and steering parts as the knuckle moves.
Special Warning for Torsion-Bar Silverado Models
Some Silverado configurations use torsion bars as part of the front suspension. These bars can store a large amount of energy. The lower control arm may also be tied directly into that system.
If your repair requires torsion-bar unloading or removal, use the correct unloading procedure and suitable tool for that suspension. Do not substitute makeshift clamps or random pullers for equipment designed to control the load.
How to Replace Lower Control Arm Chevy Silverado Step by Step
The following steps describe the general process for how to replace lower control arm Chevy Silverado assemblies. Exact details can change by model year and suspension design. Before removing spring-loaded components or final-torquing fasteners, check the service procedure for your specific truck.
Take photos before removing parts. They can help you remember washer positions, bolt directions, brake hose routing, and other details during reassembly.

Step 1: Loosen the Wheel and Raise the Truck
With the Silverado on level ground, loosen the wheel lug nuts without removing them. Lift the truck and set it securely on properly rated jack stands. Remove the wheel and place it out of your work area.
- ✦ Safety check
Push gently on the truck before working underneath it to confirm that it is stable on the stands.
Step 2: Inspect the Area Before Disassembly
Look closely at the lower control arm, steering knuckle, ball joint, shock or strut connection, sway-bar link, CV axle, brake hose, and ABS wiring. Compare the replacement arm with the original before taking the suspension apart.
Check that mounting holes, bushing locations, and ball joint design match. Catching a wrong part now is much easier than discovering it after the old arm is out.
Step 3: Support the Lower Suspension
Place the floor jack under a strong section of the lower control arm or other service-approved support point. Raise it only enough to support the suspension. Do not lift the truck off the jack stand.
This support can help control movement when connected parts are removed. The correct support position depends on the suspension design.
Step 4: Disconnect Parts Attached to the Control Arm
Remove any components that prevent the arm from coming out. Depending on the Silverado, this may include a sway-bar link, shock mounting hardware, or other brackets. Keep hardware grouped so it returns to the correct position.
Do not stretch the brake hose or wheel-speed sensor wire. If clips or brackets are attached to the control arm, release them before allowing the steering knuckle to move far.
Step 5: Separate the Lower Ball Joint
Remove the ball joint retaining hardware as required by your truck’s design. Support the steering knuckle so it cannot fall outward or place stress on the brake hose and axle.
Use a proper ball joint separator to break the tapered stud loose from the knuckle. If you strike the knuckle to help release the taper, avoid hitting the threaded end of the ball joint stud directly.
- ✦ Protect the CV axle
On 4WD models, do not let the steering knuckle hang in a way that can overextend or damage the axle joint.
- ✦ Protect brake components
Keep tension off the brake hose and ABS sensor wiring at all times.
Step 6: Mark Adjustable Alignment Hardware
If the control arm mounting system uses cams, eccentric washers, or other alignment hardware, mark their current positions before removal. A paint marker works well.
These marks can help place the new parts close to the old setting. They do not replace a professional wheel alignment after the repair.
Step 7: Remove the Control Arm Mounting Bolts
Remove the inner control arm mounting nuts and bolts. Large bolts may be tight or rusty, so use penetrating oil and a breaker bar when needed. Support the control arm while removing the final fastener.
Pay attention to bolt direction, washer location, and any adjustment cams. If corrosion has seized a bolt inside a bushing sleeve, removal can become much more difficult and may require additional tools.
Step 8: Remove the Old Lower Control Arm
Once all attachments are free, guide the lower control arm out of the frame mounts. A pry bar may help if the bushings fit tightly in the brackets. Do not bend mounting tabs to force the arm out.
Compare the removed arm with the new one side by side. Check overall shape, ball joint position, bushing width, bolt-hole size, and mounting points.
How to Install the New Silverado Lower Control Arm
Installation is mainly the reverse of removal, but a few details matter. Do not force a control arm into place with badly misaligned mounting points. Confirm the replacement part is correct if it does not fit naturally.
When learning how to replace lower control arm Chevy Silverado parts, many DIY repairs go wrong during final tightening rather than removal. Bushing position, fastener torque, and alignment all affect how long the new parts last.
Step 9: Position the New Control Arm
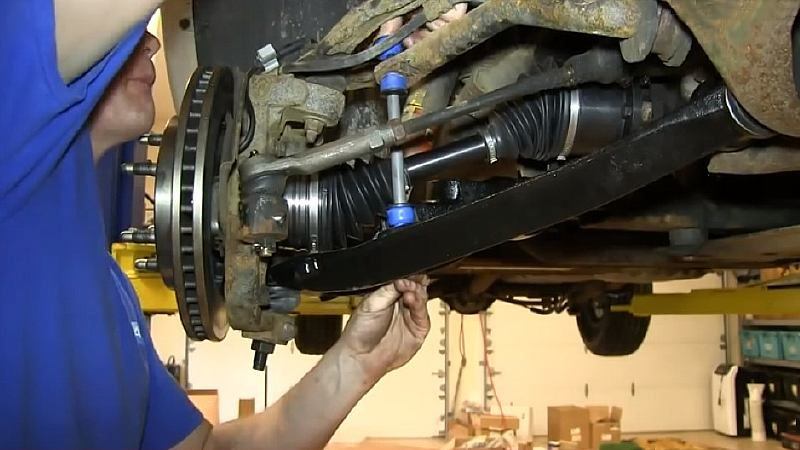
Guide the new arm into its frame brackets. Align the inner bushing sleeves with the mounting holes. Insert the original bolts in the correct direction unless replacement hardware or service information specifies otherwise.
Start the nuts by hand. Leave the pivot hardware loose enough for the arm to move while you connect the rest of the suspension.
Step 10: Connect the Ball Joint to the Steering Knuckle
Guide the ball joint stud into the steering knuckle. Install the required retaining hardware and tighten it according to the specification for your exact Silverado.
If the design uses a castellated nut and cotter pin, align the nut as directed by the service procedure and install a new cotter pin. Do not reuse a damaged locking device.
Step 11: Reinstall the Sway Bar, Shock, and Other Hardware
Reconnect every component removed for access. This may include the sway-bar link, lower shock mount, brackets, clips, or other suspension hardware.
Check brake hoses and ABS wires before tightening everything. Nothing should be twisted, stretched, trapped, or rubbing against moving suspension parts.
Step 12: Set the Suspension Near Normal Ride Height
Many bonded-rubber suspension bushings should receive their final tightening near the normal ride position. Tightening them while the suspension hangs at full droop can twist the rubber when the truck returns to the ground.
A common method is to support the lower suspension with a jack and carefully raise it toward its normal loaded position before final-torquing the pivot bolts. Follow the procedure specified for your exact suspension because the safe method can vary.
Step 13: Torque the Fasteners Correctly
Use a torque wrench on critical suspension hardware. Do not rely on an impact wrench as the final tightening method. Lower control arm bolts and ball joint hardware carry heavy loads.
Torque specifications vary by Silverado generation, model, drivetrain, bolt size, and suspension package. Use factory service data or trusted repair information for your exact VIN or configuration rather than using a generic number.
Step 14: Reinstall the Wheel and Lower the Truck
Install the wheel and hand-start all lug nuts. Lower the truck carefully. Tighten the lug nuts in the correct pattern and to the specification listed for your wheel and Silverado model.
Why You Should Not Use One Generic Silverado Torque Specification
A common mistake in online repair guides is giving one torque value for every Silverado. That can be misleading. Chevrolet has produced the Silverado across many generations, and the 1500, 2500HD, and 3500HD do not all share the same suspension hardware.
Even within one generation, two-wheel-drive and four-wheel-drive models may use different parts. Suspension packages and bolt designs may also vary. For that reason, this guide does not provide made-up universal torque figures.
When following a guide on how to replace lower control arm Chevy Silverado components, identify the truck by year, model, drivetrain, and suspension type. Then obtain the correct control arm pivot bolt, ball joint, shock, sway-bar, and wheel torque data before final assembly.
- ✦ Model year
Suspension designs can change from one Silverado generation to another.
- ✦ 1500 versus HD
Heavy-duty Silverado models can use different suspension components and hardware.
- ✦ 2WD versus 4WD
Drivetrain layout can affect front suspension design and removal steps.
- ✦ Suspension package
Factory packages and aftermarket lifts can change component geometry or required procedures.
Special Considerations for Silverado Torsion-Bar Suspension
Torsion-bar front suspension deserves special attention because the torsion bar acts as a spring. It twists under load and stores energy. On some Silverado models, the torsion bar connects with the lower control arm.
Depending on the repair procedure, you may need to unload or remove the torsion bar before the lower control arm can come out. This step requires the correct technique and suitable equipment. Treat the torsion bar as a loaded spring, not as a simple metal rod.
If you are unsure how the torsion-bar load is controlled on your specific truck, this is a good point to use professional service information or have a qualified technician handle that part of the job.

- ✦ Do not improvise
Do not use unsafe homemade tools to unload a torsion bar.
- ✦ Mark related positions
When the procedure calls for it, mark relevant adjustment positions before disassembly.
- ✦ Inspect related parts
Check torsion-bar keys, mounts, crossmembers, and control arm contact areas while the suspension is apart.
Common Mistakes When Replacing a Silverado Lower Control Arm
Knowing how to replace lower control arm Chevy Silverado parts is only half the job. Avoiding common errors can make the repair safer and help the new suspension parts last longer.
One of the biggest mistakes is tightening rubber-bushed pivot bolts with the suspension hanging at full droop. Another is letting the steering knuckle hang from the brake hose or wheel-speed sensor wire.
- ✦ Working under a jack only
Always support the Silverado with properly rated jack stands before working underneath it.
- ✦ Ignoring spring load
Know whether your truck uses coil springs, coil-over components, or torsion bars before removing suspension hardware.
- ✦ Guessing torque values
Use specifications that match your exact year and configuration.
- ✦ Damaging the ball joint threads
Use a proper separator instead of repeatedly striking the threaded stud.
- ✦ Stretching brake hoses
Support the steering knuckle and keep hoses and sensor wires free of tension.
- ✦ Skipping the alignment
Changing a control arm can alter suspension geometry and tire alignment.
- ✦ Installing the wrong side
Verify whether the replacement part is designed for the driver or passenger side.
- ✦ Ignoring other worn parts
Check tie rods, upper control arms, sway-bar links, shocks, wheel bearings, and other nearby components while access is good.
Should You Replace Both Lower Control Arms at the Same Time?
You do not always have to replace both lower control arms as a pair. If one arm was bent by an impact and the other side is healthy, replacing only the damaged side may be reasonable.
However, both arms have usually seen the same mileage and road conditions. If one side has badly worn bushings and the other side shows similar cracking or looseness, replacing both can make sense. It can also reduce the chance that you will need another suspension teardown and alignment soon.
Inspect both sides instead of replacing parts based only on age. Condition matters more than a blanket rule.
- ✦ Replace one side
This can make sense when damage is isolated and the opposite arm, bushings, and ball joint test good.
- ✦ Replace both sides
This may be practical when both arms show similar wear or the truck has high, even mileage on the original parts.
Do You Need an Alignment After Replacing a Lower Control Arm?
Yes, scheduling an alignment after lower control arm replacement is a smart step. The control arm is part of the suspension geometry that determines where the wheel sits in relation to the road.
Even if you marked adjustment cams before disassembly and returned them to the same position, the new bushings and ball joint may place the suspension slightly differently. A proper alignment checks whether camber, caster, and toe are within specification.
Do not ignore a crooked steering wheel, pulling, or unusual tire wear after the repair. These signs can point to an alignment issue or a part that was not installed correctly.
- ✦ Protect tire life
Correct alignment helps prevent rapid wear on the inside or outside edges of the tires.
- ✦ Improve steering
Proper settings help the Silverado track straight and return predictable steering feel.
- ✦ Confirm the repair
An alignment inspection may reveal bent parts or adjustments that cannot be brought into specification.
Checks to Make Before Driving the Silverado
Before the first road test, look over everything you touched. Confirm that fasteners are installed, locking devices are in place, and brake hoses or ABS wires are routed correctly.
Turn the steering from side to side while the truck is safely positioned and look for interference. Listen for contact between the new control arm and nearby components.
For the first drive, use a low-speed route close to home or the repair area. Listen for clunks and check the steering response. If the truck pulls hard, makes a new noise, or feels unstable, stop and inspect the repair before driving farther.
- ✦ Check every fastener
Verify the control arm, ball joint, shock, sway bar, and wheel hardware.
- ✦ Inspect hose routing
Brake hoses and ABS wiring should have enough movement for full steering and suspension travel.
- ✦ Look for interference
Make sure the control arm does not contact the wheel, axle, frame, or other suspension components.
- ✦ Schedule alignment
Have the front alignment checked after the suspension work.
- ✦ Recheck the repair
After a short drive, inspect the work again for loose hardware, unusual movement, or other problems.
How Difficult Is Lower Control Arm Replacement on a Chevy Silverado?
For a DIY mechanic with suspension experience, learning how to replace lower control arm Chevy Silverado assemblies can be manageable. For a beginner, it can become a difficult job because the parts are heavy and the fasteners can be extremely tight.
Rust changes the difficulty level quickly. A clean southern or western truck may come apart with ordinary hand tools, while a salt-belt Silverado can have seized control arm bolts and badly corroded hardware.
Torsion-bar systems also add risk and complexity. If you do not have strong jack stands, a good torque wrench, the correct joint separator, or the tools needed for the suspension design, professional repair may be the safer option.
- ✦ Moderate to advanced DIY skill
The job requires safe lifting, heavy fastener removal, suspension knowledge, and correct reassembly.
- ✦ Rust can add major difficulty
Seized bolts may require more time, stronger tools, cutting equipment, or professional help.
- ✦ Suspension design matters
Torsion-bar or heavy-duty configurations may require extra steps and specialized tools.
Lower Control Arm Replacement Tips That Make the Job Easier
Good preparation makes this repair much easier. Apply penetrating oil to rusty fasteners before you plan to remove them. Keep replacement hardware nearby if the manufacturer recommends new locking nuts, cotter pins, or one-time-use fasteners.
Take clear photos before removing anything. This simple habit helps with bolt direction, washer placement, sensor wiring, and bracket locations during assembly.
Another useful practice when following how to replace lower control arm Chevy Silverado procedures is to compare every new part with the original before installation. Silverado suspension parts can look very similar even when they fit different years or configurations.
- ✦ Photograph the suspension
Take photos from several angles before disassembly.
- ✦ Mark alignment hardware
Mark cams and eccentric washers so the initial setting can be approximated during reassembly.
- ✦ Organize hardware
Keep bolts and nuts grouped by the component they came from.
- ✦ Compare new and old parts
Check dimensions, mounting points, joint orientation, and left-right fitment.
- ✦ Clean mounting areas
Remove loose rust and dirt from brackets before installing the new arm.
- ✦ Use a torque wrench
Final tightening by feel is not a good substitute for the specified torque.






