To adjust shock absorber height, first identify whether your vehicle has height-adjustable coilovers, threaded shock bodies, adjustable spring seats, or fixed factory shocks. Park on level ground, measure the current ride height, and follow the suspension maker’s instructions. Never assume that turning a spring collar or changing a shock setting will safely raise or lower every vehicle.
In the United States, drivers may want to change suspension height to improve ground clearance, set up a modified car, level a truck, or prepare a vehicle for a particular type of driving. The right method depends on the suspension design. A height-adjustable coilover may let you change the distance between its mounting points, while a conventional shock absorber may have no ride-height adjustment at all.
Before you begin, check the vehicle service manual and the instructions for the exact shock or coilover kit. Some systems use a threaded lower mount to change overall length. Others use a spring perch that changes spring preload, and some dampers adjust only rebound or compression. These functions are different, and mixing them up can affect suspension travel, tire clearance, handling, and component life.
Adjusting shock absorber height usually means changing the suspension setting so the vehicle body sits higher or lower, or changing the installed length of an adjustable damper. These are related tasks, but they are not the same. The correct procedure depends on which part of the suspension controls the vehicle’s static ride height.
A shock absorber mainly controls how quickly a spring compresses and extends. The spring supports the vehicle’s weight and helps determine ride height. In many modern suspension systems, the shock and spring form one assembly, so an adjustment to the assembly can affect both height and suspension behavior.
Some vehicles use separate springs and shocks. On these vehicles, changing shock length alone may not change the normal parked ride height because the springs and their seats carry the load. A shock that is too short or too long can still limit suspension movement or cause the spring to become loose, so fitment matters even when the shock does not set the height.
Source: shocksurplus.com
Ride height
The vehicle’s height in its normal loaded condition, measured at defined body, chassis, or wheel reference points.
Shock length
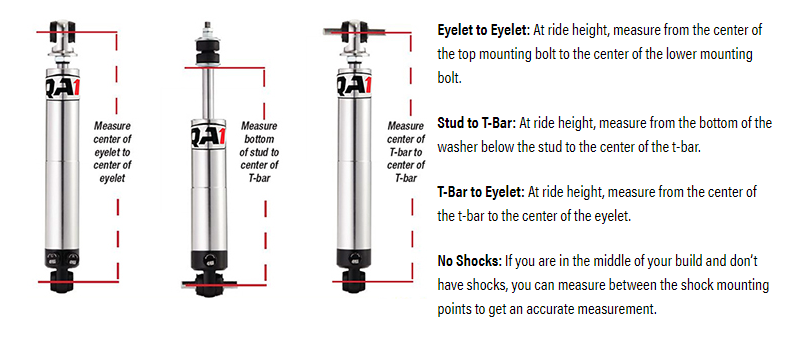
The distance between the shock’s mounting points at a given position, such as fully extended or compressed.
Spring preload
The initial compression applied to a spring during assembly. Its effect on ride height depends on the suspension design and how the spring and damper are mounted.
Damping adjustment
A setting that changes resistance to suspension movement. It usually changes how the vehicle responds, not its static ride height.
Which Parts Can Actually Change Ride Height?
A threaded coilover body or adjustable lower mount can change the installed length of some suspension assemblies. An adjustable spring seat can alter the spring’s installed position. A vehicle may instead use a separate height-adjustment system, such as an air suspension control or a manufacturer-approved leveling mechanism.
A fixed-length replacement shock normally cannot be made into a height-adjustable unit by turning its body or adding spacers. If the shock has no approved height adjustment, use a compatible suspension kit designed for the required change.
Adjustable coilovers
Use the exact collar or threaded mount specified in the kit instructions.
Separate springs and shocks
Check whether the spring seat, suspension arm, or another approved component sets ride height.
Fixed factory dampers
Replace them only with the correct specified part; do not modify the shock body to create an adjustment.
Tools and Safety Checks Before You Start
Gather the correct tools before lifting the vehicle. The required equipment depends on the suspension kit, but careful measurement and safe vehicle support are essential for any job. Keep the vehicle on a firm, level surface and follow the vehicle manufacturer’s approved lifting points.
Never work under a vehicle supported only by a hydraulic jack. Use jack stands with suitable load ratings on approved support points, and chock the wheels that remain on the ground. If the job requires a coil spring to be removed or compressed, use the specified spring-compression equipment or have a qualified suspension shop perform that work.
Coil springs store substantial energy. A spring that slips out of a compressor or a poorly supported suspension arm can cause serious injury. If the adjustment instructions require spring removal and you do not have the right equipment or experience, stop and arrange professional service.
Source: YouTube > ACE Stossdämpfer GmbH
Basic tools
A tape measure, suitable socket and wrench set, the specified adjustment spanner, a torque wrench, wheel chocks, and a reliable way to record measurements.
Vehicle support
A suitable floor jack and correctly rated jack stands placed at the vehicle maker’s approved lifting and support points.
Reference information
The vehicle service manual and the suspension kit’s installation guide, including adjustment limits and fastener torque values.
Protective equipment
Safety glasses and suitable gloves, along with secure clothing that cannot catch on moving suspension parts.
When You Should Not Adjust It Yourself
Do not proceed if a spring is cracked, a shock is leaking, a mount is bent, or a threaded adjuster is badly corroded or damaged. A height change will not repair worn or unsafe suspension parts. Replace damaged components and inspect the rest of the assembly before setting the vehicle’s height.
Vehicles with air suspension, electronic dampers, active ride control, or special load-leveling systems may need model-specific procedures or scan tools. Follow the service manual rather than applying a generic coilover method.
Stop for damaged parts
Have broken springs, bent mounts, loose hardware, or leaking dampers assessed before making adjustments.
Check special systems
Use the specified calibration and service process for electronic or air suspension systems.
How to Measure the Current Ride Height
Measure the vehicle before changing anything. A baseline helps you see whether the adjustment worked and whether one corner sits differently from the others. Use the same reference points and conditions for every measurement.
Park on level ground, set the parking brake, and place the transmission in Park or in gear as appropriate. Set tire pressures to the vehicle manufacturer’s recommendations and remove unusual cargo. If the vehicle has been lifted or rolled into place, settle the suspension as directed by the suspension maker before taking measurements.
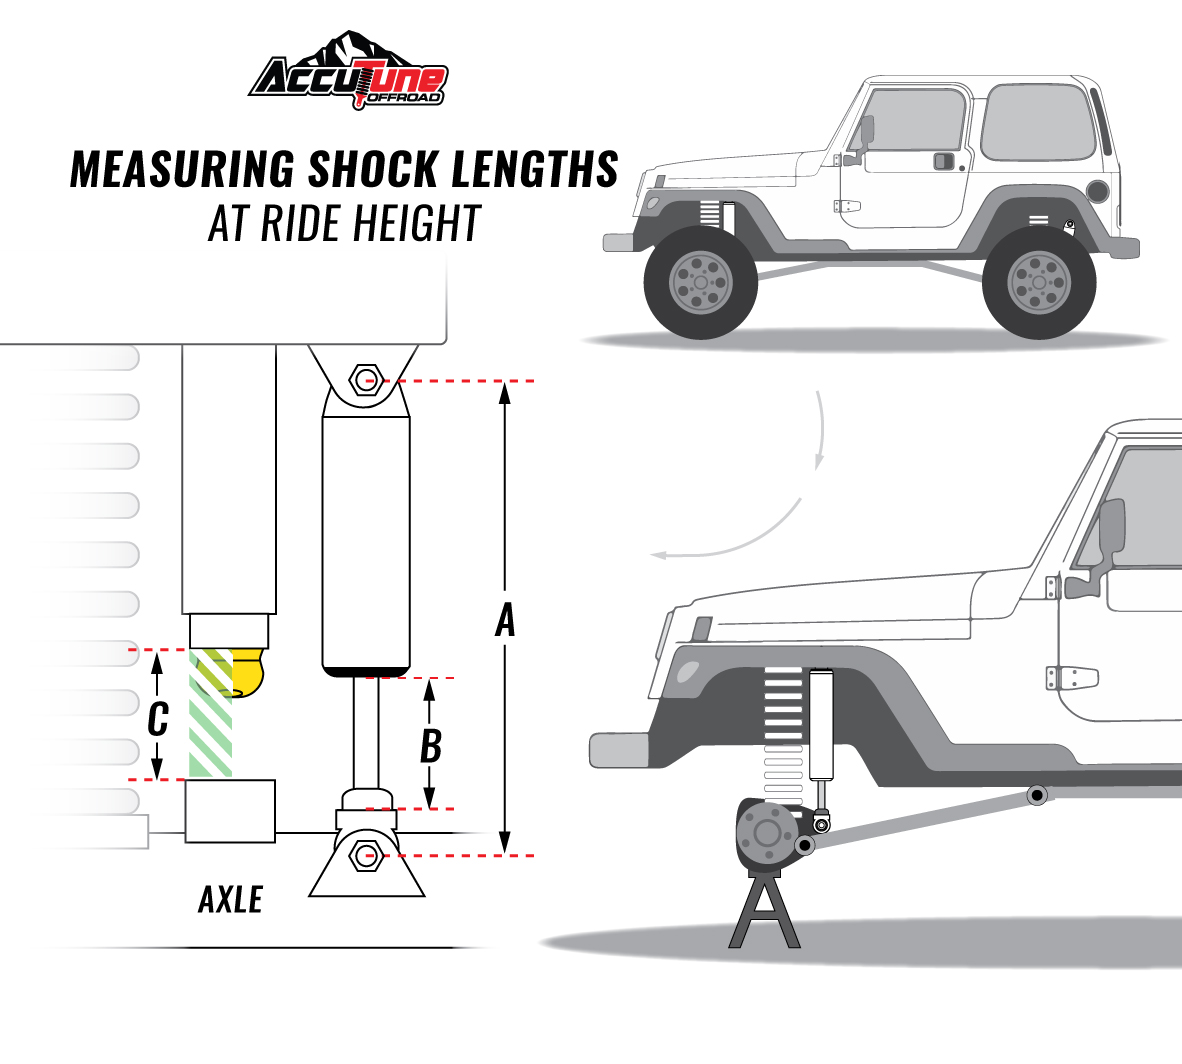
A common method is to measure from the center of each wheel hub vertically to the fender lip. This reduces the effect of tire diameter on the measurement. Some manufacturers instead specify a chassis reference point, pinch weld, or distance between suspension mounting points. Use the reference method specified for your vehicle or kit, and do not compare measurements taken from different reference points.
Source: accutuneoffroad.com
Record all four corners
Write down the front-left, front-right, rear-left, and rear-right measurements where applicable.
Keep conditions consistent
Use the same ground surface, tire pressure, cargo load, measurement points, and suspension settling method.
Check side-to-side differences
Unequal readings can come from an uneven surface, different loads, worn parts, spring condition, or previous suspension changes.
Measure shock length separately
If the task concerns installed shock length, measure the specified mounting points rather than relying on fender height alone.
Set a Realistic Height Target
Decide why you want to change the height before turning an adjuster. A truck that needs more ground clearance, a street car that needs a modest drop, and a race car being set up for a defined course have different requirements. The correct target must remain within the suspension maker’s permitted range.
Do not aim for a particular fender gap without checking suspension travel, wheel alignment, and tire clearance. A vehicle may look level while sitting too close to its bump stops or leaving too little extension travel for uneven roads.
For more ground clearance
Confirm the kit is designed for the required lift and that brake hoses, driveshafts, steering joints, and alignment remain within their permitted ranges.
For a lower stance
Check wheel and tire clearance, bump-stop engagement, and available compression travel before selecting the final height.
For an uneven stance
Rule out worn springs, damaged parts, unequal loads, and measurement errors before adjusting individual corners.
How to Adjust Height on Threaded Coilovers
Threaded coilovers are among the most common systems that allow a driver to set ride height. The exact procedure varies by design, so identify whether your kit uses a threaded shock body, an adjustable lower mount, a spring perch, or a combination of these parts. Never assume all collars serve the same purpose.
Before making a change, read the kit’s installation guide and note its minimum and maximum adjustment limits. Some coilovers are designed to change ride height through the lower mount while keeping spring preload separate. Others use a different arrangement. Using the wrong collar can alter preload, reduce available travel, or allow a spring to become loose.
Source: YouTube > Motion Raceworks Official
Step 1: Secure the vehicle
Park on level ground, chock the wheels, lift the vehicle at the approved points, and support it securely before removing a wheel.
Step 2: Find the correct adjuster
Use the kit diagram to identify the height-adjustment collar and distinguish it from the spring seat and lock collar.
Step 3: Clean the threads
Remove dirt and corrosion with an appropriate method that will not damage the threads, seals, or coating. Use lubricant only if the manufacturer permits it.
Step 4: Loosen the lock collar
Use the specified spanner and follow the maker’s instructions. Do not strike the collar with a hammer or use a pipe that can damage it.
Step 5: Make a small adjustment
Turn the designated height adjuster in the direction shown in the instructions. Record the starting position and the amount of change.
Step 6: Secure the adjuster
Set the required spring preload and tighten the lock collar according to the kit instructions and torque specifications, if provided.
Step 7: Reassemble and measure
Reinstall the wheel and fasteners using the specified torque values, lower the vehicle safely, settle the suspension, and measure again.
Which Way Should You Turn the Coilover Adjuster?
There is no universal clockwise or counterclockwise rule for every coilover. Thread direction, adjuster location, and suspension layout vary. Follow the arrows or instructions for your exact kit, and measure the result instead of assuming that a given number of turns equals a fixed change in ride height.
If the collar will not move with the correct tool, stop and inspect the threads. Forcing a seized adjuster can damage the body or locking mechanism. A suspension shop can assess corrosion or thread damage without risking a failure.
Make measured changes
Adjust in small increments permitted by the manufacturer, then lower and settle the vehicle before judging the actual change.
Avoid guessing
Do not rely on universal turn counts or internet instructions for a different coilover model.
How Spring Preload Affects Shock Height
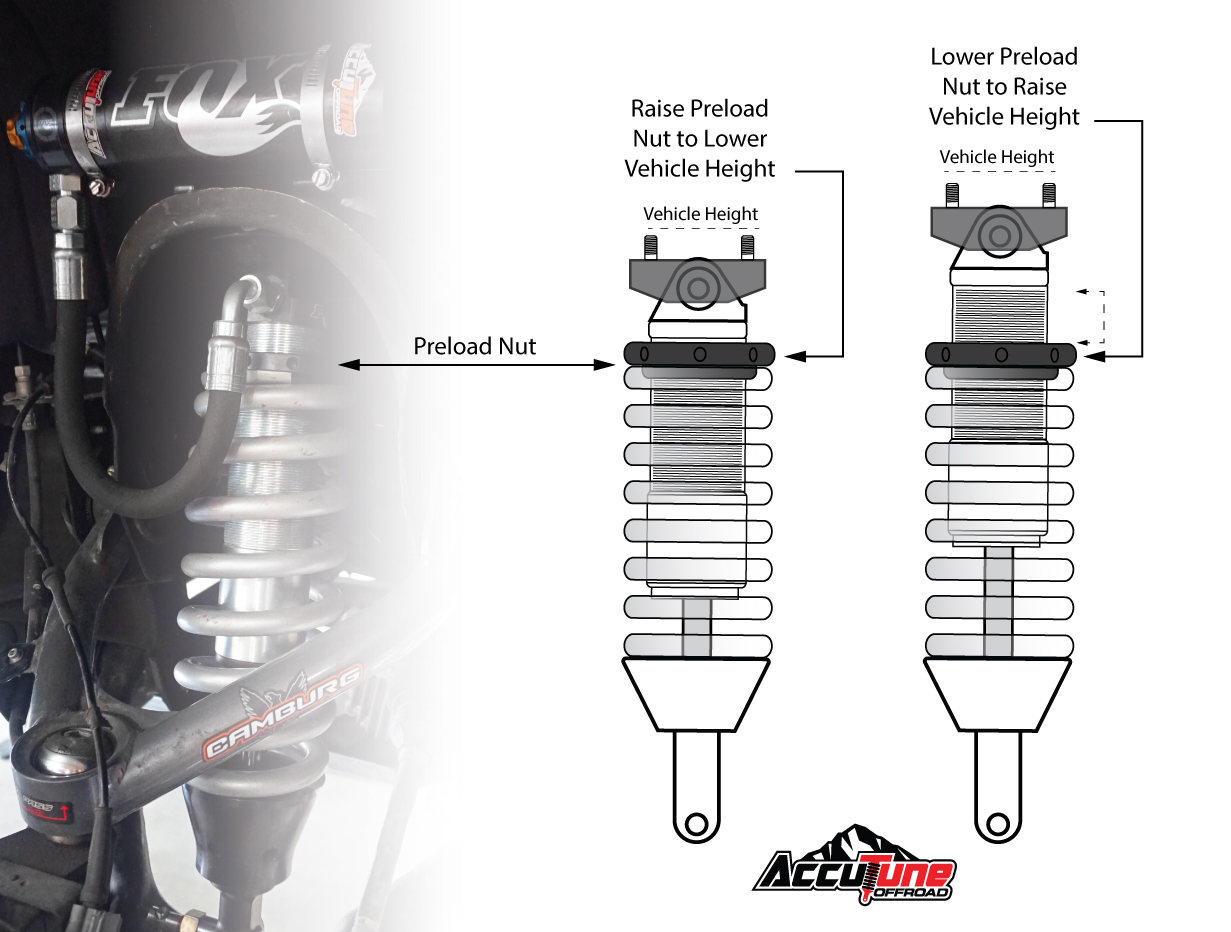
Spring preload is one of the most misunderstood suspension settings. It describes how much a spring is compressed from its free length when installed at a specified position. Adjusting preload can change the starting force in the spring, but its effect on ride height depends on the suspension layout, spring rate, load, and available travel.
On many conventional coilover designs, increasing spring-seat preload does not produce a simple, proportional increase in static ride height once the vehicle’s weight is supported by the spring. The spring compresses under the vehicle’s load, and the final position depends on the complete suspension geometry and the spring rate. On some systems, the spring perch does directly influence ride height, so the maker’s procedure matters.
Preload is not a substitute for a correctly selected spring. Excessive preload can reduce droop travel or prevent a spring from seating correctly when the suspension extends. Too little preload can allow a spring to become loose on designs that require it to remain captured. Set preload to the specified value or procedure rather than using it as a general height adjustment.
Source: YouTube > knowledge arrow
Preload
Sets the spring’s initial compression according to the suspension design and manufacturer instructions.
Spring rate
Describes how much force is needed to compress a spring by a given distance. It affects how the suspension responds to load.
Ride height
Results from the spring and suspension geometry supporting the vehicle’s weight at rest.
Available travel
The distance the suspension can move through compression and extension before reaching a mechanical limit.
Why More Preload Is Not Always Better
Adding preload to compensate for a sagging spring may hide a worn or incorrectly rated spring rather than solve the cause. If the vehicle sits too low despite correct settings, inspect the spring, mounts, bushings, load, and compatibility of the parts.
If the suspension maker specifies a preload measurement, use the stated measurement points and method. Do not copy a preload value from another vehicle or spring, even if the coilover looks similar.
Do not over-compress the spring
Stay within the specified adjustment range and preserve proper spring capture at full extension.
Investigate repeated sag
Check for worn springs, damaged mounts, incorrect spring rates, and excess vehicle load.
Can You Adjust the Height of a Standard Shock Absorber?
Most standard fixed-length shock absorbers do not have a user-adjustable ride-height setting. Some dampers have a knob or dial, but that control often changes rebound or compression damping rather than the distance between the vehicle body and the road.
If a conventional shock is separate from the spring, the spring and its seat usually determine static ride height. Replacing a shock with a longer unit is not a safe general method for lifting a vehicle. An incorrect length can limit suspension travel, allow a spring to lose its seat, or cause other parts to reach their travel limits too soon.
For a vehicle that needs a height change, use a suspension system designed and approved for that application. Depending on the vehicle, this may involve compatible springs, adjustable coilovers, approved lift components, or a manufacturer-specified leveling system. Verify the correct part numbers and installation requirements before buying or installing parts.
Source: YouTube > Practical Guru
If the shock has a damping dial
Check the manual to determine whether it controls rebound, compression, or another function. Do not assume it changes height.
If the vehicle sits too low
Inspect the springs, spring seats, mounts, vehicle load, and part compatibility before deciding on replacement parts.
If you need more lift
Choose a kit designed for the vehicle and intended lift, and check alignment, suspension travel, and related component limits.
What About Motorcycle Shock Absorbers?
Some motorcycle rear shocks use a threaded preload collar or a stepped preload adjuster. Other models have a separate ride-height adjuster, and many factory units offer no direct length adjustment. The owner’s manual identifies which controls are available and how to use them.
On a motorcycle, changes to rear ride height can affect steering response, side-stand angle, chain or belt geometry, and suspension clearance. Do not change the shock length or preload beyond the manufacturer’s range. If a height change requires different links or a different shock, confirm that the parts are compatible with the exact motorcycle model.
Identify the control
Determine whether it adjusts preload, damping, or shock length before turning it.
Check the whole setup
Confirm safe tire clearance, chain or belt movement, side-stand stability, and handling after any approved change.
How Much Should You Raise or Lower the Vehicle?
The correct amount of adjustment depends on the vehicle, suspension kit, spring rate, tire size, intended use, and permitted adjustment range. There is no single safe number of inches or millimeters that applies to every car, truck, or motorcycle.
Make one controlled change at a time. If you adjust several corners, record each change so you can identify what affected the final height. After lowering the vehicle, allow the suspension to settle using the manufacturer’s recommended method before measuring again.
The adjustment collar’s movement does not always equal the vehicle’s vertical movement. Suspension geometry can create a motion ratio, meaning that a change at the spring or shock may result in a different change at the wheel. Use the kit’s guidance and the measured ride height to determine the actual result.
Source: YouTube > MotoIQ
Example calculation
If a hypothetical hub-to-fender measurement changes from 15.0 inches to 14.5 inches after the suspension settles, the measured ride height has decreased by 0.5 inch at that reference point. This does not establish how much the adjuster moved or whether the setting is within the permitted range.
Use a consistent baseline
Compare measurements taken from the same reference points, on the same type of surface, and under similar load conditions.
Check the manufacturer’s limits
Do not extend or shorten an adjustable assembly beyond its permitted range to reach a visual target.
How to Check Whether the Vehicle Is Level
Compare left and right measurements on the same axle, then compare front and rear readings using the intended reference method. Remember that the front and rear suspension may use different reference dimensions, so a smaller front measurement does not automatically mean the vehicle is improperly set up.
If one corner remains much higher or lower than the others, check the ground, tire pressures, load distribution, spring seating, adjuster position, and worn components. Do not correct a persistent difference by repeatedly turning collars without finding the cause.
Check side-to-side height
Use comparable measurements and account for any manufacturer-specified corner-weighting procedure.
Check the front-to-rear stance
Use the vehicle’s design targets rather than assuming every body panel or fender should sit at the same height.
What to Check After Adjusting Shock Absorber Height
After setting the height, inspect the suspension before driving. Confirm that all locking collars and fasteners are secure, each spring is seated correctly, and no brake hose, electrical wire, or steering part is stretched or trapped. Refit the wheels and tighten the fasteners to the vehicle manufacturer’s specified torque.
Lower the vehicle carefully and settle the suspension as directed. Measure the final ride height at the same points used for the baseline. If the result differs from the target, make only the additional adjustments allowed by the kit instructions.
A ride-height change can alter wheel alignment, including camber and toe. Arrange an alignment when the suspension design or amount of adjustment calls for it, and follow the vehicle or kit manufacturer’s guidance. A vehicle that pulls, wanders, rubs a tire, or feels unstable should not be treated as ready for normal driving.
Source: detroitspeed.com
Mechanical inspection
Check adjuster locks, mounting hardware, spring seating, brake hoses, wiring, and any nearby moving components.
Clearance inspection
Check for tire contact and interference at steering lock and through the permitted suspension movement, using the correct inspection procedure.
Alignment
Check wheel alignment after a change that can affect suspension geometry.
Road behavior
Only after the static checks pass, follow the maker’s recommended procedure for verifying the vehicle’s behavior. Stop if there is rubbing, knocking, pulling, or instability.
Signs the Adjustment Is Not Correct
A harsh ride, repeated bottoming, a spring that becomes loose at full extension, uneven tire wear, or new suspension noises can signal a setup problem. These symptoms may also indicate worn parts or incorrect fitment, so do not assume another height adjustment will fix them.
If the vehicle bottoms out, the suspension may have too little compression travel or an unsuitable spring setup. If it tops out or the wheel loses contact over bumps, the damper length, extension travel, spring setting, or damping setup may be unsuitable. Have the system checked if you cannot identify the cause safely.
New clunks or rattles
Inspect loose hardware, spring seating, mounts, and possible contact between components.
Uneven stance
Recheck the measurement method, load, spring condition, and adjuster settings.
Poor handling
Stop driving if the vehicle is unstable, and check alignment, tire clearance, and suspension travel.
Common Mistakes to Avoid
The most common mistake is treating shock length, spring preload, damping, and ride height as interchangeable settings. They affect different parts of suspension behavior, and an adjustment that is valid for one design may be harmful on another.
Another mistake is setting height by appearance alone. A low or tall stance does not prove that the suspension has enough travel, that the springs remain captured, or that the tires clear the body under load. Check the mechanical limits before judging the result.
Do not force seized collars, guess at torque values, or use unapproved spacers to extend a shock. Do not assume a generic instruction applies to every suspension kit. If the correct adjustment method or permitted range is unclear, pause and consult the manufacturer or a qualified suspension technician.
Source: accutuneoffroad.com
Turning the damping knob to change height
Most damping controls change resistance to movement rather than static ride height.
Adjusting preload without checking the design
The effect on ride height and travel varies with the suspension layout and spring arrangement.
Ignoring suspension travel
A height that looks right may leave too little compression or extension travel.
Skipping alignment checks
Changing suspension height can alter wheel geometry and tire wear.
Using an unsafe lifting method
A jack alone is not a safe support for working beneath a vehicle.
When Professional Help Is the Better Choice
Seek a qualified mechanic or suspension shop if the spring must be removed, an adjuster is seized, the suspension uses an unfamiliar electronic system, or the required alignment cannot be verified. Professional help is also appropriate when the vehicle has damage, repeated sag, or handling problems after adjustment.
A technician can check fitment, ride height, suspension travel, alignment, and related parts as a system. That is more useful than changing one setting at a time without knowing why the vehicle sits or handles incorrectly.
Spring work
Use trained service when safe spring compression or removal is required and the proper equipment is unavailable.
Unclear adjustment limits
Ask the suspension maker or a qualified installer to identify the correct setting for the exact part number.
Quick Decision Guide for Different Suspension Types
Use this guide to identify the right next step before making a change. It is a general decision aid, not a replacement for the service manual or the instructions for the installed suspension.
Source: shocksurplus.com
Threaded coilover with a height-adjustable body
Follow the kit’s body or lower-mount adjustment procedure, preserve the specified preload, and stay within the stated range.
Coilover with a spring-seat height adjustment
Use the manufacturer’s spring-seat procedure and verify preload, spring capture, and suspension travel after adjustment.
Separate shock and coil spring
Determine whether the spring seat or another approved component sets ride height. Do not change shock length without checking travel and fitment.
Fixed factory shock
Do not try to adjust a fixed body. Use the correct replacement or a compatible height-adjustment system if a change is required.
Motorcycle rear shock
Identify whether the control changes preload, damping, or actual shock length, and check the motorcycle maker’s instructions.
Air or electronic suspension
Use the specified calibration, service mode, or adjustment procedure. Some systems require model-specific tools or professional service.
A Simple Before-and-After Record
Keep a short record of the initial measurements, the adjuster positions, the final measurements, and any symptoms after the change. This makes it easier to reverse a setting or explain the work to an alignment shop.
Record the vehicle load and tire pressure as well. If the stance changes again after a short period, investigate spring condition, loose hardware, or another fault rather than assuming the suspension simply needs more adjustment.
Before
Record each corner’s ride height, current settings, visible damage, tire pressure, and load condition.
During
Record which adjuster was changed and the amount or position of the adjustment.
After
Record settled ride height, alignment status, clearance checks, and any unusual noise or handling change.
Frequently Asked Questions
Q
Can I adjust shock absorber height without removing the shock?
Some height-adjustable coilovers can be adjusted while installed, but the exact procedure depends on the kit. You may still need to lift and safely support the vehicle and remove the wheel to reach the adjuster. Other systems require partial disassembly or spring removal. Follow the manufacturer’s instructions and never reach into an unsupported suspension assembly.
Q
Does turning a shock absorber clockwise raise the vehicle?
Not in every system. Thread direction, adjuster position, and suspension design determine the result. Use the instructions for the exact shock or coilover, make a permitted adjustment, and measure the settled ride height to confirm the change.
Q
Does increasing spring preload raise ride height?
It depends on the suspension design. Preload sets the spring’s initial compression, but it does not create the same ride-height change on every system. On many coilovers, changing the designated lower mount is the intended way to alter height while preserving the required preload. Check the kit instructions before adjusting either setting.
Q
Can I adjust the height of stock shock absorbers?
Most fixed-length stock shocks do not have a ride-height adjustment. A damping dial, if present, usually changes how the damper resists movement. If you need a different ride height, identify the component that supports the vehicle’s weight and use compatible parts designed for that change.
Q
Will adjusting shock height affect wheel alignment?
It can. Changing ride height can alter suspension angles, camber, and toe. Follow the vehicle and suspension maker’s alignment guidance after making a height change, and do not drive normally if the vehicle pulls, wanders, rubs a tire, or feels unstable.
Q
How do I know if my shocks are set too low?
Repeated bottoming, reduced ground clearance, tire rubbing, and limited compression travel can indicate that the setup is too low or otherwise incorrect. These symptoms can also come from worn parts, incorrect springs, or unsuitable shock lengths. Inspect the system and verify the manufacturer’s adjustment limits instead of raising the vehicle blindly.
Q
How often should I check an adjustable shock’s height?
Check the setup after installation or adjustment and during routine suspension inspections. Recheck it if the vehicle develops an uneven stance, unusual noises, handling changes, or signs of loose hardware. Follow the maintenance interval and inspection instructions supplied with the suspension kit.
✦ Wrapping Up
Conclusion
Learning how to adjust shock absorber height starts with identifying the suspension design. Threaded coilovers may provide a direct height adjustment, while standard shocks, preload collars, and damping controls serve different purposes. The right procedure is the one specified for the exact vehicle and suspension parts.
Measure the current ride height, make small approved changes, preserve the required spring settings, and recheck the settled result. Inspect fasteners, spring seating, clearance, and suspension travel, then arrange a wheel alignment when required. If the adjuster is damaged or the setup remains uneven or unstable, stop and have the suspension checked.
💡 Key Takeaway
Before turning an adjuster, identify the suspension model and find its official instructions. Record all ride-height measurements, make only permitted changes, and verify spring capture, suspension travel, tire clearance, fastener torque, and alignment before returning the vehicle to normal use.
Eric
Hi, I’m Eric Bennett, the person behind OffRoadTruckAccessories.com.
I created this blog to share my interest in trucks, off-road driving, automotive accessories, and DIY modifications. I enjoy learning how different truck accessories work, testing their usefulness, and understanding whether they are truly worth buying.
Shock absorbers are located near the wheels as part of the suspension system, usually between the vehicle’s body, frame, or subframe and a suspension component such as a control arm, axle, or wheel assembly. However, the exact answer to where are shock absorbers located on a car depends on the suspension design. Some vehicles have…
You should change shock absorbers when they are worn, leaking, damaged, or no longer controlling suspension movement properly. There is no single replacement interval that applies to every vehicle because shock absorber life depends on road conditions, vehicle weight, driving habits, suspension design, and component quality. If you are wondering when to change shock absorbers,…
A shock absorber is a suspension component that controls how quickly a vehicle’s suspension moves up and down after bumps, dips, braking, acceleration, and other road inputs. It works with the springs to prevent excessive bouncing and helps keep the tires in controlled contact with the road. So, what does a shock absorber do? It…
A gas shock absorber is a hydraulic shock absorber that uses pressurized gas, usually nitrogen, along with shock absorber oil to control suspension movement. The gas helps reduce oil foaming and keeps damping performance more consistent when the shock works repeatedly or under demanding conditions. If you are wondering what is a gas shock absorber,…