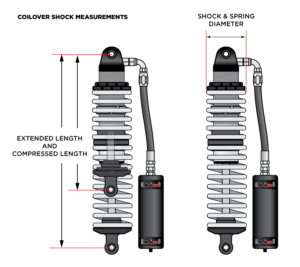
To measure shock absorber length, measure between the centers of the mounting points or the specified mounting surfaces. Record the length at full extension, at ride height, and at full compression when selecting a replacement or custom shock.
In the United States, shock absorber measurements matter when replacing worn suspension parts, restoring a classic car, lifting a truck, lowering a car, or building an off-road vehicle. A shock that is too long can reach its limit before the suspension finishes moving. A shock that is too short can restrict suspension travel or fail to provide enough control.
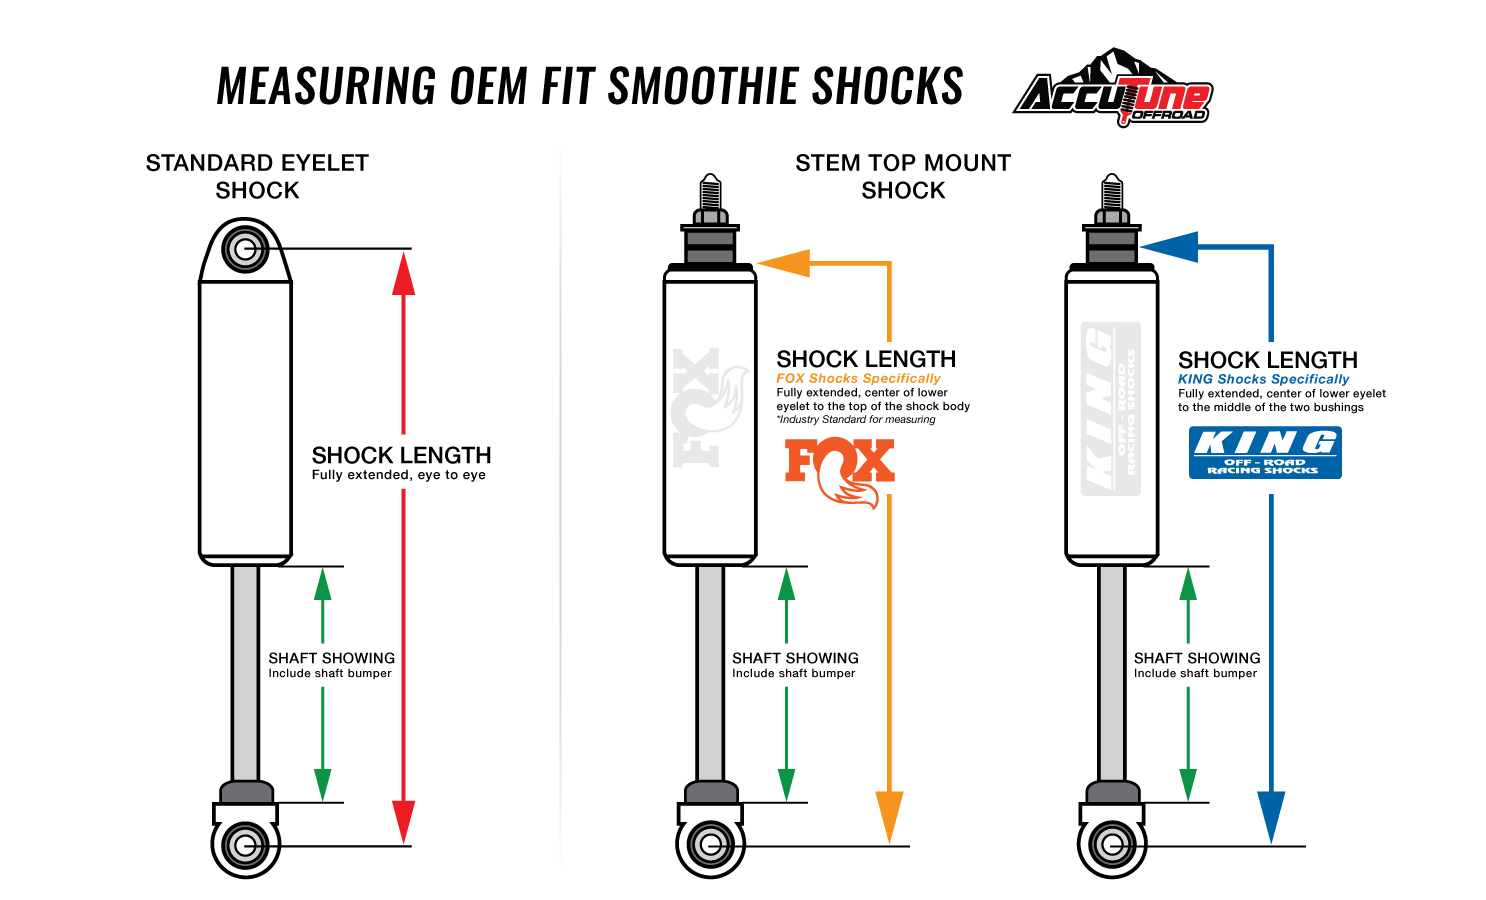
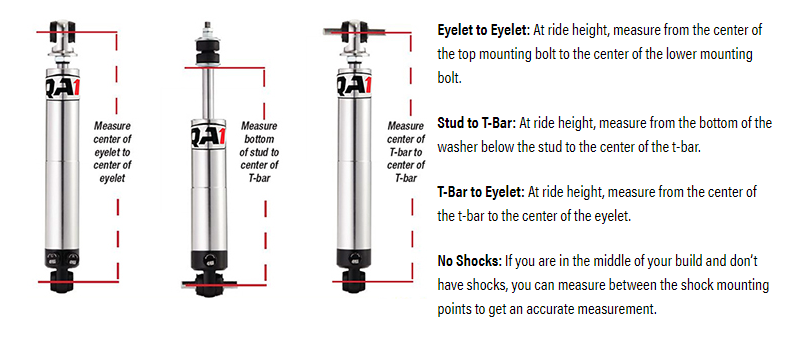
The right measurement depends on the shock design and its mounting style. An eye-to-eye shock is measured between the centers of its mounting eyes, while a stud-mounted shock may require a measurement between specified mounting faces. Coilovers, struts, and shocks with stem mounts can use different reference points, so the manufacturer’s instructions should guide the final measurement.
This guide explains how to measure shock absorber length with basic tools, how to calculate the required compressed and extended lengths, and how to check your results before ordering parts. It also covers common errors that can lead to poor fit, damaged suspension parts, or unsafe vehicle handling.
Shock absorber length is the distance between its defined mounting reference points in a particular position. The measurement changes as the suspension moves, so one measurement alone may not describe the shock’s complete operating range.
For most eye-mounted shocks, the reference points are the centers of the mounting eyes. For other designs, the correct reference may be a mounting face, stud shoulder, or another point specified by the manufacturer. Always use the same reference points when comparing two shocks.
Three measurements are especially useful: extended length, compressed length, and installed length at ride height. Together, they help establish whether a shock fits the vehicle and has enough travel for normal suspension movement.
Source: YouTube > QA1
Extended length
The distance between the mounting points when the shock is at its specified full extension.
Compressed length
The distance between the mounting points when the shock reaches its specified compressed limit.
Installed length
The mounting-point distance when the vehicle sits at its normal ride height.
Stroke
The difference between extended length and compressed length. This is the shock’s total usable length change, subject to the manufacturer’s specifications.
Why the Mounting Style Matters
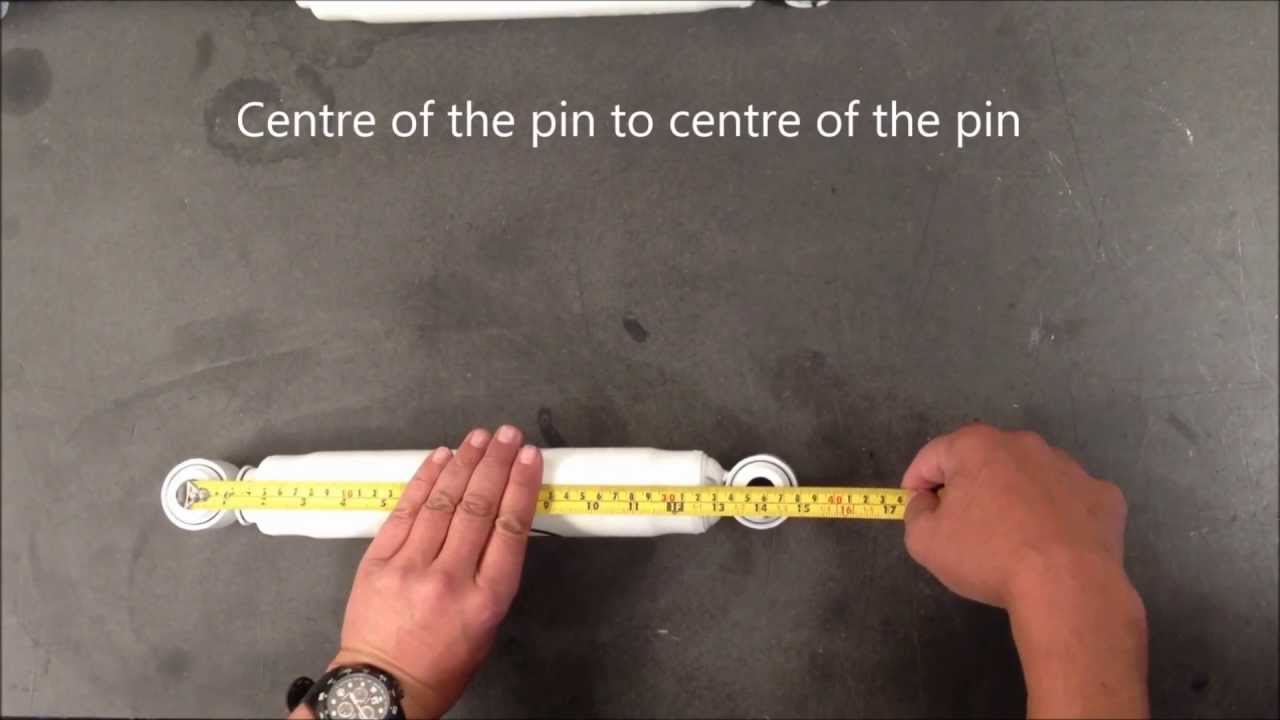
An eye-to-eye shock has a mounting eye at each end. Measure from the center of one eye to the center of the other, even if the shock has a long body or protective boot.
A stem-mounted shock may use a different reference point. Depending on its design, the correct measurement may run between mounting faces rather than from the tip of one stud to the tip of another. Rubber bushings can also compress when installed, which makes the manufacturer’s measurement method important.
A coilover combines a spring and damper in one assembly. Its overall assembly length, spring dimensions, and usable damper travel are related but are not interchangeable measurements. Follow the coilover manufacturer’s drawing for the required reference points.
Eye-to-eye
Measure center to center between the mounting eyes.
Stem or stud mount
Use the specified mounting faces or reference surfaces.
Coilover
Check the manufacturer’s assembly drawing and damper specifications.
Tools Needed to Measure Shock Absorber Length
You can measure an accessible, removed shock with a tape measure or ruler, but a steel ruler or caliper can make short measurements easier to repeat. For a shock still installed on a vehicle, a tape measure may be useful for checking mounting-point distance, provided the reference points are accessible and safe to reach.
Before measuring, check whether the manufacturer publishes a dimensional drawing. This can clarify the exact reference points and prevent confusion between the shock’s body length, mounting length, and usable stroke.
Source: onallcylinders.com
Tape measure or steel ruler
Use a clear scale in inches or millimeters and record the units for every measurement.
Caliper
Useful for checking small dimensions, such as a mounting feature, where the design permits accurate access.
Notebook or measurement sheet
Record the mounting style, compressed length, extended length, ride-height length, and measurement reference points.
Vehicle service information
Check the specified suspension travel, safe lifting locations, removal procedure, and any required ride-height conditions.
Prepare the Vehicle and Work Area
Park on a firm, level surface, apply the parking brake, and secure the wheels that will remain on the ground. If the shock must be removed, raise and support the vehicle using the correct lifting points and properly rated jack stands.
Do not rely on a hydraulic floor jack to support a vehicle while you work beneath it. Suspension springs can store substantial energy, particularly on struts and coilovers. Do not loosen a spring-loaded assembly unless you have the correct equipment and know the approved procedure.
If you only need to measure a loose shock on a workbench, keep it stable and avoid damaging the rod, seals, threads, or mounting bushings. Never clamp a polished shock rod directly in a vise.
Check access
Make sure you can identify both mounting reference points without reaching into a pinch point.
Confirm the units
Use inches or millimeters consistently and label each recorded value.
Inspect the shock
Look for bent rods, damaged mounts, leaks, and worn bushings that may affect inspection or reuse.
How to Measure Shock Absorber Length Step by Step
The most reliable method starts by identifying the mounting points, then measuring the shock in the positions that matter for the vehicle. If you are choosing a replacement, obtain the original part’s specifications where possible and compare them with the vehicle’s required suspension travel.
A removed shock is often easier to measure accurately than one installed on the vehicle. However, the length of an old shock does not automatically establish the correct replacement size, particularly if the vehicle has modified suspension or the original part is incorrect.
Source: shocksurplus.com
Step 1: Identify the Correct Measurement Points
Start by identifying the upper and lower mounting points. For an eye-to-eye shock, locate the center of each mounting hole. For other designs, consult the manufacturer’s drawing to identify the surfaces used for dimensional measurements.
Do not measure only the visible shock tube or include the entire threaded stud unless the specified measurement calls for it. The overall body length can differ considerably from the mounting-to-mounting length.
Mark the references
Write down exactly where each measurement begins and ends.
Check the mounting design
Confirm whether the shock uses eyes, studs, stems, or another connection.
Step 2: Measure the Extended Length
For a removed shock, extend the unit only as permitted by its design and manufacturer. Measure between the correct mounting reference points when the shock reaches its specified full-extension limit. Do not pull the rod with tools or force it beyond its normal travel.
Record the result as extended length. A measurement such as 24 inches is useful only when the reference points and shock position are clear. It should not be treated as a universal size for any particular vehicle.
Some dampers are gas-pressurized and extend on their own, while others behave differently. If the unit cannot be extended safely or does not move normally, use its published specifications rather than forcing it.
Keep the shock straight
Avoid angled measurements that increase the apparent distance.
Record the exact value
Write the result with its units and the mounting reference used.
Step 3: Measure the Compressed Length
Measure the shock between the same mounting reference points when it reaches the manufacturer’s specified fully compressed position. This may require compressing the unit using an approved method or consulting the technical drawing.
Do not use a bench vise, improvised clamps, or excessive body weight to force a shock to its minimum length. A damper can contain pressurized gas or fluid, and improper handling can damage it or cause injury.
If the shock cannot be safely compressed by hand, the published compressed length is the better reference. Record whether the value came from direct measurement or manufacturer data so that the source remains clear.
Use the same references
Measure from the same mounting points used for the extended-length measurement.
Avoid forced compression
Stop if the shock binds, leaks, or requires an unsafe amount of force.
Step 4: Measure the Installed Length at Ride Height
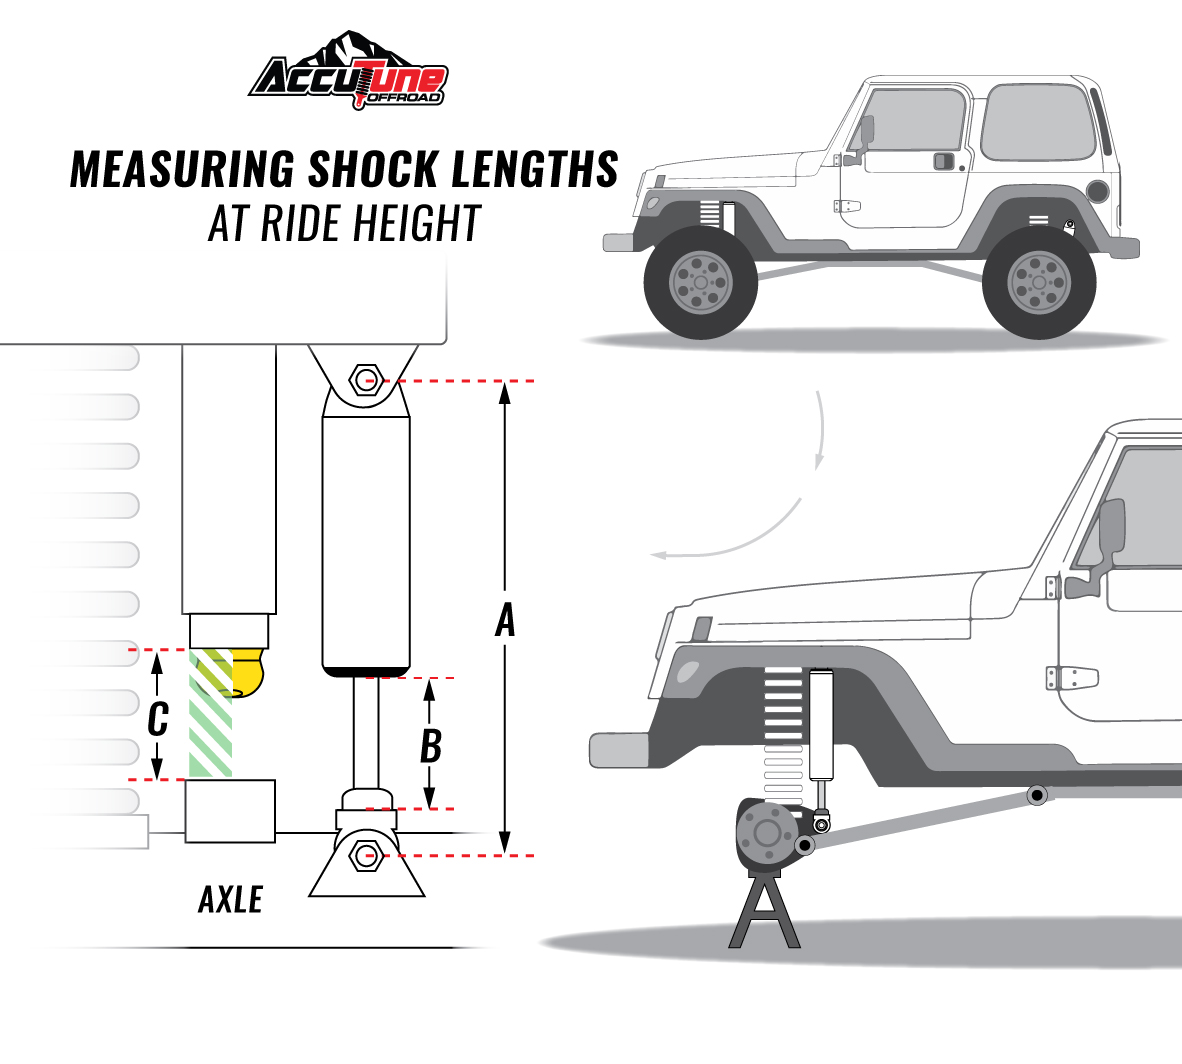
Ride-height length is the distance between the shock’s mounting points when the vehicle rests at its normal operating height. Park the vehicle on level ground with its tires supporting the vehicle, and follow the manufacturer’s procedure for establishing normal ride height.
Measure between the defined reference points without placing yourself beneath an unsupported vehicle. If the mounting points are difficult to access, use a suitable measuring method or have a qualified technician take the measurement.
Record the vehicle’s load condition, including any unusual cargo or accessories. Added weight can change ride height and the shock’s installed length, so measurements from a heavily loaded truck may not represent its normal operating condition.
Use a consistent load
Follow the vehicle or suspension manufacturer’s ride-height measurement procedure.
Check both sides
If suspension height differs from side to side, investigate the cause rather than assuming the difference is normal.
Step 5: Record the Results and Verify the Specifications
Create a simple record of the extended, compressed, and ride-height measurements. Include the mounting style, units, shock part number if known, and whether each value was measured directly or obtained from technical data.
Compare the values with the replacement shock’s specifications and the vehicle’s required suspension travel. The replacement must fit the mounting points and accommodate the suspension’s actual range of movement, not merely resemble the old part.
Confirm mounting compatibility
Check mounting type, bolt diameter, width, bushing dimensions, and clearance.
Check usable travel
Ensure the shock can accommodate required movement without topping out or bottoming out.
Verify the application
Use vehicle-specific fitment data, particularly for modified suspensions.
How to Calculate Shock Absorber Stroke
Shock absorber stroke is the difference between the extended mounting length and the compressed mounting length. Both values must use the same reference points and units.
The formula is straightforward: stroke equals extended length minus compressed length. For example, if a hypothetical shock measures 25 inches at full extension and 15 inches at full compression, its total stroke is 10 inches.
This calculation describes the shock’s length change, not the wheel’s vertical travel. Suspension linkage, mounting angles, and motion ratios can cause the wheel to move a different distance from the shock.
Total stroke does not establish whether the shock is suitable for the vehicle without checking suspension geometry and travel.
How Much Stroke Should Remain at Ride Height?
At ride height, the shock should have enough compression travel and extension travel to accommodate the suspension’s intended movement. There is no single safe percentage that applies to every vehicle, because suspension design, motion ratio, bump-stop placement, and manufacturer limits vary.
For a simple calculation, subtract the installed length from the extended length to estimate the available extension distance. Subtract the compressed length from the installed length to estimate the available compression distance.
For example, if a hypothetical shock has a 25-inch extended length, a 15-inch compressed length, and a 19-inch installed length, it has 6 inches of extension distance and 4 inches of compression distance remaining. These are shock-axis distances, not wheel-travel measurements.
Available extension distance
Extended length minus installed length.
Available compression distance
Installed length minus compressed length.
Use the result carefully
Confirm that the available movement matches the suspension’s actual operating range.
How to Measure Shock Length on a Vehicle
Measuring a shock while it is installed can establish its current mounting distance, but it does not automatically reveal the shock’s full compressed and extended lengths. The installed measurement is one point within the suspension’s range of motion.
If you need to confirm the full operating range, consult the service manual or have a qualified technician inspect the suspension through its permitted travel. Do not disconnect suspension parts or move a loaded suspension without understanding spring forces and the correct support procedure.
Source: narodnatribuna.info
Measuring at Normal Ride Height
Park on level ground and establish the specified normal vehicle load and ride height. Identify the shock’s mounting points and measure their separation using the correct reference points. Record the value, vehicle load condition, and whether the measurement was taken with the tires on the ground.
This measurement can help compare the installed geometry before and after a suspension change. However, it should not replace the manufacturer’s required shock-length specifications.
Use a stable vehicle position
Keep the vehicle on its tires at normal ride height unless the service procedure requires another condition.
Avoid unsafe access
Do not reach beneath a vehicle supported only by a jack or place yourself in a suspension pinch point.
Measuring Suspension Travel
The suspension’s compression limit and extension limit determine the operating range the shock must accommodate. These limits may be set by bump stops, springs, control arms, ball joints, brake hoses, driveshafts, or other parts, depending on the design.
A shock should not act as an unintended suspension stop. If the damper bottoms out before the suspension reaches its designed compression limit, the impact can damage the shock or its mounts. If it tops out before the suspension reaches its designed extension limit, it can restrict travel and transmit force into the mounting structure.
Checking the full range may require safely supporting the chassis, controlling the suspension with suitable equipment, and following vehicle-specific procedures. Spring-loaded struts and coilovers require particular care. If you lack the proper equipment or training, have a suspension shop perform this check.
Compression limit
Confirm the shock does not bottom out before the suspension’s designed compression stop.
Extension limit
Confirm the shock does not limit movement before the suspension reaches its intended extension range.
Clearance
Check tires, control arms, brake lines, wiring, and other components throughout the permitted range.
How to Choose the Correct Replacement Shock Length
Choose a replacement shock by matching its mounting design, specified dimensions, usable travel, and application requirements. Matching the old shock’s extended length alone is not enough, because two shocks with similar overall lengths can have different compressed lengths or mounting arrangements.
For an unmodified vehicle, the original equipment part number or a verified application catalog is a useful starting point. For a lifted truck, lowered car, custom chassis, or off-road build, the actual suspension geometry and travel limits must also be checked.
A replacement may have the correct length but still be unsuitable because its mounting width, bushing, shaft design, damping characteristics, or load rating differs from the required specification. Confirm all relevant dimensions before ordering.
Source: YouTube > ridetechtv
Vehicle fitment
Verify year, make, model, trim, drivetrain, axle, and any factory suspension package that affects fitment.
Confirm that both limits work with the vehicle’s suspension geometry.
Damper travel and performance
Check the intended application and damping specification rather than selecting by length alone.
What Changes When a Vehicle Is Lifted or Lowered?
A suspension lift can increase the distance between shock mounts at ride height, but the amount depends on the suspension design. A longer shock is not automatically correct because the suspension’s maximum extension, compression limit, and component clearances may also change.
Lowering a vehicle can reduce the installed shock length and available compression travel. A shock that is too long when compressed may bottom out, while a shock with insufficient extension length can limit droop or top out during normal driving.
Measure the modified suspension in its actual configuration and use the lift or lowering kit manufacturer’s guidance. Do not assume that a particular lift height requires a fixed increase in shock length.
Lifted truck
Check the extended range, compressed clearance, brake-line slack, and other limits after the lift.
Lowered car
Check bump-stop clearance, compression travel, tire clearance, and the shock’s intended operating range.
Custom suspension
Use verified mounting coordinates and suspension-travel calculations to select a suitable damper.
Common Mistakes When Measuring Shock Absorber Length
Most measurement errors occur when people use the wrong reference points, confuse body length with mounting length, or assume that the shock’s current installed position represents its full travel. These errors can result in an incompatible part even when the recorded number looks correct.
A careful measurement process should be repeatable. If the numbers do not match the manufacturer’s specifications, check the measuring method, units, mounting style, and condition of the old shock before concluding that the specifications are wrong.
Source: YouTube > RoughTrax 4×4
Measuring the body instead of the mounting points
A shock’s tube length does not necessarily equal its mounting-to-mounting length. Use the manufacturer’s reference points.
Mixing inches and millimeters
Convert units before comparing measurements. One inch equals exactly 25.4 millimeters.
Measuring at an unknown suspension position
A measurement taken with the wheels hanging may differ from the length at normal ride height.
Assuming the old shock is correct
A previous owner may have installed an incorrect part, or the suspension may have been modified.
Ignoring mounting hardware
Bushing widths, bolt diameters, sleeves, and mounting faces can affect fit even when the length matches.
Forcing a shock to its limit
Do not use improvised tools to compress or extend a damper beyond its permitted range.
What to Do When Your Measurements Do Not Match
Repeat the measurement using the same reference points and confirm the units. If you measured the shock while it was installed, establish whether the suspension was at normal ride height, fully extended, or another position.
Check the part number and manufacturer drawing. If the old shock and replacement have different dimensions, verify whether they use different mounting designs or are intended for different suspension configurations.
If the difference remains unexplained, do not modify mounts or force the shock into place. Contact the manufacturer or a qualified suspension shop with the vehicle details, part numbers, mounting dimensions, and measured suspension travel.
Repeat the measurement
Check each dimension twice and record the mounting references.
Verify the application
Check the exact part number and vehicle configuration.
Resolve unexplained differences
Obtain technical guidance before installation or modification.
A Practical Shock Length Measurement Worksheet
A measurement worksheet makes it easier to compare the original shock with a replacement. Record the values and their sources before ordering parts, especially if the vehicle has aftermarket suspension components.
The example below is a blank reference format, not a specification for any particular car or truck. Fill in the dimensions for your own vehicle and verify them against the correct manufacturer’s documentation.
Source: detroitspeed.com
Vehicle information
Record the year, make, model, trim, drivetrain, axle position, and any lift or lowering modifications.
Mounting style
Record eye-to-eye, stem, stud, or another mounting configuration, including relevant hardware dimensions.
Extended length
Record the specified full-extension mounting distance and measurement source.
Compressed length
Record the specified full-compression mounting distance and measurement source.
Ride-height length
Record the installed mounting distance at the documented ride-height condition.
Calculated stroke
Subtract compressed length from extended length using the same units.
Final compatibility check
Confirm travel, mounting hardware, physical clearance, and vehicle-specific fitment.
Example Measurement Record
Consider a hypothetical shock with a 25-inch extended length, a 15-inch compressed length, and a 19-inch ride-height length. The calculated stroke is 10 inches, with 6 inches of extension distance and 4 inches of compression distance at the recorded ride height.
These figures demonstrate the calculation only. They are not a recommendation for a specific vehicle, and they do not establish that the shock will safely accommodate a suspension’s full movement.
Extended length
25 inches, hypothetical example.
Compressed length
15 inches, hypothetical example.
Ride-height length
19 inches, hypothetical example.
Calculated stroke
25 − 15 = 10 inches.
Research Notes and Important Evidence Limits
The measurement method in this guide is based on dimensional definitions, basic arithmetic, and established suspension-fitment principles. The stroke formula follows directly from the difference between the specified extended and compressed lengths.
No hands-on vehicle test or independent shock measurement was performed for this article. Numerical values used in the calculation examples are hypothetical and are included only to show how the formulas work.
The supplied image list includes manufacturer-oriented material, automotive technical content, and video thumbnails about measuring shocks and coilovers. These sources identify useful visual topics, but a picture alone does not establish a universal shock specification or prove that a given replacement fits a particular vehicle.
No live competitor-page audit or verified People Also Ask review is represented here. The follow-up topics included in this guide are inferred from the practical steps involved in measuring and selecting a shock, not claimed to be observed search-demand findings.
Documented calculation
Stroke equals extended length minus compressed length when both measurements use the same reference points.
Vehicle-specific requirements
The correct shock dimensions depend on the suspension design, mounting geometry, travel limits, and manufacturer requirements.
Unverified universal claims
No single shock length or ride-height travel split is suitable for every vehicle.
Next-Question Gap Map
The most useful next questions follow the reader’s path from measurement to a safe replacement. The coverage labels below describe this article’s treatment of those needs, not a verified comparison with all competing pages.
Reader stage: calculation. Basis: inferred next need. Coverage: answered. Benefit: supplies the formula and a worked example.
How do I choose shock length after lifting a truck?
Reader stage: selection. Basis: inferred next need. Coverage: answered at a general level. Benefit: highlights suspension travel and component clearance.
Can I use the old shock’s length to choose a replacement?
Reader stage: purchase. Basis: inferred next need. Coverage: answered. Benefit: explains why fitment and mounting details must also match.
How do I check the full suspension travel safely?
Reader stage: verification. Basis: inferred next need. Coverage: answered with limits. Benefit: identifies hazards and when professional help is appropriate.
Frequently Asked Questions
Q
How do you measure shock absorber length correctly?
Measure between the shock’s specified mounting reference points. For an eye-to-eye shock, measure from the center of one mounting eye to the center of the other. Record the length at the required position, such as full extension, full compression, or normal ride height.
Q
Do I measure a shock absorber from end to end?
Not always. Measuring from the outermost ends can include threaded studs, stems, or body sections that are not part of the specified mounting length. Use the manufacturer’s reference points for the shock’s mounting style.
Q
What is the difference between compressed and extended shock length?
Extended length is the mounting distance at the specified full-extension limit. Compressed length is the mounting distance at the specified full-compression limit. The difference between them is the shock’s total stroke.
Q
Can I measure shock absorber length without removing it?
Yes, you can often measure its installed length if the mounting points are accessible. This gives the distance at the current suspension position, not the shock’s full compressed and extended lengths. Use the service procedure and safe vehicle-support methods when access is limited.
Q
How do I know if a replacement shock is too long or too short?
Compare the replacement’s compressed and extended lengths with the suspension’s required travel and the manufacturer’s specifications. A shock that is too long when compressed may bottom out, while one with insufficient extension length may top out or restrict suspension droop. Check mounting dimensions and clearances as well.
Q
Does shock absorber length equal wheel travel?
No. Shock stroke measures movement along the shock’s axis, while wheel travel measures the wheel’s movement. The relationship depends on suspension geometry and the motion ratio, which may change as the suspension moves.
Q
Can I use a tape measure to measure shock length?
A tape measure can work for many accessible mounting distances. A steel ruler or caliper may be more useful for smaller dimensions. Accuracy depends on clear reference points, correct alignment, and measuring the shock in the specified position.
Q
Should I measure the shock before or after installing a lift kit?
For a modified suspension, measure and verify the final mounting geometry after the kit is installed according to its instructions. Also establish the required compressed and extended limits and check clearance through the permitted travel. Do not select a shock based only on lift height.
✦ Wrapping Up
Conclusion
Learning how to measure shock absorber length starts with using the correct mounting reference points. Measure extended length, compressed length, and installed length at ride height when applicable, then calculate stroke by subtracting the compressed length from the extended length.
Before buying a replacement, compare the dimensions with the vehicle’s required suspension travel, mounting hardware, and manufacturer specifications. This is especially important for lifted trucks, lowered cars, off-road vehicles, and custom suspension systems, where the original shock size may no longer be suitable.
If the measurements conflict with the manufacturer’s data or you cannot safely check the suspension’s full range, stop and seek help from a qualified suspension technician. Correct measurements are the first step toward choosing a shock that fits and allows the suspension to move as designed.
💡 Key Takeaway
Record the shock’s mounting style, extended length, compressed length, and ride-height length. Calculate the stroke, confirm vehicle-specific fitment, and verify full suspension travel before ordering or installing a replacement.
Eric
Hi, I’m Eric Bennett, the person behind OffRoadTruckAccessories.com.
I created this blog to share my interest in trucks, off-road driving, automotive accessories, and DIY modifications. I enjoy learning how different truck accessories work, testing their usefulness, and understanding whether they are truly worth buying.
Shock absorbers are located near the wheels as part of the suspension system, usually between the vehicle’s body, frame, or subframe and a suspension component such as a control arm, axle, or wheel assembly. However, the exact answer to where are shock absorbers located on a car depends on the suspension design. Some vehicles have…
You should change shock absorbers when they are worn, leaking, damaged, or no longer controlling suspension movement properly. There is no single replacement interval that applies to every vehicle because shock absorber life depends on road conditions, vehicle weight, driving habits, suspension design, and component quality. If you are wondering when to change shock absorbers,…
A shock absorber is a suspension component that controls how quickly a vehicle’s suspension moves up and down after bumps, dips, braking, acceleration, and other road inputs. It works with the springs to prevent excessive bouncing and helps keep the tires in controlled contact with the road. So, what does a shock absorber do? It…
A gas shock absorber is a hydraulic shock absorber that uses pressurized gas, usually nitrogen, along with shock absorber oil to control suspension movement. The gas helps reduce oil foaming and keeps damping performance more consistent when the shock works repeatedly or under demanding conditions. If you are wondering what is a gas shock absorber,…