
How to Replace Lower Control Arm Dodge Charger: Step-by-Step Guide
Learning **how to replace lower control arm Dodge Charger** parts can save a large part of the labor cost of a suspension repair. The basic job is not hard to understand. The challenge is knowing which lower arm your Charger uses, dealing with tight hardware, and tightening the new part in the right position.
The Charger uses an independent suspension with several links and control arms. The exact layout changes by model year, trim, drivetrain, and whether you are working on the front or rear suspension. A 2006 Charger, for example, does not have every suspension detail in common with a much newer model.
I treat control arm work as a safety-critical repair. I never rely on a floor jack alone, and I do not guess at final torque values. Factory specifications can change by year and bolt location, so use the service information for your exact VIN, model year, drivetrain, and suspension package.
This guide explains **how to replace lower control arm Dodge Charger** components in a practical way. It covers diagnosis, tools, preparation, removal, installation, bushing preload, alignment, and common mistakes so you can approach the repair with a clear plan.

Know Which Dodge Charger Lower Control Arm You Are Replacing
Before learning **how to replace lower control arm Dodge Charger** suspension parts, identify the exact arm. This matters because a Charger may have separate forward and rearward links in the front suspension rather than one simple wishbone-shaped arm.
The rear suspension also uses several links. A part sold as a rear lower control arm may not be the same link as another seller calls a lower rearward arm. Compare the replacement part with the arm on the car before taking anything apart.
Use your Charger model year, engine, drivetrain, and VIN when you buy parts. AWD and RWD versions can use different components. Performance packages may also affect suspension hardware or part fit.

- ✦ Front or rear
Confirm which axle has the failed arm before ordering a replacement.
- ✦ Forward or rearward arm
Some Charger front suspensions use more than one lower link, so identify the exact position.
- ✦ RWD or AWD
Check drivetrain fitment because suspension parts can differ.
- ✦ Model year
Do not assume one Charger generation uses the same arm or hardware as another.
What Does the Lower Control Arm Do?
The lower control arm or lower suspension link helps locate the wheel while still allowing the suspension to move up and down. It connects part of the wheel or steering knuckle assembly to the vehicle structure or subframe.
Rubber bushings reduce vibration at the chassis end. Depending on the arm design, the outer end may use a ball joint or another joint that allows controlled movement as you steer and drive over bumps.
- ✦ Controls wheel movement
The arm helps keep the wheel in its intended path.
- ✦ Supports suspension geometry
It helps maintain proper wheel position while the suspension moves.
- ✦ Isolates vibration
Its rubber bushings help keep road vibration out of the body.
Signs Your Dodge Charger Lower Control Arm May Need Replacement
Do not replace a control arm only because you hear a noise. Several suspension parts can cause similar sounds. Inspect the arm, bushings, ball joint, sway bar links, tie rods, wheel bearing, and nearby hardware before buying parts.
A worn lower control arm bushing may allow the wheel to shift more than it should. You may notice a clunk when braking, accelerating, or driving across rough pavement. Steering can also feel less precise.
A damaged ball joint or badly worn bushing can become a safety issue. If the wheel has major looseness, the arm is bent, or a joint is close to separation, avoid driving the car until it has been inspected and repaired.

- ✦ Clunking noise
A worn bushing or joint may clunk when the suspension loads and unloads.
- ✦ Uneven tire wear
Excess movement can change wheel alignment and wear a tire unevenly.
- ✦ Steering wander
The car may feel less stable when a suspension joint or bushing has too much play.
- ✦ Cracked bushings
Severe cracks, separation, or movement between the rubber and sleeve can indicate failure.
- ✦ Bent arm
Impact with a pothole, curb, or road debris can bend a suspension link.
Check the Arm Before Replacing It
Raise the vehicle safely and look for torn rubber, displaced bushings, bent metal, loose joints, or shiny marks where parts have been moving against each other. A pry bar can help check movement, but use light force and compare both sides.
If you cannot tell whether the movement is normal, have the suspension checked by a qualified technician. Correct diagnosis is cheaper than replacing good parts.
- ✦ Inspect visually first
Look for obvious damage before moving suspension parts.
- ✦ Compare both sides
Side-to-side comparison can make unusual movement easier to spot.
Tools and Parts Needed for the Job
Having the right tools makes **how to replace lower control arm Dodge Charger** work much safer and faster. Rust and tight suspension bolts are common, especially on cars driven through northern U.S. winters where road salt can corrode hardware.
Socket sizes and specialty tools vary by Charger generation and by the arm being replaced. Check the new part and the hardware on the car before starting. You may also need new one-time-use nuts or bolts if the factory procedure requires them.
- ✦ Floor jack
Use a jack with enough capacity to lift the vehicle safely.
- ✦ Jack stands
Support the Charger at approved lift points. Never work beneath a car held only by a jack.
- ✦ Wheel chocks
Chock the wheels that remain on the ground.
- ✦ Socket and wrench set
Use quality metric sockets and wrenches that fit the suspension hardware correctly.
- ✦ Breaker bar
This gives you more leverage on tight fasteners.
- ✦ Torque wrench
Use it for final tightening according to the specification for your exact Charger.
- ✦ Ball joint separator
A suitable separator may be needed if the arm uses a tapered ball joint connection.
- ✦ Penetrating oil
It can help free rusted bolts and nuts.
- ✦ Replacement control arm
Match the new arm to the model year, position, drivetrain, and suspension configuration.
- ✦ Replacement hardware
Use new locking nuts or specified bolts when the repair information calls for replacement.
Should You Buy a Complete Arm or Only a Bushing?
A complete control arm is often easier for a DIY repair because the new bushings may already be installed. Some assemblies also include a ball joint. Always check the product description instead of assuming the joint is included.
Replacing only a pressed-in bushing can cost less in parts, but it usually needs a press or special bushing tools. A complete arm can also reduce the chance of damaging a new bushing during installation.
- ✦ Complete arm
Usually faster to install and may include pre-installed bushings or joints.
- ✦ Bushing only
Can cost less but may require pressing equipment and more labor.
How to Prepare Your Dodge Charger for Lower Control Arm Replacement
Good preparation is a major part of **how to replace lower control arm Dodge Charger** components safely. Work on a hard, level surface with enough room to move around the car.
Apply the parking brake when appropriate for the axle you are servicing and chock the wheels that stay on the ground. If the repair procedure requires a different parking brake setup for rear suspension work, follow the service information for that job.
Before lifting the car, loosen the wheel lug nuts slightly. Do not remove them yet. Raise the Charger at an approved lifting point, place it securely on jack stands, and then remove the wheel.

- ✦ Park on level ground
Avoid soft soil, slopes, gravel, or unstable surfaces.
- ✦ Chock the wheels
Prevent the car from rolling while you work.
- ✦ Loosen lug nuts first
Break them loose before the tire leaves the ground.
- ✦ Use approved support points
Consult the owner’s or service information for correct lift and stand locations.
- ✦ Remove the wheel
With the car firmly supported, remove the wheel for access to the suspension.
Support the Suspension When Needed
Place a jack under the appropriate suspension member if the procedure requires support. Use only light support. Do not lift the vehicle off the jack stand.
The jack can help control suspension movement when a bolt comes out. It can also help place the suspension near normal ride height later when certain rubber-bushing bolts are tightened.
- ✦ Keep the car on the stand
A suspension jack is for controlled support, not for replacing the primary jack stand.
How to Replace Lower Control Arm Dodge Charger Step by Step
The exact steps depend on the Charger year and which lower arm you are replacing. The sequence below describes the common process for a lower suspension arm. Use your vehicle’s factory service procedure for exact fastener locations, torque values, and any steps that differ.
Take photos before removing parts. I find this especially useful on multi-link suspensions because several arms sit close together. A photo gives you a quick reference for washer position, bolt direction, brackets, and routing.

- ✦ Step 1: Inspect the work area
Locate both control arm mounting points and make sure you know which bolts belong to the arm.
- ✦ Step 2: Apply penetrating oil
Treat rusty fasteners and allow the oil time to work before applying heavy force.
- ✦ Step 3: Support the suspension
Use a jack under the proper suspension point if support is needed to control movement.
- ✦ Step 4: Remove interfering parts if required
Some arm positions may require moving a shield, bracket, sway bar connection, or another component for access.
- ✦ Step 5: Disconnect the outer end
Remove the nut or bolt that connects the control arm to the knuckle or related suspension member.
- ✦ Step 6: Separate the joint safely
If the arm uses a tapered joint, use the correct separator and avoid damaging parts that will be reused.
- ✦ Step 7: Remove the inner mounting bolt
Hold the bolt and nut securely, then remove the pivot hardware from the chassis or subframe.
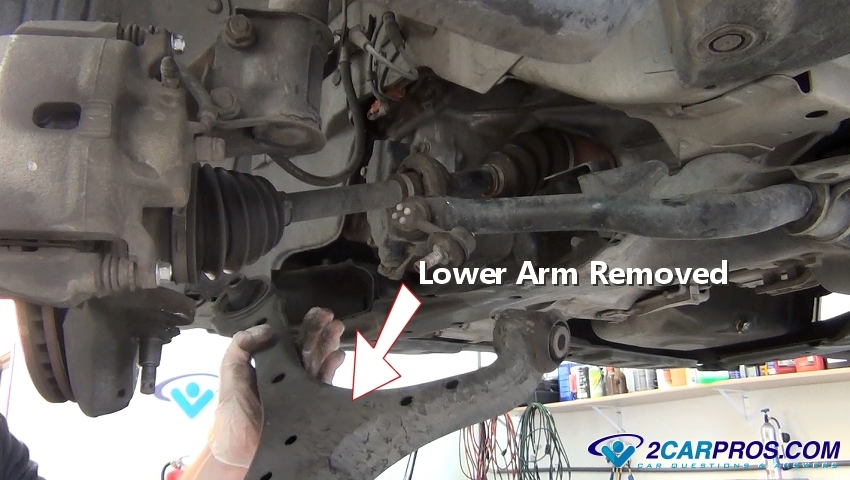
- ✦ Step 8: Remove the old arm
Work the arm out carefully without stretching brake hoses, ABS wiring, or nearby components.
- ✦ Step 9: Compare old and new parts
Check length, shape, bushing position, joint style, and mounting holes before installation.
- ✦ Step 10: Install the replacement arm
Place the new arm in position and install its hardware loosely enough to allow alignment of all mounting points.
- ✦ Step 11: Connect the outer joint
Install the outer fastener or joint connection according to the correct service procedure.
- ✦ Step 12: Set final fastener torque
Torque each fastener to the specification for your exact Dodge Charger and arm location.
Removing a Tapered Ball Joint Connection
If your lower arm has a tapered ball joint stud, remove the retaining nut as directed by the service procedure. Use a proper ball joint separator to break the taper loose.
Do not strike sensitive aluminum parts, the threaded stud, or the brake assembly without knowing the approved procedure. Protect the ball joint boot if the joint will be reused.
- ✦ Use the correct separator
A proper tool reduces the risk of damaging the knuckle or joint.
- ✦ Protect nearby parts
Watch the brake hose, ABS sensor wire, rotor, and dust shield while working.
Dealing With a Seized Control Arm Bolt
A seized bolt can turn a simple repair into a difficult one. Apply penetrating oil and clean exposed threads before using more force. A six-point socket can reduce the chance of rounding a damaged fastener.
If the bolt has seized inside a metal bushing sleeve, removal may require more advanced tools. Heat can damage rubber, coatings, fuel lines, brake hoses, wiring, and other nearby parts, so do not use it casually.
- ✦ Stop before rounding the bolt
Switch tools or methods if the fastener starts to deform.
- ✦ Replace damaged hardware
Do not reuse badly corroded, stretched, or damaged suspension bolts.
How to Install the New Lower Control Arm Correctly
Installation is more than doing the removal steps in reverse. Pay close attention to hardware direction, bushing position, and the way the arm sits in its mounting bracket.
Start bolts by hand whenever possible. If a bolt will not enter easily, do not pull the parts together with an impact wrench. Adjust the suspension height or arm position until the holes line up correctly.
This part of **how to replace lower control arm Dodge Charger** work is where patience matters most. Forcing a misaligned bolt can damage threads, deform a bracket, or create problems during final tightening.
- ✦ Check part orientation
Make sure the new arm faces the same direction as the original.
- ✦ Start hardware by hand
This helps prevent cross-threading.
- ✦ Do not force alignment
Move the suspension slightly until mounting holes align.
- ✦ Use new specified hardware
Replace single-use or locking fasteners when required.
- ✦ Torque accurately
Use a calibrated torque wrench and vehicle-specific specifications.
Why Bushing Bolt Position Matters
Many suspension bushings use bonded rubber. When the center sleeve is clamped in place, the rubber twists as the suspension moves. If you lock that sleeve while the suspension hangs, the bushing may sit twisted at normal ride height.
That preload can shorten bushing life and can make the suspension sit or move incorrectly. When the service procedure requires it, place the suspension at its specified normal position before applying final torque to the pivot bolt.
- ✦ Follow factory procedure
Not every suspension joint uses the same tightening method.
- ✦ Avoid unnecessary bushing preload
Correct suspension position helps bonded rubber bushings rest normally at ride height.
Lower Control Arm Torque Specifications
Do not use a universal torque number for a Dodge Charger lower control arm. Torque values can vary by model year, axle, arm position, bolt size, drivetrain, and suspension configuration.
For that reason, this guide does not give one number and pretend it fits every Charger. Check factory service information or a trusted repair database using your exact vehicle details.
Some suspension hardware may also use a torque-plus-angle method or require new hardware. Follow those instructions exactly. A bolt that feels tight is not a substitute for a verified specification.
- ✦ Verify model year
Torque values can change between Charger generations.
- ✦ Identify the exact arm
Forward, rearward, front, and rear links may use different fasteners.
- ✦ Check hardware rules
Some nuts or bolts may be specified for one-time use.
- ✦ Use a torque wrench
Final suspension tightening should be measured, not guessed.
Where to Find the Correct Torque Value
The best source is the service information for your exact Dodge Charger. Enter the model year, engine, drivetrain, and suspension configuration before using any specification.
If two sources give different numbers, stop and identify which one matches the exact fastener you are tightening. Similar-looking suspension bolts do not always share the same specification.
- ✦ Match the exact fastener
Use the specification tied to that control arm mounting location.
Reinstall the Wheel and Perform Final Safety Checks
Once the suspension hardware is correctly installed and torqued, reinstall anything you removed for access. Check that brake hoses and ABS wiring sit in their proper clips and have enough clearance through the steering and suspension range.
Install the wheel and snug the lug nuts. Lower the Charger carefully, then torque the wheel fasteners to the correct specification using the proper tightening pattern.
Before driving, inspect the work area one more time. Make sure no tools remain under the car and confirm that every removed fastener has been reinstalled.

- ✦ Check all fasteners
Verify every control arm and related fastener has been installed and tightened correctly.
- ✦ Check brake hoses
Make sure hoses are not twisted, stretched, pinched, or rubbing.
- ✦ Check ABS wiring
Confirm wiring is clipped away from the tire and moving suspension parts.
- ✦ Torque the wheel
Use the specified lug nut torque after lowering the vehicle.
First Test Drive
Start with a short, slow drive near your work area. Listen for clunks, scraping, or other new noises. Pay attention to steering feel and whether the vehicle pulls strongly to one side.
If anything feels unsafe or unusual, stop and inspect the repair. Do not continue driving in the hope that a loose suspension part will settle into place.
- ✦ Drive slowly first
Use a low-speed test before normal road driving.
- ✦ Stop for unusual behavior
Recheck the repair if you hear new noises or notice unstable steering.
Do You Need an Alignment After Replacing a Lower Control Arm?
Yes, getting a wheel alignment after lower control arm replacement is a smart step. The arm helps position the wheel, so replacing it can change alignment even when the new part appears identical to the old one.
A worn bushing may have allowed the wheel to sit in the wrong position before the repair. The new arm can restore that position and reveal alignment settings that now need correction.
For **how to replace lower control arm Dodge Charger** repairs, I consider an alignment part of finishing the job rather than an optional extra. It protects the tires and confirms that wheel angles are within the proper range.
- ✦ Protects tire life
Correct alignment helps prevent rapid inner or outer edge wear.
- ✦ Improves tracking
Proper wheel angles help the Charger track more predictably.
- ✦ Checks suspension geometry
Alignment measurements can help reveal a bent or incorrectly installed component.
Can You Drive to the Alignment Shop?
A short drive may be reasonable if the control arm is installed correctly, every safety-critical fastener is torqued, and the vehicle feels stable. Keep the trip short and avoid high speeds if alignment is clearly off.
If the steering wheel is severely off-center, the tire rubs, the car pulls hard, or a wheel looks visibly misaligned, do not keep driving. Recheck the repair or arrange safer transport.
- ✦ Use judgment
Do not drive a car that shows signs of a serious suspension or alignment problem.
Common Mistakes to Avoid During Dodge Charger Control Arm Replacement
Many problems after a control arm job come from installation errors rather than the replacement part itself. Taking an extra few minutes to check hardware, bushing position, and wire routing can prevent a second repair.
One mistake I always watch for is fully tightening a bonded-rubber pivot bushing with the suspension hanging when the repair procedure calls for tightening at normal position. Another is ordering the wrong lower link because the Charger has several suspension arms that look similar in online photos.
The safest way to handle **how to replace lower control arm Dodge Charger** work is to combine a clear general process with vehicle-specific service data.

- ✦ Ordering the wrong arm
Verify front or rear, left or right, forward or rearward position, model year, and drivetrain.
- ✦ Working under a jack
Always use correctly placed jack stands on a stable surface.
- ✦ Guessing torque
Use the correct specification instead of relying on an impact wrench or feel.
- ✦ Cross-threading bolts
Start hardware by hand and correct alignment before tightening.
- ✦ Damaging the ball joint boot
Use the proper separator if a joint will be reused.
- ✦ Stretching ABS wiring
Watch wiring and brake hoses whenever the knuckle moves.
- ✦ Skipping alignment
Suspension work can affect wheel angles and tire wear.
Do Not Use an Impact Wrench for Final Torque
An impact wrench is useful for removal, but it does not tell you the exact final clamping force. For critical suspension hardware, finish the job with the specified procedure and a torque wrench.
Over-tightening can damage threads or hardware. Under-tightening can allow unwanted movement. Both can create serious suspension problems.
- ✦ Use impact tools carefully
They can speed up removal but should not replace measured final tightening.
Should You Replace Dodge Charger Lower Control Arms in Pairs?
You do not always have to replace both lower control arms just because one has failed. If the opposite arm is tight, undamaged, and its bushings remain healthy, replacing only the bad part can be reasonable.
Pair replacement makes more sense when both sides have similar mileage and both show cracking, looseness, or age-related wear. It can also save labor if the second arm is already close to failure.
Inspect the matching arm before deciding. Replacing a good suspension part only because it is on the other side is not always necessary.
- ✦ Replace one side
Reasonable when the other arm tests good and has no significant wear.
- ✦ Replace both sides
Worth considering when both sides show similar wear or high-mileage deterioration.
- ✦ Align afterward
A wheel alignment remains advisable whether you replace one arm or both.
Should Upper and Lower Control Arms Be Replaced Together?
Not automatically. Upper and lower arms perform related jobs, but one can wear out before the other. Inspect each joint and bushing separately.
If several suspension parts are worn at the same time, replacing them during one repair can reduce repeated labor and alignment costs. The decision should come from inspection rather than a fixed rule.
- ✦ Inspect each component
Replace parts based on wear, damage, and measured looseness.
How Long Does Dodge Charger Lower Control Arm Replacement Take?
The time needed depends on experience, tool access, rust, and which arm you are replacing. A clean vehicle with accessible hardware can be much easier than a northern car with bolts seized inside bushing sleeves.
A first-time DIY repair may take several hours because you need time to lift the car safely, identify the correct hardware, deal with tight fasteners, and verify final torque. There is no benefit in rushing suspension work.
A professional shop with a lift, air tools, and experience may complete the same repair much faster. Extra time may be needed if bolts break, mounting points are damaged, or other worn suspension parts are found.
- ✦ Rust adds time
Corroded bolts can become the hardest part of the repair.
- ✦ Tool access matters
A lift and specialty tools can reduce removal time.
- ✦ Different arms vary
One Charger lower link may be much easier to reach than another.
When Should You Let a Shop Handle the Repair?
Use a professional shop if you cannot support the car safely, do not have the required tools, or find damaged mounting points. A shop is also the safer choice when bolts are severely seized or you are unsure whether a ball joint is properly seated.
Suspension parts directly affect steering and wheel control. If you are uncertain about a critical step, professional inspection is a sensible part of the repair.
- ✦ Safety comes first
Do not attempt the repair without stable vehicle support and suitable tools.
What to Check After the Replacement
Finishing **how to replace lower control arm Dodge Charger** work includes checking the repair after the car is back on the road. Listen for noises during the first few drives and watch how the steering feels.
Inspect the repaired area again if you hear a clunk or notice a pull. Look for loose hardware, contact marks, damaged boots, or wiring that has moved out of place.
Keep an eye on the tires over the next several hundred miles. New uneven wear can point to an alignment issue or another worn suspension component.
- ✦ Listen for clunks
A new noise after the repair should be checked promptly.
- ✦ Watch steering feel
The car should feel stable and predictable after repair and alignment.
- ✦ Inspect tire wear
Uneven wear can reveal an unresolved alignment or suspension issue.
- ✦ Recheck visible components
Look for displaced clips, damaged boots, or signs of unwanted movement.
What If the Clunk Is Still There?
If the original noise remains, do not assume the new control arm is bad. Sway bar links, upper arms, tie rods, struts, mounts, wheel bearings, brake hardware, and other suspension joints can make similar sounds.
Reinspect the vehicle and confirm the original diagnosis. A chassis-ear test or professional suspension inspection can help locate a noise that is hard to reproduce in the garage.
- ✦ Diagnose the remaining noise
Avoid replacing more parts until you confirm where the movement or sound comes from.






