
How Do Control Arms Work: Clear Overview and Expert Insights
When a car develops a clunk over potholes, wanders during braking, or wears one tire faster than the other, the control arm may be part of the problem. This suspension link is easy to overlook because it sits underneath the vehicle, but it has an important job: it lets the wheel move up and down while helping keep that wheel in the correct position.
So, how do control arms work? A control arm connects the steering knuckle or wheel hub area to the vehicle’s frame or subframe through flexible bushings and, usually, a ball joint. It guides suspension movement without allowing the wheel to move freely forward, backward, or sideways.
The spring and shock absorber handle much of the vertical movement, while the control arm manages the geometry.
This guide explains the parts, shows how to inspect them without guessing, and helps you check whether your observations point to a control arm, bushing, ball joint, or another suspension component. You will also learn when a repair is beyond a safe driveway inspection and why an alignment check often matters after suspension work.
At a glance
- A control arm guides wheel movement while allowing the suspension to travel.
- Worn bushings usually allow excess movement, while a worn ball joint can create dangerous looseness.
- Use a safe visual and movement inspection, then confirm suspected faults before buying parts.
How Do Control Arms Work? Inspect the Suspension Safely
A control arm does not hold the vehicle up by itself. Instead, it forms part of the suspension linkage between the body and the wheel assembly. Most vehicles have an upper control arm, a lower control arm, or only a lower arm depending on the suspension design.
MacPherson-strut systems commonly use a lower control arm with a strut, while other designs use multiple arms to control the wheel more precisely.
The following method is for understanding and checking the system, not for replacing a control arm. Begin with simple observations, then inspect the arm, bushings, and ball joint with the vehicle properly supported. Stop if the vehicle cannot be lifted and secured safely, or if you find severe looseness in a ball joint.
Tools you will need
- Vehicle owner’s manual or repair information, to identify approved lift points and suspension layout
- Flashlight, for viewing bushings, fasteners, and damaged components
- Floor jack and jack stands rated for the vehicle, if raising the vehicle is necessary
- Wheel chocks, to prevent rolling while the vehicle is parked
- Optional: pry bar, used only for a controlled bushing inspection and never as a substitute for safe support
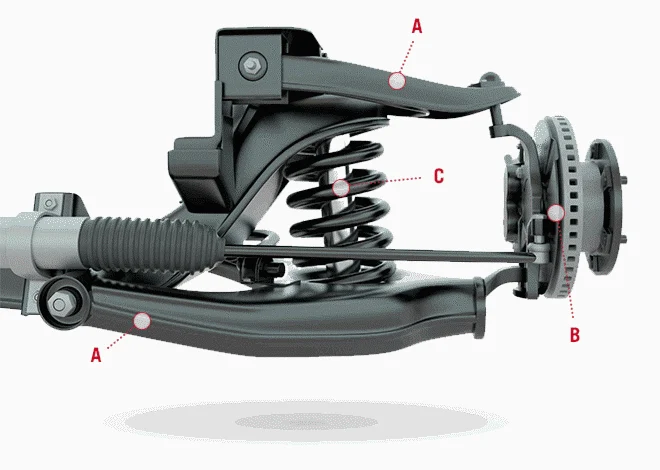
Step 1 Identify the control arm and suspension layout
Park on a level, firm surface, turn the engine off, and apply the parking brake. Chock the wheels that will remain on the ground. Look behind the front wheel, or consult the vehicle’s service information, to locate the control arm.
A typical control arm is a strong steel or aluminum link shaped like an A, a wishbone, or a straight bar. One end connects near the wheel carrier through a ball joint; the inner end connects to the body or subframe through one or more bushings. The ball joint is a swiveling joint that allows the steering knuckle to turn and move with the suspension.
A bushing is a rubber or rubber-like sleeve that permits limited movement while filtering vibration.
Do not assume every vehicle has the same arrangement. Some rear suspensions use several separate links instead of a traditional wishbone, and a visible arm may not be called a control arm in the parts catalog. Correct identification prevents you from inspecting or ordering the wrong component.
Step 2 Separate normal suspension movement from a symptom
Before lifting anything, note what the vehicle actually does. Drive slowly on a familiar, safe road and listen for a repeatable clunk over small bumps. Notice whether the steering wheel pulls during braking, whether the car wanders, or whether the steering feels loose after hitting a pothole.
Inspect the tires as well. Wear concentrated on one edge can result from an alignment problem, bent suspension part, worn bushing, incorrect tire pressure, or several issues together. A control arm problem is more convincing when the tire wear appears with a knock, visible bushing damage, or measurable looseness.
Some noises do not come from the control arm. A stabilizer-bar link, tie-rod end, strut mount, brake hardware, or engine mount can also knock over bumps. Treat the symptom as a clue rather than proof.
Step 3 Raise and support the vehicle only if needed
If the visual inspection cannot be completed with the vehicle on the ground, use the owner’s manual to find the correct jacking and support points. Loosen nothing and never place any part of your body under a vehicle supported only by a floor jack.
Lift one end at a time on solid, level ground, then place jack stands at the manufacturer-approved support points. Leave the jack positioned as a secondary support only if it can remain safely placed without interfering with the inspection. Confirm that the vehicle is stable before reaching near the wheel or suspension.
Important
Do not support the vehicle under a thin control arm, plastic panel, brake line, or other unapproved point. If the ground is soft, sloped, or cracked, postpone the inspection or use a properly equipped service facility.
Step 4 Inspect the control arm and bushings visually
Use a flashlight to examine the arm from the inner mounting points to the ball-joint area. Look for a bent arm, cracked metal, corrosion that has weakened the structure, missing fasteners, or signs that the arm has contacted another component.
Examine each control arm bushing. Small surface cracks in old rubber are not automatically a failure, but torn rubber, rubber pulled away from its outer shell, a shifted sleeve, or metal-to-metal contact is more concerning. Fluid-filled bushings may show a wet or oily-looking leak when damaged, although ordinary road grime can look similar.
Check whether the ball-joint dust boot is split, missing, or leaking grease. The boot protects the joint from water and grit; a damaged boot does not prove the joint is already loose, but it increases the chance of internal wear. Do not pack grease around an exposed joint and assume the problem is repaired.
Step 5 Check for wheel and ball-joint looseness
With the wheel installed and the suspension safely supported, grasp the tire at the top and bottom and rock it gently inward and outward. Movement at the 12-and-6 o’clock positions can indicate a ball joint or wheel bearing problem, though the exact result depends on the vehicle’s design.
Next, hold the tire at the 3-and-9 o’clock positions and repeat the movement. Looseness here more often suggests a tie-rod or steering linkage issue, but it can overlap with other faults. Have an assistant watch the ball joint, control arm, and steering parts while you apply only moderate force.
Any distinct clunk, visible separation, or movement at a joint is a reason to stop and arrange a professional inspection. The test can suggest where the play is located, but it cannot always identify the failed part from outside the vehicle.
Step 6 Observe the arm while the suspension is loaded
Some bushing problems are easier to see with the vehicle resting at normal ride height. If the vehicle is safely on the ground, have an assistant turn the steering wheel slightly left and right while you observe from outside the wheel area. Do not place your hands near moving parts.
Watch for an inner bushing sleeve that shifts excessively, a control arm that jumps rather than moving smoothly, or a wheel that visibly changes position. A small amount of controlled flex in a rubber bushing can be normal. A sharp shift, torn rubber, or knock is not a normal operating appearance.
If the vehicle must be raised to use a pry bar, follow the service procedure for that model. Applying force in the wrong direction can damage a good bushing or make normal compliance look like a defect. A pry bar is an optional diagnostic aid, not a general test for every suspension.
Step 7 Compare the opposite side and confirm the likely fault
Compare the suspected side with the matching side, looking for differences in bushing position, boot condition, corrosion, ride height, and movement. Suspension components do not always fail in pairs, but a side-to-side comparison can reveal an abnormal gap or bend.
Use the vehicle’s service information for the manufacturer’s play limits and inspection method when available. A shop may use a lift, a dedicated ball-joint gauge, a dial indicator, or a loaded suspension test because some joints feel tight when unloaded and loose when loaded. A useful way to approach how do control arms work is to check your progress after each stage.
At this point, separate what you know from what you suspect. “The bushing is torn” is a direct observation. “The control arm caused the tire wear” is a conclusion that may require alignment readings and inspection of other components.
Step 8 Decide whether the vehicle can be driven
A vehicle with a torn bushing but no looseness may sometimes be driven carefully to an inspection facility, but the decision depends on the damage and the manufacturer’s guidance. Avoid high speeds, hard braking, and rough roads when suspension movement is uncertain.
Do not drive the vehicle if a ball joint is visibly separating, the wheel sits at an abnormal angle, the control arm is bent or cracked, a wheel has substantial play, or steering control is seriously affected. Arrange towing or qualified assistance instead. A failed ball joint or mounting point can allow the wheel to move far enough to cause loss of control.
Step 9 Arrange repair and an alignment check
If a control arm or bushing is confirmed bad, use a replacement that matches the vehicle’s year, model, suspension design, and side of the vehicle. Some control arms are sold with bushings and ball joints installed; others require separate parts and special tools. Confirm the configuration before ordering.
After a control arm is replaced, the vehicle may need a wheel alignment. This is especially important if the arm was bent, if its mounting position affects suspension geometry, or if the steering wheel is no longer centered. Ask for an alignment inspection rather than assuming new parts automatically restore the correct angles.
What the Control Arm Does While You Drive
The control arm’s main job is to constrain the wheel’s path. As the wheel rises over a bump, the arm pivots around its inner bushings while the ball joint allows the steering knuckle to change angle. This arrangement permits vertical travel but limits unwanted movement toward the front, rear, or side of the car.

How the arm works with the spring and shock absorber
The coil spring supports the vehicle’s weight and compresses when the wheel moves upward. The shock absorber, often part of a strut assembly, controls the speed of that movement so the vehicle does not continue bouncing.
The control arm does a different job. It provides a guided path and carries suspension forces into the subframe or body. During braking, acceleration, cornering, and impacts, the arm and its mounts help preserve the designed relationship between the tire and the road.
Why bushings matter
Bushings are deliberately flexible. They absorb vibration and allow the control arm to pivot without requiring a metal joint at every mounting point. Their stiffness also affects how accurately the wheel stays positioned under load.
When a bushing wears, the arm can move farther than intended. Under braking, for example, the wheel may shift rearward or change its toe angle. The driver may feel a pull, a delayed steering response, or a knock as the bushing moves from one limit to another.
Why the ball joint matters
The ball joint is the pivot between the control arm and the steering knuckle. It allows the wheel to steer and move with the suspension while remaining attached to the vehicle.
Ball-joint wear can produce looseness, uneven tire wear, steering wander, or a clunk. Unlike a bushing, a severely worn ball joint can become a direct safety issue because the wheel carrier may no longer be securely guided. The acceptable movement varies by design, so a suspected ball-joint fault deserves prompt confirmation.
How to Verify the Diagnosis Before Replacing Parts
Learning how do control arms work is useful, but understanding the mechanism does not identify every noise. Verification means matching the symptom, the visible condition, and the movement test rather than replacing the most familiar part.
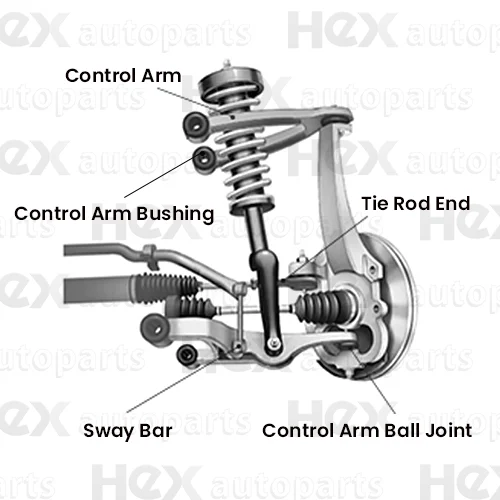
Match symptoms to likely causes
| Observation | Possible sources |
|---|---|
| Clunk over bumps | Control-arm bushing, ball joint, stabilizer link, strut mount, or loose hardware |
| Pull or wandering during braking | Control-arm bushing, alignment, brake imbalance, tire issue, or steering component |
| Play at the top and bottom of the wheel | Ball joint, wheel bearing, or another suspension connection |
| One-sided edge tire wear | Alignment change, bent part, worn joint, tire pressure, or suspension damage |
This table is a starting point, not a diagnostic verdict. For example, a clunk can come from a loose underbody shield, while tire wear can remain after a worn arm has already been replaced if the alignment was not corrected.
Know when a control arm replacement is not the answer
Inspect the tie-rod ends, stabilizer-bar links, strut mounts, wheel bearings, and subframe mounting areas when the symptoms do not match the control arm. Also check for loose lug nuts, damaged tires, and brake components before attributing every sound to suspension bushings.
A bent control arm may result from a curb or pothole impact, but the same event can bend a wheel, damage a tire, or shift alignment components. If the vehicle has suffered a hard impact, a complete suspension and steering inspection is safer than changing one visible part.
Check your result
A convincing diagnosis usually has at least one direct finding—such as a torn bushing, abnormal joint play, or a bent arm—along with a symptom that fits. If you have only a vague noise, keep the diagnosis open.
Common Inspection Mistakes and Practical Limits
Many control-arm inspections go wrong because the vehicle is tested in the wrong position or because normal rubber movement is treated as failure. A careful inspection is valuable, but it has limits without the correct specifications and equipment.
Mistaking surface cracks for complete bushing failure
Older rubber can show shallow cracks while still holding the inner sleeve in its intended position. Focus on separation, missing material, a shifted sleeve, metal contact, and excessive movement rather than judging the bushing by age alone.
Testing a ball joint with the wrong load condition
Depending on the suspension design, the spring’s load can either reveal or mask joint play. The manufacturer’s procedure may require supporting the lower arm, supporting the hub, or using a specific lifting method. If the result is unclear, do not force the joint or declare it good from one casual shake test.
Replacing only the noisy part without checking alignment
A new arm can restore the hardware while the tires remain misaligned. If the steering wheel is off-center, the car pulls, or the tire wear continues, request alignment measurements and inspect for another bent or worn component.
Using an impact tool on pivot fasteners without checking the procedure
Some control-arm fasteners must be tightened with the suspension at normal ride height, or their bushings can be preloaded and fail early. Other designs specify a torque angle or require new one-time-use hardware. Follow the vehicle-specific repair information rather than copying a generic tightening approach.
Control Arm FAQs for Beginners
These answers cover common questions that arise after a first inspection. Exact construction and test limits vary by vehicle.
Can I drive with a bad control arm?
It depends on the failure. A mildly worn bushing may allow a careful trip to a repair facility, but a loose ball joint, cracked arm, separated bushing, abnormal wheel angle, or severe steering problem makes driving unsafe. When in doubt, have the vehicle inspected or towed.
Do control arms affect alignment?
Yes. A bent arm, worn bushing, or incorrect replacement can change camber, caster, or toe-related suspension geometry. An alignment check is often appropriate after control-arm work, especially when the original problem followed an impact or caused uneven tire wear.
Should control arms be replaced in pairs?
Not automatically. The opposite side should be inspected, but only the failed side needs replacement unless the vehicle’s condition or repair recommendation supports replacing both. Replacing a good part solely because it is on the opposite side is not a universal requirement.
How long do control arms last?
There is no reliable single service interval. Lifespan depends on road conditions, impacts, corrosion, vehicle weight, bushing material, and driving habits. Inspect them when symptoms appear or during routine suspension and tire checks rather than replacing them by age alone.
Are control arms and wishbones the same thing?
Usually, “wishbone” describes an A-shaped control arm, especially an upper or lower arm with two inner mounting points. The terminology varies by manufacturer and suspension design, so use the vehicle’s parts information when identifying a replacement.
Use the Symptoms and the Inspection Together
Control arms work by guiding the wheel through suspension travel while their bushings and ball joints allow controlled movement, steering, and vibration isolation. That is why a damaged arm can affect more than ride comfort: it may change steering response, tire wear, braking stability, and alignment.
Now that you know how do control arms work, inspect the vehicle safely, document what you can actually see, and confirm any looseness before buying parts. If a joint is separating, the arm is damaged, or the diagnosis remains uncertain, stop the driveway inspection and use a qualified repair facility. A final alignment check can verify that the wheel is once again positioned correctly.






