To center an axle with an adjustable track bar, measure how far the axle sits off-center, adjust the bar length in small steps, and remeasure with the vehicle at normal ride height. Secure all fasteners to the vehicle or track bar maker’s specified torque, then check steering and suspension alignment.
On many solid-axle 4WD vehicles in the United States, a suspension lift changes the relationship between the frame and the axle. The track bar, also called a panhard bar, controls side-to-side axle movement. When the bar is too short or too long for the new ride height, the axle may sit closer to one side of the vehicle.
An adjustable track bar lets you correct that offset without changing the axle’s intended position by guesswork. The key is to measure both sides from repeatable reference points, keep the vehicle level and safely supported, and change the bar length only as much as needed. This guide applies to compatible solid-axle suspensions; exact procedures and torque values vary by vehicle, model year, lift setup, and track bar design.
Centering the axle does not automatically correct toe, caster, steering-wheel position, or every cause of poor handling. A vehicle that wanders, shakes, or pulls may have other faults, including worn joints, loose track bar mounts, incorrect alignment, or damaged steering parts. Inspect those items before treating track bar adjustment as the only solution.
A track bar links the axle to the vehicle frame or body structure. Its angled path limits side-to-side movement while the suspension travels up and down. On a solid front axle, it works with the control arms or other locating links to keep the axle in its intended position.
An adjustable track bar has a threaded section, turnbuckle-style body, or another approved length-setting design. Changing its effective length shifts the axle sideways relative to the frame when the suspension is at rest. This makes it useful after a compatible lift or when correcting an existing axle offset.
The bar does not independently set every suspension angle. Control arms, spring position, bracket geometry, bushings, and ride height all affect the final result. The adjustment range must suit the vehicle and suspension configuration.
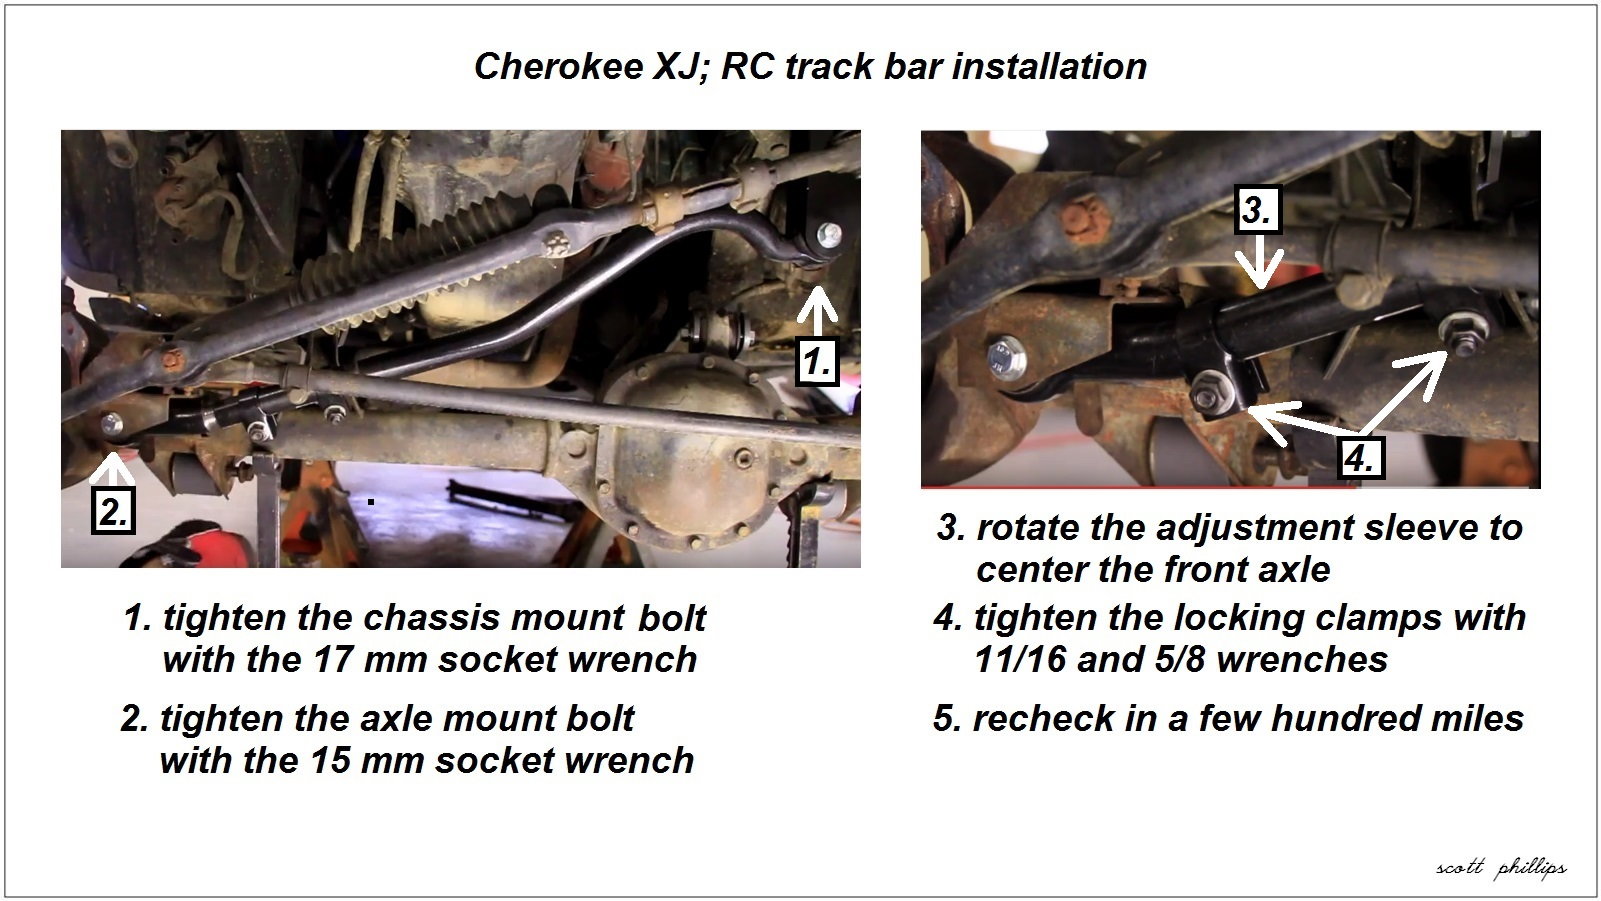
Source: www.rustysoffroad.com
Track bar length
Sets the lateral relationship between the axle and frame at the suspension’s current position.
Track bar mounts
Transfer lateral loads between the axle and frame. Loose, bent, cracked, or worn mounts must be repaired before adjustment.
Suspension ride height
Changes the angle of the track bar and can change the axle’s side-to-side position.
Why a Lift Can Move the Axle Off-Center
Many track bars follow an arc as the axle moves through its suspension travel. Raising a vehicle changes the resting position along that arc, which can pull the axle toward one side. The amount and direction depend on the bar angle, mount locations, suspension design, and lift height.
A lift does not always require an adjustable track bar. Some kits include geometry corrections or a different locating system. Check the lift manufacturer’s application notes before buying parts or changing an existing setup.
Common sign
The tires or fenders appear uneven from side to side even though the vehicle is parked on level ground.
Important limit
Uneven fender gaps alone do not prove the axle is off-center because body panels, flares, and factory tolerances may differ.
Front and Rear Track Bars Are Not Interchangeable by Assumption
Some vehicles use a track bar at the front axle, the rear axle, or both. Each bar has a specific job and may have a different shape, length, joint type, and mounting arrangement. Identify the axle you need to correct before starting.
A rear axle adjustment can affect rear wheel position relative to the body, while a front adjustment also relates to steering geometry. Use only a bar and adjustment procedure approved for the exact application.
Confirm fitment
Match the bar to the vehicle, axle, model year, suspension height, and mounting hardware.
Tools and Preparation Before Adjusting the Track Bar
Prepare the vehicle, measuring tools, and service information before loosening any suspension hardware. You need a repeatable measurement method and a safe way to keep the vehicle stable. Do not rely on visual judgment alone.
Work on firm, level ground. If the wheels must remain loaded for the centering measurement, do not crawl beneath a vehicle supported only by a jack. Follow the vehicle’s service manual for lifting and support points, and use appropriately rated equipment.
Source: dieselarmy.com
Measuring tape
Use a tape measure that can reach consistent frame or body reference points on both sides.
Hand tools
Use correctly sized sockets and wrenches for the track bar fasteners and adjustment jam nuts.
Torque wrench
Use a suitable torque wrench to tighten fasteners to the specified value.
Service information
Obtain the vehicle-specific tightening values, support procedure, and any requirements for ride-height loading.
Safety equipment
Use wheel chocks, approved jack stands when required, and eye protection. Never place any part of your body under an unsupported vehicle.
Inspect the Suspension Before Measuring
Check the track bar and its mounting points for loose hardware, damaged threads, cracked brackets, elongated holes, and worn bushings or joints. Inspect nearby steering links, control arms, springs, and axle mounts for visible damage.
If a mount is cracked or a bolt hole is damaged, stop and repair the fault before adjusting the bar. A length change cannot compensate for a loose or structurally damaged connection. If the bar has seized adjustment threads, follow the manufacturer’s service guidance rather than forcing the part.
Do not adjust around a fault
Repair damaged mounts, worn joints, and loose hardware first, then repeat the axle-position measurement.
Set Up a Repeatable Measurement
Park on level ground, set the parking brake, and place the transmission in the appropriate park or gear position. Chock the wheels as directed by the service procedure. Keep the tires at the specified pressure and remove unusual cargo that could alter ride height.
If the suspension was recently lifted, driven over uneven ground, or raised on a jack, allow it to settle according to the manufacturer’s procedure. Measure with the vehicle in a consistent state each time. If the service manual requires a particular loading condition, follow it.
Reference points
Choose matching points on the axle and frame or body that are easy to locate and measure accurately.
How to Measure Whether the Axle Is Centered
Measure the axle’s position relative to the frame or body, not just the tire’s distance from a fender flare. Bodywork can be uneven, and tire width, wheel offset, and flare shape can make tire-to-body measurements misleading.
The best reference points are those specified by the vehicle manufacturer or suspension kit maker. If none are provided, use matching structural points on the left and right sides and keep the measurement method consistent. Do not compare a frame measurement on one side with a body-panel measurement on the other.
Source: storage.googleapis.com
Method 1: Compare Axle and Frame Reference Points
Identify a repeatable point on each side of the axle and the corresponding frame or body reference. Measure the lateral distance from each reference pair. The difference between the left and right measurements indicates the direction and approximate amount of offset only when the chosen points have matching geometry.
Write down both readings before touching the adjustment. If the manufacturer’s procedure specifies a centerline measurement, use that method instead of creating your own reference system. A simple difference between two distances is not always equal to the axle’s true displacement if the reference points are not symmetric.
Record the baseline
Write down the left-side measurement, right-side measurement, vehicle loading, and ride-height condition.
Repeat the readings
Take each measurement again to confirm that tape placement and reference points have not changed.
Method 2: Check Wheel Position as a Secondary Reference
A tire-to-body comparison can help reveal a visible problem, but it should be treated as a secondary check. Measure from comparable points on the tire or wheel to the body on each side, keeping steering straight when checking the front axle.
A difference in tire clearance may result from body-panel variation, wheel offset, different tire sizes, or a bent component. If tire position and structural measurements disagree, investigate the reference points and suspension condition before adjusting the track bar.
Use visual checks carefully
Look for a clear side-to-side change, but do not use fender appearance as the only proof of correct axle centering.
Understand the Measurement Difference
Suppose a hypothetical vehicle’s approved symmetric reference measurements show a 0.75-inch difference between the two sides. That result may indicate an offset, but only if the reference geometry makes the difference directly comparable to lateral displacement. The actual axle correction must be based on the manufacturer’s measurement method.
Do not assume that turning the adjuster by a certain number of rotations will move the axle by the same distance. Thread pitch, bar angle, mounting geometry, and suspension position affect the relationship between adjuster movement and lateral axle movement.
Measure instead of guessing
Use the measured offset and the track bar maker’s adjustment instructions to decide how much to change the effective bar length.
How to Center the Axle With an Adjustable Track Bar
The correct method is to adjust the effective track bar length in small, controlled steps while repeatedly checking the axle position at the specified ride height. The following sequence is a general guide, not a replacement for the service procedure for a particular Jeep, truck, or other vehicle.
Some track bars must be adjusted with the vehicle at ride height; others have specific instructions for releasing or tightening hardware. Follow the component maker’s instructions for adjustment, joint orientation, thread engagement, and fastener torque. If the design does not permit safe adjustment in the installed position, use the prescribed removal and installation method.
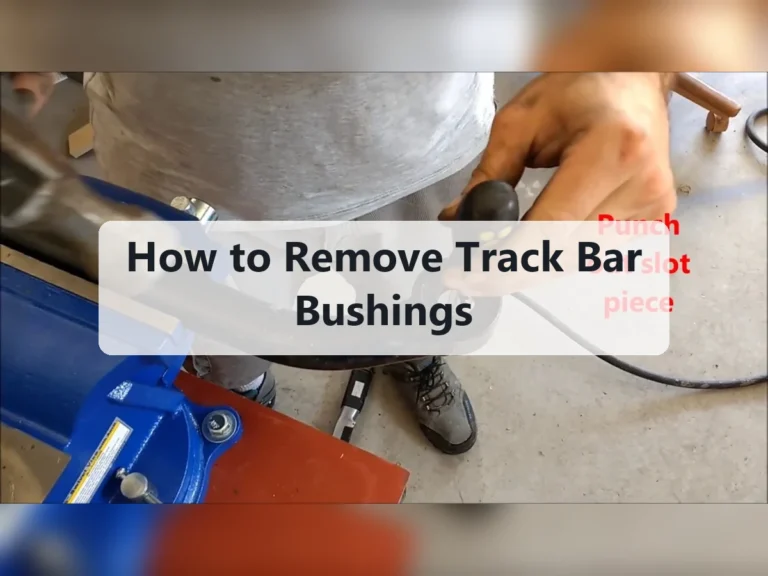
Source: www.youtube.com > The BFH Garage
Step 1: Confirm the Correct Track Bar and Adjustment Range
Verify that the adjustable bar is designed for the vehicle and the current suspension height. Check its minimum and maximum lengths, thread engagement limits, joint type, and required hardware. If the measured offset would push the bar outside its approved range, do not force the adjustment.
A bar that is too short or too long for the setup may indicate the wrong part, incorrect bracket geometry, or a lift configuration that needs additional correction. Resolve that issue before proceeding.
Confirm the part
Check the part number and fitment details against the vehicle and lift kit.
Step 2: Record the Starting Measurements
With the vehicle stable and at the required ride height, record the left and right axle reference measurements. Keep the steering straight for a front axle and use the same reference points for every later check.
Note which side of the axle appears closer to the frame or body. This helps you understand the direction of correction, but the exact adjustment direction must be confirmed from the bar’s mounting layout and the manufacturer’s instructions.
Create a baseline
Record both measurements before loosening hardware so you can judge whether each adjustment improves the result.
Step 3: Loosen the Adjustment Locking Hardware
If the track bar uses a threaded adjuster and jam nuts, loosen the locking hardware according to the maker’s instructions. Keep the bar ends and joints aligned as designed. Do not loosen axle or frame mounting bolts unless the procedure specifically calls for it.
If the mounting bolts are binding, the joint is under load, or the bar will not move without force, stop and follow the prescribed method for unloading the suspension or removing the bar. Do not hammer on threaded sections or damage the adjuster in an attempt to make it turn.
Protect the threads
Clean exposed threads as directed and use only approved methods to free a seized adjuster.
Step 4: Change the Effective Bar Length in Small Steps
Turn the adjuster in the direction that will move the axle toward the vehicle centerline. The correct direction depends on which end is threaded and how the bar is mounted, so verify it rather than assuming that clockwise always moves the axle one way.
Make a small adjustment, then settle the suspension using the approved procedure. Recheck the left and right reference measurements before making another change. Small steps make it easier to avoid overshooting and help reveal whether the adjustment is moving the axle in the expected direction.
Do not use a universal number of turns or a universal length change. Track bar designs vary, and the bar’s angle means an adjustment to its length does not translate directly into the same amount of sideways axle movement.
Adjust gradually
Make one controlled change at a time and record the new measurements.
Watch joint alignment
Keep rod ends, bushings, and mounting eyes within the orientation and articulation limits specified by the manufacturer.
Step 5: Settle the Suspension and Measure Again
After each change, return the vehicle to the specified measuring condition. If the tires were lifted, lower the vehicle using the correct procedure. Roll the vehicle a short distance or settle the suspension only when the work area and service instructions make that safe.
Repeat the same left and right measurements. If the difference decreases, the adjustment is moving in the desired direction. If the difference grows, stop and verify the direction of adjustment, measurement points, and the condition of the mounts before changing the bar again.
Keep the method consistent
Use the same reference points, surface, loading, and suspension position for each measurement.
Step 6: Lock the Adjuster and Tighten the Mounts
When the axle reaches the specified centered position, secure the adjuster locking hardware and any mounting fasteners that the procedure requires you to tighten. Use the exact torque values and tightening sequence provided for the vehicle and track bar. Do not substitute a generic torque figure.
Some suspension fasteners require final tightening at normal ride height to avoid preloading bonded rubber bushings. Others have different requirements. Follow the instructions for the specific joint and vehicle rather than applying one rule to every track bar design.
Confirm that the adjuster has the required thread engagement, the jam nuts are secure, and no brake hose, ABS wire, steering link, or other part is stretched or trapped. A centered axle is not a successful repair if the hardware is loose or a joint is misaligned.
Use specified torque
Refer to the vehicle service manual or the component manufacturer’s instructions for every fastener.
Verify clearance
Check for interference through the approved steering and suspension movement range.
Step 7: Perform a Final Measurement and Safety Check
Recheck axle position after all locking hardware is secure. Inspect the track bar ends, brackets, bolts, and nearby components. If the measured position changed when the fasteners were tightened, investigate why instead of accepting a result outside the specified tolerance.
If the vehicle has a front solid axle, also check steering-wheel position, alignment, and any relevant steering geometry. A track bar adjustment can change the relationship between the axle and frame, but it does not replace a proper alignment when one is required.
Document the result
Record the final measurements and the torque specifications used for future inspection.
How to Tell When the Axle Is Properly Centered
The axle is centered when the vehicle-specific reference measurements fall within the specified tolerance, the track bar remains within its approved adjustment range, and the suspension and steering parts are correctly secured. If the manufacturer provides a centerline or dimension, use that value rather than aiming for a visual match alone.
A good result should remain consistent after the vehicle is lowered, the suspension settles, and the locking hardware is tightened. If the axle appears centered only while a jack is supporting one side, the measurement is not a valid final check.
Source: dieselarmy.com
Matching reference measurements
The left and right readings agree with the specified centering method and tolerance.
Secure hardware
Mounting bolts and adjustment locks are tightened to the correct specifications.
No abnormal movement
The track bar and its mounts show no looseness, impact damage, or unwanted movement.
Clearance through travel
The bar, joints, steering parts, hoses, and wiring remain clear through the approved movement range.
Does Equal Fender Clearance Mean the Axle Is Centered?
Not always. Fender flares and body panels can differ from side to side, and wheel offset or tire width can affect how centered the tires look. Use structural reference points and the vehicle’s service specifications for the final decision.
A visual check is still useful as a quick screening tool. If the tires look uneven but the specified axle measurements are correct, inspect body alignment, wheel fitment, and other possible causes instead of continuing to lengthen or shorten the track bar.
Avoid chasing appearance
Do not adjust beyond the approved range just to make uneven body panels look symmetrical.
Common Problems and How to Fix Them
If the axle will not center, do not keep turning the adjuster without checking the cause. The problem may be a measurement error, a seized adjuster, damaged mounting hardware, an unsuitable track bar, or suspension geometry that the bar cannot correct by itself.
Start with the safest and simplest checks. Confirm the vehicle is at the correct ride height, repeat the measurements, and inspect the mounting points. If the hardware is damaged or the adjustment range is exhausted, stop and obtain the correct repair information or professional help.
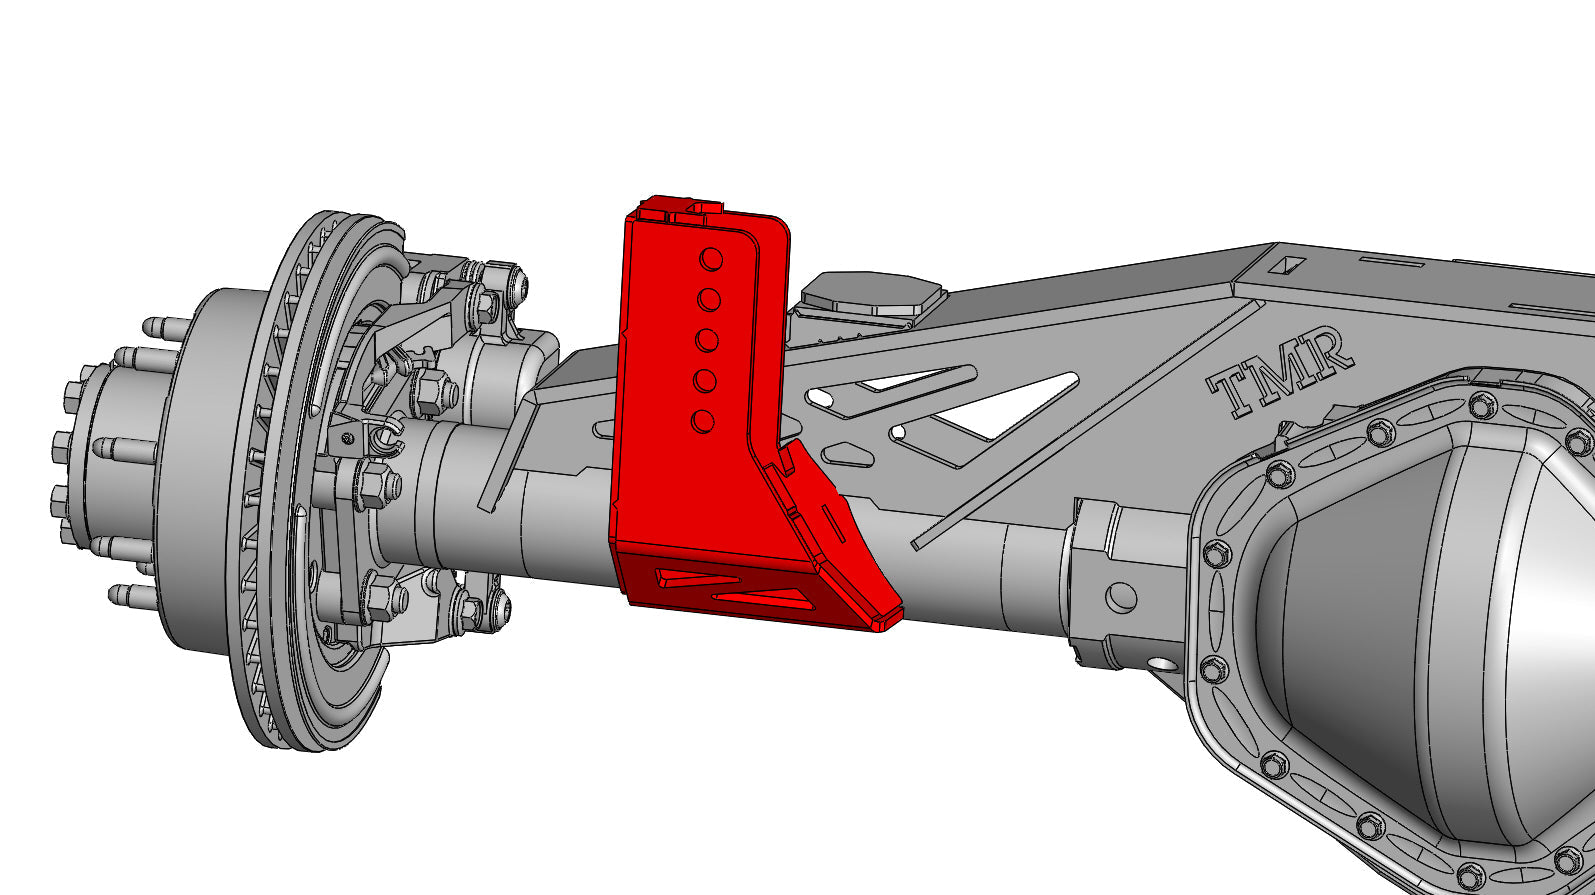
Source: tmrcustoms.com
The Axle Moves in the Wrong Direction
The adjuster may be turning the bar in the opposite direction from what you expected. The reference points may also be misleading if the frame and axle measurements are not symmetric.
Return to the baseline notes and verify the bar’s thread arrangement and mounting layout. Make only a small test change after confirming the correct direction, then remeasure.
Correction
Verify the adjustment direction and repeat the measurement using matching reference points.
The Adjuster Will Not Turn
Rust, dirt, damaged threads, corrosion between components, or load on the bar can prevent adjustment. Forcing the threads may damage the bar or weaken the connection.
Use the manufacturer’s procedure to clean or free the adjuster. If the bar must be removed or the suspension unloaded, follow the specified support and removal process. Replace components that have damaged threads or joints when required.
Correction
Stop applying force, inspect the threads and joint, and use only an approved repair method.
The Bar Reaches Its Limit Before the Axle Is Centered
An adjustment range limit can mean the track bar is not suited to the vehicle’s lift height, the wrong mounting bracket is installed, or another suspension part is incorrectly positioned. A bent axle or frame component can also cause an abnormal measurement.
Do not reduce required thread engagement or modify the bar to gain more adjustment. Confirm the part number and bracket configuration, then consult the suspension manufacturer or a qualified technician.
Correction
Check fitment and suspension geometry before selecting a bar or bracket designed for the application.
The Axle Will Not Stay Centered
If the axle position changes after driving or after the fasteners are tightened, inspect for loose bolts, worn bushings, loose rod ends, elongated mounting holes, and damaged brackets. A track bar joint should not be used to hide movement caused by a failed mount.
Do not continue driving a vehicle with a loose or damaged track bar connection. The bar is a key lateral locating link, and a failure can affect control of the vehicle.
Correction
Repair the faulty connection, tighten hardware to specification, and repeat the complete centering check.
The Steering Wheel Is Off-Center After Adjustment
An off-center steering wheel can be related to steering linkage geometry, alignment settings, or the way the front suspension was modified. It does not prove that the axle itself remains off-center.
Check the axle measurements first, then have the steering and alignment checked using the correct procedure. Do not use the track bar to correct an alignment problem unless the vehicle maker’s procedure specifically calls for that adjustment.
Correction
Separate axle-centering measurements from steering-wheel and wheel-alignment checks.
Common Mistakes to Avoid
Most avoidable problems come from guessing, measuring in inconsistent conditions, or overlooking damaged hardware. A careful baseline and a repeatable method are more useful than making large adjustments until the vehicle looks right.
Do not treat every solid-axle vehicle as if it uses the same bar, mount, or torque values. The correct procedure depends on the exact vehicle and component design.
Source: trailbuiltoffroad.com
Using fender gaps as the only measurement
Body panels may not be symmetrical. Confirm axle position with approved structural reference points.
Making a large adjustment at once
Large changes make it harder to identify the correct direction and may push the bar beyond its intended range.
Ignoring the bar’s thread limits
Insufficient thread engagement can weaken the assembly. Follow the manufacturer’s minimum engagement requirement.
Guessing fastener torque
Incorrect tightening can lead to loose connections or damaged threads. Use the exact specification for the hardware.
Adjusting around worn parts
Worn joints and damaged mounts can allow movement that no length adjustment can fix.
Skipping the final check
Recheck measurements, clearances, locking hardware, and steering after the adjustment is complete.
When Professional Help Is the Better Choice
Use a qualified suspension technician if the frame or axle mount is cracked, the axle appears bent, the adjustment range is insufficient, or the bar cannot be secured to specification. Professional inspection is also appropriate when steering behavior changes suddenly or the vehicle has severe vibration.
If the vehicle pulls, wanders, or develops steering shake after the work, avoid highway driving until the cause is identified. Severe steering shake can have several causes, and repeated adjustment without inspection can miss a dangerous fault.
Stop and inspect
Do not drive with loose track bar hardware, damaged mounts, a binding steering system, or any sign that a locating link may fail.
What to Check After Centering the Axle
After the axle is centered, inspect the full suspension and steering system before returning the vehicle to normal use. A correct static measurement is only one part of a safe result, especially after a lift or a change to suspension brackets.
Follow the vehicle manufacturer’s service guidance for alignment and inspection. If the work changed ride height or steering geometry, an alignment check may be needed even when the axle measurements are correct.
Source: tmrcustoms.com
Track bar security
Confirm that the bar ends, bolts, locking nuts, and brackets are secure and undamaged.
Steering and alignment
Check steering-wheel position, toe, and other applicable alignment settings according to the vehicle’s requirements.
Brake and ABS routing
Confirm that hoses and wires are not stretched, pinched, or rubbing against the bar or suspension.
Suspension movement
Check clearances through the approved range of steering and suspension travel.
Is a Test Drive Required?
A cautious road check may be appropriate only after the vehicle passes the full stationary inspection and all fasteners are secured. Follow any break-in or post-installation inspection instructions supplied with the track bar or lift kit.
Start in a safe, low-speed area and pay attention to new clunks, steering changes, or unusual movement. Stop if the vehicle feels unstable or a new noise appears. A road test does not replace a torque check or a required professional alignment.
Check again if needed
Repeat the inspection at the interval specified by the component manufacturer, especially after suspension work.
Research Notes and Next-Question Gap Map
This guide is a general procedure for compatible solid-axle suspensions, not a model-specific repair manual. The controlling evidence for exact measurements, torque values, adjustment limits, and support points is the service information for the vehicle and the installation instructions for the fitted track bar.
The most useful next questions arise from the work itself: how to measure offset accurately, how much to turn the adjuster, what to do when the adjustment range runs out, and whether an alignment is needed afterward. These are inferred next needs based on the procedure, not verified search-volume findings.
The supplied image list provides visual references for track bars, mounting hardware, and installation. It does not establish vehicle-specific torque values, adjustment tolerances, or test results. No hands-on test, measured vehicle inspection, or independent performance test is claimed in this article.
Question: How do I measure axle offset?
Reader stage: before adjustment. Basis: inferred next need. Competitor coverage: not checked in a live page-by-page comparison for this draft. Benefit: reduces errors from uneven fenders. Evidence needed: vehicle service dimensions and a consistent reference method. Priority: high. Placement: measurement section.
Question: How far should I turn the adjuster?
Reader stage: during adjustment. Basis: inferred next need. Competitor coverage: not checked. Benefit: prevents overshooting. Evidence needed: adjuster thread pitch, track bar geometry, and maker instructions. Priority: high. Placement: adjustment steps.
Question: What if the bar reaches its adjustment limit?
Reader stage: troubleshooting. Basis: inferred next need. Competitor coverage: not checked. Benefit: prevents unsafe thread engagement or improvised modifications. Evidence needed: fitment and suspension configuration data. Priority: high. Placement: troubleshooting section.
Question: Do I need an alignment afterward?
Reader stage: after adjustment. Basis: inferred next need. Competitor coverage: not checked. Benefit: separates axle centering from steering and wheel alignment. Evidence needed: vehicle maker’s alignment guidance and the changes made. Priority: high. Placement: final inspection section.
Frequently Asked Questions
Q
How much should I adjust an adjustable track bar?
There is no single adjustment amount for every vehicle. The needed change depends on the measured axle offset, track bar angle, adjuster design, and mounting geometry. Make small changes and remeasure at the specified ride height, while keeping the bar within its approved adjustment range.
Q
Can I center the axle by measuring from the tires to the fenders?
Tire-to-fender measurements can help identify a possible offset, but they are not always accurate enough for final adjustment. Fender shape, body alignment, tire size, and wheel offset can differ. Use the vehicle manufacturer’s structural reference points or the suspension maker’s approved centering method.
Q
Should the vehicle be on the ground when adjusting a track bar?
The final measurement usually needs to reflect the vehicle at its specified ride height, but the safe adjustment method depends on the track bar design and service procedure. Some components have specific instructions for adjusting them installed, while others require the suspension to be unloaded or the bar to be removed. Never work beneath a vehicle supported only by a jack.
Q
Will centering the axle fix an off-center steering wheel?
Not necessarily. Axle centering and steering-wheel position are related to different measurements and adjustments. If the axle is centered but the steering wheel remains off-center, check the steering linkage and wheel alignment using the correct vehicle-specific procedure.
Q
Do I need a wheel alignment after adjusting the track bar?
A track bar adjustment does not automatically change every wheel-alignment angle, but a lift or suspension modification can affect steering geometry and may require an alignment check. Follow the vehicle and lift kit instructions. Have a qualified alignment shop inspect the vehicle if the steering wheel is off-center, the vehicle pulls, or handling has changed.
Q
What should I do if the axle still looks off-center after adjustment?
Repeat the measurements with the vehicle on level ground and in the specified ride-height condition. Confirm the reference points, track bar fitment, adjustment direction, and mount condition. If the bar reaches its limit or the structural measurements still disagree, stop and inspect the suspension geometry rather than forcing more adjustment.
✦ Wrapping Up
Conclusion
Centering an axle with an adjustable track bar starts with accurate measurements, not guesswork. Confirm the correct part, inspect the mounts, measure axle position at the required ride height, and make small changes while checking the result after each step.
Finish by securing the adjuster and mounting hardware to the correct specifications, checking clearance and steering components, and confirming that the axle remains centered. If the bar cannot reach the required position or the vehicle shows signs of loose or damaged suspension parts, stop and have the setup inspected.
💡 Key Takeaway
Before turning the adjuster, record the left and right axle reference measurements and confirm the exact track bar instructions. Adjust gradually, remeasure consistently, and do not drive until all hardware and safety checks pass.
Eric
Hi, I’m Eric Bennett, the person behind OffRoadTruckAccessories.com.
I created this blog to share my interest in trucks, off-road driving, automotive accessories, and DIY modifications. I enjoy learning how different truck accessories work, testing their usefulness, and understanding whether they are truly worth buying.