
How to Measure Coilover Ride Height: Step-by-Step Instructions
A coilover setup can look evenly adjusted and still leave a car sitting unevenly. A small difference in spring perch position does not always produce the same change at the wheel, because spring rates, suspension geometry, tire pressure, fuel load, and bushing friction all affect where the chassis finally rests. Measuring instead of judging by eye turns an uncertain adjustment into a repeatable setup.
The most useful beginner method is to measure from the center of each wheel hub to a consistent point on the fender arch. This avoids letting tire diameter or changing tire pressure distort the comparison. Ground-to-fender measurements are still useful when you need to know the car’s overall clearance, but hub-to-fender measurements are usually better for comparing left and right ride height.
This guide explains how to measure coilover ride height safely, prepare the car, record useful numbers, settle the suspension after an adjustment, and check whether the result is believable. You will also learn why the threaded shock-body length and spring perch position are only adjustment references—not proof of the vehicle’s actual ride height.
At a glance
- Measure with the car loaded consistently and resting on level ground.
- Use hub-center-to-fender measurements for the clearest side-to-side comparison.
- Recheck after rolling the car to settle the suspension and after every height adjustment.
How to measure coilover ride height accurately
The procedure below is designed for a car with adjustable coilovers already installed. It measures the height the chassis actually sits at, rather than assuming that matching coilover threads or spring-perch positions will produce matching wheel heights.
Tools you will need
- A steel tape measure or ride-height gauge for repeatable measurements
- Vehicle load information, such as normal fuel level and whether the driver is included
- A tire-pressure gauge to set all tires consistently
- A flat, hard surface and a recording sheet or phone
- Optional: a small plumb bob or straight edge to identify the fender-arch reference point
- Optional: a floor jack and properly rated jack stands for adjustments, used only according to the vehicle and coilover manufacturer’s instructions
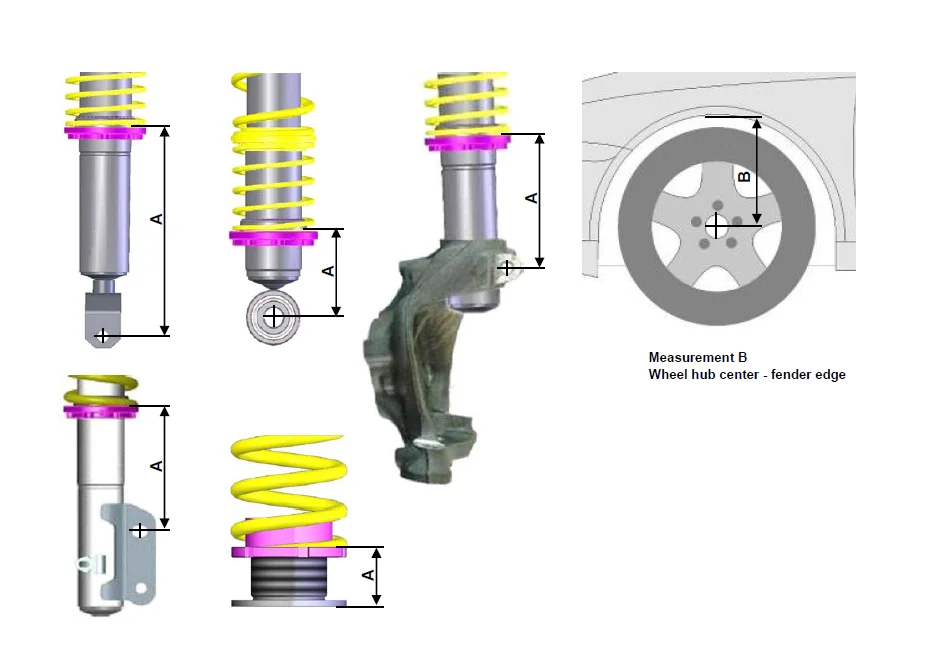
Step 1 Choose one measurement definition before touching the suspension
Decide what “ride height” means for this setup. For comparing suspension height at each corner, use the distance from the center of the wheel hub to the highest point of the corresponding fender arch. The hub center can be located by measuring from the top of the wheel to the bottom, or by using the wheel’s center bore if it is concentric with the hub.
Keep the reference points identical at all four corners. Do not measure to a random body seam on one side and the lip of the wheel arch on the other. If the fender arch is damaged, modified, or shaped differently from side to side, choose a fixed body point that can be identified consistently and write down exactly where it is.
A ground-to-fender measurement is appropriate when the question is whether the car has enough clearance over a driveway, lift, or tire. It is less useful for diagnosing left-to-right suspension height because the tire’s loaded radius changes with pressure, construction, and weight.
Step 2 Prepare the car in its normal measuring condition
Park the car on a level, hard surface with the steering wheel straight. Set tire pressures to the values you intend to use, remove loose cargo unless it normally stays in the car, and choose a consistent fuel level. If the vehicle is tuned for a driver’s weight, place the driver or an equivalent ballast in the normal position for the measurements.
Use the same load every time you compare measurements. A nearly empty fuel tank, a full tank, a spare wheel in the trunk, or tools left on one side can change corner loads enough to make a small height comparison misleading.
Before measuring, look for obvious problems such as a low tire, a damaged spring, a loose lock collar, a leaking damper, or a spring that is not seated correctly. Stop and correct a mechanical problem rather than trying to compensate for it with perch adjustments.
Step 3 Settle the suspension on the ground
With the car on the ground, release the parking brake if it is safe to do so, then roll the vehicle forward and backward a short distance. Keep the wheels pointed straight ahead. This allows suspension bushings and tire sidewalls to relax after the car has been lifted or moved.
If space is limited, gently push down and release each corner once or twice, then roll the car if possible. Do not bounce aggressively; the goal is to remove friction and temporary twist, not to compress the suspension repeatedly.
Success looks like the car returning to the same resting position after the roll. If one corner rises or drops noticeably each time, investigate binding, a spring that is not seated, a damaged component, or a surface that is not actually level.
Step 4 Record all four hub-to-fender measurements
Place the end of the tape at the center of the wheel hub and measure vertically to the selected fender-arch point. Keep the tape straight rather than following the curve of the tire or fender. Record the left-front, right-front, left-rear, and right-rear values separately.
Take each measurement at least twice without changing the car’s load. If the two readings differ, check that the tape is vertical and that you are using the same hub and fender reference points. A simple table in your notes prevents left and right values from being swapped.
| Corner | Hub to fender | Notes |
|---|---|---|
| Left front | Example: 345 mm | Normal tire pressure |
| Right front | Example: 347 mm | Same reference point |
| Left rear | Example: 350 mm | Fuel level recorded |
| Right rear | Example: 349 mm | Driver weight included or excluded |
Millimeters make small changes easier to see, but inches work just as well if you use them consistently. Do not mix units between measurements. A useful way to approach how to measure coilover ride height is to check your progress after each stage.
Step 5 Compare the numbers with the intended target
Compare left and right measurements on the same axle first, then compare the front-to-rear relationship. A small difference may be normal because of the driver, fuel tank, battery, exhaust, or other offset weight. The correct target is not always four identical numbers.
If the car has a manufacturer-specified ride-height measurement, use that definition and target instead of replacing it with a generic number. Some manufacturers measure from a suspension pivot, pinch weld, or chassis datum rather than from the fender, and those specifications may be tied to alignment or bump-travel requirements.
For a modified street or track car without a documented target, establish a baseline before making changes. Note the measurements, tire pressures, fuel condition, wheel and tire combination, and any driver ballast. That baseline is more useful than an isolated number because it lets you identify what changed.
Step 6 Adjust the coilover only when the measurement calls for it
Follow the coilover manufacturer’s instructions for separating ride-height adjustment from spring-preload adjustment. On many designs, ride height is changed by moving the threaded lower mount or shock body while preserving the intended spring preload. On other designs, the spring perch itself changes the height, so the exact procedure is model-specific.
Never assume that turning a collar by a measured amount will move the fender by the same amount. The motion ratio—the relationship between wheel movement and shock movement—can make the change smaller or larger, and the suspension may settle differently after the adjustment.
Make a small, documented adjustment rather than making several large changes at once. Keep the adjustment collars locked as specified, ensure the spring remains properly seated, and maintain the manufacturer’s minimum thread engagement and travel limits.
Important
Never work beneath a vehicle supported only by a floor jack. Use stable jack stands at approved support points, keep hands clear of pinch areas, and stop if you are unsure how your coilover’s lock collars or height adjustment mechanism operates.
Step 7 Lower the car, roll it, and measure again
After an adjustment, lower the vehicle fully onto its tires, remove the jack or stands, and repeat the settling process. Roll the car straight, allow the suspension to return to rest, and then measure all four corners again—not just the corner you changed.
Record the new values beside the old ones. The changed corner may influence the opposite corner through the chassis, and adjusting one end can alter the apparent height relationship elsewhere. The new measurement is the result that matters, not the number of turns made at the collar.
If the value moves in the opposite direction from what you expected, do not keep turning the adjuster. Confirm which collar changes ride height, verify that the spring and lock rings are not binding, and check that the car was fully lowered and settled before measuring.
Step 8 Confirm the final setup with a clearance and alignment check
Once the measurements are within your intended range, check the practical results. Turn the steering from lock to lock, inspect tire-to-fender and tire-to-suspension clearance, and look for contact around brake lines, sway-bar links, and other moving parts. Check clearance with the suspension loaded and, where appropriate, at full steering lock.
Also consider suspension travel. A lower number is not automatically better if the car has little bump travel, frequently contacts the bump stops, or scrapes components on normal roads. After changing ride height, a professional alignment is often appropriate because toe, camber, and caster can change as the suspension moves through its range.
Check your result
A useful final check is a second measurement session after the car has been driven carefully over normal pavement. If the heights change substantially, look for settling, loose collars, spring seating problems, tire-pressure changes, or a component that is binding.
What the measurements actually tell you
Ride height is the position of the chassis at rest, while coilover adjustment is only the means of changing that position. The threaded body, lower mount, and spring perch provide mechanical reference points, but none of them alone tells you where the wheel arch or chassis will sit once the car is carrying its normal load.
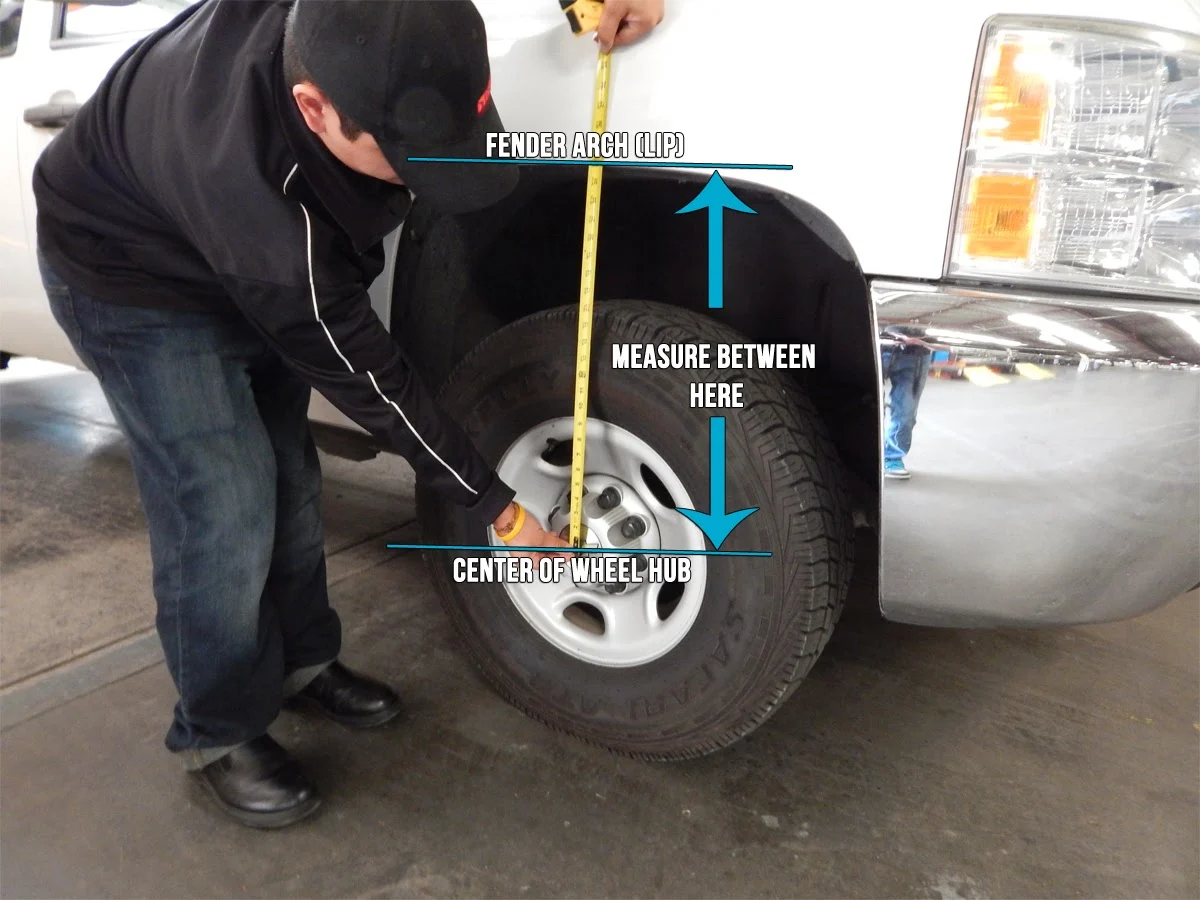
Hub center to fender versus ground to fender
Hub-to-fender measurement removes most tire-radius variation from the comparison. If the front tires have slightly different pressures or the tires wear unevenly, the hub remains the same reference while the ground-to-fender number can change. Understanding how to measure coilover ride height also means recognizing the limits of the method.
Ground-to-fender measurement is still valuable for checking ramp, trailer, and road clearance. It can also be easier for a quick visual check. For suspension setup, however, use the same method at every corner and do not compare a hub-based number with a ground-based number.
Ride height versus corner weight
Equal ride heights do not guarantee equal corner weights. Spring rates, suspension geometry, chassis weight distribution, and crossweight all affect the load carried at each wheel. A car can measure level while carrying a different percentage of its weight at each corner.
If balance under braking and cornering is important, use properly calibrated corner scales and have the process completed by someone familiar with corner-weight setup. Height measurements are a practical baseline, not a substitute for weighing the car.
Why matching spring-perch threads can mislead you
Matching visible thread length is useful as a starting reference, especially when setting up a new set of coilovers. It does not prove that the wheel-center heights match because the chassis may have uneven weight distribution, the suspension may be at different points in its travel, and the coilover bodies may not be installed at exactly the same effective length.
Spring preload also deserves caution. Preload is the compression applied to a spring when the suspension is unloaded, while ride height describes the loaded vehicle at rest. Changing preload can affect available droop travel and spring seating, so follow the manufacturer’s setup range rather than using preload as a shortcut for every height correction.
How to make the result repeatable
A useful measurement is one another person—or your future self—could reproduce. Write down the reference point, units, tire pressures, fuel level, driver or ballast condition, surface, and whether the steering was straight. The more unusual the car or setup, the more valuable these notes become.

- Measure on the same surface whenever possible.
- Keep wheel and tire combinations unchanged during comparisons.
- Set tire pressures before every serious comparison.
- Roll the car before measuring, especially after lifting it.
- Measure all four corners after any adjustment.
- Record the adjustment direction and the measured result, not only the collar position.
When using a fender reference, mark the point temporarily with removable tape if the arch shape makes it difficult to find again. A small plumb bob can help locate the vertical line from the hub center to the fender, but the tool is optional if the reference point is clear.
For a car with adjustable control arms, altered fenders, air suspension, or unusual wheel offsets, document the setup more carefully. The ordinary fender-arch method may not describe the manufacturer’s specified geometry, so use the vehicle or suspension maker’s datum when one is available.
Common measurement problems and corrections
Most confusing results come from inconsistent conditions rather than a defective tape measure. Compare the symptom with the likely cause before adjusting another collar.
| What you observe | Likely cause and response |
|---|---|
| Readings change after every roll | Suspension or bushing bind, an unseated spring, or an uneven surface. Recheck the surface and inspect the suspension before adjusting height. |
| Ground measurements disagree but hub measurements match | Tire pressure, tire wear, or tire construction differs. Use hub-to-fender measurements for suspension comparison. |
| One corner stays low | Uneven load, a loose collar, spring seating issue, damaged spring, leaking damper, or bent component. Correct the cause instead of simply raising that corner. |
| The adjustment direction seems reversed | The wrong collar may have been turned, or the car was measured before settling. Verify the manufacturer’s instructions and repeat the ground-level check. |
| Heights match but the car handles oddly | Alignment, corner weight, tire condition, damping, bump travel, or clearance may be the actual issue. Ride height alone cannot diagnose handling balance. |
When not to continue adjusting
Stop making height changes if a collar will not move, the spring is loose at full droop when the design does not permit that condition, a threaded section appears damaged, or the damper is leaking. Also stop if you cannot identify a safe support point or determine how the coilover is intended to be adjusted.
A suspension shop can inspect the components, set the car to a known height, perform an alignment, and corner-weight the vehicle when needed. Seeking help is especially sensible after a crash, when ride height differs dramatically between sides, or when a vehicle has modified suspension geometry you cannot verify.
Beginner questions about coilover ride height
Should I measure from the ground or from the wheel hub?
Use the wheel hub center to the fender arch when comparing suspension height between corners. Use ground-to-fender measurements when checking overall clearance, but keep in mind that tire pressure and tire wear affect that number.
Do all four ride-height measurements need to be identical?
No. The driver, fuel tank, battery, exhaust, and other components can create normal side-to-side differences. Follow a documented vehicle specification when available, and treat matching numbers as a goal only when the suspension design and intended setup call for it.
Should the driver be in the car while I measure?
Include the driver, or an equivalent ballast, if the car is primarily set up for that driver. If the car is measured without the driver, record that condition and repeat it whenever you compare results.
Can I use coilover thread length as my ride-height measurement?
Thread length is an adjustment reference, not the final ride-height result. Suspension motion ratio, chassis weight distribution, spring preload, and installation differences mean equal thread measurements may still produce unequal wheel heights.
Why did the height change after I drove the car?
The suspension may have settled, bushings may have released stored friction, or a spring may have reseated. Recheck tire pressures, roll the car on level ground, inspect the springs and lock collars, and measure again before making another adjustment.
Use measured height as the starting point for a sound setup
Learning how to measure coilover ride height gives you a reliable baseline for suspension changes. Prepare the car consistently, measure from the hub center to the same fender reference, record every corner, and settle the vehicle before trusting the numbers.
Remember that ride height is only one part of a safe setup. Confirm tire and body clearance, preserve adequate suspension travel, and arrange an alignment after significant changes. If the measurements remain unstable or a coilover component seems damaged or unfamiliar, stop adjusting and have the suspension inspected before driving the car hard.


