
How to Get Even Ride Height with Coilovers: Detailed Key Facts
Uneven ride height is one of the most common frustrations after installing coilovers. The car may look tilted on level ground, one wheel arch may have more tire gap than the other, or the height may change after driving around the block. Those symptoms do not always mean the coilovers are defective.
Unequal measurements, a suspension that has not settled, incorrect adjustment points, worn parts, or a naturally uneven chassis can all contribute.
The practical way to get an even stance is to measure from repeatable points, adjust the correct threaded collar, settle the suspension, and measure again. Matching fender gaps alone can be misleading, especially if the body panels are not perfectly symmetrical, so hub-to-fender measurements and a level surface are more useful.
This guide explains how to get even ride height with coilovers without treating spring preload as a simple height control. You will learn how to prepare the car, identify the adjustment style, balance the four corners, recognize when the result is good enough, and know when to stop and have a qualified suspension or alignment shop inspect the vehicle.
At a glance
- Measure from the wheel hub to the fender, not only from the ground to the body.
- Use the coilover’s intended height-adjustment method so you do not create unnecessary spring preload.
- Settle and remeasure the suspension before making final judgments or getting an alignment.
How to get even ride height with coilovers
The method below assumes the coilovers are correctly installed, compatible with the vehicle, and adjusted within the manufacturer’s range. The goal is not merely to make all four measurements identical; it is to achieve a stable, visually balanced ride height without reducing spring engagement, damaging threads, or creating unsafe suspension travel.
Tools you will need
- Floor jack and four appropriately rated jack stands for safely lifting and supporting the vehicle
- Wheel chocks for preventing movement while the vehicle is parked
- Tape measure or small steel rule for repeatable hub-to-fender measurements
- Paint marker or fine-tip marker for recording collar positions
- Coilover adjustment wrench supplied with the kit
- Level, hard surface and tire-pressure gauge for consistent measurements
- Optional: digital angle gauge or scales for a more precise corner-weight setup
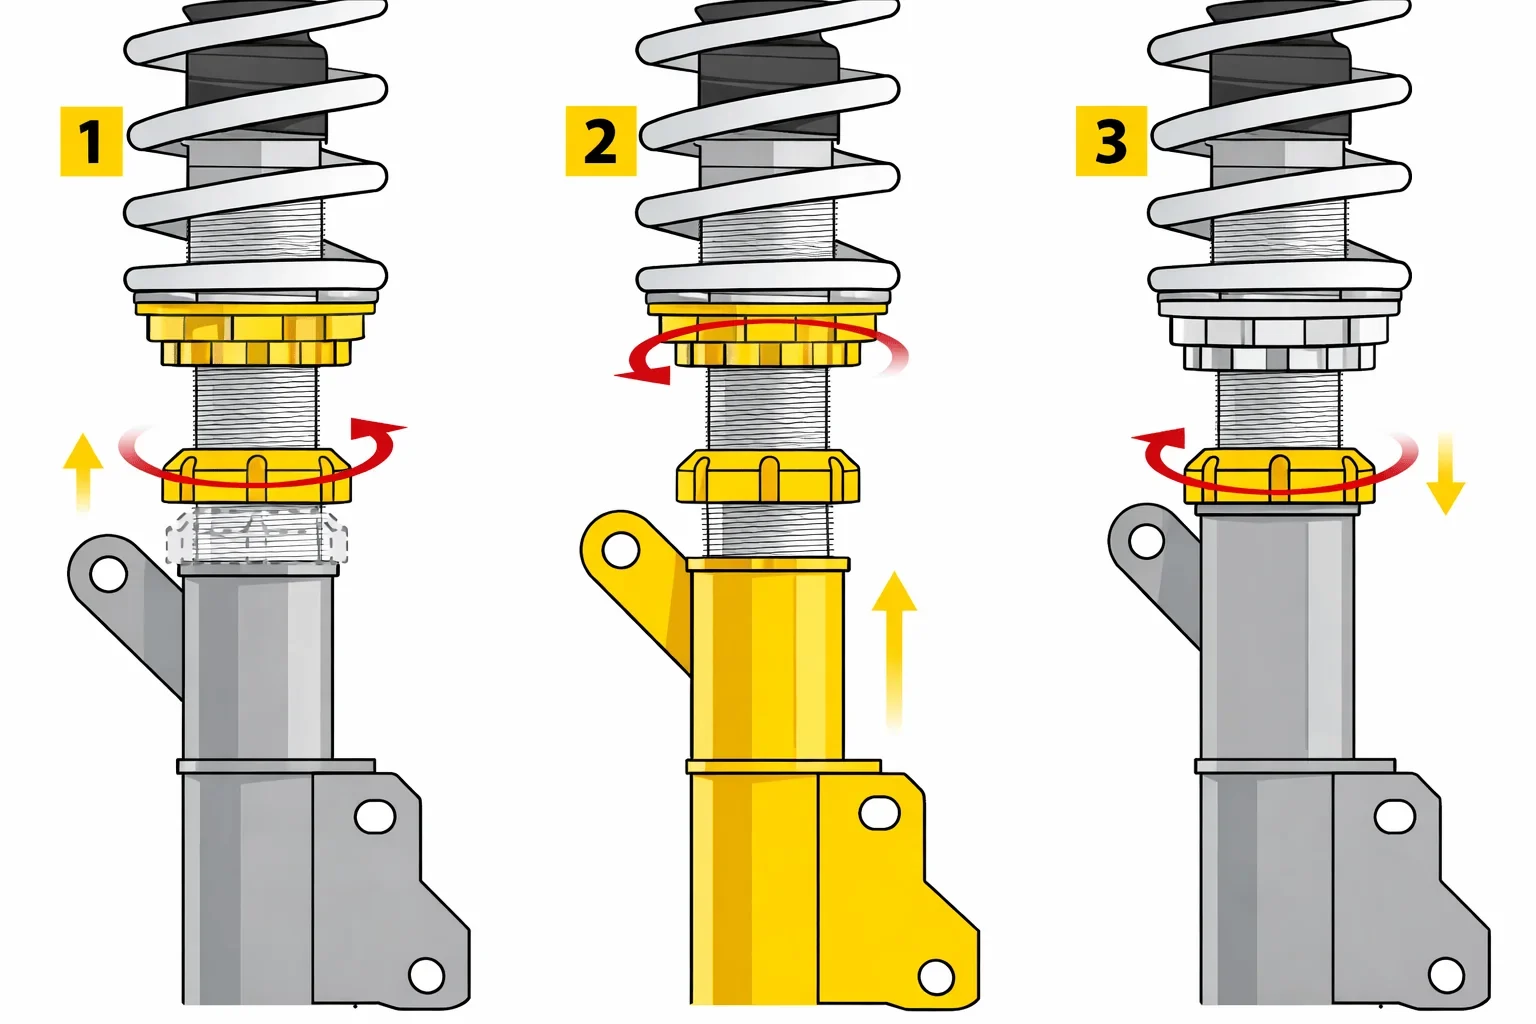
Step 1 Confirm the coilovers and suspension are ready to adjust
Before turning a collar, verify that each coilover is installed on the correct corner and that the upper mounts, lower mounts, locking collars, and fasteners are assembled as the manufacturer specifies. Check that the springs are seated in their perches, the collars are not cross-threaded, and no brake hose, ABS wire, sway-bar link, or control arm is binding.
Check the vehicle’s tire pressures and set them to the same cold pressure on each axle unless the manufacturer specifies a different arrangement. Remove heavy items from the trunk and cabin, and use a normal fuel level if possible. A full toolbox on one side or a spare wheel removed from the other can make a careful height adjustment look inconsistent.
Look at the spring engagement with the suspension at full droop. Many coilover manufacturers require the spring to remain captured between the perches when the wheel hangs. If a spring becomes loose, do not simply lower the perch until it touches the spring; consult the coilover instructions because the condition may indicate incorrect installation or an adjustment outside the safe range.
Important
Never work under a vehicle supported only by a floor jack. Use jack stands on approved support points, chock the wheels that remain on the ground, and keep your hands clear of pinch points when lowering or settling the car.
Step 2 Park on a level surface and establish a baseline
Move the car onto a hard, reasonably level surface. A sloped driveway can make one side appear low even when the suspension measurements are close, while soft asphalt can let a jack stand or tire settle unevenly. If the surface is questionable, check it with a long level or measure the surface at each wheel.
With the car on the ground, roll it forward and backward several feet so the suspension is not held in a twisted position from the last time it was lifted. Do not rely on bouncing one corner aggressively; that can move the car without allowing the suspension to settle naturally.
Record a baseline at all four corners. The most repeatable common measurement is from the center of the wheel hub vertically to the lower edge of the fender or wheel arch. Measuring from the hub removes tire diameter and tire-pressure differences from the result.
Use the same point and technique at every corner, and write down the values before changing anything.
You can also record ground-to-fender height if you care about the visual stance, but treat it as a secondary number. Compare left and right corners on the same axle first, then compare front to rear. A small difference between diagonally opposite corners may be normal because the driver, fuel tank, battery, and other equipment do not distribute weight evenly.
Step 3 Identify whether height is adjusted at the spring perch or lower mount
Coilovers use different height-adjustment designs, and this distinction is important. On a basic threaded-body design, moving the spring perch changes both the spring’s installed position and its preload. On a design with an independently threaded lower mount, the lower mount can often be used to change the body’s installed length while leaving the spring preload close to its intended setting.
Find the adjustment instructions for your exact coilover model before making changes. Some systems have two collars at the spring perch and another threaded section at the lower mount; others use the lower mount only for installation or do not permit that adjustment. Do not assume that a collar with a lock ring is automatically a ride-height adjuster.
As a general rule, use the manufacturer-designated height adjustment first. If the system provides independent height adjustment, avoid using the spring perch to make large height changes. If it does not, adjust the perch in small, controlled increments and maintain the minimum spring preload and minimum thread engagement specified by the manufacturer.
Step 4 Mark the starting positions and loosen only the correct lock collars
Clean dirt from the exposed threads with a soft brush and apply a small paint mark across each relevant collar and threaded section. This gives you a reference if the adjustment moves too far or you need to return to the original setting.
Use the supplied adjustment wrench to loosen the lock collar or collars. Keep the wrench fully engaged so it does not slip and damage the collar. If a collar is seized, do not hammer directly on the aluminum or force it with a long improvised lever.
Use the manufacturer’s approved method for freeing it, and stop if the threads appear damaged.
Only loosen what must move. A lower height-adjustment collar and a spring-perch lock ring may look similar but serve different purposes. If you are uncertain which collar controls height, pause and identify it from the installation manual rather than experimenting under load.
Step 5 Adjust the low or high corner in small, equal increments
Raise the vehicle safely enough to remove the load from the coilover being adjusted, unless the manufacturer specifically permits adjustment under load. Support the vehicle securely, keep the spring and threaded sections clean, and make a note of the direction in which the collar moves the body or spring.
Turn the adjustment in a small amount, such as a fraction of a turn or one marked thread increment. The actual height change at the fender will not necessarily equal the amount the collar moves because suspension motion is affected by the control-arm geometry and motion ratio. Make one change at a time so you can tell which adjustment produced the result.
For a vehicle with a separate lower height adjuster, changing the lower mount generally changes the installed length of the coilover. For a spring-perch-only system, raising the perch usually raises the vehicle but also increases spring preload; lowering it generally lowers the vehicle but can reduce preload. Stay within the manufacturer’s limits and never allow the spring to become loose at full droop.
When the left and right measurements differ, do not automatically force them to be exactly equal. First correct a clearly low corner, then compare the axle again after settling. A small deliberate difference may be appropriate to compensate for a consistent driver-side load, but that decision should be based on the vehicle’s setup goals rather than appearance alone.
Step 6 Tighten the collars and lower the vehicle onto its tires
After the adjustment, snug the lock collars against their mating surfaces as specified by the coilover manufacturer. Some collars are intended to be hand-tightened with the adjustment wrench, while others have a specified torque. Follow the supplied instructions; overtightening an aluminum collar can damage threads or distort the part.
Lower the car carefully until all four tires are on the ground. Remove the jack and stands only after checking that the vehicle is stable and that no tool, stand, or support remains under it. Turn the steering slightly from side to side if necessary to ensure the front suspension is not held in a bind, then return the wheels to a straight-ahead position.
Step 7 Settle the suspension and take a second measurement
Roll the vehicle forward and backward several feet, allowing the tires to rotate rather than dragging them sideways. Apply the brakes gently while stopping, because an abrupt stop can leave the front suspension compressed. A short, careful drive over a smooth surface can also help the suspension settle, provided the vehicle is safely assembled and steering and braking feel normal.
Park in the same measurement area and repeat the hub-to-fender measurements using the same reference points. Compare them with your baseline and with the intended left-to-right balance. If the height changed substantially after settling, that does not necessarily indicate a problem; it may mean the suspension was not seated after lifting or that a bushing was temporarily loaded in an unusual position.
If the car still sits unevenly, repeat the adjustment in small increments. Change one corner, settle the vehicle, and remeasure. Large changes at several corners at once make it difficult to determine whether the problem came from the adjustment, the measuring method, or suspension bind.
Step 8 Lock in the setting and inspect clearance through suspension travel
Once the measurements are acceptably balanced, confirm that every adjustment collar is locked and that the threaded sections have sufficient engagement. Check the spring at normal ride height and at full droop if the vehicle is safely supported. The spring should remain properly seated, and the coilover body should not contact the tire, wheel, brake line, control arm, or sway-bar hardware.
Turn the steering from lock to lock on the front axle while watching for contact. Inspect the inner sidewall and the wheel barrel, not only the visible tread. On the rear, check clearance around the tire, spring, damper body, and inner fender.
Lowering the vehicle can change the relationship between these parts even when the wheel fitment was previously safe.
Take a short, cautious drive and listen for clunks, scraping, spring movement, or unusual steering pull. Return to the same surface and measure once more. A setting that remains stable after this check is more trustworthy than one that looked correct immediately after the first collar adjustment.
Why equal measurements do not always mean equal handling
Ride height is only one part of suspension setup. Changing height alters suspension geometry, including control-arm angles, bump-steer characteristics, roll-center location, and available bump and droop travel. A vehicle can have matching hub-to-fender numbers and still need an alignment because the wheel angles changed during the height adjustment.
Spring preload is also frequently misunderstood. Preload is the compression placed on a spring when the coilover is assembled or extended, while ride height is the vehicle’s installed position under its weight. On a coilover with independent height adjustment, the two can be managed separately.
On a simpler design, changing height at the spring perch may change both.
For this reason, how to get even ride height with coilovers is not simply a matter of turning every collar until the fender gaps look alike. The correct result depends on the coilover design, the manufacturer’s limits, the vehicle’s normal load, and whether the goal is street comfort, appearance, track balance, or a combination of those priorities.

Hub-to-fender measurements versus fender gaps
Body panels are not precision suspension reference points. Fender lips can be shaped differently from one side to the other, and a bumper or quarter panel may sit slightly off-center after manufacturing or repair. Hub-to-fender measurements are more useful because the wheel hub is tied directly to the suspension and is not affected by tire size.
Still, visual inspection matters. Once the mechanical measurements are close, stand several feet in front of and behind the car and check whether the stance looks balanced. If the measurements and appearance disagree, recheck the surface, the reference points, the tire pressures, and the body-panel symmetry before making another adjustment.
When corner weighting is the better approach
A professional corner-weight setup uses scales under each tire to measure how the vehicle’s weight is distributed. The technician can then adjust ride height while considering cross-weight, front-to-rear distribution, driver weight, and the intended use of the car.
Corner weighting is especially useful for a competition car or a vehicle that pulls in one direction under braking or feels inconsistent in turns. It is not always necessary for a street car whose goal is a visually even stance, but scales can reveal why four similar height measurements do not produce balanced handling.
How to verify the finished ride height
A successful adjustment should remain safe and reasonably stable after the vehicle is driven. Verification is more than checking whether the wheel arches look level while the car is parked immediately after lowering it from a jack.

- Confirm tire pressures are still correct and equal where appropriate.
- Repeat all four hub-to-fender measurements on the same level surface.
- Check that the spring remains seated and that the locking collars are tight.
- Inspect tire, wheel, brake-line, sway-bar, and control-arm clearance.
- Listen for new clunks, scraping, rattling, or spring movement during a cautious drive.
- Arrange a four-wheel alignment after changing ride height significantly.
- Record the final collar positions so the setup can be restored or compared later.
Check your result
The adjustment is ready for normal use when the measurements are repeatable, the springs remain captured, all hardware is locked, clearance is adequate through steering and suspension movement, and the vehicle drives without new abnormal behavior.
An alignment is particularly important after a substantial height change. Toe, camber, and caster can shift as the suspension moves through a different part of its range. Uneven tire wear or a steering wheel that is no longer centered is a sign that the setup needs alignment attention rather than another random height adjustment.
Common uneven-height problems and their causes
If how to get even ride height with coilovers has led to repeated collar adjustments without a stable result, stop making larger changes and compare the likely causes below. The problem may not be the corner you first assumed was low.
| Symptom | Likely causes and checks |
|---|---|
| One corner changes after every drive | Suspension has not settled, a collar is slipping, a bushing is binding, or a spring is not seated. Recheck the lock collar, spring capture, and suspension movement. |
| Left and right measurements disagree but fender gaps look similar | Body-panel differences or inconsistent reference points. Recheck from the hub center and inspect the panels separately. |
| The car is low after lowering the perch | Spring preload may have been reduced too far, or the adjustment has exceeded the intended range. Confirm the manufacturer’s minimum setting. |
| The vehicle pulls after height adjustment | Alignment may have changed, or a tire pressure, tire, brake, or suspension issue may be present. Do not correct a pull by randomly changing ride height. |
| A spring rattles when the wheel hangs | The spring may not be captured, the preload setting may be incorrect, or the coilover may be assembled incorrectly. Stop and consult the manufacturer or a qualified shop. |
| One side will not adjust smoothly | Dirty or damaged threads, a seized collar, bent hardware, or a loaded suspension component may be involved. Do not force the collar. |
When to stop adjusting and seek help
Stop and get qualified assistance if a locking collar is damaged, a threaded body is bent, a spring is loose at full droop, a mounting bolt will not seat correctly, or the vehicle develops a clunk, steering problem, brake issue, or contact with a tire. These conditions can affect vehicle control and should not be solved by compensating with more ride-height adjustment.
A professional inspection is also sensible when the vehicle remains uneven despite careful measurements and settling. Worn control-arm bushings, a bent suspension component, a weak or mismatched spring, incorrect coilover length, or a chassis issue can all produce a persistent height difference.
Frequently asked questions
Should all four coilovers be set to exactly the same length?
No. The same visible height may require slightly different coilover settings because the vehicle’s weight distribution is not symmetrical. Start with the manufacturer’s baseline and use measured corner heights and driving behavior rather than assuming every threaded section must match.
Can I adjust coilover height with the car on the ground?
Only if the coilover manufacturer specifically allows it and the adjustment can be made safely. Many collars are difficult to turn under load, and forcing them can damage threads or cause the wrench to slip. Lifting and supporting the vehicle correctly is usually the safer approach.
How much difference between left and right is acceptable?
There is no universal number that applies to every vehicle and purpose. A small difference can result from normal weight distribution or body-panel variation. Focus on repeatable measurements, proper suspension travel, stable handling, and the manufacturer’s setup guidance rather than chasing an arbitrary zero difference.
Do I need an alignment after adjusting ride height?
Yes, plan on a four-wheel alignment after a meaningful ride-height change. Moving the suspension changes wheel angles and can affect tire wear, steering feel, and straight-line stability even if the car appears visually level.
Why did the ride height change after I drove the car?
The suspension may have settled after being unloaded, a bushing may have been holding tension, or an adjustment collar may not have been locked. Measure again on the same surface and inspect the spring seating and collars. A continuing or large change requires further inspection.
Conclusion
Learning how to get even ride height with coilovers starts with accurate measurements and ends with a suspension that stays stable, clears surrounding parts, and drives normally. Use a level surface, measure from the hub to the fender, identify the correct adjustment method, and make small changes rather than turning several collars at once.
Do not use spring preload as a substitute for independent height adjustment when the coilover design separates those functions, and never sacrifice spring capture or thread engagement to achieve a visual stance. After the final setting settles, verify clearances, record the measurements, and schedule an alignment. If the vehicle remains uneven or develops noise, steering, or clearance problems, stop adjusting and have the suspension inspected.


