
How to Adjust Coilovers: A Step-by-Step Guide to Ride Height, Preload, and Damping
Learning how to adjust coilovers can seem hard at first. The basic idea is simple: change one setting at a time, measure the result, and test the car before making another change. Most mistakes happen when several settings get changed at once.
A good coilover setup is not just about making a car lower. Ride height, spring preload, shock damping, tire clearance, suspension travel, alignment, and corner weight all affect how the car feels. On a daily-driven car in the U.S., a small change can also make a big difference on rough roads, steep driveways, and highway expansion joints.
Before you start, read the manual for your exact coilover kit. Designs vary by brand and vehicle. Some kits use a threaded shock body for height changes, while others use the spring perch or another adjustment system. Never assume that two coilovers use the same method.

What Are Coilovers and What Can You Adjust?
A coilover combines a coil spring and a shock absorber in one suspension unit. Many aftermarket coilovers let you change ride height, spring preload, and shock damping. Some advanced kits also allow separate compression and rebound adjustment.
The key is to know what each adjustment does. Ride height changes where the car sits. Preload changes how the spring is held on the shock. Damping changes how quickly the suspension moves.

- ✦ Ride height
Ride height is the distance between the car and the ground or a chosen reference point. Changing it alters ground clearance, suspension travel, and often alignment.
- ✦ Spring preload
Preload is the amount of spring compression when the suspension is at full droop. It should be set within the range specified by the coilover maker.
- ✦ Damping
Damping controls how fast the shock resists suspension movement. More damping can reduce movement, while less damping allows the suspension to move more freely.
- ✦ Corner balance
Corner balancing changes the load carried by each wheel. It is mainly useful for performance driving and should be measured with proper scales.
Ride Height Is Not the Same as Spring Preload
This is one of the most important points when learning how to adjust coilovers. On many height-adjustable coilovers, you can change ride height without changing the spring’s basic preload setting. This helps keep the spring working in its intended range.
If you lower a shock by simply loosening the spring perch on a design that does not separate height from preload, you may change both settings at once. Follow the manufacturer’s adjustment method instead of copying a setup from another kit.
Tools and Safety Steps Before You Adjust Coilovers
Good preparation makes coilover adjustment much easier. Park on a level surface when taking measurements, and use proper jack stands whenever you lift the vehicle. Never work under a car supported only by a jack.
Clean the threaded body before turning the collars. Dirt and grit can damage the threads or make the collar bind. If the manufacturer provides adjustment spanners or a thread lubricant recommendation, use them as directed.

- ✦ Use a level work area
Measure the car on a flat surface so the readings are easier to compare.
- ✦ Support the vehicle safely
Use a suitable jack and properly rated jack stands. Follow the vehicle maker’s lifting points.
- ✦ Measure before changing anything
Record the current ride height, collar position, and damping clicks if your kit uses click adjustments.
- ✦ Use the right tools
A tape measure, adjustment spanners, torque wrench, marker, and basic hand tools are useful for most setups.
- ✦ Check the manual
Confirm the allowed adjustment range, minimum ride height, spring preload method, and locking procedure for your exact kit.
Make a Baseline Sheet
Write down the height at all four corners before you touch the coilovers. A common method is to measure from the center of the wheel hub to the fender edge. This reduces the effect of tire pressure and small floor changes.
Also record the number of damping clicks from the manufacturer’s reference position. A simple baseline makes it much easier to return to the original setup if a test change does not work.
How to Adjust Coilover Ride Height
Ride height is usually the first setting to adjust. Before turning a collar, check how your coilover changes height. A true height-adjustable design often lets you move the lower mount on the threaded shock body while keeping the spring perch in its proper position.
Start with small changes. A change of about 5 to 10 mm at the adjustment point can be enough to notice a difference, but the actual change at the wheel depends on the suspension design and motion ratio. Measure the car after each adjustment instead of relying on the number of turns alone.
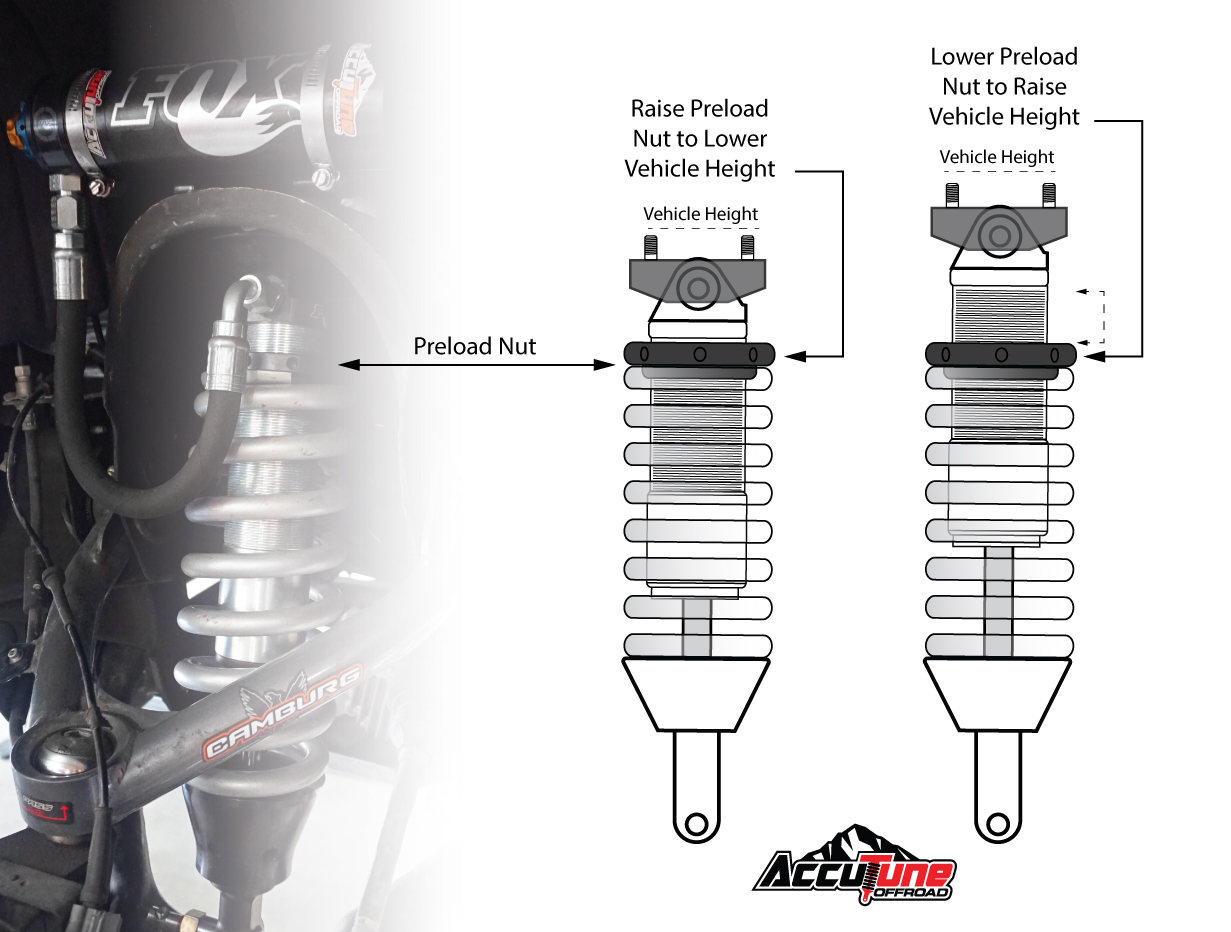
- ✦ Loosen the lock collar
Use the supplied spanner to release the locking collar. Do not force a seized collar.
- ✦ Set the desired height
Turn the correct adjustment collar or threaded body according to the coilover manufacturer’s instructions.
- ✦ Keep both sides close
Make matching changes on the left and right when your goal is an even static ride height.
- ✦ Tighten the lock collar
Secure the adjustment using the manufacturer’s specified method and torque where applicable.
- ✦ Settle the suspension
Lower the car, roll it forward and back, or use another approved method to let the suspension settle before measuring again.
How Low Should You Set Coilovers?
There is no single correct ride height for every car. A street car needs enough clearance for normal roads, ramps, potholes, and suspension movement. Going too low can reduce useful suspension travel and cause the car to hit the bump stops or other parts.
A sensible street setup usually starts with a moderate drop. Check tire clearance at full steering lock and during suspension compression. Also check exhaust parts, sway bars, brake lines, and other components for contact.
Why Matching the Left and Right Height Matters
Large side-to-side height differences can change suspension geometry and corner loads. However, do not chase identical measurements blindly on a performance car. A proper corner-balance setup may use slightly different perch positions to achieve the desired wheel loads while keeping the car level.
How to Adjust Coilover Spring Preload
Spring preload is often misunderstood. On a coilover, the spring may already have compression when the suspension is fully extended. That does not automatically mean the spring is set incorrectly.
The correct preload depends on the spring, shock, vehicle, and coilover design. Some kits specify a measured amount of preload. Others tell you to tighten the spring perch until the spring is seated, then add a specified amount. Use the instructions for your kit.

- ✦ Do not guess the preload
Use the coilover manufacturer’s procedure rather than copying a number from a different brand.
- ✦ Keep the spring seated
The spring should remain properly seated in the perch through the intended range of suspension movement.
- ✦ Avoid excessive preload
Too much preload can reduce available droop travel on some designs and may create unwanted suspension behavior.
- ✦ Do not use preload as a simple height knob
Changing spring preload just to raise or lower the car can alter suspension travel and spring behavior when the coilover is not designed to separate height from preload.
How Preload Affects Suspension Movement
When the suspension extends, the spring must stay controlled within the coilover’s intended range. If the spring becomes loose at full droop when it should not, the setup may need correction. If the spring is heavily compressed beyond the manufacturer’s specification, you may lose useful droop travel.
The goal is not to find the biggest preload number. The goal is to keep the spring and shock operating in the range the manufacturer designed.
How to Adjust Coilover Damping
Damping is the next major setting to learn. If your coilovers have adjustable shocks, a knob or clicker usually changes damping force. Some systems have one adjustment for overall damping, while others separate compression and rebound.
The number of clicks does not have a universal meaning between brands. Ten clicks on one coilover may not feel like ten clicks on another. Always count from the specified soft or hard reference point in your own manual.

- ✦ Start from the manufacturer’s baseline
Use the recommended starting position before making changes.
- ✦ Change one setting at a time
If you change damping and ride height together, it becomes harder to tell which change caused a new handling response.
- ✦ Use small changes
Try one or two clicks at a time when the manufacturer provides click-based adjustment.
- ✦ Test on the same route
A repeatable road or track section makes changes easier to compare.
What More Damping Feels Like
More damping can slow suspension movement. Depending on the shock design, this may make the car feel more controlled during steering, braking, or transitions. Too much damping can make the car feel harsh and may stop the tires from following rough pavement well.
Less damping can make the suspension move more freely. If the car feels loose, bouncy, or slow to settle after a bump, the damping may need attention. But do not use damping to hide a spring rate, ride height, tire, or alignment problem.
How to Adjust Coilovers for Street Driving
A street setup should work on more than a smooth parking lot. U.S. roads can have potholes, rough pavement, steep driveway entrances, and sudden changes in road surface. A very low car with very stiff damping may look good but can become tiring and less useful every day.
For a daily driver, start with the manufacturer’s street baseline. Set a practical ride height, keep enough suspension travel, check clearance, and use moderate damping. Then test the car in normal driving conditions before making another change.

- ✦ Keep useful ground clearance
Make sure the car can clear common roads, ramps, speed bumps, and driveway transitions without damaging parts.
- ✦ Protect suspension travel
Avoid lowering the car so far that the shock spends too much time near its bump stop.
- ✦ Check tire clearance
Turn the steering from lock to lock and inspect clearance. Also consider movement during compression.
- ✦ Test comfort
Drive over different road surfaces before deciding that a setting works well.
Signs Your Street Setup Needs Attention
Repeated bottoming, scraping, bouncing, or a sharp impact over normal bumps can signal a setup problem. Uneven tire wear may also point to alignment or suspension issues.
Do not assume every problem comes from damping. Check ride height, spring seating, tire pressure, alignment, bump stops, bushings, and other suspension parts as well.
How to Adjust Coilovers for Track or Performance Driving
Track setup adds more variables. Tire type, spring rate, alignment, corner weight, damping, temperature, and driving style can all affect the result. A setting that works on a smooth race track may feel poor on public roads.
For performance use, change one variable at a time and keep detailed notes. Record tire pressures, temperatures when relevant, ride heights, damping positions, alignment settings, and driver feedback. This creates a useful test history instead of relying on memory.

- ✦ Corner balance
Use proper scales to measure wheel loads when corner balancing. Adjusting perch heights can shift weight between corners.
- ✦ Alignment
Changing ride height can change camber and toe. Recheck alignment after meaningful ride-height changes.
- ✦ Tire behavior
Tire grip and temperature can change how the car responds. Do not tune the suspension without considering the tires.
- ✦ Keep test notes
Record every change and the result. This makes it easier to return to a known setup.
Corner Balancing Basics
Corner balancing uses scales under each wheel to measure the vehicle’s weight distribution. Adjustments at the coilover perches can change the load at individual corners while keeping the overall ride height close to the target.
This work is more precise than simply matching fender measurements. If you want a competition setup, a shop with proper scales and suspension setup experience can measure the car under controlled conditions.
What to Check After Adjusting Coilovers
The job is not finished when the collars are tight. Lower the car, let the suspension settle, and measure the ride height again. Then inspect the suspension and steering for clearance before driving at normal road speed.
A ride-height change can affect wheel alignment. Toe is especially important because a large change can affect straight-line behavior and tire wear. Have the alignment checked when the final ride height is set.
- ✦ Recheck ride height
Measure all four corners using the same reference points as your baseline.
- ✦ Inspect clearances
Check tires, wheels, brake lines, sway bars, control arms, exhaust parts, and other nearby components.
- ✦ Check fasteners
Confirm that all required locking collars and suspension fasteners are secure and meet the manufacturer’s instructions.
- ✦ Check alignment
A professional alignment is wise after substantial ride-height changes.
- ✦ Road test carefully
Start slowly and listen for rubbing, clunks, scraping, or other new sounds.
When You Should Stop and Get Professional Help
Stop the job if a collar will not move, a threaded body is damaged, a spring is not seated correctly, or you cannot confirm the correct adjustment procedure. Do not use excessive force on a suspension component just to make it move.
Professional help also makes sense for corner balancing, complex damping adjustment, damaged threads, unusual suspension geometry, or a vehicle that develops unsafe handling after an adjustment.
Common Coilover Adjustment Mistakes to Avoid
The most common coilover mistakes come from making changes without measuring the result. It is easy to turn a collar several times, lower the car too far, and then struggle to understand why the suspension feels different.
Another common mistake is treating preload and ride height as the same adjustment. They are related, but they do different jobs on many coilover systems.
- ✦ Adjusting without a baseline
Always record the starting height and damping position so you can compare changes.
- ✦ Lowering too far
Excessive lowering can reduce suspension travel and create clearance problems.
- ✦ Ignoring alignment
Ride-height changes can alter camber and toe, so alignment should be checked after the final height is set.
- ✦ Changing many settings at once
Change one main variable at a time so you can identify its effect.
- ✦ Using another brand’s settings
Coilover designs differ. A preload or damping setting from another kit may not apply to yours.
- ✦ Forcing dirty threads
Clean the threaded body and use the care procedure recommended by the manufacturer before turning adjustment collars.
- ✦ Skipping a final inspection
Always check for clearance, loose parts, unusual noises, and correct suspension operation before normal driving.
A Simple Coilover Adjustment Process
If you want a simple answer to how to adjust coilovers, use a repeatable process. Set a baseline, choose the target ride height, make small changes, let the suspension settle, measure again, and then adjust damping. Finish with a clearance check and alignment check.
Do not rush the process. A few extra measurements can save hours of guessing later. The best setup is one you can explain and reproduce, not one that came from turning random knobs until the car felt different.

- ✦ Step 1: Read the manual
Confirm the adjustment method and safe range for your exact coilovers.
- ✦ Step 2: Record the baseline
Measure ride height and note spring and damping settings.
- ✦ Step 3: Set ride height
Use the proper height adjustment method and make small, equal changes when appropriate.
- ✦ Step 4: Confirm spring setup
Check spring seating and preload against the manufacturer’s specification.
- ✦ Step 5: Set damping
Start at the recommended setting and make small changes based on the car’s behavior.
- ✦ Step 6: Settle and measure
Put the vehicle on level ground, settle the suspension, and measure again.
- ✦ Step 7: Inspect and align
Check clearance and suspension components, then verify wheel alignment.
- ✦ Step 8: Test and document
Drive carefully, note the changes, and adjust only when you have a clear reason.


