
How to Adjust Coilover Ride Height: A Step-by-Step Guide
Learning how to adjust coilover ride height is much easier when you separate ride height from spring preload. Many coilovers use threaded bodies or lower mounts to change height. The exact method varies by brand and model, so the coilover maker’s manual should always guide the final setup.
A small height change can affect more than looks. It can change suspension travel, bump clearance, alignment, and how the car feels on the road. For a daily-driven car in the U.S., the goal is usually enough clearance for driveways, speed bumps, rough roads, and full steering lock while keeping the suspension in a useful range.
What Coilover Ride Height Means
Ride height is the height of the vehicle when it sits on its wheels under normal load. You can measure it from the ground to a body point, from the wheel center to the fender, or by another method set by the manufacturer. The key is to use the same points every time.
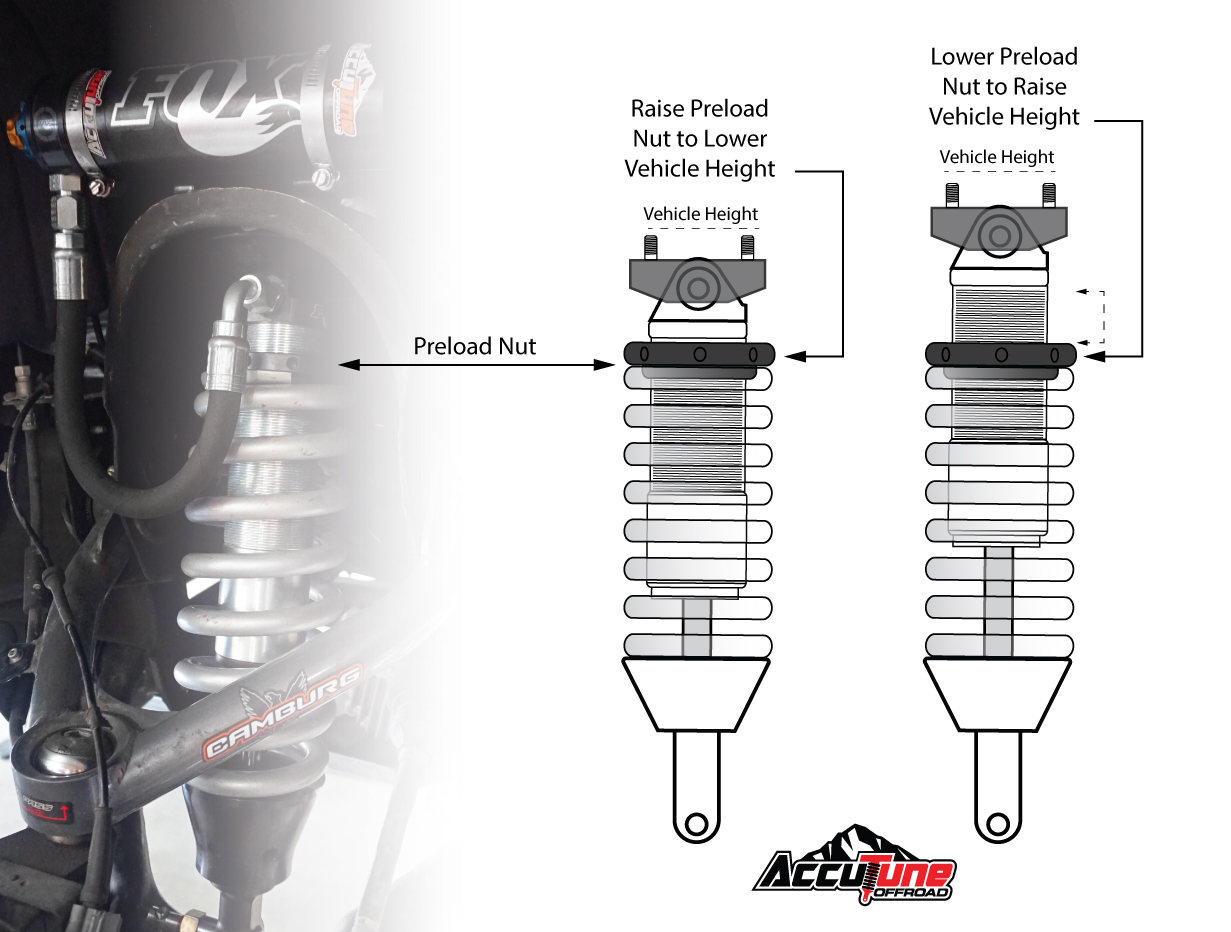
A coilover has several parts that can look similar but do different jobs. The spring perch supports the spring. Locking collars hold settings in place. Some coilovers also let the lower mount move on the threaded body. That lower mount is often the main part used for independent ride-height adjustment.
Before learning how to adjust coilover ride height, check which type you have. Moving the spring perch on some designs changes both ride height and spring preload. Moving the lower mount on a true height-adjustable design can change ride height while keeping the spring setting close to its intended value.
- ✦ Ride height
The vehicle’s loaded height from a consistent measurement point.
- ✦ Spring preload
The amount of force placed on the spring when the suspension is at full droop or another defined setup position.
- ✦ Suspension travel
The amount of useful movement available as the wheel moves up and down.
- ✦ Corner height
The ride height at one wheel or corner of the vehicle.
Why the Adjustment Method Matters
Not every coilover adjusts in the same way. Some use a threaded shock body. Others use a threaded lower mount. Some systems use separate spring and body adjustments. If you turn the wrong collar, you may change spring preload when your goal is only to change ride height.
That is why the safest answer to how to adjust coilover ride height starts with the exact instructions for your kit. If the manual gives a minimum thread engagement, minimum preload, maximum drop, or target spring length, follow those limits.
- ✦ Read the manual first
Find the adjustment diagram and note the allowed range before turning any collar.
- ✦ Identify each collar
Know which collar locks the setting and which part actually changes the height.
Tools and Safety Equipment You Need
Good tools make this job simpler and safer. You normally need a floor jack, jack stands, the coilover adjustment spanner or hook wrench, a tape measure, and a torque wrench. A marker can help you record the starting position of each collar.
Never rely on a floor jack alone while working under a car. Park on a solid, level surface and use properly rated jack stands at approved support points. Keep the car stable before you put your hands near the suspension.
Clean the threaded area before making an adjustment. Dirt and road salt can make the collars hard to turn. Do not force a seized collar with excessive leverage, because damaged threads can make future adjustments difficult and may affect the coilover’s safe operation.

- ✦ Floor jack
Use a jack that is rated for the vehicle and place it only at an approved lift point.
- ✦ Jack stands
Support the vehicle securely before working around the suspension.
- ✦ Adjustment wrench
Use the wrench supplied or specified by the coilover maker.
- ✦ Tape measure
Measure the same points before and after every change.
- ✦ Torque wrench
Use it for fasteners that the manufacturer requires you to remove or retighten.
Safety Checks Before You Start
Check that the car is stable before you remove a wheel or work near a coilover. Keep your hands away from a spring that may be under load. If a collar will not move with normal force, stop and inspect the threads rather than forcing it.
If you are not sure which parts are safe to turn, stop and use the coilover manufacturer’s instructions or have a qualified suspension shop perform the adjustment.
- ✦ Work on level ground
A level surface makes measurements more consistent and reduces the risk of vehicle movement.
- ✦ Support the vehicle
Use jack stands at proper support points before reaching into the wheel well.
- ✦ Keep tools clear
Avoid placing tools where they could contact a moving spring, brake line, or suspension arm.
How to Adjust Coilover Ride Height Step by Step
The safest way to learn how to adjust coilover ride height is to make small changes and measure often. Do not guess based only on the gap between the tire and fender. That gap can look different from side to side even when the actual suspension height is close.
Start with the car on a level surface. Record the current ride height at all four corners, or at least at the corners you plan to change. Also note the current collar position or threaded-body measurement if your manufacturer provides a setup method.
The steps below describe a common adjustable-coilover layout. Your kit may use a different system, so treat the manufacturer’s instructions as the final authority.

- ✦ 1. Measure the starting height
Measure from the same fixed point at each corner and write the numbers down.
- ✦ 2. Lift and support the car
Raise the vehicle safely and remove the wheel if the adjustment hardware is not accessible.
- ✦ 3. Clean the threads
Remove dirt from the threaded section and collars before making changes.
- ✦ 4. Unlock the adjustment collar
Use the correct spanner to loosen the locking collar without damaging the collar or threads.
- ✦ 5. Adjust the correct part
Turn the ride-height collar or lower mount specified by the coilover maker. Do not change preload by accident.
- ✦ 6. Make a small change
Move one corner by a small amount, then record the new setting.
- ✦ 7. Lock the setting
Tighten the locking collar as directed by the manufacturer.
- ✦ 8. Reinstall the wheel
Torque the wheel fasteners to the vehicle manufacturer’s specified value.
- ✦ 9. Set the car down
Lower the car carefully and let the suspension settle before taking the final measurement.
- ✦ 10. Recheck all corners
Compare the new measurements with your starting numbers and adjust again if needed.
How to Lower Coilovers
To lower a car, use the height adjustment specified for your coilover and turn it in the direction that reduces the installed suspension height. The direction can vary by design, so confirm it before turning the collar.
Lower the car in small steps. A very low setting can reduce bump travel and increase the chance of tire, wheel, exhaust, or chassis contact. For a street car, check clearance at steering lock and over bumps before deciding that the new height is suitable.
- ✦ Check tire clearance
Turn the steering from lock to lock and inspect the tire, wheel, liner, and suspension for contact.
- ✦ Check bump travel
Make sure the suspension still has useful upward travel and does not hit the bump stop too easily.
How to Raise Coilovers
Raising a coilover follows the same basic process, but the adjustment direction is reversed. Make a small change, lock the setting, lower the car, and measure again.
A higher setting can improve ground clearance for steep driveways, rough roads, and tall speed bumps. It can also change suspension geometry, so an alignment check remains important after a meaningful height change.
- ✦ Use small steps
Small changes make it easier to reach a balanced final height without overshooting your target.
- ✦ Measure both sides
Do not assume that the same collar position will produce identical corner heights.
How to Set Coilover Height Without Ruining Spring Preload
One of the most common mistakes when learning how to adjust coilover ride height is treating the spring perch as the only height control. On many kits, moving the spring perch changes spring preload. That can change how the spring behaves at full droop and may alter the intended suspension setup.
A true independent height adjustment lets you change the position of the vehicle without using the spring perch as the main height control. This can help preserve the manufacturer’s intended spring preload and available suspension travel.
The correct preload setting is not the same for every coilover. Some kits specify a measured spring length. Others specify a preload amount or a method for setting the spring until it is just captive. Use the value and method provided for your exact kit.

- ✦ Do not guess at preload
Use the coilover manufacturer’s stated spring-length or preload procedure.
- ✦ Keep the spring captive
Follow the manufacturer’s minimum setting so the spring remains properly retained through the suspension’s range of movement.
- ✦ Watch thread engagement
Never exceed the manufacturer’s minimum or maximum threaded-body or lower-mount limits.
Preload and Ride Height Are Not the Same
Preload is the amount the spring is compressed from its free length in the installed setup. Ride height is where the vehicle sits under load. These two settings can interact, but they are not interchangeable.
If you use preload to make a car much lower, you may create an unwanted spring setting or reduce available travel. A height-adjustable lower mount can often avoid that problem, but only when the coilover was designed for that adjustment.
- ✦ Height adjustment
Changes the installed position of the suspension when the coilover design allows independent height adjustment.
- ✦ Preload adjustment
Changes the spring’s installed compression and should be set within the manufacturer’s stated range.
How Much Should You Adjust Coilover Ride Height?
There is no single ride height that works for every car. The right range depends on the coilover design, spring rate, wheel and tire package, suspension geometry, road conditions, and how you use the vehicle.
For a street car, start close to the manufacturer’s recommended range. If you want a lower stance, change the height in small steps and test the car after each change. The lowest possible setting is not automatically the best setup because useful suspension travel and clearance still matter.
If the car sees track use, the setup may focus more on suspension travel, corner balance, tire clearance, and alignment than on visual height. A professional alignment and corner-weighting session can help when precise handling is the goal.

- ✦ Daily driving
Keep enough clearance for common roads, ramps, speed bumps, and normal passengers or cargo.
- ✦ Performance driving
Prioritize suspension travel, tire clearance, alignment, and a balanced chassis setup.
- ✦ Show use
Very low settings may be possible on some builds, but clearance and suspension function still need attention.
- ✦ Uneven roads
A little extra height can help prevent repeated contact with the chassis and underbody.
Why Very Low Is Not Always Better
Lowering a car changes the position of suspension arms and other components. Too much lowering can reduce bump travel, change alignment, and increase the chance of bottoming out.
On U.S. roads, driveway transitions and rough pavement can expose these problems quickly. If the car scrapes often or feels harsh after lowering, raise it slightly and inspect the suspension travel and contact points.
- ✦ Ground clearance
Protect the oil pan, exhaust, subframes, and other low parts from road contact.
- ✦ Suspension travel
Leave enough movement for the wheel to follow bumps without constant bottoming.
How to Measure and Match Ride Height
Accurate measurement is a key part of how to adjust coilover ride height. Park on a flat surface and use the same measurement points every time. Measuring from the ground to a body panel can be affected by tire pressure and wheel size, so many suspension setups use a repeatable point such as the wheel center or a marked chassis point.
Before measuring, make sure tire pressures are correct and the car has its normal load. If the vehicle normally carries a driver, fuel, or regular cargo, consider whether that load should be part of the setup.
After an adjustment, roll the car forward and backward or drive it a short distance at low speed so the suspension can settle. Then measure again. Do not make several large changes based on a measurement taken while the suspension is still loaded unevenly.

- ✦ Use fixed points
Pick repeatable measurement points and use them for every check.
- ✦ Check tire pressure
Keep tire pressure consistent because pressure changes can affect measured height.
- ✦ Let the suspension settle
Move the car after adjustment before taking your final measurement.
- ✦ Record every change
Write down the starting height and each adjustment so you can return to a known setting.
Fender Gap Versus Wheel-Center Measurement
Fender gap is easy to see, but it is not always the best measurement. Different body panels can sit at different heights, and aftermarket body parts can make visual comparisons misleading.
A wheel-center measurement removes much of the tire-to-ground variation. The most important rule is consistency: use one defined method when comparing before and after measurements.
- ✦ Visual check
Useful for spotting obvious differences from side to side.
- ✦ Measured check
Better for making repeatable suspension adjustments.
What to Check After Adjusting Coilover Ride Height
The job is not finished when the car reaches the target number. Changing ride height can affect wheel alignment and the relationship between suspension parts. Always inspect the car before normal driving.
Check for tire contact at steering lock and through suspension movement. Look around the wheel well, spring, shock body, brake lines, sway bar, control arms, exhaust, and underbody. Any new contact should be fixed before regular use.
A meaningful ride-height change should also be followed by a wheel alignment. Changes in camber and toe can affect tire wear and vehicle behavior. If the vehicle has adjustable suspension geometry, an alignment shop can verify that the settings remain within the desired range.

- ✦ Wheel alignment
Check camber, caster, and toe as applicable after a significant height change.
- ✦ Tire clearance
Look for contact during steering and suspension movement.
- ✦ Brake line clearance
Make sure brake hoses and wires do not rub against moving or sharp parts.
- ✦ Fasteners
Verify that any removed fasteners are installed and torqued to the required specification.
- ✦ Suspension travel
Confirm that the suspension can move through its intended range without harsh contact.
Signs the Ride Height Is Too Low
Frequent scraping, tire rubbing, repeated bump-stop contact, or a sudden harsh ride can signal that the setting is too low for the car’s use. These symptoms can also come from other suspension problems, so inspect the complete setup before changing height again.
If the car has lost useful travel, raising it slightly may restore clearance. If the problem remains, check spring preload, damping settings, bump stops, alignment, and other suspension components against the coilover manufacturer’s setup instructions.
- ✦ Repeated scraping
May indicate insufficient ground clearance for the roads you use.
- ✦ Tire rubbing
Can damage the tire or nearby components if left unresolved.
- ✦ Harsh impacts
May point to reduced bump travel or frequent contact with the bump stop.
Common Coilover Height Adjustment Mistakes
Most problems come from rushing the setup. A few extra minutes spent measuring, cleaning the threads, and checking the manual can prevent hours of correction later.
The biggest mistake is changing a spring perch or collar without knowing its purpose. Another common mistake is making a large adjustment on one side and assuming the other side will match. Suspension components, body weight distribution, and previous settings can all affect the final measurement.
- ✦ Using a jack as the only support
Never work under a vehicle that is supported only by a floor jack.
- ✦ Turning the wrong collar
Identify the height and preload controls before making an adjustment.
- ✦ Ignoring minimum thread engagement
Stay within the manufacturer’s safe adjustment range.
- ✦ Making huge changes
Large changes make it harder to find a balanced setting and can create clearance problems.
- ✦ Skipping alignment
A height change can alter wheel alignment, especially on suspension designs with significant geometry change.
- ✦ Judging only by appearance
A car can look level while its measured corner heights or suspension settings differ.
- ✦ Forcing seized collars
Excessive force can damage threads, collars, or tools.
When to Stop and Use a Professional
Stop if the adjustment collar will not move normally, the threads look damaged, the spring is not captive as required, or you cannot identify the correct height adjustment. A suspension shop can inspect the setup and use the correct tools.
Professional help also makes sense when the car needs precise corner balancing, track alignment, or suspension geometry work. These jobs require more than simply turning a collar.
- ✦ Damaged threads
Do not continue turning a collar over damaged or badly corroded threads.
- ✦ Unknown setup
Use the manufacturer or a qualified technician when the coilover’s adjustment method is unclear.
- ✦ Track setup
Consider professional corner weighting and alignment when precise competition setup is required.
How Often Should You Recheck Coilover Ride Height?
Coilover settings should be checked whenever you make a height change or perform suspension work. It is also useful to inspect the collars and threads during routine maintenance, especially on cars that see rain, snow, road salt, dirt, or frequent track use.
If the car suddenly sits lower on one side, do not assume the collar simply moved. Inspect the spring, mount, shock body, suspension parts, and fasteners for a mechanical issue. A change in ride height without an adjustment can point to a problem that needs attention.
For a street car, a simple written setup record is valuable. Record ride height, tire pressure, alignment settings, and coilover adjustments so you have a known baseline.
- ✦ After every height change
Measure all affected corners and confirm the settings.
- ✦ After suspension work
Recheck ride height after replacing or removing suspension components.
- ✦ After unusual symptoms
Inspect the suspension if the car suddenly sits unevenly or develops new noises.
- ✦ Before track events
Verify the setup, tire pressures, alignment, and suspension settings before driving at higher speeds.
Keep a Simple Setup Record
A setup sheet can save time. Write down each corner’s ride height and the coilover setting used to reach it. If you change the car for an event, you can return to the street setting with much less guesswork.
This is especially useful when several people work on the same car. Clear measurements are easier to repeat than a note such as “three turns lower.”
- ✦ Record measurements
Write down each corner’s height using the same measurement method.
- ✦ Record adjustments
Note collar positions, spring settings, and any manufacturer-specific setup values.


