To install a track bar relocation bracket, safely support the vehicle, remove the track bar mounting hardware, fit the correct bracket, reinstall the track bar, and tighten every fastener to the manufacturer’s specifications. Then check axle centering, steering clearance, and suspension travel before driving.
For American drivers who lift a Jeep Wrangler or another solid-axle 4×4, a track bar relocation bracket can help restore suspension geometry after a lift. It moves one track bar mounting point to a new position. This can help keep the axle centered and improve the relationship between the track bar and steering linkage when the selected kit is designed for that setup.
The installation is not the same on every vehicle. A front bracket may attach near the axle and affect steering clearance, while a rear bracket may use a riser, brace, U-bolt, or other mounting hardware. Some kits are fully bolt-on, while others require drilling or welding. The exact vehicle, lift height, bracket design, and supplied instructions determine the correct method.
Before starting, identify the bracket’s part number and confirm that it fits your model year, axle, suspension lift, and track bar. This guide explains the general process for common solid-axle vehicles, including Jeep Wrangler models sold in the United States. It does not replace the installation manual for a specific kit. If the instructions require structural welding, frame modification, or work beyond your skills, use a qualified suspension shop.
A track bar relocation bracket changes the position of one track bar mounting point. On a solid-axle vehicle, the track bar connects the axle housing to the chassis and limits side-to-side axle movement. It helps keep the axle in the correct lateral position as the suspension moves.
When a suspension lift changes the distance and angle between the axle and chassis, the original track bar position may no longer provide the geometry intended by the vehicle manufacturer. Depending on the design, a relocation bracket can move the axle-side or frame-side mounting point to help correct that change.
The bracket does not replace the track bar. It also does not automatically fix every handling issue on a lifted vehicle. Worn bushings, loose fasteners, damaged steering parts, poor alignment, and incorrect suspension setup can cause similar symptoms and need separate checks.
Source: storage.googleapis.com
Axle centering
A suitable bracket can help place the axle closer to the center of the chassis after a lift. Final centering may still require an adjustable track bar.
Suspension geometry
Moving a mounting point changes the track bar angle and its relationship to the chassis. The correct location depends on the vehicle and suspension setup.
Mounting strength
Some brackets reinforce the original mounting area, but only when the design and installation provide the intended support.
Clearance
The new position must leave room for steering parts, the differential, brake lines, and other nearby components throughout suspension travel.
Relocation Bracket vs. Adjustable Track Bar
A relocation bracket changes the location of a mounting point. An adjustable track bar changes the effective length of the bar. These parts address related but different needs, and some lifted vehicles require both.
Do not assume that a bracket will center the axle by itself. A manufacturer may require an adjustable track bar because the original bar cannot reach the new mounting position correctly. Follow the kit’s fitment notes before combining parts.
Use a relocation bracket
When the suspension design calls for a different mounting height or position.
Use an adjustable track bar
When the track bar needs a length change to center the axle or fit the revised mounting location.
Use both when specified
When the kit manufacturer requires both parts for the intended lift height and suspension geometry.
Tools, Parts, and Safety Checks Before Installation
Gather all tools and hardware before lifting the vehicle. The right tools reduce the chance of damaged threads, rounded bolt heads, or a bracket that sits crooked. Exact socket sizes and torque values vary by vehicle and kit, so check the installation manual first.
Park on a firm, level surface in a well-ventilated work area. Set the parking brake, place wheel chocks where appropriate, and keep people away from the vehicle while it is raised. Never rely on a hydraulic floor jack alone to hold the vehicle during installation.
A solid-axle suspension can store force even when the vehicle appears stable. Support the chassis on suitable jack stands and use a separate jack to control the axle. Keep hands and fingers away from gaps between the bracket and factory mount while adjusting axle height.
Source: YouTube > Steer Smarts
Basic tools
A suitable floor jack, correctly rated jack stands, wheel chocks, metric or SAE sockets and wrenches as required, a breaker bar, and a calibrated torque wrench.
Inspection supplies
A work light, wire brush, measuring tape, paint marker, and eye protection help with inspection and final checks.
Correct installation kit
The bracket, its supplied bolts and nuts, spacers, braces, washers, and any specified clamps or reinforcement pieces.
Vehicle information
The factory service manual and current bracket instructions for the exact model, axle position, and part number.
Inspect the Existing Mounting Area
Before taking the track bar apart, inspect the factory bracket, axle tube, and frame-side mount for cracks, bends, corrosion, damaged threads, and signs of movement. A relocation bracket should not conceal a damaged mounting point.
Clean away loose dirt and rust where the new bracket must sit flush. Do not grind away structural material or enlarge mounting holes unless the approved instructions specifically require that operation. If a mount is cracked or badly distorted, stop and arrange a proper repair.
Record the original setup
Take photos of the bar orientation, bolt direction, spacers, brake-line routing, and nearby steering components before removal.
Check hardware
Replace damaged or stretched fasteners only with the correct specified parts. Do not substitute ordinary hardware for suspension fasteners.
Step 1: Secure the Vehicle and Support the Axle
Begin by making the vehicle stable before loosening the track bar. Follow the vehicle and bracket manufacturer’s lifting points. Raise the vehicle only as much as needed, then place jack stands under approved chassis support points.
Use a separate jack to support the axle housing. The goal is to control axle position and reduce unwanted load on the track bar bolts. On many installations, keeping the suspension near normal ride height makes removal and refitting easier, but the exact support arrangement depends on whether the procedure calls for a loaded or unloaded suspension.
Do not put any part of your body beneath an unsupported axle or chassis. If the axle shifts as a bolt comes out, stop and adjust the support before continuing. Never use the track bar or its bracket as a lifting point unless the vehicle manufacturer explicitly permits it.
Source: www.ford-trucks.com
Check stability
Confirm that the jack stands sit on solid ground and that the vehicle cannot roll or rock.
Control axle height
Raise or lower the axle slowly to reduce tension on the track bar mounting hardware.
Keep the work area clear
Move tools and loose parts away from the jack stands, tires, and suspension movement path.
Should the Wheels Stay on the Vehicle?
Some relocation bracket installations can be completed with the wheels installed, while others require wheel removal for access. Follow the instructions for your specific kit. Removing a wheel may improve access, but it does not change the need for proper chassis and axle support.
Leave wheels installed when permitted
This may be practical if the bracket and fasteners are accessible and the manual allows the procedure.
Remove wheels when needed
Use the specified wheel-removal and support procedure when access or the installation instructions require it.
Step 2: Remove the Track Bar Mounting Hardware
Locate the track bar at the axle and chassis. Remove the mounting hardware specified by the kit instructions, taking care to support the bar so it cannot drop or swing into nearby parts. Some kits require loosening both ends; others direct you to remove only the axle-side fastener and move the bar out of the way.
Keep track of the original bolt direction, washers, spacers, and nuts. Some factory fasteners are reused, while other kits supply new hardware. Do not discard parts until you have checked the parts list and confirmed what the new bracket requires.
If a bolt will not move, check for suspension load and corrosion before applying more force. Adjust axle height slightly to relieve binding. Avoid striking threaded ends or using heat near rubber bushings, fuel lines, brake hoses, or other sensitive components.
Source: jksmfg.com
Support the track bar
Hold or secure the bar as the bolt is removed so it cannot swing unexpectedly.
Protect reusable parts
Keep approved original hardware clean and separate from the new kit hardware.
Stop if the mount moves
Movement, cracking, or severe corrosion in the factory mount needs attention before a new bracket is installed.
What If the Track Bar Bolt Is Stuck?
A stuck bolt may be binding under load, seized by rust, or damaged. First, verify that the axle is properly supported and adjust its height in small increments. Use a suitable penetrating fluid where appropriate and allow it time to work.
If the bolt remains seized, avoid bending the factory bracket or damaging the axle-side mount with excessive force. A professional technician may need specialized tools to remove it without harming the mounting structure.
Do not force misaligned holes
If the bar and mount are under tension, correct the axle position before attempting removal or installation.
Avoid unsafe heat
Heating a suspension mount can damage nearby parts and affect material properties. Use a suitable repair method instead.
Step 3: Position and Attach the Relocation Bracket
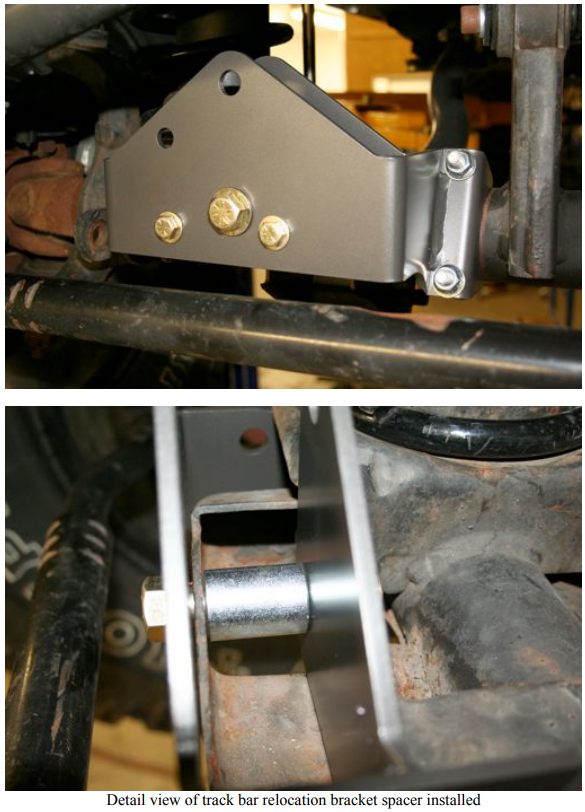
Place the new bracket over or against the factory mounting area in the exact orientation shown in the kit instructions. A bracket that looks similar when turned around may have different hole positions, reinforcement surfaces, or clearance requirements. Confirm the front, rear, left, and right orientation before installing fasteners.
Clean the contact surfaces and check that the bracket sits flush where designed. Install the specified bolts, nuts, washers, spacers, U-bolts, and braces in the required order. Most multi-piece kits call for an initial loose fit so the parts can align before final tightening.
Do not omit a supplied brace or spacer because the main bracket appears secure. These parts may distribute loads or support the original mount. Likewise, do not add washers or substitute bolts unless the instructions permit it. Incorrect stack height or fastener length can affect clamping force and thread engagement.
Some brackets are bolt-on, while others require drilling or welding. This guide does not provide a universal drilling pattern or weld specification. If your kit requires either operation, use its exact template and procedure or have the work completed by a qualified professional.
Source: extremeterrain.com
Verify orientation
Compare the bracket with the kit diagrams and make sure each mounting surface and hole lines up as designed.
Install all required support pieces
Fit the specified riser, brace, clamp, sleeve, or reinforcement before final torque.
Keep fasteners loose initially
Allow adjustment during assembly where the manufacturer instructs you to do so.
Inspect contact surfaces
Make sure the bracket is seated correctly and does not rock, bind, or leave an unintended gap.
How to Handle Different Bracket Designs
An axle-side bolt-on bracket may sit over the original mount and use a new raised hole for the track bar. A rear relocation kit may instead use a U-bolt around the axle tube and an internal riser brace. A frame-side bracket has a different load path and requires its own installation method.
These designs cannot be treated as interchangeable. Use the hardware diagram and assembly order supplied with your exact part. If the bracket does not fit the factory mount without force, stop and confirm the part number and vehicle application.
Axle-side bracket
Check the original mount, axle-tube contact area, and all supplied reinforcement pieces.
Frame-side bracket
Follow the instructions for the chassis mounting point and inspect the surrounding structure closely.
Weld-on bracket
Use the required welding procedure and structural inspection by a qualified technician.
Step 4: Reinstall the Track Bar and Torque the Fasteners
Move the track bar into the new mounting position and align its eye or bushing with the bracket hole. Raise or lower the axle slowly with the support jack until the holes line up naturally. Do not use the bolt as a drift to pull misaligned parts together, and never hammer a bolt through holes that do not align.
Install the correct fastener in the direction required by the instructions. Check that all washers, spacers, and locking nuts are in the correct locations. Start the threads by hand to reduce the chance of cross-threading, then snug the hardware in the specified order.
Torque every fastener to the value listed for that exact connection in the bracket instructions or vehicle service manual. A factory bolt, a supplied metric bolt, a U-bolt, and a small brace bolt may all have different torque requirements. Do not use one generic torque value for the entire assembly.
Some manufacturers specify final tightening with the vehicle at normal ride height or with the suspension loaded. Follow that requirement where applicable, especially for fasteners that clamp rubber-bushed suspension joints. If you cannot safely reach a fastener at the required suspension position, use a suitable lift or seek professional help.
Source: www.youtube.com
Use a calibrated torque wrench
Confirm the unit and value for each fastener. Do not estimate final torque by feel.
Follow the specified sequence
Tighten the original mount, relocation bracket, reinforcement pieces, and track bar connections in the order stated by the manufacturer.
Check thread engagement
Make sure the fastener is the correct length and that the locking nut engages as intended.
Record completed torque checks
Use the kit’s maintenance guidance to determine which fasteners need later inspection.
Why There Is No Universal Torque Specification
Torque depends on the fastener diameter, thread pitch, grade, material, lubrication condition, joint design, and manufacturer requirements. Even two brackets for the same model may use different hardware and have different torque specifications.
For example, published instructions for some Jeep Wrangler JK rear relocation kits specify 125 ft-lb for particular track bar connections, while other bracket fasteners have different values. That example is not a universal specification. Use it only if the exact instructions for your part identify the same connection and hardware.
Do not copy values from another kit
Similar-looking brackets may use different bolts, nuts, and mounting arrangements.
Do not guess if instructions are missing
Obtain the correct instructions from the manufacturer before putting the vehicle back into service.
Step 5: Center the Axle and Check Suspension Geometry
After the bracket and track bar are secured, verify that the axle is centered beneath the chassis. Park the vehicle on level ground and place the suspension at normal ride height when the manufacturer calls for that condition. Measure both sides using the same reference points.
For a basic comparison, measure from each tire’s outer tread edge to a consistent point on the nearby chassis. Repeat the measurement on the opposite side. Differences can indicate that the axle is not centered, but tire width, tread shape, body trim, and the chosen reference points can affect the result.
If the axle remains offset, check whether the kit requires an adjustable track bar and whether the bar can reach the correct length without binding. Adjust only according to the track bar manufacturer’s procedure. After adjustment, confirm that the joints sit correctly and the locking hardware is secured to specification.
A relocation bracket changes geometry, but it does not replace a complete suspension inspection. Check the steering linkage, drag link, tie rod, stabilizer, differential, exhaust, brake hoses, ABS wiring, sway bar links, and tires for contact or strain. The components must remain clear through the usable suspension and steering range.
Source: www.cherokeeforum.com
Measure both sides consistently
Use the same type of reference point and the same measurement method on each side of the vehicle.
Check the steering wheel
A change in steering wheel position may indicate that alignment or steering adjustment is needed; it is not proof that the axle is centered.
Inspect full steering travel
With the vehicle safely supported as required, check the specified steering range for interference.
Check suspension travel
Verify clearance at the suspension positions required by the kit manufacturer. Use a professional shop if safe full-travel testing is not practical.
Do You Need an Alignment After Installation?
A track bar relocation bracket does not automatically require every type of wheel alignment, but a lifted vehicle may need steering geometry and alignment checks. The correct action depends on what parts were changed and the manufacturer’s instructions.
If the installation also changes the drag link, steering linkage, control arms, or other alignment-related components, arrange the relevant measurements and adjustments before normal driving. A professional inspection is appropriate if the steering wheel is off-center, the vehicle pulls, or the steering feels different.
Check steering alignment
Follow the vehicle and lift manufacturer’s guidance when the drag link or other steering parts have been changed.
Check axle centering separately
Wheel alignment measurements do not, by themselves, prove that a solid axle is centered beneath the chassis.
Common Installation Problems and How to Fix Them
Most installation problems come from incorrect fitment, axle load on the mounting hardware, missing parts, or a failure to follow the kit’s assembly sequence. Do not solve a fitment problem by forcing parts into place. Stop and identify the cause before tightening the bracket or driving the vehicle.
A bracket that sits crooked, a fastener that will not thread by hand, or a track bar that cannot reach its mounting hole may indicate that the wrong part was supplied or that the axle needs repositioning. A persistent mismatch can also point to a bent factory mount or a track bar that is not suitable for the revised geometry.
Source: www.carid.com
The bracket will not sit flush
Check its orientation, the mounting surface, trapped debris, and whether the part matches the vehicle. Do not grind or bend the bracket without an approved procedure.
The bolt holes do not line up
Adjust axle height slowly to relieve suspension load. If alignment remains impossible, verify the part number and inspect the mounts for damage.
The axle is still off-center
Confirm the measurements, lift height, bracket position, and adjustable track bar requirements. Do not assume that a relocation bracket guarantees perfect centering.
The steering feels loose or unstable
Stop driving and inspect the track bar connections, steering linkage, bushings, and mounting structure. Have any uncertain or damaged parts assessed by a qualified technician.
A hose or wire is stretched
Do not continue until the routing and clearance are corrected using the approved method. Brake hoses and ABS wiring must not be pinched or pulled tight.
Mistakes That Can Make the Installation Unsafe
Never use a generic torque value in place of the correct specifications. Do not reuse damaged fasteners, omit a reinforcement brace, or assume that a snug bolt is secure enough for road use.
Another common mistake is checking clearance only while the vehicle sits on the ground. Steering and suspension parts move as the wheels turn and the suspension compresses or extends. The required clearance checks must reflect the manufacturer’s specified operating range.
Do not drive the vehicle to test a bracket that is loose, visibly misaligned, or missing hardware. A track bar connection helps control lateral axle movement, and a failure can cause loss of vehicle control.
Never drive with incomplete assembly
All required fasteners and support components must be installed and secured before the vehicle returns to service.
Do not ignore damaged mounts
A new bracket cannot make a cracked or severely weakened factory mounting point safe without the proper repair.
Do not skip the final inspection
Check torque, axle position, steering movement, and line routing before considering the job complete.
Frequently Asked Questions
Q
Can I install a track bar relocation bracket at home?
Yes, some bolt-on kits can be installed at home by someone with suitable mechanical skills, safe lifting equipment, the correct tools, and the manufacturer’s instructions. Kits that require structural welding, drilling, or extensive steering changes may need professional installation.
Do not begin if you cannot safely support the vehicle and axle or obtain the correct torque specifications.
Q
Do I need an adjustable track bar with a relocation bracket?
Not in every case. The answer depends on the bracket design, suspension lift height, and length of the existing track bar. Some manufacturers specifically require an adjustable bar because the original bar cannot center the axle at the relocated mounting point.
Check the kit’s fitment notes before buying or installing either component.
Q
Does a track bar relocation bracket stop death wobble?
A relocation bracket is not a guaranteed cure for death wobble. Severe front-end shaking can involve worn steering joints, loose track bar mounts, damaged bushings, tire problems, or other faults.
Inspect the full steering and suspension system and correct the underlying cause. Do not rely on a bracket alone to resolve dangerous shaking.
Q
How long does track bar relocation bracket installation take?
Installation time varies with the vehicle, bracket design, corrosion, access, and whether drilling or other modifications are required. A straightforward bolt-on kit may take much less time than a job involving seized hardware or structural repairs.
Use the manufacturer’s stated installation time as a starting point, not a guarantee. Allow time for inspection, torque checks, axle centering, and clearance verification.
Q
Should I replace the factory track bar bolts?
Use new bolts and nuts when the kit specifies them. Some kits reuse selected factory hardware, while others supply replacement fasteners or additional spacers and sleeves.
Do not reuse damaged hardware or substitute fasteners based only on appearance. The size, grade, thread, length, and locking method must match the manufacturer’s requirements.
Q
How do I know the bracket is installed correctly?
The bracket should sit in its intended position, all required hardware should be installed and torqued to specification, and the track bar should fit without forced alignment. The axle should be correctly centered, and steering and suspension parts should move without interference.
If the bracket shifts, a bolt loosens, the steering feels abnormal, or any component contacts the bracket, stop using the vehicle until the problem is corrected.
✦ Wrapping Up
Conclusion
Installing a track bar relocation bracket involves more than moving a bolt to a higher or lower hole. Correct fitment, secure mounting, proper fastener torque, axle centering, and clearance checks all affect how the suspension works. The exact steps depend on the vehicle and the bracket kit, so the manufacturer’s instructions must guide the installation.
Before returning the vehicle to normal road use, inspect the mounting structure, confirm every required fastener is secure, and verify that the track bar and steering components move freely through the specified range. Arrange a professional inspection if the holes will not align, the mount is damaged, the installation requires welding, or the steering behaves differently afterward.
💡 Key Takeaway
Identify the exact bracket part number and download its current installation instructions first. Then gather the correct hardware and tools, support the vehicle safely, follow the specified assembly and torque sequence, and verify axle centering and clearance before driving.
Eric
Hi, I’m Eric Bennett, the person behind OffRoadTruckAccessories.com.
I created this blog to share my interest in trucks, off-road driving, automotive accessories, and DIY modifications. I enjoy learning how different truck accessories work, testing their usefulness, and understanding whether they are truly worth buying.