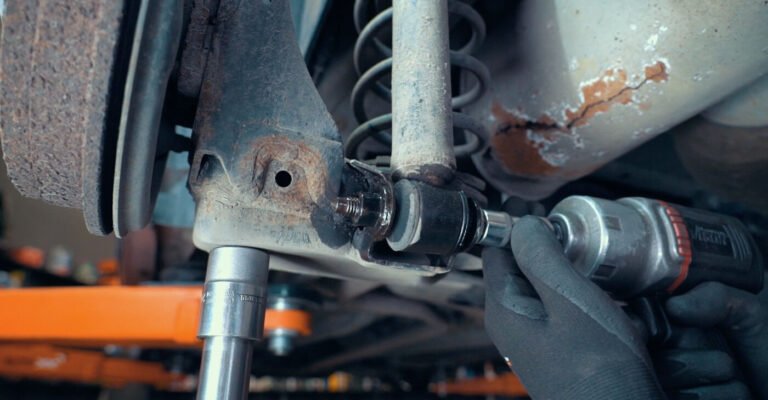
To install an adjustable track bar, secure the vehicle, support the axle, remove the original bar, fit the compatible replacement, center the axle, and tighten every fastener to the vehicle and part maker’s specifications.
On U.S. roads, a properly installed track bar helps keep a solid axle centered beneath a vehicle during turns, lane changes, and uneven pavement. This matters for Jeep Wrangler and Cherokee owners, as well as drivers of other solid-axle vehicles that have received a suspension lift. An adjustable track bar can help correct axle position after a lift, but the correct part and adjustment depend on the vehicle, suspension design, and amount of lift.
Installing an adjustable track bar is more than swapping one metal bar for another. The bar connects the axle to the chassis and helps control side-to-side axle movement. Poor installation, loose bolts, incorrect adjustment, or damaged mounting holes can affect handling and create a serious safety risk. This guide explains the tools, preparation, installation steps, axle-centering checks, and common problems to address before driving.
An adjustable track bar is a suspension link that controls the sideways position of a solid axle relative to the vehicle body. One end attaches to the chassis or frame, while the other attaches to the axle or a connected bracket. Its length and mounting geometry help keep the axle centered as the suspension moves.
Many solid-axle vehicles use a track bar, also called a Panhard bar. A lift can change the relationship between the axle and frame. Depending on the suspension design and lift height, the axle may sit farther to one side than it did at the original ride height. An adjustable bar can help correct this position.
The track bar is not the same as a steering tie rod or drag link. Those parts control steering movement. A track bar locates the axle laterally. On some vehicles, the relationship between the track bar and steering linkage also affects how the suspension and steering respond to bumps, so the complete setup must be checked.
Source: storage.googleapis.com
Axle location
The bar limits side-to-side movement of the solid axle relative to the chassis.
Lift correction
Adjustment can help recenter the axle after a compatible suspension lift or other approved geometry change.
Mounting integrity
Sound brackets, bolts, bushings, and joints are essential because the bar carries suspension loads.
When Should You Install an Adjustable Track Bar?
Consider an adjustable track bar when the vehicle manufacturer or suspension kit instructions call for one, when a lift has shifted a solid axle off center, or when replacing a damaged bar with an adjustable design approved for the vehicle. It may also be useful when a suspension setup requires a specific bar length to restore the intended geometry.
Do not assume that every lifted vehicle needs an adjustable bar or that installing one will fix every steering problem. A worn steering joint, incorrect alignment, loose wheel bearing, damaged bracket, or unsuitable suspension component can cause similar symptoms. Identify the actual issue before buying or fitting parts.
A lifted vehicle
Measure axle position and follow the lift manufacturer’s recommendations.
A worn or bent bar
Inspect the original bar and mounts, then choose a compatible replacement.
Persistent steering symptoms
Inspect the entire steering and suspension system instead of assuming bar adjustment alone will solve the problem.
Tools and Parts Needed for Installation
Gather the correct parts and tools before raising the vehicle. Track bar bolts can be tight, corroded, or difficult to reach. Having the right equipment reduces the chance of damaging a fastener or leaving the vehicle in an unsafe state.
The exact tool sizes, torque values, and installation method vary by vehicle and track bar design. Read the replacement part instructions and the vehicle service information first. Some designs use a threaded adjustment sleeve and jam nuts, while others use a different adjustment or locking arrangement.
Source: storage.googleapis.com
Replacement track bar
Use a bar specified for the vehicle, axle, lift configuration, and intended mounting position.
Hand tools
Prepare the correct sockets, wrenches, breaker bar, and any specialty tools listed by the manufacturer.
Torque wrench
Use a suitable torque wrench to tighten fasteners to documented specifications.
Lifting equipment
Use a floor jack, appropriately rated jack stands, and wheel chocks on a firm, level surface.
Measuring tools
Use a tape measure, straightedge, or other suitable tool to compare axle position on both sides.
Safety equipment
Wear eye protection and gloves when appropriate. Keep hands clear of pinch points and unsupported suspension parts.
Check Fitment Before Raising the Vehicle
Confirm the year, make, model, axle, front or rear position, and suspension configuration. Two vehicles with similar names can use different track bar lengths, bolt diameters, bushings, or mounting arrangements. A bar that physically fits may still have the wrong travel or geometry.
Inspect the new bar for shipping damage, damaged threads, loose joints, missing hardware, and clear adjustment markings. Verify whether the manufacturer requires new mounting hardware or permits reuse of the original bolts. Do not reuse a fastener that is damaged or specified as single-use.
Read the instructions
Find the specified adjustment range, torque values, locking method, and any ride-height requirements.
Compare the parts
Check the mounting ends and hardware against the original assembly before removing it.
Step 1: Park and Secure the Vehicle
Park on a firm, level surface away from traffic. Set the parking brake when appropriate, place the transmission in Park or in gear as directed by the vehicle manufacturer, and chock the wheels that will remain on the ground. Remove loose items that could interfere with the work area.
Review the vehicle’s lifting points and support requirements. Raise the vehicle only at approved points and place appropriately rated jack stands beneath approved support locations. If the axle must be supported separately, position the jack so the axle can be controlled during removal and installation without placing a load on an unsafe point.
Never rely on a hydraulic floor jack alone. Never put any part of your body under a vehicle that is unstable or supported only by a jack. If you cannot support the chassis and axle securely, have a qualified shop perform the installation.
Source: carpartsfaq.com
Verify stability
Check that the stands are fully seated and the vehicle does not rock before working underneath.
Control axle movement
Support the axle as required so removing the bar does not allow the suspension to shift unexpectedly.
Protect nearby parts
Keep hoses, wiring, brake lines, and steering components clear of tools and support equipment.
Should the Suspension Be at Ride Height?
The correct working position depends on the vehicle and the replacement bar instructions. Some installations are performed with the chassis supported and the axle controlled at a specified position. Others require the suspension to be at normal ride height for final adjustment or tightening.
Do not crawl under a vehicle supported by its tires alone unless a safe, approved service arrangement provides adequate clearance. If the instructions require ride-height tightening, use a suitable lift or another manufacturer-approved method that keeps the vehicle stable and provides safe access.
Follow the specified position
Distinguish between the position used for installation, adjustment, and final tightening.
Step 2: Record the Original Axle Position
Before removing the old track bar, record the current axle position and inspect the existing installation. Measurements provide a useful reference, especially on lifted vehicles where the axle may not be centered beneath the body.
On a level surface, compare the distance from a consistent point on each side of the axle to a matching chassis or body reference. Use symmetrical reference points whenever possible. Do not measure from body panels that are uneven, damaged, or not centered over the axle.
A visual check alone can be misleading. Fender openings may not be symmetrical, and wheel offset can change how the tires appear beneath the body. If the measurements disagree with what you see, inspect the vehicle’s dimensions and mounting geometry before deciding how much adjustment is needed.
Source: storage.googleapis.com
Measure both sides
Use equivalent reference points and keep the measuring method consistent.
Photograph the original setup
Pictures can help identify the original bolt direction, bracket position, and nearby hose or wiring routes.
Inspect for damage
Look for shifted brackets, elongated bolt holes, cracks, corrosion, bent metal, or loose hardware.
Do Not Copy the Old Bar Length Without Checking
The original bar length is a reference, not an automatic final setting. A previous owner may have installed a lift, changed the brackets, or adjusted the original bar incorrectly. Use the replacement manufacturer’s baseline and the measured axle position to determine the proper setting.
If the axle is substantially off center or the bar cannot reach the required position within its approved adjustment range, stop. The vehicle may have incompatible parts, incorrect brackets, or another suspension problem.
Use the correct reference
Follow the replacement instructions and vehicle specifications rather than relying only on the old assembly.
Step 3: Remove the Original Track Bar
Locate both track bar mounting points and confirm which end attaches to the chassis and which attaches to the axle. Clean loose dirt from the bolt heads and surrounding area so the tools seat fully. Apply a suitable penetrating fluid to corroded fasteners if needed, following the product instructions and keeping it away from surfaces where contamination could create another problem.
Support the axle so the bar is not carrying uncontrolled side load. Remove the mounting hardware using the correct tools. Depending on the suspension, the bolt may resist removal because the axle and frame are not aligned. Do not strike nearby components or force a bolt through a loaded bracket.
If the bolt binds, adjust the axle support slightly to relieve the load while keeping the vehicle stable. The axle can shift when the track bar comes free, so keep hands clear of gaps between the axle, frame, and suspension parts. Remove the bar only when both mounting ends are free.
Source: storage.googleapis.com
Keep the hardware organized
Separate the bolts, washers, spacers, and nuts by mounting location unless the manufacturer requires replacement hardware.
Inspect the removed bar
Check for bent metal, worn bushings, loose joints, damaged threads, and signs of contact with nearby parts.
Stop if the mount is damaged
A cracked bracket or elongated mounting hole needs proper repair before a new bar is installed.
What If the Track Bar Bolt Will Not Come Out?
A stuck bolt may be seized by corrosion or loaded by suspension tension. First, verify that the axle is supported and the fastener is not binding under side load. Apply suitable penetrating fluid and allow time for it to work before trying again with the correct tool.
If the bolt is seized inside a bushing sleeve, excessive force can damage the bracket or surrounding components. Avoid uncontrolled cutting, heating, or hammering near rubber bushings, fuel lines, brake hoses, wiring, and other heat-sensitive parts. Seek professional help if safe removal requires specialist tools.
Relieve the load
Make small, controlled adjustments to axle support without destabilizing the vehicle.
Protect the bracket
Do not enlarge the mounting hole or damage the bracket to remove a seized bolt.
Step 4: Prepare and Adjust the New Track Bar
Compare the replacement bar with the original and verify that its mounting ends, hardware, and overall design match the intended application. Confirm that the adjuster, threads, bushings, and joints are in good condition before installation. Follow the manufacturer’s instructions for lubrication, thread preparation, and locking hardware.
If the bar uses a threaded adjustment sleeve, loosen its jam nuts or locking hardware as instructed. Turn the adjuster to set an appropriate starting length while keeping enough thread engagement at both ends. Never exceed the maker’s adjustment limits or assume a minimum engagement rule from another product applies to this bar.
Keep the mounting ends oriented correctly. Some bars have specific bends, offsets, or joint orientations for clearance. Reversing the bar or rotating an end incorrectly can cause interference with the differential, steering linkage, frame, or other suspension components.
Source: dieselarmy.com
Check thread engagement
Keep the threaded ends engaged within the manufacturer’s stated limits throughout adjustment.
Check the locking method
Identify whether the design uses jam nuts, locking fasteners, or another specified retention system.
Confirm joint orientation
Install bushings and rod ends in the required direction to preserve articulation and clearance.
How Do You Set the Initial Length?
Use the replacement manufacturer’s specified baseline length if one is provided. If the instructions call for matching the original length initially, measure between the exact reference points stated by the maker. Measurements from the center of one mounting hole to the center of the other are common, but not every design specifies the same measurement method.
Treat the initial length as a starting point rather than proof that the axle is centered. Final adjustment must account for the actual chassis and axle position with the suspension in the specified condition. If the bar’s adjustment range cannot achieve the required position, do not force it into place.
Use the correct measurement
Record the reference points and measurement method so the setting can be repeated accurately.
Do not preload the bar
Avoid using the mounting bolts to pull a misaligned axle or bar into position.
Step 5: Install the Adjustable Track Bar
Position the new bar at the specified mounting points and align its ends with the brackets. Install the required bolts, washers, spacers, and nuts in the correct order and direction. Start the threads by hand whenever possible to reduce the risk of cross-threading.
If the holes do not line up, adjust the axle support or bar length within the approved range. A small change in axle position may be needed to align the mounting points. Do not use the bolts as tools to drag the bar into place, and do not hammer a fastener through a misaligned bracket.
Leave final tightening until the stage specified by the manufacturer. Some designs require the axle to be in a particular position before the fasteners are torqued. Other parts have special instructions for tightening their adjuster or locking nuts. Follow those requirements rather than applying a universal sequence.
Source: storage.googleapis.com
Seat the hardware correctly
Check that the bolt passes through the intended mounting surfaces and that any sleeves or spacers are positioned correctly.
Keep the bar free of interference
Check the bar’s clearance from steering links, the differential, brake hoses, exhaust parts, and wiring.
Do not force alignment
Correct the axle or bar position before tightening if the mounting holes do not line up naturally.
Should You Tighten the Bolts Before Adjusting the Bar?
Install the hardware far enough to secure the bar while allowing only the movement permitted by the installation instructions. The correct order depends on the design. Do not leave a fastener loose if the vehicle could shift or the bar could fall out of position.
Before final torque, confirm the bar length, joint orientation, mounting alignment, and required suspension position. Follow the manufacturer’s instructions for the main mounting bolts and the adjuster locking hardware as separate steps when applicable.
Use the specified torque
Obtain the correct value from the vehicle service manual or track bar instructions for the exact application.
Use the specified tightening condition
Follow any instructions about ride height, dry or lubricated threads, new nuts, or single-use bolts.
Step 6: Center the Axle and Lock the Adjustment
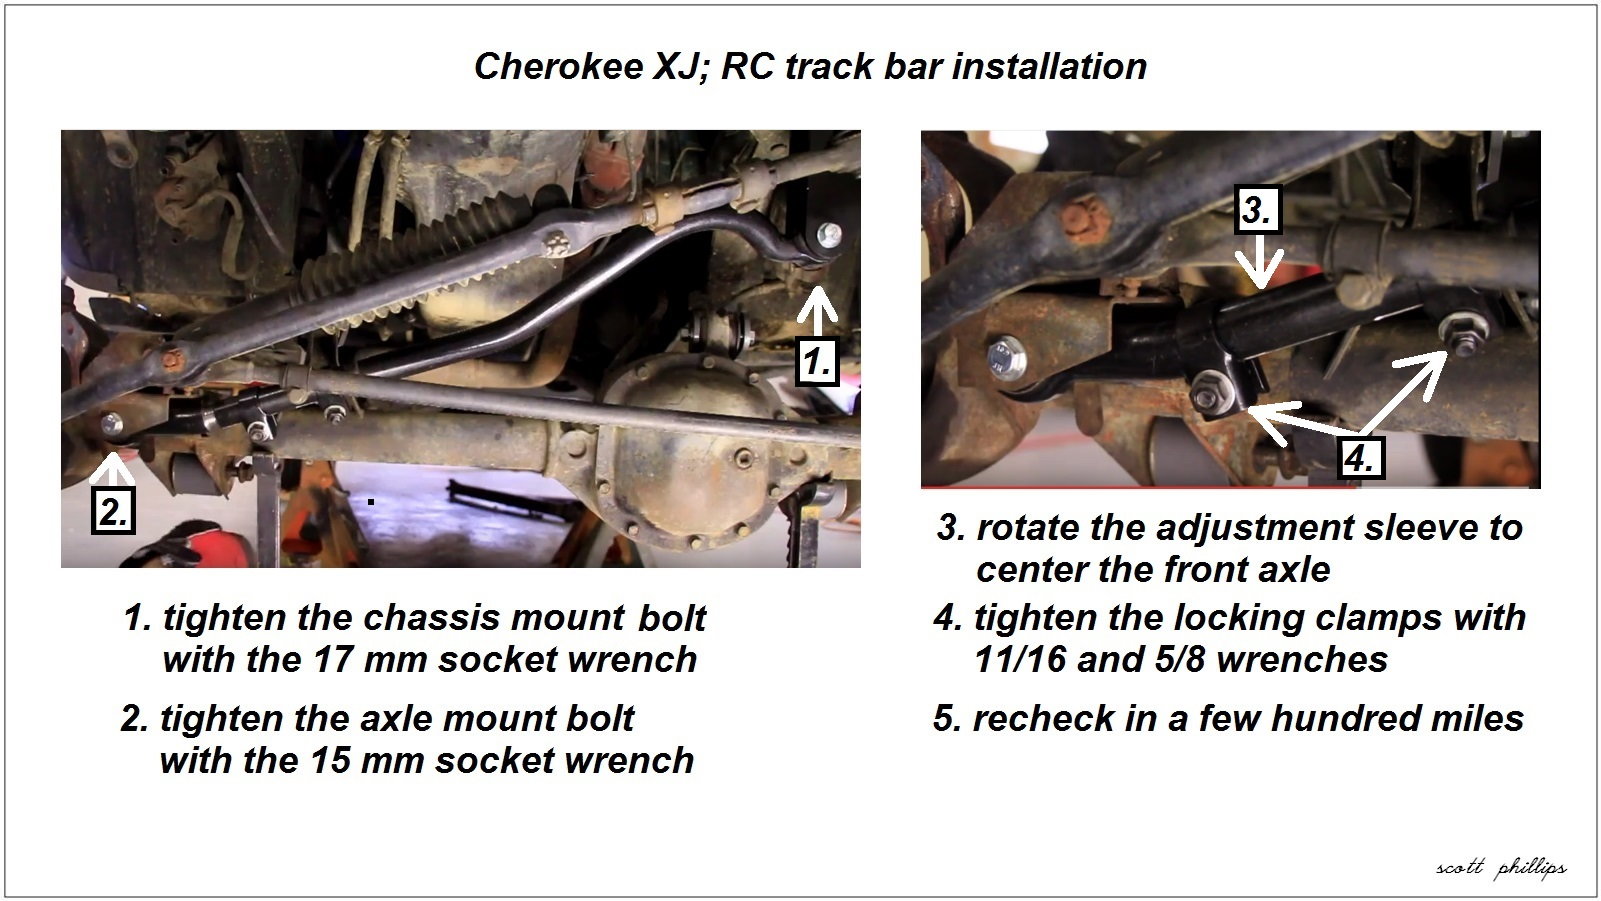
Centering the axle is a key part of installing an adjustable track bar. With the suspension placed in the condition specified by the manufacturer, compare the same left-side and right-side reference measurements used earlier. Adjust the bar in small increments until the axle reaches the intended position.
A track bar moves the axle along an arc as the suspension travels. The axle’s lateral position can therefore change with suspension height. This is why the specified ride-height condition and measurement points matter. A measurement made with the axle hanging may not represent its position when the vehicle rests on its tires.
Once the axle is centered, secure the adjustment sleeve or locking mechanism according to the manufacturer’s procedure. Some adjusters require a specified torque on the jam nuts; others use different hardware. Hold the adjuster as instructed so tightening the lock does not unintentionally change the bar length.
Source: extremeterrain.com
Measure again
Repeat the left-to-right measurements after each adjustment rather than relying on appearance alone.
Check available adjustment
Maintain the specified thread engagement and stay within the approved adjustment range.
Secure the adjuster
Tighten the locking hardware to its documented specification and confirm that the adjustment has not shifted.
What If the Axle Still Looks Off Center?
First, confirm that the measurements use matching reference points and that the vehicle is positioned correctly. Uneven ground, a suspension that is not settled, different wheel offsets, or asymmetrical bodywork can distort a visual comparison.
If the axle remains off center after a correct measurement, check whether the bar is suitable for the lift height and whether the mounting brackets are in the correct locations. Bent brackets, worn bushings, incorrect axle components, and incompatible suspension parts may prevent proper adjustment. Do not exceed the bar’s adjustment range to compensate.
Repeat the measurement
Use the same points on both sides and make sure the vehicle is stable and on a level surface.
Inspect the installation
Check for incorrect orientation, binding joints, and bracket damage.
Seek a suspension inspection
Have a qualified technician diagnose persistent misalignment or incompatible parts before driving.
Step 7: Torque the Fasteners and Inspect the Installation
Use a calibrated torque wrench to tighten the track bar mounting hardware and adjuster locks to the exact specifications for the vehicle and replacement component. There is no single torque value that applies to every track bar. Bolt diameter, grade, joint design, thread condition, and mounting arrangement can change the correct value.
Check that all required washers, sleeves, and spacers are installed. Verify that the bar does not contact the steering linkage, axle housing, frame, brake lines, or other parts throughout the available suspension movement. Also inspect nearby components that may have been disturbed during the repair.
If the manufacturer requires a second torque check or an inspection after initial use, follow the stated interval and procedure. Do not invent a retightening schedule or loosen a fastener merely to check it. Use the documented service instructions.
Source: storage.googleapis.com
Mounting bolts
Torque each fastener to the value and condition stated in the applicable service instructions.
Adjustment locks
Verify that jam nuts or other locking parts are secured as directed.
Nearby components
Check brake hoses, ABS wiring, steering joints, and other parts for pinching, stretching, or contact.
Final visual check
Confirm that the bar is seated, the axle is centered as intended, and no hardware is missing.
Why the Correct Torque Matters
Under-tightened hardware can allow unwanted movement between the track bar and its mounts. Excessive torque can stretch or damage fasteners, threads, bushings, or mounting components. Neither problem is reliably corrected by simply tightening everything as hard as possible.
If the correct specification cannot be found, pause the installation. Contact the vehicle manufacturer, suspension kit supplier, or track bar manufacturer with the exact part and vehicle details. Do not substitute a generic torque chart without confirming that it applies.
Use application-specific data
Match the specification to the exact fastener and mounting location.
Step 8: Lower the Vehicle and Perform Final Checks
Remove tools from beneath the vehicle and lower it using the approved procedure. If the work involved raising the chassis and supporting the axle separately, make sure the suspension returns to its intended operating position without trapping a hose or wire. Remove the wheel chocks only when it is safe to do so.
With the vehicle on level ground, recheck axle position and inspect the track bar mounts. Confirm that the steering wheel is reasonably centered and that the tires, brake hoses, ABS wiring, and steering components have adequate clearance. An adjustable track bar can affect axle position, but it does not replace a required wheel alignment or steering adjustment.
Before a road test, make sure the vehicle has no loose hardware, binding joints, obvious interference, or signs of mount damage. If any part of the installation remains uncertain, do not drive until the issue is resolved.
Source: storage.googleapis.com
Check static clearance
Look for contact or tension around the track bar, steering linkage, tires, brake hoses, and wiring.
Check steering and alignment
Follow the vehicle and suspension maker’s requirements for steering-wheel centering and alignment.
Arrange a road test only when safe
If all installation checks pass, begin with a cautious, low-speed test in a safe area and stop if abnormal behavior occurs.
What Does a Successful Installation Look Like?
A successful installation has correctly seated hardware, secure adjustment locks, no damaged mounts, and an axle position that meets the vehicle and suspension specifications. The bar should not bind or strike nearby parts through the intended range of suspension travel.
During a cautious test, the vehicle should not show new clunks, sudden steering changes, or obvious instability. A quiet test drive does not prove that every fastener is correct, so the inspection and torque checks remain essential.
Good result
The axle position is correct, all hardware is secured, and no new abnormal noises or handling changes appear.
Failed check
Any clunk, loose mount, binding joint, or unexpected steering behavior requires stopping and inspecting the installation.
Common Adjustable Track Bar Installation Mistakes
Most installation problems arise from incorrect fitment, poor axle support, careless adjustment, or improper fastener tightening. A track bar is a structural suspension link, so small errors can have a direct effect on axle location and handling.
If the bar will not align with the mounts, stop and find the cause. Forcing the assembly into place can hide an incorrect part or damaged bracket. The goal is a correctly fitted suspension component, not merely getting the bolts through the holes.
Source: www.youtube.com > Matt’s Garage
Choosing the wrong bar
A part designed for another model, axle, or lift can have the wrong length, mounting ends, or clearance.
Using the wrong torque
A guessed value can leave the joint loose or damage the fastener and mount.
Ignoring worn brackets
A new bar cannot reliably correct a cracked bracket or elongated bolt hole.
Exceeding adjustment limits
Insufficient thread engagement or excessive extension can weaken the connection.
Skipping the centering check
A bar that fits the mounting points may still leave the axle incorrectly positioned.
Assuming the track bar fixes every steering problem
Steering joints, alignment, tires, wheel bearings, and other suspension parts may need separate diagnosis.
When Should You Stop and Get Professional Help?
Seek qualified help if a mounting bracket is cracked, a bolt hole is elongated, the correct torque information is unavailable, or the bar cannot be adjusted within its approved range. Professional service is also appropriate if the vehicle has modified steering geometry or a complex suspension setup that you cannot verify.
Do not road-test a vehicle with loose track bar hardware, a visibly damaged mount, severe steering looseness, or an axle that is not securely located. These conditions can affect control and need correction before the vehicle returns to service.
Structural damage
Have cracked, bent, or badly corroded mounts assessed and repaired correctly.
Unresolved alignment
Have a suspension specialist verify the bar length, brackets, axle position, and steering geometry.
Persistent instability
Stop driving and arrange an inspection if the vehicle develops new severe wandering, clunks, or steering changes.
How an Adjustable Track Bar Relates to Alignment and Ride Quality
An adjustable track bar helps locate the axle laterally, but it does not directly set every wheel alignment angle. Caster, camber, toe, and steering-wheel position depend on the vehicle’s suspension and steering design. A track bar adjustment should therefore be treated as one part of a complete suspension setup.
After a lift or track bar replacement, inspect whether the steering wheel is centered and whether the vehicle follows the intended alignment specifications. Some solid-axle vehicles require additional steering adjustments after suspension work. Follow the model-specific service instructions rather than assuming that every vehicle needs the same procedure.
A properly fitted bar can correct an axle that has shifted sideways, but it will not restore worn shock absorbers, repair damaged tires, or correct every source of poor ride quality. Diagnose each symptom separately and avoid changing multiple settings without recording the results.
Source: storage.googleapis.com
Axle centering
The adjustable bar changes the lateral position of the axle relative to the chassis.
Wheel alignment
Alignment angles and steering adjustments must be checked according to the vehicle’s design and service requirements.
Ride quality
Shocks, springs, bushings, tires, and other suspension parts can affect comfort and control independently of the track bar.
Does an Adjustable Track Bar Fix Death Wobble?
An adjustable track bar may be relevant when a solid-axle vehicle has loose, worn, or incorrectly fitted track bar hardware, but installing a new bar is not a guaranteed cure for severe steering oscillation. Worn steering joints, damaged brackets, incorrect alignment, tire problems, and other faults may contribute.
If the vehicle develops severe shaking or rapid steering oscillation, slow down safely and stop when possible. Do not continue driving to test whether the problem disappears. Have the steering and suspension system inspected, including the track bar mounts and fasteners, before returning the vehicle to normal use.
Inspect the full system
Check the track bar, steering linkage, ball joints where applicable, tires, wheel bearings, and alignment.
Avoid a one-part diagnosis
Replace or adjust components only after identifying the actual fault and verifying compatibility.
Frequently Asked Questions
Q
Can I install an adjustable track bar at home?
Yes, if you have the correct part, suitable tools, safe lifting equipment, and the service information for your vehicle. You must be able to support the chassis and axle securely, adjust the bar within its approved range, and tighten the hardware to the correct specifications. If you cannot safely control axle movement or verify the installation, use a qualified repair shop.
Q
Do I need an alignment after installing an adjustable track bar?
An alignment check is a sensible step after suspension modifications, and some vehicles require specific steering or alignment procedures. The track bar mainly controls lateral axle position, so it does not automatically change every alignment angle. Follow the vehicle and suspension manufacturer’s instructions and have the alignment checked if the steering wheel is off center or the vehicle pulls.
Q
How do I know what length to set the adjustable track bar?
Use the measurement method and baseline length specified by the track bar manufacturer, then verify the axle position under the required suspension conditions. The original bar length alone may not be correct if the suspension or brackets have been modified. Never exceed the stated adjustment range or reduce thread engagement below the specified minimum.
Q
Can I reuse the original track bar bolts?
Reuse the original bolts only if the vehicle and replacement part instructions permit it and the hardware is in good condition. Replace damaged, stretched, badly corroded, or otherwise unsuitable fasteners. If the manufacturer specifies new hardware or single-use fasteners, follow that requirement.
Q
Should I replace the front and rear track bars together?
Not necessarily. Replace the bar that is damaged, worn, or required by the suspension setup. Some vehicles use track bars at both axles, while others have a different suspension design. Check the vehicle’s configuration and the condition of each assembly rather than assuming both bars must be replaced as a pair.
Q
Can I drive immediately after installing an adjustable track bar?
Drive only after confirming that the bar is compatible, all fasteners and adjustment locks are secured to specification, the axle is positioned correctly, and nearby parts have adequate clearance. If the installation passes these checks, a cautious low-speed test may be appropriate. Stop immediately if you notice a clunk, binding, unusual steering behavior, or instability.
✦ Wrapping Up
Conclusion
Installing an adjustable track bar requires careful fitment, safe axle support, accurate adjustment, and correct fastener torque. The main goal is to keep the solid axle in its intended position while preserving proper suspension movement and clearance. A bar that bolts into place is not necessarily adjusted correctly.
Before driving, verify the part application, axle measurements, mounting hardware, adjuster locks, steering components, and brake hose routing. Use the specifications for your exact vehicle and replacement bar, and have any unresolved damage or alignment problem inspected by a qualified technician.
💡 Key Takeaway
Before starting, obtain the correct installation instructions and torque specifications for your vehicle and adjustable track bar. Measure the axle position, install and adjust the bar within the approved limits, secure all hardware, and complete the required suspension and steering checks before driving.
Eric
Hi, I’m Eric Bennett, the person behind OffRoadTruckAccessories.com.
I created this blog to share my interest in trucks, off-road driving, automotive accessories, and DIY modifications. I enjoy learning how different truck accessories work, testing their usefulness, and understanding whether they are truly worth buying.