
How to Adjust Coilover Stiffness for Better Handling and Comfort
Coilovers can make a car feel controlled and planted, but an unfamiliar adjustment knob can also make the ride harsh, bouncy, or unpredictable. The good news is that you do not need to guess at every setting. By recording the starting position, changing one setting at a time, and testing on the same stretch of road, you can learn what your suspension is doing and move toward a useful setup.
In most cases, adjusting coilover stiffness means changing damping, the shock absorber’s resistance to suspension movement. It usually does not mean tightening the spring or changing ride height. A firmer damping setting can reduce float and sharpen responses, while a softer setting can improve comfort and help the tires stay in contact with rough pavement.
This guide explains how to adjust coilover stiffness safely on an installed suspension system. You will learn how to identify the adjuster, document the baseline, make small click-by-click changes, test the result, and recognize when the problem is actually spring rate, alignment, tire pressure, or worn hardware rather than damping.
At a glance
- Record the current setting before touching an adjuster.
- Change only one axle or one setting at a time, using small equal adjustments.
- Judge the result with a repeatable road test, not by turning the knob to its maximum.
How to adjust coilover stiffness without guessing
The safest beginner method is a controlled baseline-and-test process. First identify what the adjuster controls, then count its usable range according to the manufacturer’s instructions. After that, make a small change, drive the same route, and compare the car’s behavior with your notes.
Coilover designs vary significantly. A single knob may control rebound damping, compression damping, or both; some systems have separate high-speed and low-speed compression adjusters. The terms “soft” and “hard” are not universal, so use the adjustment direction and click count specified for your exact brand and model.
Tools you will need
- Owner’s manual or coilover manufacturer instructions, to identify the adjuster and its click range
- Notebook or phone, to record settings and test observations
- Measuring tape, optional, for checking that ride height has not changed
- Jack and jack stands, only if your coilover design requires wheel removal or access from underneath
- Torque wrench, optional but important if removing wheels or suspension hardware
Step 1 Confirm that the coilovers are adjustable
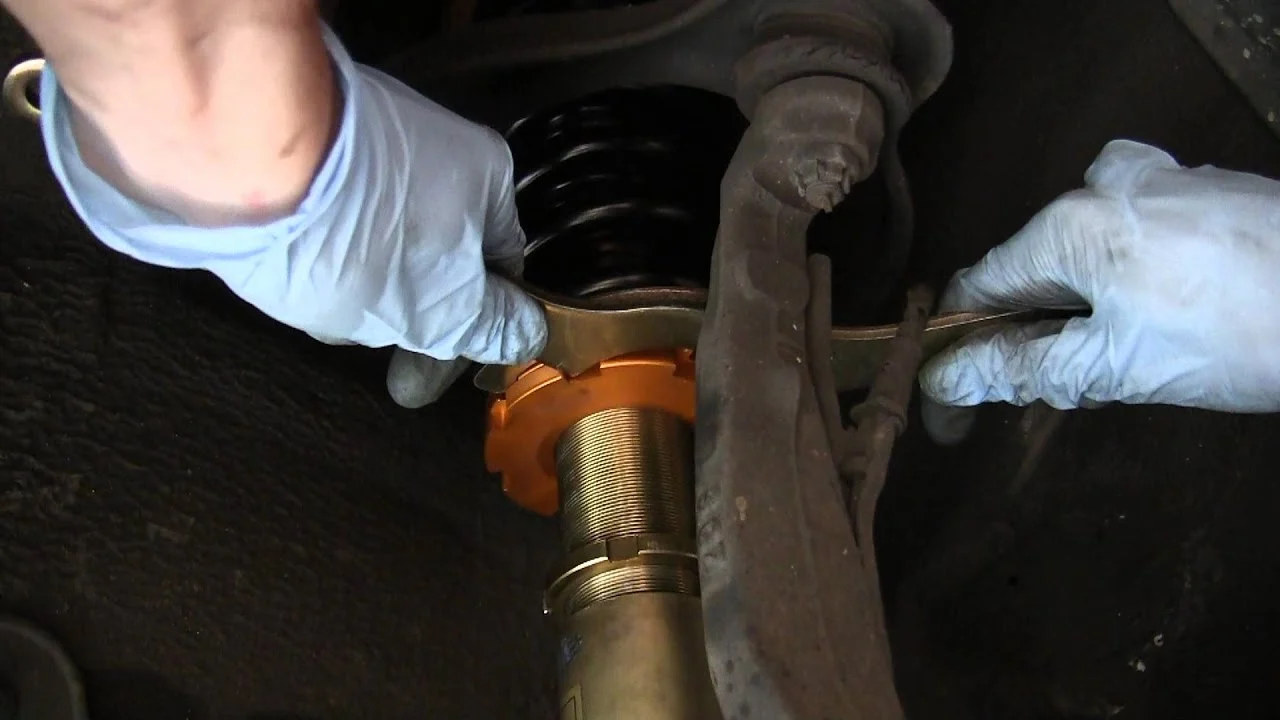
Look for a small knob, screw, or hex adjuster on the top of the shock shaft, top mount, or lower shock body. Some adjusters are hidden under a trim panel or require a supplied tool. Do not assume that a threaded collar is a stiffness control: the collar normally changes spring preload or ride height, not damping.
Read the instructions for the exact coilover model before turning anything. Check whether the system adjusts rebound, compression, or both, whether the knob must be pressed down while turning, and whether the manufacturer defines clockwise as firmer. If no instructions are available, identify the brand and model from the damper body before experimenting.
Important
Never force an adjuster past its stop. A small needle or internal valve can be damaged by excessive torque, and a damaged adjuster may no longer provide reliable click positions.
Step 2 Choose a safe, repeatable starting condition
Park on a level surface, set the parking brake, and make sure the car is stable before reaching near the suspension. If you need to lift the vehicle, use a suitable jack and support it with jack stands on approved points; never work under a car supported only by a jack.
For a road test, begin with properly inflated tires, normal fuel, and no loose items in the cabin or trunk. Check that the tires are in comparable condition and that no warning light, clunk, leaking damper, damaged spring, or loose suspension part is already present. Damping adjustments cannot correct a mechanical fault.
If the adjustment can be reached with the car on the ground, that is often preferable because it avoids unnecessary lifting. If access requires wheel removal, follow the vehicle’s lifting procedure and reinstall the wheel fasteners to the vehicle manufacturer’s torque specification.
Step 3 Record the current damping setting
Find the manufacturer’s reference point, usually full soft or full firm, and turn the adjuster gently to that stop only if the instructions permit it. Count each click as you move back to the desired baseline. If the manual says not to use the end stop as a reference, simply record the number of clicks from the current position and mark the adjuster’s orientation.
Write down the setting at every corner, even if you believe all four are identical. For example, note “front left: 10 clicks from soft; front right: 10; rear left: 8; rear right: 8.” A paint marker line or a photograph can help you return to the original position.
Do not turn an adjuster rapidly or skip clicks. If one corner has a different count from the others, do not immediately “correct” it. The difference may be intentional, or the previous setting may have been recorded from the opposite reference direction.
Confirm the adjustment procedure first.
Step 4 Make a small, equal adjustment
For a first change, move both adjusters on the same axle by one or two clicks in the same direction. On many systems, moving toward more resistance is called firmer and moving toward less resistance is called softer, but verify the direction for your model. Keep the front and rear settings unchanged relative to each other unless you have a specific reason to change both axles.
Turn the left and right adjusters by the same amount. Unequal settings across an axle can create confusing handling differences and may make the car pull or react differently in left and right turns. After adjusting, return the knobs to the correct seated position if the instructions require it, and confirm that each side has the same click count.
A useful way to approach how to adjust coilover stiffness is to check your progress after each stage.
Do not use spring preload to imitate damping adjustment. Increasing preload or moving a threaded collar can alter ride height, available suspension travel, and corner balance. If your goal is simply to reduce bouncing or sharpen response, leave the spring collars alone.
Step 5 Drive a controlled test route
Use a familiar road with safe traffic conditions and a mixture of the surfaces that matter to you, such as a smooth corner, a patched section, and a moderate bump. Stay within legal speeds and avoid testing at the limit of grip. The goal is to feel changes in body control and comfort, not to prove how fast the car can corner.
First drive over the same straight section and notice whether the body settles after a bump or continues to oscillate. Then use gentle, repeatable lane changes or normal corners to evaluate steering response. Pay attention to whether the tires feel connected to the road, whether the car skips across rough pavement, and whether impacts reach the cabin more sharply.
Let the suspension settle naturally after each change. A single large bump can mislead you, so compare several similar road features. Keep notes using concrete descriptions such as “one extra bounce after a dip,” “rear feels nervous over broken pavement,” or “steering response improved but ride became sharp.”
Step 6 Compare the result and adjust only if needed
If the car feels controlled and predictable, stop and save that setting. The best setup is not necessarily the firmest one; it is the setting that gives the driver adequate control while allowing the tires to follow the road.
If the car feels too harsh, back off one or two clicks on the same axle and repeat the route. If it feels floaty or takes too long to settle, increase damping one or two clicks and test again. Make changes in one direction at a time so you know which adjustment caused the result.
When the front and rear seem to need different behavior, change one axle rather than turning all four knobs. A small rear adjustment can influence rotation and stability, while a front adjustment can change steering response. Make conservative changes on public roads, because an aggressive balance can make the car less forgiving during an emergency maneuver.
Step 7 Save the final setting and return the car to service
Record the final click count at each corner, the tire pressures, the approximate load in the car, and the road conditions. Also note whether the test was primarily smooth pavement, rough pavement, commuting, or spirited driving. This record makes future troubleshooting much easier.
Inspect the adjusters and surrounding hardware for anything loose or damaged. If you removed wheels or trim, confirm that everything is secured before driving normally. If the setting change was accompanied by a new clunk, pull, vibration, tire rub, or visible fluid leak, return to a safe baseline and have the suspension inspected instead of continuing to tune it.
What coilover stiffness actually changes
Coilover “stiffness” is an imprecise everyday term. The spring supports the vehicle and determines much of the wheel rate, while the damper controls how quickly the suspension moves. The adjuster generally changes damping force, so the car may feel firmer without the spring itself becoming harder.

Rebound damping
Rebound damping resists the suspension as the wheel and spring extend after compression. More rebound can reduce a spring’s tendency to release energy quickly, which may make the car feel more settled during transitions. Too much can prevent the suspension from returning quickly enough over repeated bumps, causing the car to feel stuck down or lose compliance.
Compression damping
Compression damping resists the suspension as the wheel moves upward into the body. More compression can improve body control on smooth surfaces, but excessive compression makes sharp bumps feel harsh and can reduce the tire’s ability to follow uneven pavement. Some single-adjustable dampers primarily affect rebound rather than compression, so knob movement does not always produce the same result across brands.
Understanding how to adjust coilover stiffness also means recognizing the limits of the method.
Spring preload and ride height
Spring preload is the amount of compression placed on the spring when the suspension is assembled or adjusted. On many coilovers, changing the lower mount or threaded collar changes ride height while preserving a target amount of preload. It can also affect bump travel and alignment, which is why it should not be used as a substitute for a damping adjustment.
If the car is too low, bottoms out, rubs tires, or has very little available travel, a damping change may not solve the problem. Ride height, spring rate, bump stops, and alignment may need attention from someone familiar with the suspension.
How to tell whether the adjustment helped
A useful result should be repeatable. The car should respond consistently on the same road, and the improvement should not depend on one unusually smooth or rough patch. Test in both directions when safe, because a setting that feels acceptable in one turn may reveal an imbalance in another.
After your test, check the simple physical clues before making another click change. Look for fresh tire contact marks in the wheel well, unusual tire wear, loose adjuster knobs, and fluid around the damper body. If ride height has changed, measure from the same point on each side rather than relying only on appearance.
Check your result
A successful adjustment usually feels like a clear tradeoff: better control with acceptable impact harshness, or better comfort without repeated bouncing. If the car becomes vague, skips over bumps, pulls, or behaves differently left to right, stop tuning and investigate the underlying cause.
Use symptoms as clues, not diagnoses
A floaty sensation can point toward insufficient damping, but it can also come from worn dampers, soft springs, low tire pressure, or excessive suspension travel. A harsh ride can result from too much damping, but very stiff springs, short bump stops, excessive tire pressure, or inadequate travel can feel similar.
Adjustment clicks are not interchangeable between products. “Eight clicks from soft” on one damper does not equal the same damping force on another. Treat the numbers as a record for your own car, not as a universal setup recommendation.
Common problems after adjusting coilovers
Most beginner errors come from changing several variables at once or using the wrong control. The table below separates common observations from sensible next checks.
| What you notice | Possible cause | Next check |
|---|---|---|
| Harsh impacts on small bumps | Too much damping, stiff springs, high tire pressure, or limited travel | Return one or two clicks, check pressures, and inspect bump-stop clearance |
| Repeated bouncing after a dip | Insufficient damping or a worn damper | Increase damping slightly, then inspect for leaks and damaged hardware |
| Car skips over rough corners | Excessive damping, excessive spring rate, or poor tire contact | Back off damping and check whether the suspension can move freely |
| Pulling or different left/right behavior | Unequal settings, alignment issue, tire difference, or loose component | Compare click counts and inspect the suspension before more testing |
When the knob seems to do nothing
Confirm that you are turning the damping adjuster rather than a ride-height collar or a cosmetic cap. Count clicks slowly and make sure the tool is fully engaged. If the knob turns without clicks, will not reach a defined stop, or changes only one corner unexpectedly, stop using it and contact the manufacturer or a qualified suspension technician.
When the ride became worse immediately
Return to the documented baseline rather than continuing to turn the knob in the same direction. Recheck tire pressures, wheel installation, and the exact click counts on both sides of the axle. A sudden clunk or metallic noise is not a normal tuning response and should be inspected.
When you need professional help
Seek qualified help if the damper leaks, a spring is loose, a mount is cracked, a suspension fastener is damaged, the car sits unevenly, or you are unsure where to lift it. Stop driving if steering control is abnormal, a tire rubs a suspension or body component, or the vehicle changes direction unexpectedly under braking.
A professional alignment may also be necessary after ride-height changes or suspension installation. Damping adjustments alone normally do not alter alignment, but a low or uneven car can have alignment and bump-steer problems that no click setting will correct.
Beginner questions about coilover adjustments
These answers address the most common points of confusion before a first adjustment.
Should I adjust all four coilovers equally?
Begin with equal changes on both sides of the same axle so the car remains balanced left to right. Front and rear settings do not always need to match because the axles carry different loads and perform different jobs. Change the rear relative to the front only after establishing a clear handling reason.
Is a firmer setting always better for handling?
No. Too much damping can make the tires skip over rough pavement and reduce grip, even if the steering initially feels sharper. The useful setting is the one that controls body motion while keeping the tires in contact with the road.
Can I adjust coilover stiffness with the wheels on the ground?
Often you can, if the adjuster is accessible and the manufacturer permits adjustment in that position. Keeping the car on the ground avoids unnecessary lifting, but do not reach near moving or hot components. If access requires lifting or wheel removal, use proper support and follow the vehicle and coilover instructions.
How many clicks should I use for a street car?
There is no universal click number. Start from the manufacturer’s recommended baseline or your recorded setting, then make one- or two-click changes and evaluate them on your normal roads. The correct position depends on the damper, spring rate, tires, vehicle weight, and road surface.
Why does adjusting the spring collar not fix a bouncy ride?
The spring collar mainly changes preload or ride height, while bouncing is often related to damping, spring rate, worn components, or insufficient travel. Changing the collar can create new ride-height and alignment problems. Use the damping adjuster for damping changes and inspect the suspension if the symptom remains.
Use measured changes to adjust coilover stiffness
Learning how to adjust coilover stiffness is mainly an exercise in controlled comparison. Identify the correct damping control, document the baseline, move both sides of one axle by a small amount, and test the same route under similar conditions. That approach is slower than turning every knob at once, but it gives you a setting you can understand and reproduce.
Keep the final limits in mind: a damping adjustment cannot repair a leaking damper, incorrect spring choice, poor alignment, damaged hardware, or inadequate suspension travel. If the car remains harsh, unstable, uneven, or noisy after returning to a known baseline, stop adjusting and arrange an inspection before further road testing.


