
How to Adjust Preload on Coilovers: A Simple Step-by-Step Guide
Learning how to adjust preload on coilovers is much easier once you know what the spring collars do. Preload is not the same as ride height or shock damping. It is the amount of spring compression that exists before the suspension carries the car’s weight.
The key lesson is simple: do not copy a preload number from another car and assume it will work on yours. Coilover designs differ. Some systems let you change spring preload without changing ride height. Others use the spring perch for both jobs. Your coilover maker’s instructions should always take priority.
A good setup also uses repeatable measurements. Mark the original position, measure the spring, make small changes, and check both sides. This approach helps avoid the common problem of chasing ride height with the spring perch when the coilover was designed to use the lower mount for height adjustment.

What Is Coilover Preload?
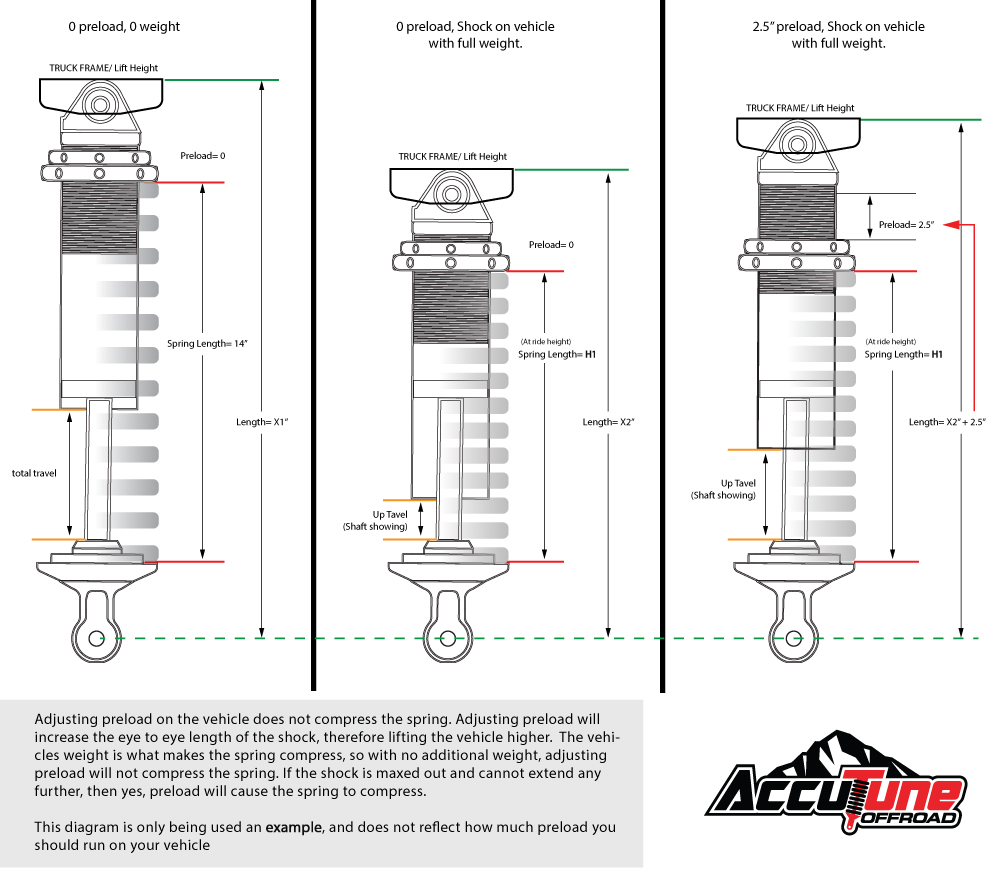
Spring preload is the amount of compression placed on a coil spring while the coilover is unloaded. In simple terms, you tighten the spring perch against the spring so the spring starts with a set amount of compression before the car is sitting on it.
Preload does not automatically mean a stiffer spring. The spring rate is mainly set by the spring itself. Adding preload changes the spring’s starting position and can change how much available travel remains in certain coilover designs.
This is why understanding how to adjust preload on coilovers matters. A small collar change can affect spring seating, droop travel, ride height, and the way the suspension behaves over bumps.
- ✦ Spring preload
The spring is compressed between the spring perch and the upper spring seat before the vehicle loads the suspension.
- ✦ Ride height
This is the vehicle’s position above the ground. On many modern coilovers, ride height can be changed separately from spring preload.
- ✦ Damping
Damping controls how fast the shock responds to suspension movement. It is adjusted at the damper, not by turning the spring perch.
Why Preload Matters
Correct preload helps keep the spring properly seated when the suspension reaches full droop. Too little preload can allow unwanted movement or noise on some setups. Too much preload can reduce useful travel and may make the car feel harsh or unsettled when the design does not call for it.
- ✦ Spring seating
The spring should remain correctly located through the normal range of suspension movement.
- ✦ Suspension travel
Preload affects where the spring starts in its travel range, so excessive adjustment can reduce available movement.
Before You Adjust Coilover Preload
Before you learn how to adjust preload on coilovers, identify the exact coilover model and read its setup guide. Do not assume every threaded-body coilover uses the same collar system or the same preload value.
Park on a firm, level surface and work with safe lifting equipment. If you need to remove a wheel or lift the vehicle, use a proper jack and jack stands or a suitable vehicle lift. Never rely on a jack alone while working under a vehicle.
Clean dirt and rust from the threaded section before turning the collars. A dirty thread can make the collar hard to move and can damage the thread or collar if you force it.
- ✦ Check the manual
Find the manufacturer’s recommended preload range, measurement method, collar procedure, and torque values.
- ✦ Gather tools
Most setups need coilover spanner wrenches and a tape measure or ruler. Some designs also need an Allen key or other tool.
- ✦ Record the starting point
Measure the spring and collar position before making changes. A simple written record makes it easier to return to the previous setup.
- ✦ Inspect the spring
Check for damaged coils, poor seating, broken paint, corrosion, or parts that rub against the spring.
Safety Checks
Keep your hands clear of a compressed spring and use the tools made for your collar system. Do not heat, cut, grind, or clamp a coilover spring to make an adjustment. If a spring is damaged or the collars are seized, stop and have the assembly inspected by a qualified suspension shop.
- ✦ Never force a seized collar
A seized collar may need cleaning or professional service rather than excessive force.
- ✦ Follow the maker’s limits
Thread engagement and minimum adjustment limits are safety items, not optional setup preferences.
How to Adjust Preload on Coilovers Step by Step
The exact collar layout varies, but the basic process for how to adjust preload on coilovers is similar on many systems. You normally have a spring perch that supports the spring and a lock collar that holds the perch in place.
Start with the suspension unloaded unless your manufacturer gives a different procedure. With the spring free of vehicle weight, measure the spring from one end to the other and record the result. Then compare that measurement with the manufacturer’s target.
Next, use the correct spanner wrench to loosen the lock collar. Turn the spring perch in small steps. Compressing the spring more increases the spring’s installed preload; backing the perch away reduces it.
Measure again after each change. When the measurement is correct, hold the spring perch in position, tighten the lock collar against it, and check that the spring remains seated. Repeat the same process on the other coilover.

- ✦ Step 1: Unload the suspension
Raise and support the vehicle safely if the manufacturer’s procedure calls for the suspension to be unloaded during preload adjustment.
- ✦ Step 2: Measure the spring
Measure from the top of the spring to the bottom of the spring, using the measurement method specified by the coilover maker.
- ✦ Step 3: Loosen the lock collar
Use the proper spanner wrench and avoid damaging the collar or threaded body.
- ✦ Step 4: Turn the spring perch
Move the perch in small steps until the spring reaches the specified preload.
- ✦ Step 5: Lock the setting
Hold the perch and tighten the lock collar as directed by the manufacturer.
- ✦ Step 6: Repeat and compare
Set the matching coilover to the same intended specification, then inspect both assemblies.
How to Measure Preload Correctly
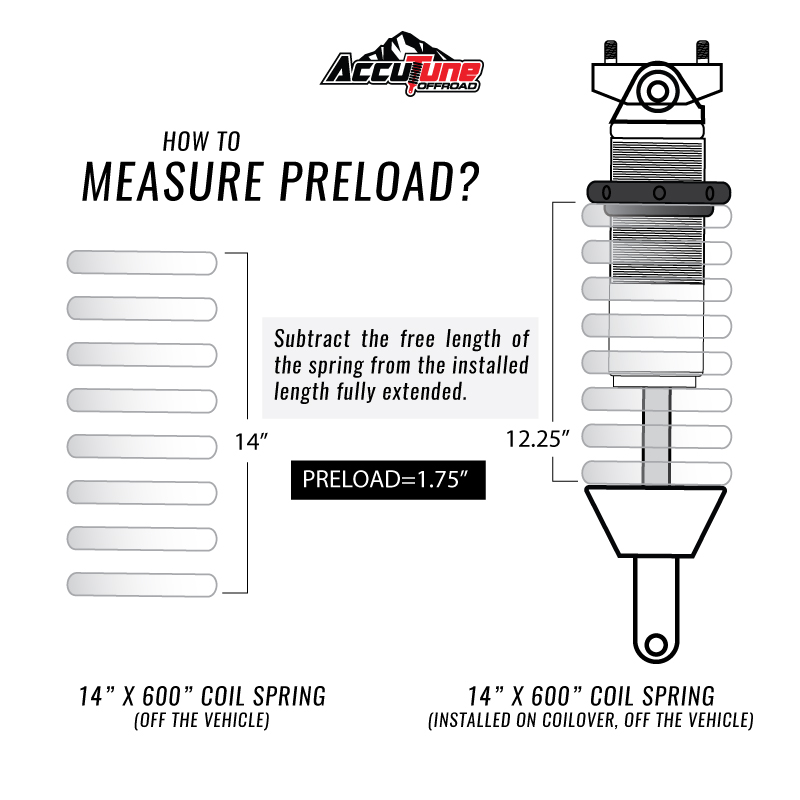
Measurement is one of the most important parts of how to adjust preload on coilovers. Some manufacturers define preload as the difference between the spring’s free length and its installed length. Others give a collar position or a direct spring measurement.
For example, if a spring has a free length of 8 inches and the manufacturer’s procedure calls for 0.25 inch of compression, the installed spring length would be 7.75 inches. That example explains the math only. It is not a universal preload setting for every coilover.
- ✦ Use the correct reference points
Measure the spring itself unless the manufacturer specifies a different reference.
- ✦ Use the same method on both sides
A consistent measurement method is more useful than trying to match collar threads by eye.
A Common Manufacturer Example
As one example, Fortune Auto has published different preload recommendations for different suspension layouts on its coilovers. Its published guidance has used 0.25 inch for MacPherson applications and 0.125 inch for double-wishbone applications. Those numbers are manufacturer-specific and should not be treated as a universal rule.
- ✦ MacPherson example
A published Fortune Auto example uses 0.25 inch of spring preload.
- ✦ Double-wishbone example
A published Fortune Auto example uses 0.125 inch of spring preload.
- ✦ Important limit
Always use your own coilover maker’s instructions if they give a different value or measurement method.
How Preload and Ride Height Work Together
One of the biggest mistakes people make when learning how to adjust preload on coilovers is treating preload and ride height as the same adjustment. They are related, but they are not always the same thing.
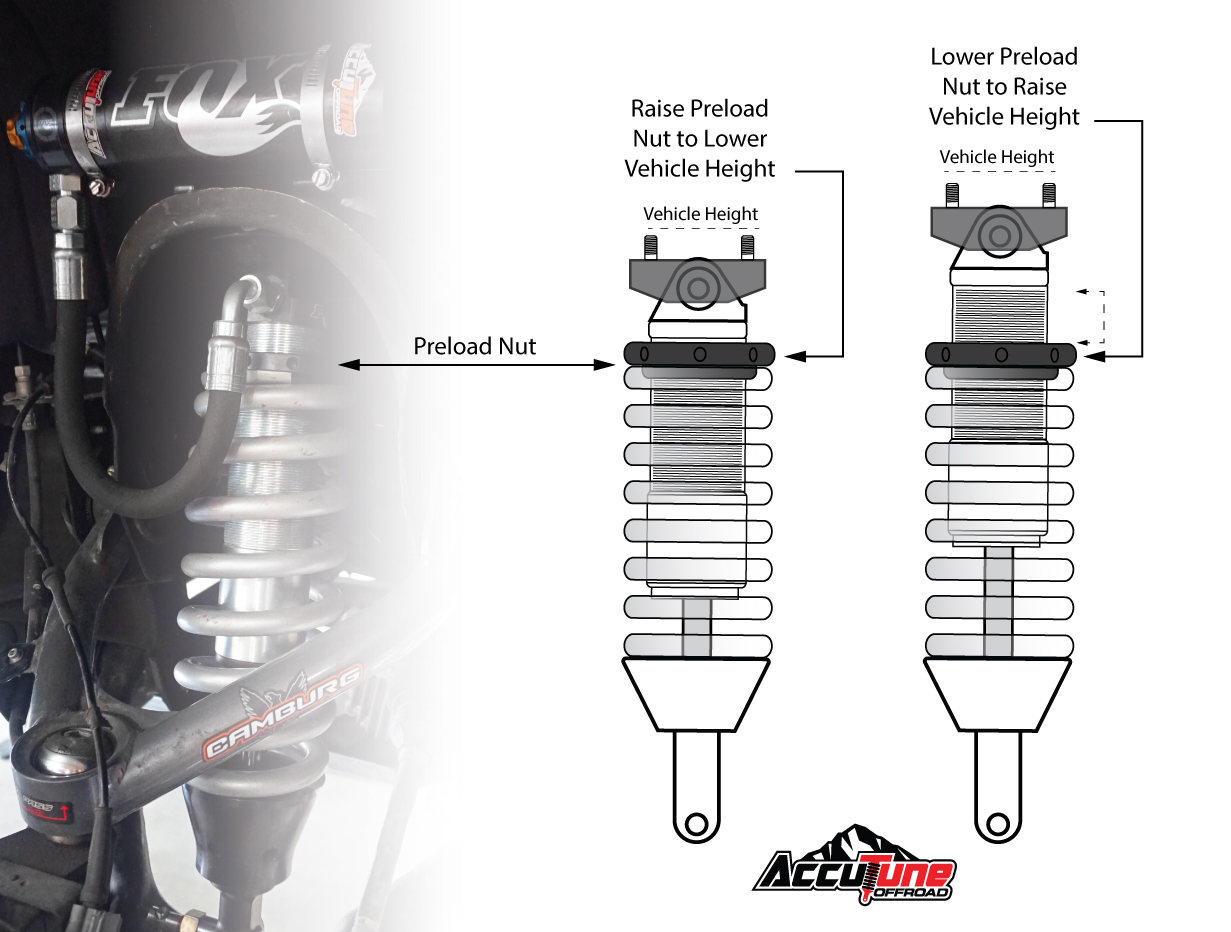
Many true coilover designs use the lower mount to change overall ride height. The spring perch can then set spring preload without moving the shock body through its working range. This design helps preserve suspension travel when the ride height is changed.
Other coilovers use a simpler threaded-body design where changing the spring perch also changes ride height. In that case, changing preload can have a much larger effect on the vehicle. Read the instructions for your exact model before turning the collars.
- ✦ Independent height adjustment
On some true coilovers, the lower mount changes ride height while the spring perch sets preload.
- ✦ Combined adjustment
On some simpler designs, moving the spring perch changes both spring compression and ride height.
- ✦ Do not guess
If you are unsure which design you have, check the manual or contact the manufacturer before changing the setting.
Why Using Preload to Lower a Car Can Cause Problems
If a coilover is designed for independent ride-height adjustment, moving the spring perch to lower the car can use up suspension travel. The shock may sit too far into its stroke, and the spring may have an unsuitable installed position.
A better method on those systems is to keep the specified preload and use the lower mount for ride height. This keeps the spring setting closer to the design target and helps preserve the intended shock travel.
- ✦ Follow the correct adjustment point
Use the lower mount for ride height when the coilover maker specifies independent height adjustment.
- ✦ Watch travel
A very low setup can reduce bump or droop travel and cause the suspension to hit its limits more often.
How Much Preload Should Coilovers Have?
There is no single preload number that works for every coilover. The correct amount depends on the coilover design, spring length, spring rate, suspension layout, helper springs, intended ride height, and the manufacturer’s setup instructions.
This is why a guide about how to adjust preload on coilovers should not give one number as a universal answer. A value that works for one coilover can be wrong for another.
Some manufacturers publish a small preload value for their standard setup. Others may specify zero preload, a spring seating procedure, or a particular spring length. Helper and tender springs can also change the correct setup method.

- ✦ Street cars
Use the manufacturer’s street setup. Focus on safe spring seating, adequate travel, and a ride height that works with normal road conditions.
- ✦ Track cars
Track setups may use different springs, heights, and travel targets. Follow the suspension builder’s setup data rather than copying a street setting.
- ✦ Off-road vehicles
Off-road coilovers can use different spring stacks and travel requirements. Follow the off-road shock builder’s instructions, especially with dual-rate systems.
- ✦ Helper springs
A helper spring is not the same as the main spring. Follow the specific procedure for the complete spring stack.
Zero Preload Does Not Always Mean No Spring Tension
On some coilovers, zero preload means the spring is just seated with no extra compression from the perch. The spring may still carry load once the vehicle is lowered onto the suspension.
With helper or tender springs, the setup can be more complex. A spring may go loose at full droop by design, while the helper spring keeps the stack located. Never apply a simple zero-preload rule to a dual-spring system without checking the maker’s instructions.
- ✦ Main spring
The main spring provides the primary spring force for the suspension.
- ✦ Helper spring
A helper spring helps keep the spring stack together when the suspension is unloaded.
Signs Your Coilover Preload May Be Wrong
The car’s behavior can give you clues, but symptoms alone cannot prove that preload is the cause. Noise, poor grip, harshness, or uneven ride height can also come from worn parts, incorrect damping, bad alignment, poor spring seating, or insufficient suspension travel.
If the spring is loose when it should remain seated, check the setup before driving normally. If the car feels very harsh or bouncy after a collar change, return to the known setting and verify the manufacturer’s preload and ride-height procedure.
The safest approach is to change one setting at a time. Record what you changed, how much you changed it, and what the car did afterward. This makes troubleshooting far easier.

- ✦ Spring movement or noise
A spring that is not properly seated or retained can move and make noise during suspension travel.
- ✦ Reduced suspension travel
An unsuitable setup can leave less useful bump or droop travel.
- ✦ Uneven ride height
Different settings from side to side can contribute to uneven vehicle height, although chassis and corner-weight differences can also matter.
- ✦ Harsh or unsettled ride
Excessive preload may contribute to poor behavior on some coilover designs, but damping, spring rate, tire pressure, and ride height also need to be checked.
Do Not Diagnose From Ride Feel Alone
A car that feels harsh does not automatically need less preload. A car that feels soft does not automatically need more. Shock damping and spring rate have major effects on ride quality, so changing preload to fix every handling problem can lead you in the wrong direction.
- ✦ Check the basics first
Inspect tire pressure, spring seating, ride height, damper settings, fasteners, and alignment before making large preload changes.
Common Coilover Preload Adjustment Mistakes
Most preload problems come from using the wrong reference point or making too many changes at once. The cure is simple: use the manufacturer’s procedure, measure your work, and keep a record.
Another common mistake is assuming that both sides must have identical visible thread or collar positions. The goal is to achieve the correct setup, not simply to make every thread count look identical.

- ✦ Using preload to set ride height
This can be incorrect on coilovers designed to use the lower mount for ride-height adjustment.
- ✦ Guessing the preload
Counting collar turns without measuring can produce a different result because thread pitch and starting positions vary.
- ✦ Over-tightening the collars
Use the manufacturer’s torque or locking procedure. Do not attack a collar with a hammer and punch unless the manufacturer specifically permits that method.
- ✦ Ignoring thread limits
Do not exceed the allowed adjustment range or reduce the required thread engagement in the lower mount.
- ✦ Changing several settings at once
Changing preload, ride height, damping, tire pressure, and alignment together makes it hard to know what caused a change in handling.
- ✦ Skipping an alignment
Changing ride height can change suspension geometry. A professional alignment is often needed after a meaningful ride-height change.
A Better Setup Habit
A useful setup habit is to make a baseline sheet. Record spring length, preload, ride height, damper setting, tire pressure, and alignment data. Then make one change and record the result. This turns trial and error into a controlled process.
- ✦ Measure
Write down the original setting before touching the collars.
- ✦ Change
Make a small, known adjustment.
- ✦ Test
Check the car on the same type of road or test area when possible.
- ✦ Record
Note what changed and whether the result improved or worsened the specific issue.
What to Check After Adjusting Preload
Once you finish how to adjust preload on coilovers, do not immediately assume the job is complete. Lower the vehicle safely, let the suspension settle as directed by the manufacturer, and check the ride height on level ground.
Look for proper spring seating and make sure the collars remain locked. Check for tire contact, unusual noises, and adequate clearance around the suspension. If you changed ride height, check suspension geometry and alignment as well.
For a street car in the United States, this final check matters because the car may see potholes, steep driveways, uneven pavement, and long highway trips. A setting that looks fine in the garage still needs to work through the full range of normal road conditions.

- ✦ Check ride height
Measure both sides on level ground using the same reference points.
- ✦ Check spring seating
Confirm the spring sits correctly in both seats and follows the coilover manufacturer’s retention requirements.
- ✦ Check clearance
Turn the steering through its range and inspect for tire, spring, damper, brake-line, and suspension interference.
- ✦ Check fasteners
Confirm that required fasteners and collars are tightened to the manufacturer’s specifications.
- ✦ Get an alignment when needed
A ride-height change can alter toe, camber, and other suspension angles, so check alignment after significant height changes.
When to Stop and Get Professional Help
Stop the adjustment if a collar will not move, the spring is damaged, the threaded body is damaged, the spring does not seat correctly, or you are unsure about the correct procedure. A qualified suspension shop can inspect the assembly and set it safely.
Professional help is also a good choice for corner-weighting, competition setups, custom spring changes, and complex helper-spring or dual-rate systems. These setups need more than a simple collar adjustment.
- ✦ Damaged parts
Do not continue using a coilover with damaged threads, collars, springs, mounts, or other structural parts.
- ✦ Unknown setup
If you cannot identify the coilover model or its adjustment procedure, find the manufacturer’s documentation first.


