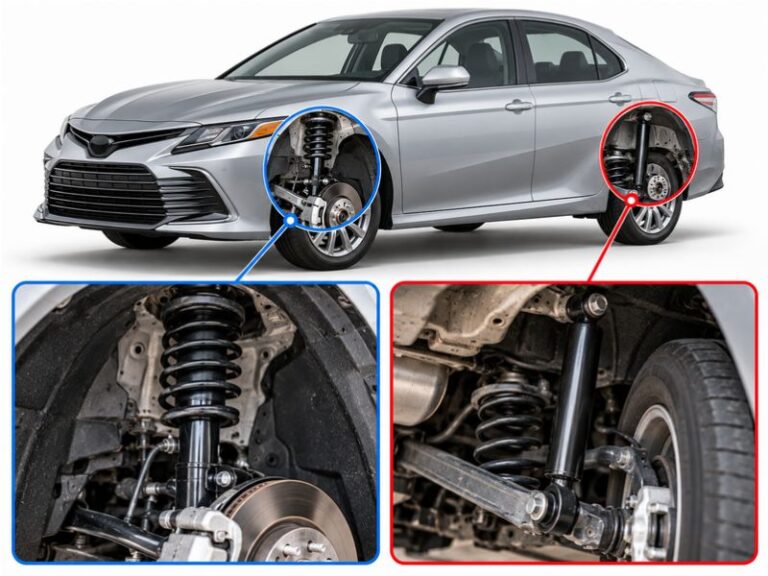
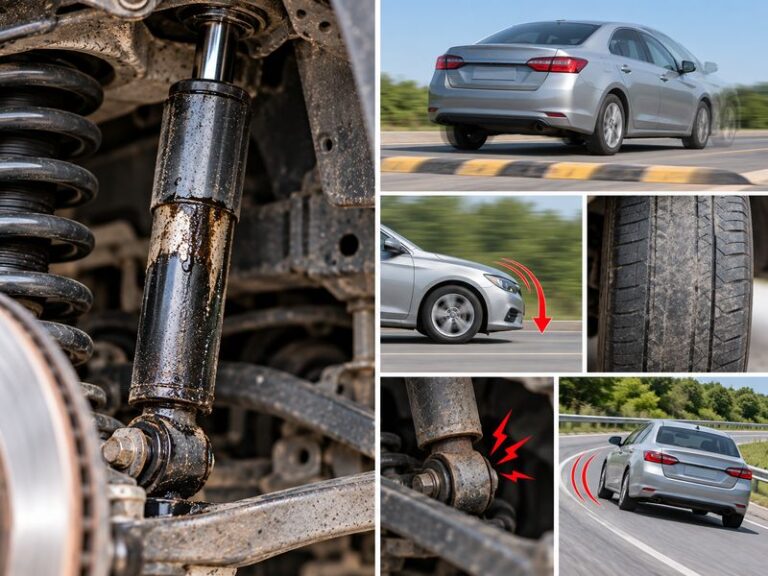
You should not continue normal driving with a leaking shock absorber until its condition has been checked. A slight film of oil may be normal, but active fluid loss, poor handling, tire contact, or repeated bouncing can make driving unsafe. If the leak is heavy or the vehicle feels unstable, stop in a safe place and arrange a tow.
On roads across the United States, from interstate highways to local streets with potholes, shock absorbers help keep a vehicle’s tires in contact with the road. They control the movement of the suspension after bumps, turns, and braking. When a shock absorber loses too much fluid, it may no longer control that movement as designed.
A leaking shock absorber does not always mean the vehicle must be towed. The amount of fluid loss, the unit’s remaining damping ability, the condition of the tires, and the vehicle’s behavior all affect the risk. However, a visual check alone cannot prove that the shock still works properly.
This guide explains how to judge the warning signs, when driving may be too risky, what causes shock absorbers to leak, and what to expect during inspection and repair. The goal is to help drivers make a safer decision without mistaking a minor oil film for a harmless failure or assuming every damp shock has lost its function.
You may be able to move a vehicle with a minor shock absorber leak, but that does not mean it is safe for normal use. The safest choice is to have the suspension inspected promptly and avoid unnecessary driving until the severity is known.
Shock absorbers control spring movement. Springs support the vehicle’s weight and compress over bumps, while shocks dissipate the energy that would otherwise make the body continue moving. Hydraulic fluid inside a conventional shock helps create the resistance needed for this control.
As fluid escapes or internal parts wear, damping can weaken. The vehicle may bounce more after a bump, pitch during braking, or lean and sway during turns. These changes can reduce the driver’s ability to keep the vehicle on the intended path, especially during emergency maneuvers.
There is no universal safe mileage or number of days for driving with a leak. A small amount of seepage from one unit differs greatly from a shock that is losing fluid rapidly and can no longer control suspension movement.
Source: testingautos.com
Minor seepage with normal handling
Arrange a prompt inspection. Do not assume the unit has failed, but do not ignore the condition or postpone assessment indefinitely.
Visible active leakage
Avoid routine driving and seek a professional assessment. If fluid runs down the body or the suspension behaves abnormally, towing is the safer choice.
Severe instability or damage
Stop in a safe location and arrange recovery. Do not attempt to reach a repair shop by driving a vehicle that cannot be controlled reliably.
When Is It Too Dangerous to Drive?
Driving is too risky when the leaking shock is accompanied by a loss of control, repeated uncontrolled bouncing, severe clunking, visible broken suspension parts, or a tire rubbing against the body. A vehicle that dives sharply, sways, or feels loose may also have a serious suspension problem.
If you are already on the road and notice a sudden change in handling, ease off the accelerator, avoid abrupt steering or braking when possible, and move to a safe stopping area. Turn on the hazard lights if appropriate. Do not crawl beneath the vehicle or inspect the suspension beside moving traffic.
Arrange a tow
Choose recovery if the vehicle is unstable, a wheel or suspension component appears damaged, a tire is rubbing, or the shock has suffered major fluid loss.
Do not carry on at highway speed
High speeds leave less time to respond to a loss of grip or an unexpected body movement. A vehicle with uncertain suspension control should not be tested on the highway.
What Does a Leaking Shock Absorber Look Like?
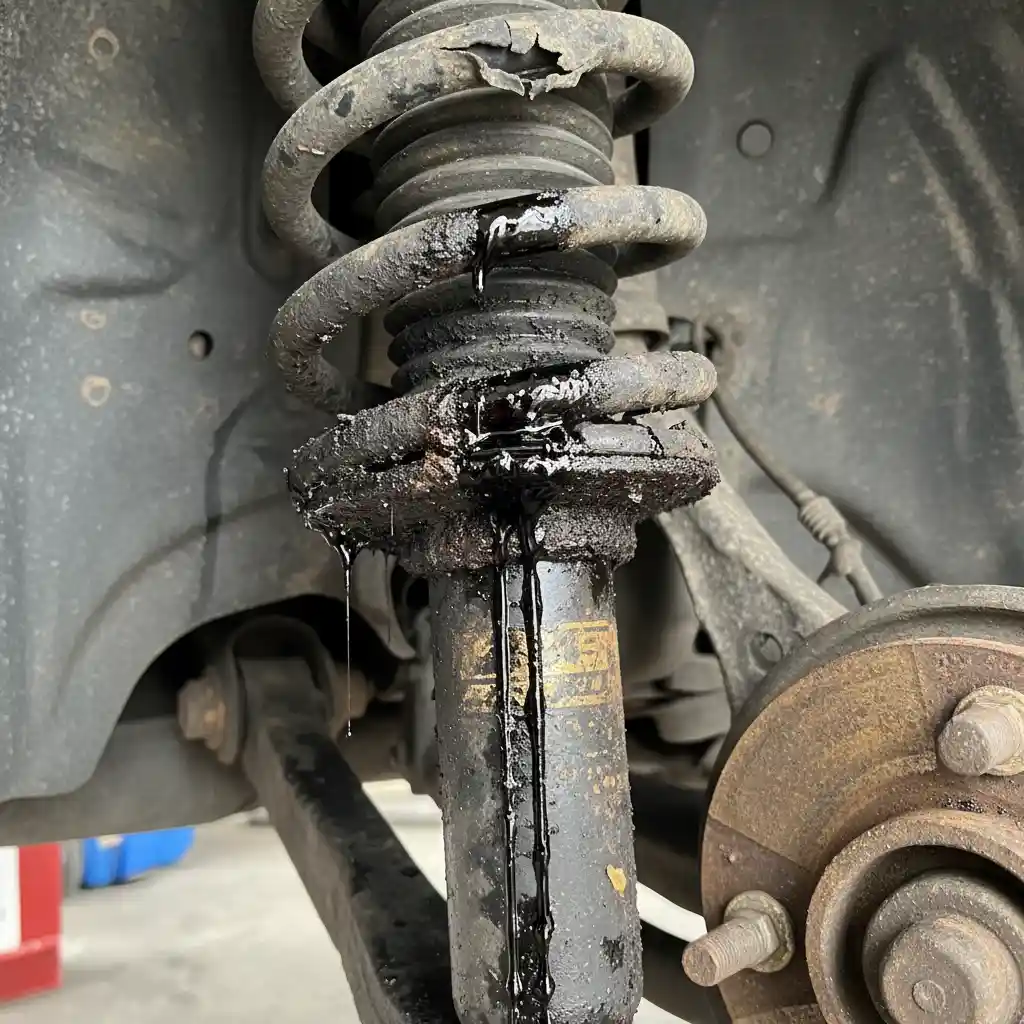
A leaking shock absorber may show a damp area around its shaft seal, a wet trail down the shock body, or oily dirt stuck to the surface. The location and amount of fluid matter more than a single dark mark.
A shock absorber can also be defective without a visible leak. Internal valve wear, damaged components, or other failures may reduce damping even when the outside looks dry. Conversely, some oil residue does not prove that a unit has lost enough fluid to stop working properly.
The first step is to distinguish normal film from active fluid loss. Dirt, water, road grime, rust protection, and fluid from nearby components can make visual inspection confusing. A technician may need to clean the area and inspect it again to identify the source.
Source: cdn.autodoc.de
Light oil film
A thin, slightly damp layer near the seal may be normal seepage on some designs. Check the component manufacturer’s inspection guidance before treating it as a failed shock.
Wet body with oily dirt
A thick layer of grime that sticks to wet oil can indicate a leak. The source still needs confirmation because other components may release fluid nearby.
Fresh oil running down the unit
Visible fluid trails or repeated wetness after cleaning are stronger signs of active leakage and warrant prompt inspection.
Damaged shaft or housing
Pitting, deep corrosion, dents, or a bent shaft can damage the seal or interfere with normal movement. The unit may need replacement even if fluid loss is limited.
How to Check for a Leak Safely
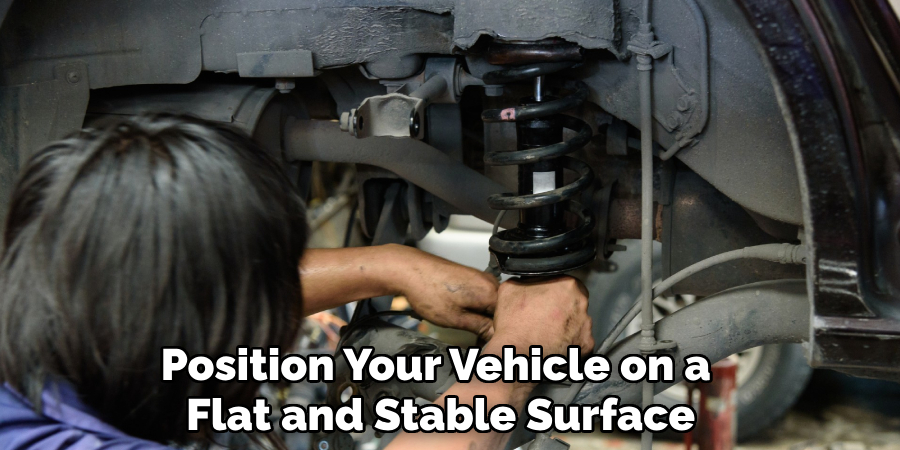
Park on firm, level ground, switch off the engine, set the parking brake, and let hot components cool. Use a flashlight to inspect the visible shock body from outside the wheel area. Do not reach into a suspension assembly or place any part of your body under a vehicle supported only by a jack.
Look for the highest point where the oily residue begins, not just the lowest wet spot. Fluid can travel down a component or collect on nearby parts. If the area is dirty, a repair professional can clean it and determine whether fresh fluid returns.
Never loosen shock mounts or suspension fasteners merely to investigate a leak. Some suspension systems contain highly loaded springs, and certain strut assemblies require specialized tools to disassemble safely.
Record the location
Note whether the damp area is at the front or rear and whether it is on one side or both. This information can help guide the inspection.
Check for related symptoms
Look for uneven tire wear, unusual body movement, loose mounting hardware, and visible damage without touching hot or moving parts.
Symptoms That Can Make Driving Unsafe
The most important warning signs are changes in handling, repeated suspension movement, and tire contact. These symptoms may point to a failed shock absorber, but they can also result from worn springs, damaged bushings, loose mounts, tire problems, or other suspension faults.
A leaking shock should be assessed in context. For example, a vehicle that bounces repeatedly after a road dip may have weak damping, while a low corner may indicate a broken spring or another load-support problem. A shock absorber alone generally does not support the vehicle’s static weight in the way a spring does.
If several symptoms occur together, do not assume that replacing the leaking shock alone will correct the problem. A complete suspension and tire inspection can identify additional damage before new parts are installed.
Source: cdn.autodoc.de
Excessive bouncing
The body continues moving after a bump instead of settling in a controlled way. This can indicate reduced damping.
Nose dive or rear squat
The body moves noticeably during braking or acceleration. Springs and vehicle loading also affect these movements, so the cause must be confirmed.
Swaying or wandering
The vehicle feels unstable in turns, crosswinds, or lane changes. Worn shocks are one possible cause, but steering and tire faults must also be checked.
Clunking or rattling
Loose mounts, damaged bushings, broken springs, or other suspension parts may be responsible. A leak alone does not establish the source of a noise.
Uneven or cupped tire wear
Repeated high and low patches on a tire may be associated with poor damping, but alignment, tire balance, and worn suspension joints can also contribute.
Bottoming out
The suspension hits its travel limit over bumps. This can indicate a failed shock, damaged spring, worn bump stop, excess load, or a combination of faults.
Why These Symptoms Matter in Rain and Emergency Stops
Shock absorbers help the tires follow the road surface by controlling spring movement. When damping is weak, a tire may be more prone to losing consistent contact over rough pavement, depending on the road, speed, load, and suspension design.
Reduced tire contact can interfere with steering and braking control. Wet roads, standing water, loose gravel, and uneven pavement may leave less margin for error. A leaking shock does not automatically increase stopping distance by a fixed amount, but a badly degraded suspension can make the vehicle less predictable when the driver needs maximum control.
Electronic systems such as anti-lock brakes and electronic stability control cannot repair a mechanical suspension fault. They rely on the vehicle’s tires and suspension to respond properly. Do not treat these systems as a substitute for fixing a leaking or ineffective shock.
Reduce exposure to risk
Avoid high speeds, rough routes, heavy loads, and towing until the suspension has been assessed.
Do not test the vehicle aggressively
Hard braking, sharp turns, and deliberate high-speed bumps are not safe ways to confirm whether a shock is defective.
What Causes a Shock Absorber to Leak?
Most hydraulic shock absorber leaks begin when fluid escapes past a seal or through damaged parts. Age, corrosion, impact damage, contamination, and excessive shaft movement can all contribute. The exact cause depends on the shock design, its location, the vehicle’s use, and the condition of surrounding components.
A shock absorber normally contains fluid that moves through internal passages and valves as the suspension travels. This resistance converts some movement energy into heat and helps control the spring. When the seal or housing can no longer retain the fluid, damping performance may decline.
Finding the cause matters because replacing a shock without addressing related damage can lead to another failure. For example, a bent mounting point, damaged protective boot, or recurring impact exposure may need attention during the repair.
Source: shockabsorberpro.com
Worn shaft seal
The seal around the moving shaft can wear with age and repeated suspension cycles, allowing hydraulic fluid to escape.
Corrosion or a damaged shaft
Rust pits, scratches, or bends can damage the sealing surface and prevent the seal from retaining fluid.
Road debris and contamination
Dirt, grit, and debris can damage protective parts or contribute to wear around the shaft seal.
Pothole or impact damage
A severe impact may damage the shock, its mounts, or nearby suspension parts. One impact does not always cause a leak, so inspection is necessary.
Age and wear
Repeated movement, heat, and normal material aging can reduce seal effectiveness over time.
Incorrect installation
Wrong parts, damaged threads, improper mounting, or installation that places unusual stress on the unit can contribute to problems.
Can Cold Weather or Hot Weather Cause a Leak?
Temperature changes affect hydraulic fluid viscosity and the behavior of seals and other materials. Very cold conditions can make fluid more viscous, while heat can change fluid properties and increase operating temperatures. These effects alone do not prove that a shock will leak.
An older unit with worn seals or a damaged shaft may show a problem under conditions that make an existing weakness more apparent. If a leak appears after a period of extreme weather, inspect the shock and its surroundings rather than assuming temperature is the sole cause.
Inspect after impact or unusual handling
A new wet trail, new noise, or sudden handling change after a pothole or curb strike warrants a closer inspection.
Check protective components
A torn dust boot or damaged protective cover may expose the shaft to debris, although a damaged cover does not by itself prove that the shock is leaking.
Can You Drive a Short Distance to a Repair Shop?
A short trip may be possible when the suspected leak is minor, the vehicle has no handling symptoms, the tires are clear of the body, and there is no visible structural damage. However, distance alone does not make a trip safe. The condition of the shock and the vehicle’s response are the deciding factors.
If the leak is clearly active, the shock has lost substantial fluid, or the vehicle behaves abnormally, arrange a tow instead. A mechanic can help determine whether the vehicle is suitable for limited movement, but remote advice cannot reliably establish the condition of a damaged suspension.
There is no safe universal speed limit for driving with a leaking shock absorber. Driving slowly may reduce some forces, but it does not restore damping or guarantee control. A vehicle can still encounter a sudden obstacle, uneven pavement, or an emergency maneuver.
Source: i.ytimg.com
Before considering a short trip
Confirm that there is no obvious severe leak, broken spring, damaged mount, tire rubbing, or major change in handling. If any of these signs are present, do not drive.
Choose the lowest-risk option
Contact a repair shop, describe the leak and symptoms, and ask whether recovery is recommended. When uncertainty remains, towing avoids exposing the vehicle to road risks.
If a professional confirms limited driving is acceptable
Use a direct route, avoid highways and rough roads, keep speed modest for the conditions, and stop if handling changes. These precautions reduce exposure but do not guarantee safety.
Should You Drive With a Leaking Rear Shock Absorber?
A leaking rear shock absorber can be just as important as a leaking front unit. Rear damping helps control body movement and tire contact, especially over bumps and during lane changes. The risk depends on the condition of the shock and the suspension design, not simply on whether it is at the front or rear.
A rear shock that leaks while carrying passengers or cargo may be exposed to greater suspension movement. Do not assume that a rear leak is harmless because the steering wheels are at the front. If the rear of the vehicle sways, bounces, or feels loose, avoid driving until the problem is assessed.
Check load and tire clearance
Excess cargo, a damaged spring, or a failed bump stop can contribute to bottoming out and tire contact. Remove unnecessary load only when it is safe to do so.
Assess both sides of the axle
A technician should compare the left and right shocks and inspect the related suspension parts before recommending repairs.
How Much Does a Leaking Shock Absorber Affect Tire Wear?
A weak shock absorber can contribute to irregular tire wear by allowing the wheel and tire to move excessively over road surfaces. One possible pattern is cupping, where parts of the tread develop alternating high and low areas. The pattern is a clue, not proof that the shock is the only cause.
Incorrect wheel alignment, unbalanced tires, worn bushings, loose suspension joints, and tire inflation problems can also produce abnormal wear. A vehicle may have more than one fault at the same time, so replacing a shock without checking the tires and suspension can leave the original problem partly unresolved.
Once a tire has developed significant uneven wear, replacing the shock will not restore the tread. A technician should assess whether the tire remains safe to use and whether alignment or other repairs are required. If the tire has exposed cords, severe damage, a bulge, or another dangerous defect, do not continue driving on it.
Source: media.a-premium.com
Inspect the tread
Look for unusual scallops, feathering, bald areas, or wear concentrated on one edge. Use the tire maker’s guidance and applicable safety standards when deciding whether a tire needs replacement.
Check tire pressure
Use the pressure listed on the vehicle’s tire information label, usually located on the driver’s door area, rather than the maximum pressure printed on the tire sidewall.
Request an alignment check when indicated
If the vehicle pulls, the steering wheel is off-center, or tires show abnormal wear, ask the technician to check alignment and worn steering or suspension parts.
Can a Leaking Shock Absorber Damage Other Parts?
Continued driving with a severely worn shock can contribute to repeated suspension impacts, poor tire control, and extra movement through other suspension components. The exact damage depends on the fault, the roads driven, vehicle loading, and how long the problem continues.
A leaking shock does not automatically damage every nearby part. The concern is that the original damping problem may allow uncontrolled movement or hide a separate defect that also needs repair. Inspection should include the shock mounts, bushings, springs, bump stops, tires, and relevant steering parts.
Shock mounts and bushings
Inspect for looseness, cracks, separation, or impact damage that may create noise and allow unwanted movement.
Springs and bump stops
Look for broken coils, sagging, damaged bump stops, or signs that the suspension is reaching the end of its travel.
Tires and wheel alignment
Assess abnormal tread wear, wheel damage, and alignment where symptoms indicate a related problem.
How Is a Leaking Shock Absorber Repaired?
A leaking conventional shock absorber is usually replaced rather than repaired by adding fluid or sealing the outside. The internal seals, shaft, valves, and housing work as a precision hydraulic assembly. Once the unit can no longer retain fluid or control movement properly, an external patch is not a dependable fix.
Some specialized suspension systems have serviceable components or manufacturer-approved rebuilding procedures. That does not mean every sealed automotive shock can be safely opened and refilled. The correct repair depends on the exact part, vehicle design, and service instructions.
A proper repair begins by confirming the source of the fluid and checking for other faults. The technician should inspect the opposite-side shock, mounting hardware, springs, bushings, bump stops, tires, and any parts damaged by impacts or abnormal suspension travel.
Source: repairious.com
Confirm the source
Distinguish shock fluid from grease, engine oil, brake fluid, or residue from another nearby component.
Verify the replacement part
Match the part to the vehicle’s year, make, model, trim, axle, suspension package, and any relevant load or towing configuration.
Inspect the complete assembly
Check mounting points, fasteners, springs, protective boots, and surrounding parts for damage or wear.
Follow installation specifications
Use the specified fasteners, tightening procedures, and torque values. Some designs require the suspension to be loaded or positioned in a specific way during tightening.
Should You Replace One Shock or Both?
Replacing both shocks on the same axle is generally recommended when one conventional shock has failed, particularly when both units have similar age and mileage. Matching damping helps the left and right sides respond more consistently during bumps and turns.
Replacing only one may be reasonable in some circumstances, such as when the opposite unit is nearly new and the manufacturer permits single-side replacement. The decision should consider the design, condition, age, and service guidance rather than cost alone.
Do not assume that all suspension parts must always be replaced in pairs. Springs, mounts, electronic dampers, and complete strut assemblies have different requirements. Follow the service information for the specific vehicle.
Compare the opposite-side unit
Ask the technician to inspect the other shock for leakage, wear, damage, and reduced damping.
Check for related repairs
If a shock is part of a strut assembly or an electronically controlled system, confirm whether extra components, calibration, or special procedures are needed.
Can You Fix a Leaking Shock Absorber at Home?
A capable home mechanic may be able to replace a shock if the vehicle design, tools, and service instructions allow it. However, some suspension assemblies use highly compressed coil springs or difficult-to-access mounts. These jobs can cause severe injury when handled with unsuitable equipment.
Never attempt to repair a leak by applying household sealant, welding a shock body, drilling the housing, or adding fluid through an improvised opening. These actions can compromise a pressurized or sealed component and create new hazards.
If the repair requires compressing a coil spring, working beneath an inadequately supported vehicle, or servicing a pressurized electronic damper, use suitable professional equipment and procedures. When the design or correct method is uncertain, professional service is the safer option.
Use rated lifting equipment
Work only on a firm, level surface with the vehicle supported at approved lift points by correctly rated stands or a suitable lift. Never rely on a hydraulic jack alone.
Keep spring energy in mind
A coil spring can store enough energy to cause serious injury. Do not loosen a spring-loaded assembly unless you have the correct equipment and know the specified procedure.
Dispose of old parts properly
Follow local waste and recycling rules for used automotive components and any fluid that may escape during removal.
How Much Does It Cost to Replace a Leaking Shock Absorber?
The cost depends on the vehicle, the type of suspension, the parts selected, labor rates, and whether related components also need repair. A conventional shock may be relatively simple to replace, while a strut assembly or an electronically controlled suspension component can require more labor and specialized parts.
There is no single price that applies to every vehicle in the United States. A quote should identify the exact parts being replaced, whether one or both sides of the axle are included, the labor charge, and any additional inspection or alignment work that is needed.
If the leak has contributed to tire damage or exposed another suspension fault, the total repair bill may be higher than the cost of the shock alone. Ask for a clear explanation of each recommended repair and the reason it is necessary.
Vehicle and suspension design
Truck, SUV, passenger car, performance, air suspension, and adaptive damping systems can have very different parts and labor requirements.
Parts and fitment
Confirm that the quoted part matches the vehicle and that any required mounts, fasteners, or related components are included.
Labor and additional work
Access difficulty, corrosion, seized hardware, alignment requirements, and damaged surrounding parts can change the final cost.
Warranty terms
Check the parts and labor warranty, including any exclusions for incorrect installation, impact damage, or modifications.
Is It Cheaper to Wait?
Waiting may appear cheaper if the vehicle still moves normally, but the risk is that damping can worsen and a separate tire or suspension problem may go unnoticed. The timing and extent of any additional damage cannot be predicted from the leak alone.
The sensible next step is to arrange an inspection soon and make the repair decision from the actual condition. If the vehicle is unstable or the leak is severe, avoiding a tow does not justify continued driving.
Request an itemized estimate
Separate parts, labor, alignment, diagnostic work, and additional repairs so you can compare quotes fairly.
Prioritize safety-related faults
Address severe leakage, poor control, damaged tires, broken springs, and loose suspension hardware before cosmetic or optional work.
How to Tell Whether the Repair Worked
After replacement, the suspension should control body movement in a manner consistent with the vehicle’s design, and there should be no new mounting noise or visible fluid loss. A technician should verify correct installation and inspect any related parts identified during diagnosis.
Do not rely only on a bounce test. Modern suspension layouts differ, and some vehicles resist manual movement even when a damper has a problem. A bounce test also cannot reliably identify every internal fault or confirm that the replacement has been installed correctly.
The vehicle should be evaluated under safe conditions, following the repair procedure and manufacturer guidance. If it still sways, clunks, bottoms out, or wears tires abnormally, return to the shop rather than assuming the new shock has solved every issue.
Check the installation
Confirm that the correct parts are fitted and that the mounts and fasteners have been installed and tightened according to service specifications.
Look for remaining symptoms
Persistent bouncing, pulling, noise, or uneven tire wear may indicate another fault or a problem that was not corrected during the repair.
Follow the service instructions
If the vehicle requires alignment, suspension calibration, or a special post-installation procedure, complete it before returning to normal use.
Frequently Asked Questions
Q
How long can you drive with a leaking shock absorber?
There is no dependable number of miles or days. A light film of oil with normal handling is different from a shock that is losing fluid rapidly or no longer controls the suspension. Arrange an inspection promptly, and do not drive if the vehicle is unstable, bottoms out severely, or shows signs of suspension or tire damage.
Q
Can a leaking shock absorber cause an accident?
A severely degraded shock absorber can contribute to loss of vehicle control by allowing excessive suspension movement and reducing consistent tire contact with the road. The risk depends on the vehicle, road surface, speed, load, and condition of the rest of the suspension. A leak does not guarantee an accident, but it should not be ignored.
Q
Can I drive with only one leaking shock absorber?
One leaking shock can affect vehicle stability, even if the other shocks appear dry. The affected unit may also have reduced damping without obvious external signs. Have the leaking shock and the opposite-side unit inspected, and arrange towing if handling is abnormal or the leak is severe.
Q
Does a leaking shock absorber always need to be replaced?
Not every damp shock has failed. A light oil film may be normal seepage, depending on the design and manufacturer guidance. A confirmed active leak, damaged shaft, or loss of damping usually calls for replacement of the affected unit or an approved service procedure. A technician should identify the source and assess performance before deciding.
Q
Can a leaking shock absorber cause uneven tire wear?
Yes, weak damping can contribute to cupping or other irregular tire wear by allowing excessive wheel movement. However, alignment errors, incorrect tire pressure, imbalance, and worn suspension parts can cause similar patterns. Inspect the tires and suspension together so the repair addresses the actual cause.
Q
Can I drive with a leaking shock absorber in the rain?
Rain leaves less margin for error when tire contact or vehicle control is compromised. If a shock is leaking and the vehicle shows bouncing, swaying, or other handling changes, do not drive in wet conditions. If the leak appears minor and the vehicle behaves normally, arrange prompt professional assessment rather than assuming rain driving is safe.
Q
Should I replace both shock absorbers at the same time?
Replacing both shocks on the same axle is generally recommended because units of similar age and condition are more likely to provide balanced damping. A nearly new opposite-side unit may be an exception if the manufacturer permits it. Have both sides checked and follow the vehicle’s service instructions.
✦ Wrapping Up
Conclusion
You should not treat a leaking shock absorber as a harmless cosmetic problem. Fluid loss can signal wear or damage that reduces the suspension’s ability to control spring movement, which may affect handling, tire contact, and stability. A light film may be normal seepage, but an active leak or any change in vehicle behavior needs prompt attention.
The safest response depends on the severity of the leak and the condition of the complete suspension. If the vehicle sways, bounces excessively, bottoms out, makes severe noises, or has damaged tires or suspension parts, stop driving in a safe place and arrange a tow. When symptoms are absent and seepage appears minor, contact a repair shop promptly to determine whether limited driving is acceptable.
A proper inspection should identify the leak source, check the remaining damping performance, and look for related damage. Replacing the failed unit and addressing any other faults is more dependable than trying to seal the leak or continuing to drive without knowing how much control remains.
💡 Key Takeaway
Inspect the shock for active fluid loss without crawling under an unsupported vehicle, note any handling or tire symptoms, and contact a qualified repair shop. If the leak is heavy or the vehicle is unstable, do not drive it; arrange recovery.
Eric
Hi, I’m Eric Bennett, the person behind OffRoadTruckAccessories.com.
I created this blog to share my interest in trucks, off-road driving, automotive accessories, and DIY modifications. I enjoy learning how different truck accessories work, testing their usefulness, and understanding whether they are truly worth buying.
Shock absorbers are located near the wheels as part of the suspension system, usually between the vehicle’s body, frame, or subframe and a suspension component such as a control arm, axle, or wheel assembly. However, the exact answer to where are shock absorbers located on a car depends on the suspension design. Some vehicles have…
You should change shock absorbers when they are worn, leaking, damaged, or no longer controlling suspension movement properly. There is no single replacement interval that applies to every vehicle because shock absorber life depends on road conditions, vehicle weight, driving habits, suspension design, and component quality. If you are wondering when to change shock absorbers,…