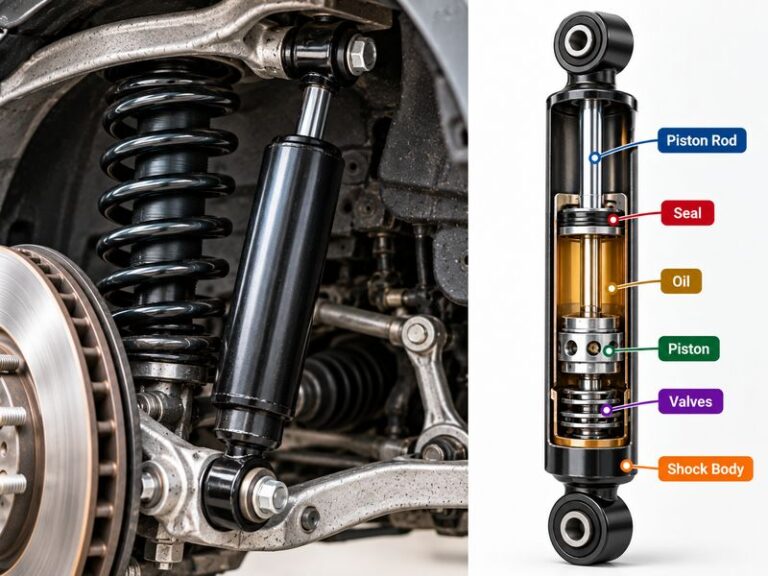
You need a shock absorber that matches your vehicle’s application, mounting points, compressed length, extended length, and required suspension travel. Start with the original equipment part number or a verified vehicle fitment guide before measuring.
If you are replacing shocks on a car, truck, SUV, or off-road vehicle in the United States, the right size depends on more than the length of the old part. Your vehicle’s year, make, model, trim, drivetrain, suspension package, and ride height can all affect fitment. A shock that looks close to the original may still have the wrong mounts or travel range.
The safest starting point is to check the vehicle manufacturer’s specifications or use a trusted replacement parts catalog. If your vehicle has a lift kit, lowered suspension, modified springs, or other changes, you may need to measure the suspension and verify its full range of movement. Do not select a shock based on appearance or overall length alone.
This guide explains how to identify the correct shock absorber size, measure the important dimensions, and check whether a replacement will work through the suspension’s full travel. It also covers common measurement errors, modified vehicles, and situations where a suspension shop should verify the setup.
The correct shock absorber is the one designed to fit your vehicle and control its suspension through the intended range of movement. There is no single shock size that fits every car, truck, or SUV. Two vehicles from the same model year may use different shocks because of their engines, trim levels, axle types, payload ratings, or factory suspension packages.
For a stock vehicle, start with a vehicle-specific parts catalog or the original equipment manufacturer part number. A reputable parts supplier can use your vehicle identification number, or VIN, to help narrow the options. Confirm the actual suspension configuration because a VIN lookup may not identify every previous modification or special equipment change.
If the vehicle has been lifted, lowered, or fitted with aftermarket suspension components, factory fitment alone may not be enough. You must also verify the mounting dimensions and travel range at the current ride height. A shock that fits the original vehicle may be unsuitable after a suspension change.
Source: enidine.com
Vehicle details
Record the model year, make, model, trim, engine, drivetrain, and relevant suspension package.
Original part number
Check the existing shock label or an authoritative parts catalog. Confirm that the number applies to your exact vehicle configuration.
Mounting dimensions
Identify the upper and lower mount styles, mounting widths, bolt diameters, and any required bushings or sleeves.
Suspension travel
For a modified vehicle, establish the required compressed and extended dimensions before selecting a replacement.
When the Original Shock Is Still Available
Read any visible part number and compare it with the vehicle’s service information or a trusted parts catalog. The original shock can provide useful measurements, but it is not automatically a reliable template if it is bent, damaged, incorrectly installed, or already an unsuitable aftermarket part.
If the replacement is a verified direct-fit part, the manufacturer has generally designed it for the specified application and mounting arrangement. Even then, check for any catalog notes about towing packages, heavy-duty suspension, electronic damping, or other equipment differences.
Verify before ordering
Match the replacement part number to the vehicle and confirm whether the catalog lists front, rear, left, or right applications.
When the Vehicle Has Modified Suspension
Do not assume that a two-inch lift automatically requires a shock that is exactly two inches longer. Lift height and shock length are different measurements. The change in shock mounting distance depends on the suspension design, the location of the shock mounts, and how the suspension moves through its travel.
Use the suspension kit manufacturer’s fitment guidance as a starting point. Then verify the compressed and extended dimensions against the actual suspension geometry. Some kits require specific shocks, relocation brackets, revised bump stops, or other matched parts.
Check the full setup
Record the lift or lowering kit, spring type, mounting brackets, axle configuration, and any changes to bump stops.
What Shock Absorber Measurements Matter?
Three measurements are central to selecting a shock: compressed length, extended length, and mounting dimensions. These determine whether the shock fits between its mounting points and can move through the required suspension travel. Other specifications, including shock body diameter, shaft size, damping characteristics, and load capacity, may also affect suitability.
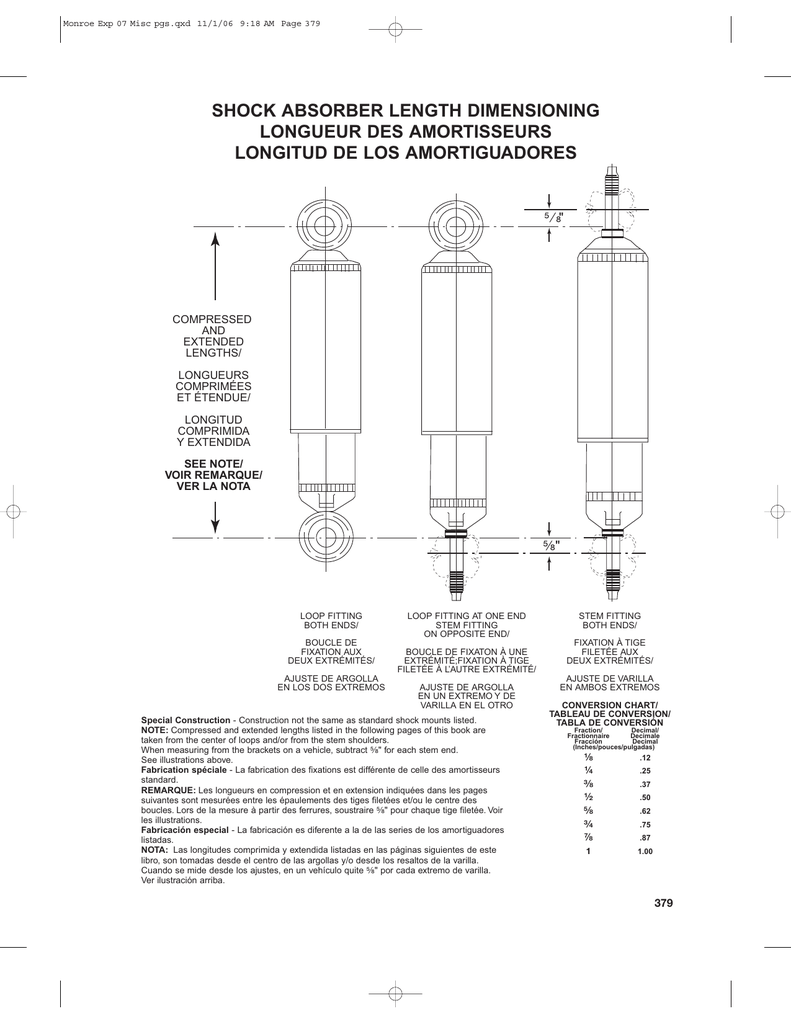
Compressed length is the distance between the shock’s mounting points when it is at its specified minimum length. Extended length is the distance between those points when it is at its specified maximum length. The difference between the two is the shock’s available stroke, provided the figures are measured using the same mounting reference points.
Always check how the manufacturer defines these dimensions. For an eye-to-eye shock, measurements are generally taken from the centers of the mounting eyes. For a stem mount or a mixed mounting arrangement, the reference points may differ. A published overall body length is not necessarily the same as mounting-to-mounting length.
Source: shocksurplus.com
Compressed length
The minimum specified mounting distance. It must accommodate the suspension’s intended compression without the shock bottoming out prematurely.
Extended length
The maximum specified mounting distance. It must allow the suspension to extend without the shock becoming an unintended travel limiter.
Stroke
The difference between extended and compressed mounting lengths. It describes the shock’s available movement, not the vehicle’s exact wheel travel.
Mounting dimensions
The eye, stud, stem, fork, or other attachment type, along with widths, bolt sizes, and required hardware.
Body and shaft dimensions
These help establish clearance, component compatibility, and suitability for the shock’s intended application.
Why Stroke Is Not the Same as Wheel Travel
A suspension’s wheel travel is the distance the wheel can move relative to the vehicle body. Shock stroke is the distance the shock itself can move between its compressed and extended limits. These values are not always equal because control arms, linkages, and mounting locations can change the motion ratio.
For example, a shock mounted closer to a control arm’s pivot than the wheel is may move less than the wheel. The exact relationship depends on suspension geometry and can change through the range of travel. This is why a shock cannot be selected by matching its stroke to a published wheel-travel figure without checking the mounting layout.
Practical rule
Use vehicle or suspension manufacturer specifications where available. For a custom setup, have the motion ratio and travel limits checked rather than assuming a one-to-one relationship.
How to Measure for the Right Shock Absorber
Measuring a shock correctly requires safe access to the suspension and clear reference points. If the vehicle is stock, verify the catalog specification first. Physical measurements are especially useful when the vehicle has been modified, the original shock is unavailable, or the existing part number cannot be confirmed.
Before measuring, gather a tape measure or suitable measuring tool, a notebook, the vehicle specifications, and any instructions for the suspension kit. A ruler or tape may be enough for a preliminary measurement, but precise custom suspension work may require dedicated measuring tools and a qualified technician.
Source: s413.photobucket.com
Safety first
Park on firm, level ground, secure the vehicle against movement, and follow the service manual’s lifting and support instructions. Never work beneath a vehicle supported only by a jack.
Know the mounting points
Identify the exact upper and lower shock attachments before taking measurements.
Record units
Write down each measurement in inches or millimeters and identify the reference points so the figures can be compared correctly.
Step 1: Identify the Vehicle and Suspension Setup
Write down the vehicle year, make, model, trim, drivetrain, and axle configuration. Note whether the suspension is factory original, lifted, lowered, or modified with aftermarket control arms, springs, brackets, or bump stops.
Search the manufacturer’s parts information using these details. If a direct-fit replacement is listed and the vehicle has no relevant modifications, that specification is generally a better starting point than measuring an old shock by itself.
Record modifications
Include the exact lift kit or lowering kit, spring changes, and any changes to shock mounting locations.
Step 2: Measure the Existing Shock
If the shock is removed and safe to handle, measure between the mounting reference points in its fully extended and specified compressed states. Follow the shock manufacturer’s instructions for compression. Do not force a gas-charged shock into compression with an unsafe tool or place your hands where the mechanism could pinch them.
For an eye-to-eye shock, measure from the center of one eye to the center of the other. For a stem or stud mount, use the manufacturer’s stated mounting reference. Record the compressed length, extended length, mounting type, mounting width, and any sleeve or bolt dimensions.
If the shock cannot be safely compressed or its minimum length is not known, do not guess. Obtain the manufacturer’s technical specification or have a suspension shop measure it. A damaged shock may also provide misleading dimensions.
Avoid measuring the body only
The length of the metal tube or shaft does not necessarily equal the mounting-to-mounting dimension.
Keep the reference points consistent
Use the same mounting points for both compressed and extended measurements.
Step 3: Check the Suspension Mounting Distance
For a custom or modified setup, the key measurement is the distance between the shock mounts at the relevant suspension positions. This distance changes as the wheel moves up and down. One measurement at normal ride height cannot prove that the shock will fit at full compression and full extension.
A complete check considers the mounting distance at the intended compression limit and the intended extension limit. The suspension must be evaluated using the manufacturer’s procedure and suitable support equipment. On some vehicles, springs, control arms, brake hoses, driveshafts, and other parts can store energy or be damaged if the suspension is moved incorrectly.
At compression
Verify that the shock does not bottom out before the intended suspension compression limit.
At extension
Verify that the shock does not top out before the suspension reaches its intended extension limit or strain other components.
Step 4: Confirm Mounting Compatibility
Compare the upper and lower mounting styles of the proposed shock with the vehicle’s mounting points. Common arrangements include eyelet mounts with bushings, threaded stems, studs, and fork-style attachments. Similar-looking mounts may still differ in width, bolt diameter, thread, sleeve size, or offset.
Do not assume that a bolt can be forced through a slightly smaller sleeve or that a loose fit can be fixed by tightening the fastener. Incorrect hardware can create excess movement, noise, poor alignment, or a failed connection. Use only compatible hardware and the specified tightening procedure.
Check clearance
Make sure the shock body, reservoir, spring, and mounting hardware will clear the surrounding suspension, tires, frame, and body throughout travel.
Step 5: Compare the Measurements With Manufacturer Data
Compare the measurements with the shock manufacturer’s published compressed length, extended length, stroke, mounting specifications, and application notes. Make sure the listed dimensions use the same measurement method as yours.
If the figures do not match, pause before ordering. The difference may come from the wrong part number, different measurement reference points, an incorrect old shock, or an unsuitable replacement. Ask the manufacturer or a qualified suspension shop to resolve the mismatch.
Final fitment check
Confirm vehicle application, mounting dimensions, travel range, load requirements, and any suspension-kit restrictions.
How to Choose Shock Length for Stock, Lifted, and Lowered Vehicles
The correct shock length depends on the suspension’s geometry and intended travel, not simply on how high the vehicle sits. Stock vehicles often use application-specific shocks. Lifted and lowered vehicles may need different lengths, mounts, or damping characteristics to work correctly.
Before changing shock length, determine whether the suspension modification changes the distance between the shock mounts, the amount of available travel, or the position of the suspension at rest. A longer shock does not automatically create more usable wheel travel, and a shorter shock does not automatically improve handling.
Source: demon-tweeks.com
Stock suspension
Use the correct direct-fit replacement unless the vehicle manufacturer or a qualified specialist specifies a different setup.
Lifted suspension
Check the lift kit’s shock recommendations and verify compression, extension, and clearance at the new geometry.
Lowered suspension
Confirm that the shock suits the reduced ride height and that sufficient compression travel remains. Check compatibility with the springs and bump stops.
Off-road suspension
Consider actual wheel travel, mounting geometry, shock stroke, heat management, clearance, and the intended terrain.
Does a Two-Inch Lift Need a Two-Inch Longer Shock?
Not necessarily. A two-inch lift describes a change in ride height at a stated reference point. It does not mean the distance between the shock mounts increases by exactly two inches in every suspension design.
The correct replacement depends on the mounting layout, the amount of remaining compression travel, the required extension, and any changes to bump stops or control arms. Use the lift kit manufacturer’s specified shock range and verify the dimensions on the actual vehicle.
Do not use lift height alone
Confirm the exact shock application and travel range rather than adding the advertised lift height to the original shock length.
What About Lowered Cars?
Lowering springs change the suspension’s resting position and can reduce the space available for compression. A shock designed for standard ride height may not provide the intended travel or damping when paired with lowering springs.
Choose a shock that is explicitly compatible with the lowering setup or approved by the suspension manufacturer. Check the spring’s seating, bump-stop arrangement, mount clearance, and available travel before driving.
Check the complete combination
A compatible shock, spring, and bump-stop setup must work together; matching length alone is not enough.
How to Calculate Shock Stroke and Check Fitment
You can calculate the nominal shock stroke by subtracting compressed mounting length from extended mounting length. This is useful when comparing specifications, but it does not by itself establish whether a shock fits the vehicle. The mounting geometry and suspension travel limits still need to be checked.
For example, suppose a shock has a published extended length of 22 inches and a compressed length of 14 inches, both measured between the same mounting reference points. Its nominal stroke is 8 inches. These are hypothetical figures for explaining the calculation, not a recommendation for a particular vehicle.
Source: amulettejewelry.com
Stroke formula
Nominal stroke = extended mounting length minus compressed mounting length.
Hypothetical calculation
22 inches minus 14 inches equals 8 inches of nominal shock stroke.
What the result means
The shock can change its mounting length by 8 inches within the specified limits. Actual wheel travel depends on the suspension’s motion ratio and geometry.
A Simple Measurement Comparison
Consider a hypothetical vehicle whose suspension manufacturer specifies that the mounting distance at the intended compression limit is 15 inches and at the intended extension limit is 21 inches. A shock with a compressed length of 14 inches and an extended length of 22 inches has a nominal range that includes both distances.
This comparison is only a preliminary dimensional check. It does not prove that the shock is appropriate for the vehicle. The correct shock must also provide the right damping, mounts, clearances, load suitability, and mechanical compatibility. The vehicle’s specified travel limits and the manufacturer’s measurement method must be used.
Compression allowance
The example leaves 1 inch between the shock’s minimum length and the stated 15-inch compression-limit distance. This arithmetic does not establish the required safety margin or prove correct fitment.
Extension allowance
The example leaves 1 inch between the stated 21-inch extension-limit distance and the shock’s maximum length. The required allowance depends on the actual suspension and manufacturer guidance.
Why the Numbers Must Be Verified
A shock that is too short may limit extension, while one that is too long when compressed may bottom out before the suspension reaches its intended compression limit. Either condition can place unwanted loads on suspension parts or damage the shock.
The acceptable dimensions are application-specific. Do not treat the example’s one-inch differences as a universal clearance rule. Follow the suspension manufacturer’s requirements or have a qualified technician verify the complete setup.
Use matched reference points
Never compare eye-to-eye length from one specification with an overall length measured using a different method.
Other Factors That Affect Shock Absorber Fit
Correct length is only one part of shock selection. A shock may have suitable compressed and extended dimensions but still be wrong for the vehicle because of its mounting hardware, damping characteristics, load requirements, or physical clearance.
The spring and shock also serve different functions. The spring supports the vehicle’s weight and influences ride height, while the shock controls suspension movement. On some vehicles, these components are integrated into a strut or coilover assembly. Replacing one part may require additional checks to preserve the intended setup.
The shock’s compression and rebound characteristics must suit the vehicle, spring rate, weight, and intended use.
Load and use
A vehicle used for towing, heavy cargo, rough roads, or sustained off-road driving may need a different approved application.
Clearance
Check the shock body, shaft, reservoir, and mounting hardware against nearby components through the full suspension range.
Electronic systems
Vehicles with electronically controlled damping may require compatible shocks, electrical connections, or approved conversion components.
Does Shock Diameter Matter?
Yes, but diameter must be considered in context. Body diameter affects the physical space the shock occupies and may relate to oil capacity, heat management, and design. Shaft diameter, mounting sleeves, and other dimensions also vary by model.
A larger shock is not automatically better for every vehicle. Its damping design, internal construction, mounting compatibility, and intended application matter more than a single outside measurement. Verify the complete specification rather than choosing by diameter alone.
Measure available space
Check clearance to the frame, tires, springs, control arms, brake lines, and other nearby parts throughout suspension travel.
Do Front and Rear Shocks Need to Be the Same Size?
No. Front and rear suspension systems often have different designs, mounting positions, loads, and travel ranges. Their shock lengths and mounting types can differ even on the same vehicle.
Always select the correct front or rear application. Do not use the front measurement as a substitute for the rear measurement or assume that two shocks with similar dimensions are interchangeable.
Check axle position
Confirm that the part is intended for the exact front or rear position and the vehicle’s suspension configuration.
Common Shock Size Selection Mistakes
The most common sizing mistake is treating a shock’s overall length as the only specification that matters. Two shocks can have similar lengths but different mounting styles, stroke, damping, or clearance requirements. Another frequent error is ordering a replacement based on an old shock without confirming that the existing part is correct.
A careful fitment check can prevent unnecessary returns and reduce the risk of suspension damage. If any critical measurement is uncertain, resolve it before installation rather than relying on a visual comparison.
Source: www.youtube.com, BEMSLIVE
Measuring only at ride height
One resting measurement does not show whether the shock will bottom out or top out through the full suspension range.
Adding lift height to shock length
Lift height does not translate directly into the required increase in shock length. Suspension geometry determines the change.
Ignoring mount differences
A similar-looking eyelet, stem, or sleeve may have different dimensions and may not fit safely.
Assuming all shocks are universal
Shock absorbers are application-specific unless the manufacturer clearly lists a compatible range of vehicles or setups.
Choosing by price or appearance
A cheaper or larger shock is not necessarily compatible with the vehicle’s spring, weight, or damping needs.
Overlooking electronic damping
Replacing electronically controlled shocks with incompatible conventional units can affect system operation and may trigger warning messages.
What If the Replacement Does Not Match the Old Shock?
Stop before installation if the new shock differs in mounting style, length, or other key dimensions and the difference is not explained by the manufacturer’s specifications. Check the part number, vehicle configuration, and any catalog notes about superseded parts or suspension packages.
If the shock is confirmed as correct but the mounting distance appears wrong, review the measurement reference points and suspension position. Do not modify mounting brackets, drill new holes, force the bushings into place, or alter bump stops simply to make the part fit without approved instructions.
Resolve the mismatch
Ask the parts supplier or shock manufacturer to confirm the application and dimensions before proceeding.
How to Confirm the New Shock Fits After Installation
After installation, confirm that the shock is seated correctly, the mounting hardware is appropriate, and all fasteners are tightened to the vehicle or component manufacturer’s specifications. Check that bushings and sleeves are positioned correctly and that no brake hose, wiring, tire, spring, or suspension component contacts the shock.
A static inspection is useful but cannot prove that the shock has enough travel. The suspension must remain within the shock’s permitted operating range during compression and extension. A qualified technician should verify a custom or modified setup using the correct procedure and safe equipment.
Do not test an uncertain setup by driving over a large bump or deliberately forcing the suspension to its limits. If the shock reaches a hard stop, the suspension binds, or the mounting hardware does not seat correctly, stop and correct the issue before road use.
Source: wibe.e-lectricavenue.co.uk
Check mounting security
Confirm that the fasteners, sleeves, bushings, and mounting surfaces match the installation instructions.
Check for interference
Look for contact with tires, springs, control arms, brake lines, wiring, and the frame where applicable.
Check suspension movement
Use the manufacturer’s procedure to confirm the shock does not limit intended suspension travel or bottom out prematurely.
Recheck after installation
Follow the manufacturer’s instructions for any required inspection or retightening. Do not apply a universal retorque interval when none is specified.
When to Get Professional Help
Have a qualified suspension technician inspect the vehicle if you cannot establish the correct travel limits, the mounting dimensions do not match, or the vehicle has a custom lift or suspension conversion. Professional help is also advisable when the work involves struts, coil springs under tension, complex multilink suspension, or electronically controlled damping.
Suspension components can store substantial energy. Incorrectly removing a spring, moving a loaded control arm, or lifting an axle without following the service procedure can cause serious injury or damage. Use the correct service manual and equipment rather than improvising a method.
Stop if the setup is uncertain
Do not drive a vehicle when the shock, mounts, or suspension travel may be incompatible or unsafe.
A Practical Checklist Before Buying Shock Absorbers
Before placing an order, compare the replacement against the vehicle’s verified fitment information and, when needed, the measured suspension dimensions. A short checklist helps ensure that the purchase covers both physical fit and intended function.
For a stock vehicle, an exact application match may settle most of the sizing questions. For a custom setup, do not order until the compressed and extended mounting dimensions, travel limits, mounting hardware, and intended use have been verified.
Source: www.aliexpress.com
Vehicle match
The part is listed for the correct year, make, model, trim, drivetrain, axle, and suspension package.
Correct position
The part is intended for the required front or rear position and side, where applicable.
Correct length
Compressed and extended dimensions suit the intended suspension travel and use matching reference points.
Correct mounts
The mounting types, widths, sleeves, bolt sizes, and hardware are compatible.
Correct application
The shock’s damping, load suitability, and construction match the vehicle and intended driving conditions.
Confirmed clearance
The shock and its hardware have adequate clearance throughout the intended suspension movement.
Installation information
The service instructions, torque specifications, and any electronic compatibility requirements are available.
The Fastest Reliable Way to Get the Answer
For most owners, the fastest reliable route is to identify the exact vehicle, obtain the correct original equipment or approved replacement part number, and confirm the application with the supplier. This avoids measuring every dimension when a verified direct-fit specification already exists.
If your vehicle has been modified or the correct part cannot be established, collect the existing shock’s part number, mounting style, extended length, compressed length, and the suspension kit details. Give those details to the shock manufacturer or a suspension specialist and ask them to confirm fitment before ordering.
Next action
Start with the vehicle identification and original part number. Measure and verify suspension travel when standard fitment data does not cover your setup.
Frequently Asked Questions
Q
How do I know what size shock absorber my car needs?
Check the original equipment part number or a reliable parts catalog using your car’s exact year, make, model, trim, drivetrain, and suspension package. Confirm whether the shock is for the front or rear. If the suspension has been modified, verify the mounting dimensions and travel range as well.
Q
Can I use a longer shock absorber than the original?
Only if the longer shock is approved for the vehicle’s suspension setup and its compressed length, extended length, mounting hardware, damping, and clearance are suitable. A longer shock may reach full extension before the suspension reaches its intended limit or may interfere with nearby parts. Do not use extra length as a substitute for a verified suspension design.
Q
How do I measure shock absorber length?
Measure between the manufacturer’s specified mounting reference points. On an eye-to-eye shock, this is generally from the center of one mounting eye to the center of the other. Record both the extended and compressed lengths, and use the same reference points for each measurement. Follow the manufacturer’s instructions for compression and do not use unsafe tools to force a shock shorter.
Q
Does a lifted truck need longer shocks?
Often, a lifted truck needs shocks selected for its revised suspension geometry, but the lift height alone does not determine the correct length. Check the lift kit manufacturer’s recommendations and verify the shock’s compression and extension limits, mounting points, and clearance. Some suspension designs also require brackets or changes to bump stops.
Q
Are shock absorbers universal?
No. Some shocks fit multiple vehicle applications, but compatibility must be listed or confirmed by the manufacturer. Similar overall dimensions do not guarantee matching mounts, stroke, damping, load capacity, or clearance. Use the correct application data before buying.
Q
Should I replace shock absorbers in pairs?
Replacing shocks in axle pairs is commonly recommended because the two sides should provide consistent damping. If one shock has failed, the other on that axle may have similar wear. Follow the vehicle or shock manufacturer’s guidance, and inspect the mounts, springs, tires, and other suspension components for related problems.
Q
What happens if a shock absorber is too short?
A shock that is too short may reach full extension before the suspension reaches its intended travel limit. This can place unwanted loads on the shock and its mounts, limit wheel movement, and potentially damage components. Select a shock that matches the intended extension range and any specified travel allowance.
Q
What happens if a shock absorber is too long?
A shock that is too long when compressed may bottom out before the suspension reaches its intended compression limit. This can transfer excessive loads to the shock and suspension mounts. A longer extended length is not automatically a problem, but the complete compressed and extended range must suit the vehicle.
✦ Wrapping Up
Conclusion
The right shock absorber size is determined by vehicle fitment, mounting dimensions, compressed length, extended length, and the suspension’s intended travel. For a stock car, truck, or SUV, a verified direct-fit replacement is usually the best starting point. For a lifted, lowered, or custom vehicle, physical measurements and suspension specifications become more important.
Do not choose a shock based only on its advertised length, the amount of lift, or the appearance of the old part. Confirm the mounting style, stroke, damping, clearance, and intended application before buying. If you cannot verify the travel limits or the measurements disagree, ask a qualified suspension technician or the shock manufacturer to confirm the correct part.
💡 Key Takeaway
Record your vehicle’s exact details and original shock part number first. If the vehicle has modified suspension, measure the mounting distances at the intended compression and extension limits, confirm all mounting dimensions, and verify the replacement with the manufacturer before installation.
Eric
Hi, I’m Eric Bennett, the person behind OffRoadTruckAccessories.com.
I created this blog to share my interest in trucks, off-road driving, automotive accessories, and DIY modifications. I enjoy learning how different truck accessories work, testing their usefulness, and understanding whether they are truly worth buying.
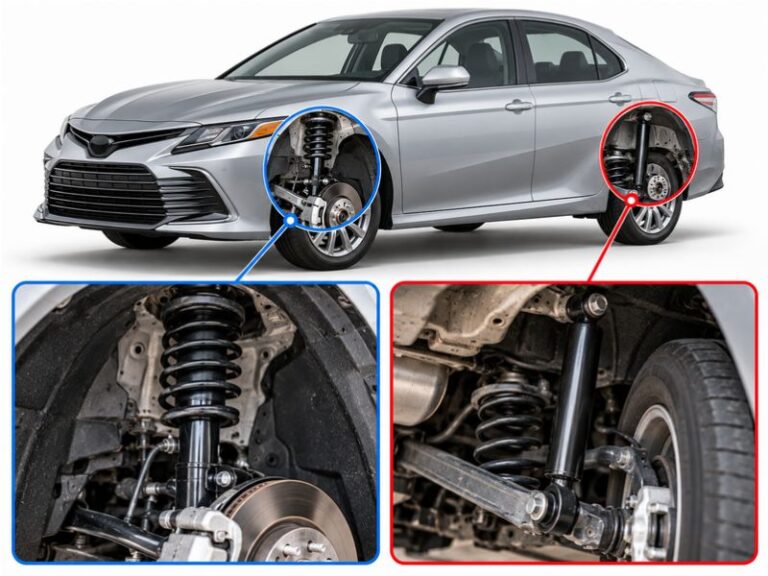
Shock absorbers are located near the wheels as part of the suspension system, usually between the vehicle’s body, frame, or subframe and a suspension component such as a control arm, axle, or wheel assembly. However, the exact answer to where are shock absorbers located on a car depends on the suspension design. Some vehicles have…
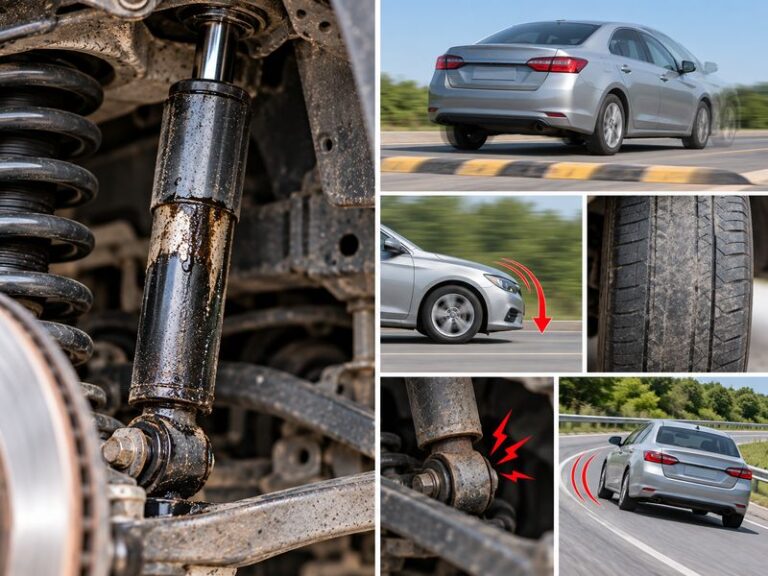
You should change shock absorbers when they are worn, leaking, damaged, or no longer controlling suspension movement properly. There is no single replacement interval that applies to every vehicle because shock absorber life depends on road conditions, vehicle weight, driving habits, suspension design, and component quality. If you are wondering when to change shock absorbers,…
A shock absorber is a suspension component that controls how quickly a vehicle’s suspension moves up and down after bumps, dips, braking, acceleration, and other road inputs. It works with the springs to prevent excessive bouncing and helps keep the tires in controlled contact with the road. So, what does a shock absorber do? It…