To open a shock absorber, first identify its design and confirm that the manufacturer permits disassembly. Remove a serviceable unit from the vehicle, secure it as directed, and use the specified tools to release its retaining parts. Never cut, drill, heat, or force a sealed or pressurized shock absorber. Coil springs can also store enough energy to cause severe injury.
Across the United States, cars, pickup trucks, SUVs, and vans rely on shock absorbers to control suspension movement on highways, city streets, and rough roads. When a shock begins to leak, loses damping, or makes unusual noises, an owner may want to open it to inspect its internal parts. However, not every shock absorber is designed to be opened or repaired outside a specialist workshop.
The right method depends on the shock’s construction. Some serviceable performance and off-road dampers have threaded caps, replaceable seals, or rebuild kits. Many original-equipment shocks used on everyday vehicles are sealed units intended for replacement rather than internal repair.
This guide explains how to identify the type of shock absorber you have, prepare for permitted disassembly, recognize the parts inside, and decide when professional service is the safer option. It also explains why gas pressure, hydraulic oil, and nearby coil springs require special care. The aim is to help you understand the job without treating a potentially dangerous assembly as an ordinary household repair.
Opening a shock absorber means gaining access to its internal damping parts for inspection, cleaning, or approved rebuilding. These parts commonly include a piston, piston rod, valves or shims, hydraulic oil, seals, and a cylinder. Some designs also contain a gas chamber that helps control oil aeration and maintain damping performance.
The process is not the same as removing a shock absorber from a car. Removal involves releasing the vehicle’s mounting fasteners and taking the complete unit off the suspension. Opening the unit involves working on its sealed or serviceable body, which can expose pressurized gas, oil, and components that require precise reassembly.
Before starting, establish which task you actually need to perform. If the shock is worn out and the manufacturer specifies replacement, opening it is usually unnecessary. If you own a rebuildable motorsport or off-road damper, use the model-specific service manual and required equipment.
Source: slickmotorz.com
External inspection
Check for oil leaks, corrosion, dents, damaged mounting eyes, worn bushings, and a bent or scratched piston rod without opening the unit.
Vehicle removal
Disconnect the shock from its mounting points using the vehicle’s repair procedure while supporting the suspension safely.
Internal disassembly
Access the damping mechanism only when the manufacturer provides a safe service procedure for that exact model.
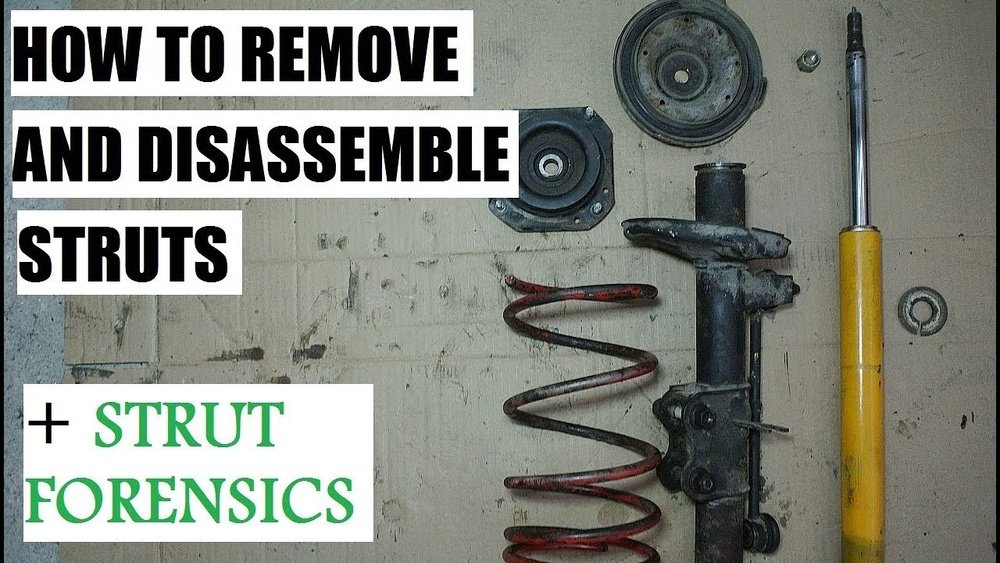
Shock Absorbers and Struts Are Not Always the Same
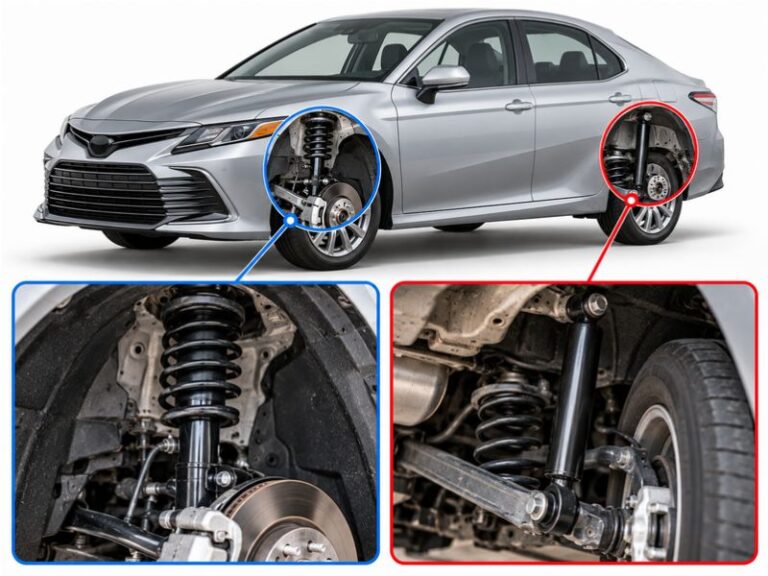
A conventional shock absorber usually controls suspension movement without serving as the main structural support for the wheel assembly. A strut can also form a structural part of the suspension and may carry a coil spring. Some struts have replaceable cartridges, while others use different designs.
This distinction matters because a spring-loaded strut may contain stored mechanical energy even after it has been removed from the vehicle. Do not loosen a spring seat, center shaft nut, or retaining component until you have identified the assembly and followed the correct spring-removal procedure.
Separate shock absorber
May be removable without dismantling a spring assembly, although internal opening can still be hazardous.
MacPherson strut
Often carries a coil spring and requires the correct spring-handling procedure before certain components can be separated.
Can You Open Every Type of Shock Absorber?
No. Shock absorbers vary in construction, and many sealed units are not intended for owner disassembly. Their housings may be crimped, welded, or closed with retaining features that require specialized tools. Forcing these parts apart can damage the housing and release oil or gas unexpectedly.
Rebuildable dampers are different. Certain performance, racing, and off-road models are designed for scheduled servicing. They may use threaded end caps, replaceable seals, service ports, or manufacturer-approved rebuild kits. Even these units can require a proper fixture, controlled pressure-release procedure, clean work conditions, and calibrated filling equipment.
Do not assume that a shock is rebuildable because its end looks threaded or because a video shows someone cutting open a similar-looking unit. Different model versions can use different internal designs and pressure specifications. Confirm serviceability through the manufacturer’s documentation for the exact part number.
Source: smart.dhgate.com
Sealed twin-tube shock
Many conventional twin-tube units are crimped or otherwise sealed. They are commonly replaced as complete assemblies unless the manufacturer specifies a repair method.
Monotube shock
Some monotube dampers are rebuildable, but their gas charge and internal construction make model-specific service instructions essential.
Adjustable performance damper
External damping adjustments do not necessarily indicate that the unit can be opened. Verify the available service procedure before disassembly.
Motorcycle shock
Many motorcycle rear shocks contain pressurized gas and require specialist tools to service. Their small size does not make them safe to open casually.
How to Identify a Serviceable Shock
Start with the part number, brand, model, and any markings on the body or label. Search the manufacturer’s official service documentation for the exact unit. Look for a rebuild manual, approved seal kit, replacement cartridge, or instructions that explicitly authorize internal disassembly.
If the documentation gives only installation instructions and does not explain internal service, do not infer that the unit is designed to open. Contact the manufacturer or a qualified damper specialist if the status remains unclear.
Positive evidence
A model-specific service manual explicitly describes internal disassembly and lists the required equipment.
Insufficient evidence
A removable-looking cap, an online demonstration, or the absence of visible welds does not prove that a unit is safe to open.
Tools and Safety Equipment to Prepare
Prepare tools only after confirming that the shock is designed for service. The equipment required depends on the model and the work being done. Ordinary hand tools may be enough to remove a complete shock from its mounts, but they are not a substitute for specialist damper-service equipment.
Work on a stable surface in a clean, well-lit area. Keep children, pets, and bystanders away. Wear suitable eye protection and gloves when handling dirty or oily components, and have a plan for collecting used hydraulic oil and disposing of it according to local requirements.
A vehicle must be supported on appropriately rated jack stands at the manufacturer-approved support points before anyone works beneath it. A hydraulic floor jack alone is not a safe support. Chock the wheels that remain on the ground and follow the vehicle-specific lifting instructions.
Source: thediyworkshop.co.uk
Vehicle support equipment
Use a correctly rated floor jack, suitable jack stands, and wheel chocks for vehicle removal work.
Basic hand tools
Use the correct sockets, wrenches, and specified holding tools for mounting fasteners. Avoid improvised methods that can damage the shaft or fastener.
Model-specific service tools
A rebuildable damper may require a dedicated holding fixture, seal tools, measuring tools, filling equipment, and approved pressure-service equipment.
Protective equipment
Wear eye protection, suitable gloves, and clothing that protects skin from oil and sharp edges.
Tools You Should Not Use to Force a Shock Open
Do not use a cutting wheel, torch, drill, hammer, or improvised clamp to defeat a sealed housing. Such methods can damage the pressure vessel and cause sudden fluid release, flying debris, fire, or injury. A pipe wrench can also score a polished shaft or deform a thin housing.
If the manufacturer’s procedure requires a special cap tool or fixture that you do not have, stop and obtain the correct equipment or send the unit to a specialist. Tool availability is part of the safety decision, not a minor convenience.
Avoid heat
Heating the housing can damage seals, change material properties, and create pressure or fire hazards.
Avoid puncturing
Never drill or pierce a shock body to drain oil or release gas.
How to Open a Serviceable Shock Absorber
The following workflow applies only when the manufacturer explicitly permits internal service and provides a suitable procedure. It is a preparation and inspection guide, not a universal method for releasing a pressurized damper. Follow the model-specific manual whenever it differs from this general overview.
If your shock is sealed, gas-pressurized without a documented owner-service procedure, damaged, or of unknown construction, stop before attempting to remove its closure. Arrange professional service or replace the unit as directed by the manufacturer.
Source: club.autodoc.co.uk
Step 1: Identify the exact unit
Record the manufacturer, model, part number, and any revision or serial markings. Obtain the correct service manual and confirm that the unit can be rebuilt.
Step 2: Inspect the outside
Check for corrosion, dents, leaks, bent parts, damaged threads, and signs of previous repairs. A damaged pressure-containing body must not be opened using an improvised method.
Step 3: Remove the complete unit if needed
Use the vehicle’s approved lifting and support procedure. Support the suspension as specified, remove the mounting fasteners in the correct order, and keep track of hardware and spacers.
Step 4: Clean the exterior
Remove dirt from the outside without allowing cleaning fluid or grit to enter any service opening. Dirt inside a damper can damage precision surfaces and seals.
Step 5: Confirm pressure-release requirements
Check the manual for the approved method and equipment needed to manage gas pressure and oil. Do not loosen a cap or retaining ring merely to see whether pressure remains.
Step 6: Secure the damper as specified
Use the manufacturer’s fixture and holding points. Do not clamp the polished piston rod or crush a thin-wall housing. Keep your face and hands away from possible release paths.
Step 7: Open the designated service closure
Only after completing the prescribed isolation and pressure-management steps, use the specified tool to remove the approved service cap, retainer, or cartridge component. Do not substitute a cutting or drilling method.
Step 8: Inspect and document the internal parts
Follow the manual to identify seals, shims, pistons, guides, and other parts. Photograph their order and orientation where permitted, and keep components arranged in a clean tray.
Step 9: Decide whether rebuilding is appropriate
Compare the observed condition with the manufacturer’s limits and service criteria. Replace only the specified parts with compatible components, or send the unit to a specialist if damage or uncertainty remains.
How to Know When to Stop
Stop if the closure does not release using the specified tool and procedure, if the manual’s pressure-management step is unclear, or if oil or gas begins escaping unexpectedly. Do not apply more force in an attempt to overcome resistance.
Stop as well if you find a bent piston rod, a cracked or deeply corroded housing, damaged retaining threads, or signs of unauthorized modification. These conditions can affect structural integrity and safe operation. A replacement or specialist assessment is often the appropriate next step.
Unexpected pressure
Move away from the release path and follow the manufacturer’s emergency procedure. Do not continue handling the unit while it is releasing fluid or gas.
Unclear construction
Confirm the model and service procedure before proceeding. Never assume two visually similar dampers use the same internal design.
Visible structural damage
Do not attempt to restore a damaged pressure-containing body with welding, heating, or improvised repairs.
What Is Inside a Shock Absorber?
A shock absorber converts suspension movement into heat by forcing hydraulic oil through carefully designed passages and valves. Its internal parts work together to control how quickly the suspension compresses and extends. The exact arrangement depends on whether the unit is a twin-tube, monotube, or another specialized design.
Knowing the main parts helps you understand what a technician may inspect during an approved rebuild. It does not mean that each part is user-serviceable or that visual inspection alone can confirm correct damping performance.
Source: club.autodoc.co.uk
Piston rod
Transfers movement between the suspension and the internal piston. Scratches, corrosion, or bending can damage seals and affect operation.
Piston and valves
Control oil flow during compression and rebound. Their configuration influences damping behavior.
Hydraulic oil
Carries energy away as heat and enables the damping mechanism to work. Incorrect fluid or contamination can affect performance.
Seals and guides
Help retain fluid, guide moving parts, and limit contamination. Their dimensions and materials must match the design.
Gas chamber or pressurized gas
Present in many designs to help manage oil aeration and maintain consistent damping. Gas pressure creates additional service hazards.
Twin-Tube Versus Monotube Construction
A twin-tube shock commonly has an inner working cylinder and an outer reservoir. Oil can move between these areas through passages and valves. Some twin-tube designs use gas pressure, while the exact arrangement varies by model.
A monotube shock uses a single main cylinder and often separates hydraulic oil from pressurized gas with a floating piston. The gas charge and compact construction mean that opening the body may require specialized equipment and controlled procedures.
Neither design should be opened based only on its external shape. Consult the model’s service information to identify the correct method and determine whether the unit is rebuildable.
Main practical difference
The internal layout changes the service procedure, oil handling, pressure management, and tools needed.
Important limitation
The terms twin-tube and monotube alone do not establish that a specific shock is safe for home disassembly.
Should You Repair or Replace the Shock Absorber?
Repair is appropriate only when the unit is designed for service, replacement parts are available, and the manufacturer’s procedure permits the work. For many standard passenger vehicles, replacing a failed sealed shock with the correct compatible unit is the intended repair.
A rebuild may be useful for a serviceable performance damper with available seals, valves, and technical support. However, internal repairs can require exact oil specifications, measured fluid quantities, correct gas pressure, and specialized tools. A damper that looks clean after reassembly may still deliver incorrect damping if those requirements are not met.
Do not judge the unit only by its price or by whether it can be physically opened. Consider the manufacturer’s service policy, parts availability, labor, condition of the body and shaft, and the need for correct performance after installation.
Source: storage.googleapis.com
Replacement is often appropriate
The shock is sealed, the manufacturer does not support rebuilding, or the housing and shaft are damaged.
Professional rebuilding may be appropriate
The model is designed to be rebuilt and a qualified service provider has the correct tools, parts, and specifications.
Further inspection is needed
The cause of a leak or poor damping is uncertain, or damage to nearby suspension components may have contributed to the failure.
Signs That a Shock May Need Attention
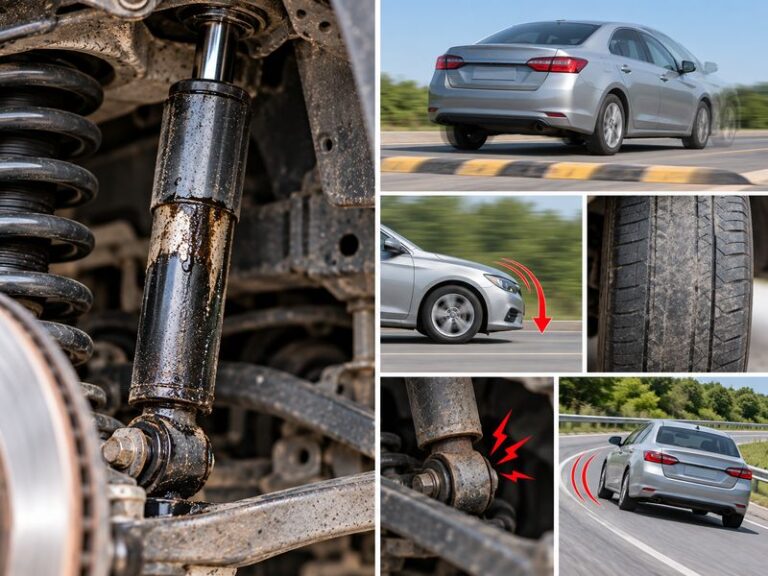
Oil wetness or fresh leakage on the shock body can indicate a seal problem, although dirt and road residue can make the source difficult to identify. Excessive bouncing, poor body control, unusual tire wear, and knocking noises can also point to suspension trouble, but none of these symptoms proves that the shock alone is responsible.
Inspect the tires, mounts, bushings, springs, and other suspension parts as part of the diagnosis. If the vehicle handles poorly, bottoms out repeatedly, or shows a damaged suspension component, avoid normal driving until the problem has been assessed.
Visible fluid leakage
Clean and inspect the exterior as permitted by the vehicle’s maintenance procedure, then determine whether the fluid is coming from the damper.
Poor ride control
Have the suspension checked for worn dampers, loose mounts, damaged springs, and other possible causes.
Uneven tire wear
Check tire pressure, alignment, suspension wear, and damping condition instead of assuming one failed part explains every symptom.
Common Mistakes When Opening a Shock Absorber
The most serious mistakes involve treating a pressurized damper like an empty metal tube. A shock may contain compressed gas even when it has been removed from the vehicle, and internal pressure may not be obvious from its appearance. Forceful opening can cause sudden movement, fluid spray, or flying components.
Other mistakes can ruin a serviceable unit even without an immediate injury. Dirt in the oil, scratched piston rods, mixed-up shims, incorrect seals, and unsuitable fluid can all affect operation. Follow the exact service manual and stop whenever the required procedure is unavailable or unclear.
Source: ebay.com
Cutting open a sealed housing
This can release pressure unpredictably and damage the body. Use replacement or specialist service instead of destructive opening.
Loosening a center shaft nut on a spring-loaded strut
The spring may be under high tension. Use the specified spring-handling method and never release the assembly by guesswork.
Clamping the polished rod
Marks on the rod can damage seals and create leaks. Use only approved holding points and fixtures.
Using unverified hydraulic oil
Different dampers require different fluid properties and quantities. Use only the specification stated in the service documentation.
Reassembling parts in the wrong order
Incorrect piston, shim, spacer, or seal placement can alter damping or cause failure. Document the arrangement and follow the specified assembly sequence.
Skipping post-service checks
A rebuilt unit must meet the manufacturer’s assembly and testing requirements before returning to service.
Why a DIY Video May Not Be Enough
A video can help identify a component or illustrate a particular service tool, but it may not show every safety step or the internal differences between model revisions. Some videos demonstrate destructive inspection of scrap units rather than a method intended for reuse.
Use videos as supporting material, not as a replacement for the correct manufacturer’s service manual. If a video shows drilling, cutting, heating, or uncontrolled release of pressure, do not copy those actions on an intact shock.
Verify the model
Confirm that the demonstration covers the same shock family and service version.
Check the full procedure
Look for documented pressure handling, approved tools, compatible parts, assembly specifications, and required testing.
How to Confirm the Shock Is Ready for Use After Service
Opening and closing a damper does not prove that it works correctly. A serviceable shock must be rebuilt to the manufacturer’s specifications and pass any required inspection or performance test. Some models require specialized equipment to set the gas charge, fill the oil, remove trapped air, or verify damping behavior.
Before reinstalling a serviced unit, confirm that all approved replacement parts are correct, the shaft and housing are within the specified limits, and the retaining components have been installed according to the manual. Do not guess at torque values, oil quantities, gas pressures, or seal dimensions.
After installation, follow the vehicle manufacturer’s mounting and fastener procedures. Reconnect any linked suspension parts, brake-line brackets, sensor wires, or other components that were moved during removal. A qualified technician should check the assembly if any mounting or safety-critical step is uncertain.
Source: www.youtube.com
Inspect for leaks
Check the serviced unit for fluid leakage according to the manufacturer’s procedure.
Verify all mounts
Confirm that fasteners, bushings, spacers, and brackets are correctly fitted and tightened to the specified values.
Check related components
Inspect springs, mounts, tires, and suspension joints for damage or wear that may affect handling.
Obtain required testing
Use the prescribed damper test or professional inspection when the model requires verification of internal performance.
When Professional Help Is the Best Next Step
Choose a qualified suspension or damper specialist if the shock contains pressurized gas and the correct release equipment is unavailable, if the service instructions are unclear, or if the body or piston rod is damaged. Professional service is also appropriate when a rebuild requires special filling, charging, or testing equipment.
If you only need to restore normal vehicle operation and the shock is a non-serviceable design, replacement with the correct part is often the more direct option. Confirm fitment and any installation requirements for the exact vehicle before buying or fitting a replacement.
Specialized pressure equipment is required
Do not improvise a pressure-release or charging setup.
The suspension includes a loaded spring
Use an approved procedure and suitable equipment or have the complete assembly serviced professionally.
Safe reassembly cannot be verified
Keep the vehicle out of service until the assembly has been checked and meets the manufacturer’s requirements.
Frequently Asked Questions
Q
Can I open a shock absorber at home?
Only consider it when the exact model is designed for service and you have the manufacturer’s instructions, required tools, and a safe way to manage pressure. Many standard automotive shocks are sealed and are better replaced than opened at home. Never cut, drill, heat, or force a pressurized unit.
Q
How do I open a sealed shock absorber?
A sealed shock absorber generally should not be opened as a home repair. Its housing and internal pressure system may not support safe disassembly or reliable reassembly. Check the manufacturer documentation to determine whether the unit is serviceable; if it is not, replace it or consult a qualified damper specialist.
Q
Can a shock absorber still contain gas after removal?
Yes. Many gas-pressurized shocks retain gas pressure after they have been removed from a vehicle. Removal from the suspension does not make the internal assembly safe to open. Follow the model-specific pressure-management procedure and use the specified equipment.
Q
Can I reuse the oil inside a shock absorber?
Do not assume that the old oil can be reused. It may contain wear particles, degraded fluid, or trapped air, and its condition may not be clear from appearance alone. A rebuildable damper should be serviced with the exact fluid type and filling procedure specified by its manufacturer. Dispose of used oil through an appropriate collection or recycling facility.
Q
Is it safe to remove the top nut from a shock or strut?
It depends on the assembly. A top mounting nut on a separate shock may serve a different function from the center shaft nut on a spring-loaded strut. On a strut, loosening the center nut while the coil spring remains loaded can cause severe injury. Identify the assembly and follow the correct vehicle-specific procedure before loosening any fastener.
Q
What should I do if the shock absorber will not open?
Stop rather than applying more force. The unit may be sealed, may require a dedicated tool, or may still contain pressure. Verify the exact model and its service instructions. If the manufacturer does not provide an approved opening procedure, use replacement or specialist service instead.
Q
Is rebuilding a shock absorber cheaper than replacing it?
It depends on the shock design, parts availability, labor, required equipment, and the condition of the housing and shaft. A rebuildable performance damper may be economical to service, while a standard sealed unit may be more practical to replace. Compare the complete repair cost and required testing rather than the cost of seals or oil alone.
✦ Wrapping Up
Conclusion
Learning how to open a shock absorber starts with identifying the exact unit and checking whether the manufacturer allows internal service. Rebuildable dampers may be opened with approved tools and a model-specific procedure, while many standard automotive shocks are sealed and intended for replacement. Gas pressure, hydraulic oil, and nearby coil springs make improvised disassembly unsafe.
If your goal is to fix a leaking or poorly performing shock, first inspect the external condition and confirm the source of the problem. Use the correct service documentation, keep contamination out of the unit, and make sure any rebuilt damper meets the required assembly and testing standards. When those requirements cannot be met safely, professional service or correct replacement is the sensible choice.
💡 Key Takeaway
Before attempting any disassembly, record the shock absorber’s brand and part number and obtain its official service instructions. If no approved opening procedure exists, do not cut or force it open; choose qualified service or replacement.
Eric
Hi, I’m Eric Bennett, the person behind OffRoadTruckAccessories.com.
I created this blog to share my interest in trucks, off-road driving, automotive accessories, and DIY modifications. I enjoy learning how different truck accessories work, testing their usefulness, and understanding whether they are truly worth buying.
Shock absorbers are located near the wheels as part of the suspension system, usually between the vehicle’s body, frame, or subframe and a suspension component such as a control arm, axle, or wheel assembly. However, the exact answer to where are shock absorbers located on a car depends on the suspension design. Some vehicles have…
You should change shock absorbers when they are worn, leaking, damaged, or no longer controlling suspension movement properly. There is no single replacement interval that applies to every vehicle because shock absorber life depends on road conditions, vehicle weight, driving habits, suspension design, and component quality. If you are wondering when to change shock absorbers,…