
How to Raise Coilovers Safely Without Losing Your Wheel Alignment
Lowered suspension can look sharp and handle well, but a steep driveway, rough road, or unexpected tire rubbing can make the extra drop impractical. Raising a coilover-equipped car is often straightforward, yet the adjustment is easy to misunderstand: some collars change spring preload, while others change the suspension’s installed length. Moving the wrong collar can alter ride quality, available travel, or the spring’s secure fit.
The safe goal is not simply to turn a collar until the fender sits higher. You want a measured ride-height change that keeps the spring properly seated, leaves adequate suspension travel, clears the tires and bodywork, and does not create a new alignment or handling problem. The exact adjustment method depends on the coilover design and the manufacturer’s instructions.
This guide explains how to raise coilovers on a typical height-adjustable suspension, from identifying the correct adjustment point to measuring the result and arranging an alignment when needed. It also covers what to do when the collar is seized, the spring becomes loose, the car sits unevenly, or the available adjustment range is not enough.
At a glance
- Use the lower mount for independent height adjustment when the coilover manufacturer provides it; do not casually use spring preload to set ride height.
- Measure from the wheel center to the fender rather than relying only on the gap above the tire.
- After a meaningful height change, inspect clearance and have the wheel alignment checked before normal driving.
How to raise coilovers without changing the suspension incorrectly
Most adjustable coilovers use threaded components that let you change the car’s ride height. The important distinction is between the spring perch, which supports the spring, and the lower mount or threaded shock body, which may let you change the coilover’s installed length. Before turning anything, identify which design your kit uses and compare it with the manufacturer’s instructions.
Tools you will need
- Floor jack and properly rated jack stands for safely lifting and supporting the vehicle
- Wheel chocks to prevent movement while a corner is raised
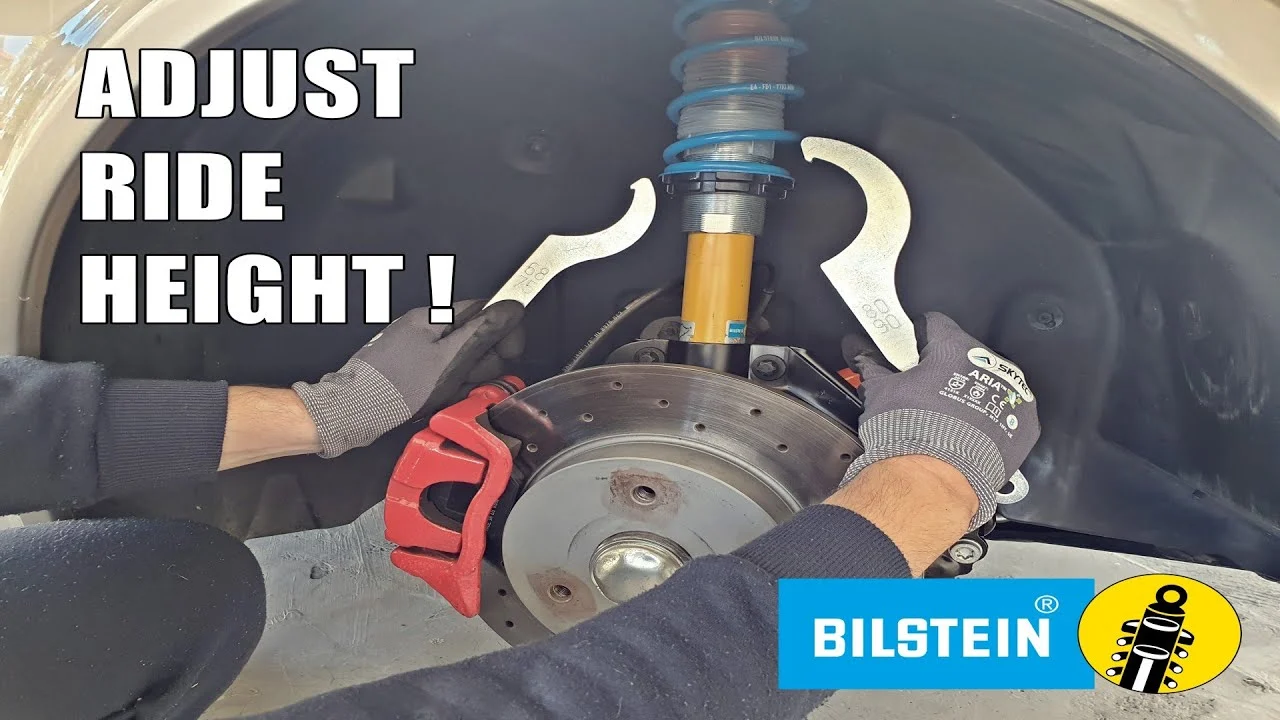
- Coilover spanner wrenches sized for the adjustment collars
- Tape measure or ruler for recording ride height
- Paint marker or grease pencil for marking the starting collar position
- Torque wrench and the vehicle’s service information for reinstalling fasteners correctly
- Optional: wire brush and penetrating fluid for dirty or lightly stuck threads

Step 1 Confirm the coilover design and the amount of lift needed
Park on a level, hard surface, engage the parking brake, and place the transmission in Park or in gear. Chock the wheels that will remain on the ground. Read the coilover instructions if available, then inspect the assembly through the wheel opening or after removing the wheel.
Look for the collar that supports the spring and the threaded section below it. On a height-adjustable coilover, the lower mount may thread onto the shock body and lock with a separate collar. That design allows the body length to change while spring preload stays close to its original setting.
Other kits use a simpler arrangement in which the spring perch is the primary height adjustment.
Measure the current height at each corner you plan to adjust. A repeatable method is to measure from the center of the wheel hub or wheel center vertically to the lower edge of the fender. Record the number, the number of exposed threads or collar position, and which corner the measurement belongs to.
Decide on a modest initial increase rather than trying to reach the final height in one large adjustment. Raising one axle or one corner can affect cross-weight, toe, camber, and the way the vehicle settles, so the finished height should be checked on all four corners.
Important
Stop before adjusting if you cannot identify the correct collar, if the spring is already loose at full droop, or if the coilover body, threads, mounts, or lock collars appear bent or damaged. A suspension shop should inspect an uncertain or damaged assembly.
Step 2 Lift the vehicle and expose the adjustment collars
Loosen the wheel lug nuts slightly while the tires are on the ground, if wheel removal is necessary for access. Use the vehicle’s approved lifting points, raise the car, and place jack stands under suitable structural support points. Lower the vehicle onto the stands and gently confirm that it is stable before working near the suspension.
Remove the wheel only if the adjustment cannot be reached safely with it installed. Keep the removed wheel nearby as a secondary visual reference, but never use a wheel, suspension arm, or jack alone as your support. The suspension may hang at full droop, so be aware that its position will not match the normal loaded ride height.
Brush loose dirt from the visible threads and collars. Do not force a wrench across packed grit, and do not use heat near a damper, rubber bushing, brake hose, or flammable fluid. If a collar will not move with reasonable hand-tool force, pause and investigate rather than rounding the locking ring.
Step 3 Mark the original settings before turning anything
Use a paint marker to make a reference line across the collar and the adjacent threaded section or lower mount. Mark the starting position on both sides of the suspension when practical. This gives you a way to return to the previous setting and helps you count equal adjustments on opposite corners.
Also mark or photograph the orientation of any accessible brackets, brake-line tabs, and nearby components. These references are useful if the assembly has multiple collars or if the adjustment is interrupted. Do not assume that an equal number of turns always produces an equal height change if the threads or collar designs differ.
Step 4 Loosen the lock collar without disturbing the spring perch
Most threaded coilovers use two collars that sit against each other. The locking collar prevents the adjustment collar from moving. Hold the appropriate collar with one spanner wrench and turn the lock collar with the other, following the kit’s instructions.
Keep track of which collar you are moving. If you loosen the spring perch instead of the lock collar, the spring may lose preload or the ride height may change unexpectedly. Once the lock collar is free, separate it only enough to allow the intended height adjustment; do not disassemble the damper or remove the spring.
Some systems use a locking collar at the lower mount rather than directly around the spring. The same principle applies: loosen the lock collar first, then make the height adjustment at the component specified by the manufacturer.
Step 5 Raise the vehicle at the correct adjustment point
If the coilover has an independent lower-mount adjustment, hold the spring perch in place and turn the lower mount or threaded shock body so the coilover becomes longer between its mounting eyes. A longer installed coilover generally raises that corner of the vehicle once the suspension is loaded. Follow the manufacturer’s specified direction because thread orientation and adjustment design can vary.
Keep the spring perch and its relationship to the spring as unchanged as possible. This preserves the intended spring preload instead of using preload as a substitute for ride-height adjustment. Count turns or measure exposed threads, and make the same change on the opposite side of the axle.
If the kit does not have an independent lower-mount adjustment, the spring perch may be the prescribed ride-height control. In that case, support the spring correctly and adjust only within the manufacturer’s range. The spring must remain captured and seated when the suspension hangs at full droop; if it becomes loose, the setting is unsafe for normal use.
Do not raise the car beyond the usable threaded range. Leave the minimum thread engagement and maximum adjustment limits specified by the coilover maker. If those limits are missing, contact the manufacturer or a qualified suspension technician rather than guessing.
Helpful tip
Make small, equal changes on both sides of an axle, then lower the vehicle and let the suspension settle before deciding whether more adjustment is needed. Turning a collar while the suspension is loaded can damage threads or give a misleading result.
Step 6 Tighten the collars and reinstall the wheel
When the initial height change is complete, seat the locking collar against the adjustment collar or lower mount as designed. Use the manufacturer’s torque specification if one is provided. If the instructions prohibit impact tools, do not use one; spanner wrenches provide better control and reduce the chance of damaging the collar.
Inspect the spring ends to confirm they remain seated in their upper and lower perches. Check that brake hoses, ABS wires, sway-bar links, and tire sidewalls are not trapped, stretched, or touching the threaded body. Reinstall the wheel and hand-tighten the lug nuts.
Raise the vehicle slightly, remove the jack stand, and lower it until the tire contacts the ground. Torque the lug nuts in a star pattern to the vehicle manufacturer’s specification. Repeat the support and adjustment process at the other corners as needed rather than leaving the vehicle supported unevenly.
Step 7 Settle the suspension and measure the new height
With the car fully on the ground, roll it forward and backward a short distance or gently drive it a few feet so the suspension can settle. Do not bounce aggressively on the body. Measure from the same wheel-center reference to the same fender point used earlier.
A useful way to approach how to raise coilovers is to check your progress after each stage.
Compare the new readings with your original measurements. Check the left-to-right difference on each axle and compare the front and rear heights with your intended setup. A small difference can come from fuel level, cargo, road slope, worn components, or normal manufacturing variation, but a large unexplained difference suggests an adjustment or suspension problem.
If another adjustment is required, repeat the lift, support, collar-release, and measurement process. Do not judge the height while the car is still hanging from the jack stands, because full droop changes the spring and damper position.
Step 8 Check clearance, travel, and fastener security
Turn the steering from lock to lock on a front-wheel-drive or steering axle vehicle and look for contact between the tire, fender liner, spring, coilover body, brake hose, and nearby brackets. Check both directions and inspect the rear suspension for tire contact under compression if the vehicle has a history of rubbing.
Look for adequate clearance around the damper shaft, bump stop, and upper mount. Raising the car generally creates more body clearance, but it can also change suspension geometry and available travel. Confirm that the spring remains captured at full droop if the design requires that check, and verify that no lock collar has backed away.
Recheck visible fasteners and compare their position with the service instructions. If the car uses adjustable camber plates, eccentric bolts, or adjustable control arms, note that raising the ride height may have changed their effective alignment even when no alignment hardware was touched.
Step 9 Road-test carefully and arrange a final alignment check
Begin with a slow drive in a safe area. Listen for clunks, scraping, spring movement, or unusual tire noise. Test braking and steering gently, then inspect the suspension and tires again after the short drive.
After a meaningful ride-height change, schedule a four-wheel alignment or at least have the alignment checked with suitable equipment. Changes in ride height can alter camber and toe, and incorrect toe can wear tires quickly or make the car wander. A steering wheel that is no longer centered, new pulling, or uneven tire wear is a reason to stop normal driving until the alignment is evaluated.
Once the final setting is confirmed, record the ride height, collar position, and alignment results. This makes future maintenance easier and provides a useful baseline if the car is raised or lowered again.
Why coilover collar adjustments matter
Coilover height is not controlled by one universal mechanism. The spring perch supports the coil spring and determines how much spring preload exists. The lower mount or threaded shock body, when independently adjustable, changes the distance between the suspension mounting points without forcing the spring to carry a different preload.
Spring preload is the amount of compression already applied to the spring when the suspension is assembled and unloaded. Increasing it can raise the car on some designs, but it can also reduce droop travel and make the spring loose when the suspension extends. That is why the manufacturer’s intended adjustment method matters more than a general rule about turning the lower or upper collar.
When learning how to raise coilovers, think in terms of three separate outcomes: body height, spring security, and damper travel. A setting that raises the fender but leaves the spring unsecured or the damper near its limit is not a successful setup.
Height adjustment versus preload adjustment
On a true independent-height-adjustable coilover, changing the lower mount length is usually the preferred way to alter ride height. The spring perch can remain close to its established position, preserving the spring’s working relationship with the damper.
On a basic threaded-body coilover, the spring perch may be the only height control. That does not automatically make the kit unsafe, but it means the available adjustment range and preload limits must be followed closely. A spring should not be allowed to rattle or separate from its seats when the suspension is unloaded.
Compatibility and adjustment limits
Coilover instructions are specific to the model, spring rate, damper length, and vehicle application. A replacement spring, different top mount, altered control arm, or wheel-and-tire combination can change the safe range. Do not assume that collars from one brand or model can be adjusted like another brand’s parts.
The manufacturer may specify minimum thread engagement, maximum lowering or raising range, a minimum number of exposed threads, or a required relationship between the lower mount and shock body. Those limits take priority over a desired fender height.
How to tell whether the new height is usable
A visual fender gap is only one part of the result. A usable setup keeps the spring seated, clears the wheel and tire through steering and suspension movement, and leaves enough damper travel for ordinary roads. Verify the result both while the car is stationary and during a cautious road test.

- Ride height: Measure both sides using the same wheel-center and fender references.
- Spring position: Confirm the spring is seated in both perches and is not loose at full droop when the design requires capture.
- Clearance: Check tires, brake lines, ABS wires, sway-bar links, bump stops, and fender liners.
- Handling: Watch for pulling, a crooked steering wheel, new instability, or noises over small bumps.
- Alignment: Arrange a professional check after a substantial height change or any sign of altered tracking.
A raised ride height may solve driveway or tire-rub problems, but it does not guarantee factory-like geometry. If the car is far from its normal range, adjustable alignment components may be necessary, and the alignment technician should know the intended ride height.
Common problems after raising coilovers
Most problems come from moving the wrong collar, making unequal adjustments, or overlooking a damaged thread. The table below helps separate an adjustment issue from a reason to stop and seek help.
| What you notice | Likely cause or concern | What to do |
|---|---|---|
| The spring is loose when the suspension hangs | Too little preload, incorrect adjustment point, or a non-captive design used outside its range | Stop driving and restore the manufacturer’s required spring seating or have the assembly inspected. |
| One side sits higher | Unequal turns, different preload, settled suspension, or a worn component | Re-measure on level ground, match the prescribed settings, and investigate persistent differences. |
| A collar will not move | Dirt, corrosion, cross-threading, or a damaged collar | Clean the threads and use approved penetrant if appropriate; stop if force or heat would be needed. |
| The steering wheel is off-center | Toe or other alignment change after altering ride height | Have the alignment checked rather than correcting the wheel position by guesswork. |
| Clunking or scraping begins | Loose collar, shifted spring, contact, or a stretched line or link | Stop, inspect with the car safely supported, and seek qualified help if the source is not obvious. |
When the adjustment range is not enough
If the car still needs more clearance after reaching the allowed coilover range, do not keep turning the collars. The practical solution may involve different springs, a different coilover configuration, corrected suspension geometry, or a wheel-and-tire change. A suspension professional can determine which component is limiting the result.
Likewise, do not use spacers, improvised washers, or unapproved hardware to create height. Such changes can alter fastener engagement and load paths in ways that are difficult to verify visually.
Beginner questions about raising coilovers
Can I raise coilovers without removing the wheels?
Sometimes. If the adjustment collars are accessible and you can safely use the correct spanner wrenches, wheel removal may not be necessary. Do not reach into a cramped area or turn collars against an unsupported suspension just to avoid removing a wheel.
How much should I raise the car at one time?
Make a small, measured change and evaluate the settled height before making another. The correct amount depends on the desired clearance, the coilover’s adjustment range, suspension travel, and alignment geometry rather than a universal number.
Does raising coilovers make the ride softer?
Not necessarily. Raising the vehicle through an independent lower-mount adjustment may leave spring preload and damping settings largely unchanged. Raising it by adding preload can alter droop travel and may change how the suspension feels, so the adjustment method matters.
Do I need an alignment after raising coilovers?
A meaningful ride-height change should be followed by an alignment check because camber and toe can change. It is especially important when the steering wheel is off-center, the vehicle pulls, or tire wear changes.
Why is one corner still higher after I matched the turns?
Unequal vehicle weight, fuel or cargo, settled bushings, different spring preload, or a worn suspension component can cause a difference. Measure on level ground using the same references, then have the suspension inspected if the difference remains significant.
Can I use an impact wrench on the adjustment collars?
Use the coilover manufacturer’s instructions. Many collars are intended for hand-operated spanner wrenches, and an impact tool can damage threads, collars, or the damper assembly. Controlled hand adjustment is the safer default when no approved procedure is available.
Finish the height change with a measured inspection
Learning how to raise coilovers safely means treating ride height as part of the entire suspension system, not just a fender-gap adjustment. Identify the correct collar, preserve spring security and damper travel, make equal measured changes, and stay within the manufacturer’s limits.
Afterward, settle the car, check every clearance point, listen for abnormal noises, and verify alignment before returning to normal driving. If the spring becomes loose, a collar is damaged, or the correct adjustment method is unclear, stop and have a qualified suspension technician inspect the vehicle.


