
How to Lower Coilovers: Instructions, Tips, and Useful Advice
Lowering a car with coilovers is more precise than simply turning a threaded collar until the fender looks closer to the tire. The adjustment changes ride height, suspension travel, alignment, and sometimes spring preload. A small mistake can leave the car riding on bump stops, sitting unevenly, or using a dangerous amount of thread engagement.
The good news is that how to lower coilovers is manageable for a careful beginner when the coilover design and manufacturer instructions are understood first. The safest general method is to adjust ride height with the designated height-adjustment collar or lower mount, rather than compressing the spring to force the car downward.
This guide explains how to identify the correct adjustment, record your starting height, make a controlled change, and check the result. You will also learn when an alignment is required, why suspension travel matters, and when to stop and ask a qualified technician for help.
At a glance
- Use the lower height-adjustment mechanism when the coilover is designed for independent height adjustment.
- Measure from consistent points and change both sides of an axle equally.
- Recheck clearance, preload, torque, suspension travel, and alignment before normal driving.
How to lower coilovers safely and check the result
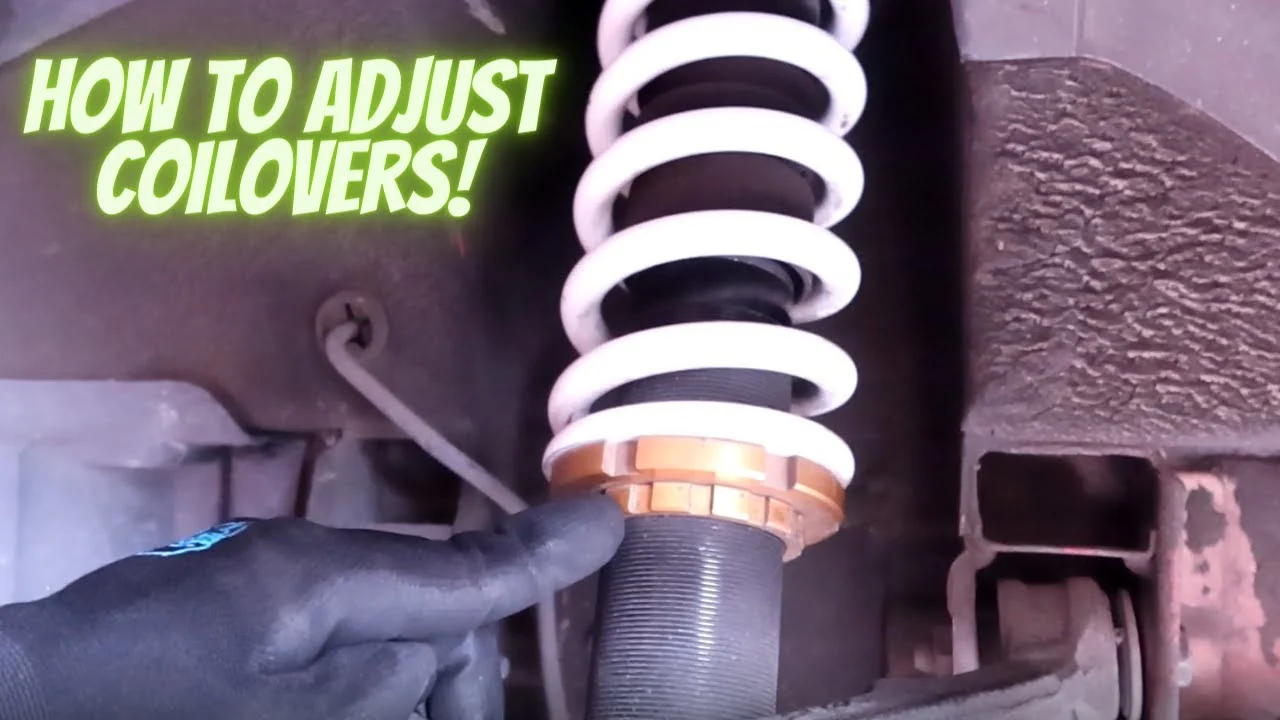
Coilover brands use different designs, so begin by confirming exactly which collar controls ride height on your kit. On many threaded-body coilovers, the lower mount or lower locking collar changes the distance between the shock body and the mounting point. The spring perch may adjust preload instead, and using it as the primary height adjustment can reduce available travel or cause the spring to become loose at full droop.
Never rely on appearance alone. The goal is a measured ride-height change that leaves adequate suspension movement, secure spring seating, safe thread engagement, and enough clearance for the tire, wheel, brake line, and suspension components.
Tools you will need
- Vehicle jack and four appropriately rated jack stands for lifting and supporting the vehicle
- Wheel chocks to prevent movement while the vehicle is raised
- Coilover adjustment spanner wrenches sized for the collars
- Torque wrench and the vehicle or coilover manufacturer’s torque specifications
- Steel ruler or tape measure for recording ride height
- Paint marker or masking tape for marking starting collar positions
- Optional: digital angle finder or caliper for recording exposed thread length
Step 1 Confirm the coilover design and permitted adjustment range
Read the installation instructions for your specific coilovers before loosening anything. Look for the terms ride-height adjustment, lower mount adjustment, spring preload, and minimum thread engagement. If the instructions are unavailable, identify the manufacturer and model before proceeding; do not assume that collars from different brands work the same way.
A common full-length threaded-body design has two collars near the bottom of the shock body. One collar locks the height setting, while the threaded lower mount changes the body’s position relative to the mounting point. Other kits use a threaded shock body and a separate spring perch, and some designs do not provide independent height adjustment at all.
Check whether the manufacturer specifies a minimum and maximum ride height, a minimum amount of thread engagement, or a maximum amount of lowering. These limits matter more than the visual gap between the tire and fender. If lowering past the permitted range would leave too little travel or thread engagement, keep the higher setting.
Important
Do not loosen a collar that supports the vehicle until the vehicle is safely supported and the suspension load is controlled. If you cannot identify the correct collar or the spring is loose when the suspension is fully extended, stop and consult the coilover manufacturer or a qualified suspension technician.
Step 2 Record the current ride height and collar position
Park on a level, hard surface with the tires inflated to the normal cold pressure. Roll the car forward and backward a short distance to release tire and bushing wind-up, then apply the parking brake and place wheel chocks at the wheels that remain on the ground.
Measure each corner before lifting the vehicle. A practical repeatable measurement is from the center of the wheel hub vertically to the lower edge of the fender arch. Measuring hub center to fender is usually more useful than measuring from the ground because it reduces the effect of tire size and tire pressure.
Record all four measurements.
Also record the exposed thread length or mark the current position of the adjustment collars with a paint marker. Take a clear photograph of each assembly. These records give you a way to return to the original setting if the new height creates a problem.
Look for existing unevenness. If one corner is already substantially different, lowering both collars by the same number of turns may not produce a level car. A corner-balanced vehicle may require more specialized measurement and adjustment than a basic home height change.
Step 3 Lift the vehicle and remove the wheels safely
Use the vehicle’s approved lifting points and support the chassis on jack stands placed at strong structural locations. Raise the vehicle high enough for the wheels to come off, but keep it stable and level on the stands. Never work under a vehicle supported only by a hydraulic jack.
Remove the wheels and keep the lug nuts together. Inspect the coilovers while they are accessible. Look for leaking damper fluid, bent parts, damaged threads, cracked springs, loose hardware, torn boots, and brake lines that may be rubbing.
Fix any such problem before changing the ride height.
Clean dirt and corrosion from the threads with a nylon or brass brush if needed. Avoid forcing a seized collar with excessive leverage, because damaged threads can prevent the collar from locking correctly. Do not use a torch near a pressurized damper, rubber components, brake lines, or flammable contamination.
Step 4 Release the locking collar with the correct wrench
Identify the locking collar and the collar intended to change height. Hold the appropriate collar with one spanner wrench while turning the lock collar with another, following the manufacturer’s instructions. On many kits, the lock collar is loosened by turning it away from the adjustment collar, but the thread direction and access can vary.
Turn the wrench on the collar’s notches rather than striking the collar with a hammer or punch. If the collar will not move, stop and reassess. Penetrating lubricant may help on external threads if the manufacturer permits it, but it should not be allowed into the damper or used as a substitute for repairing damaged threads.
A useful way to approach how to lower coilovers is to check your progress after each stage.
Keep track of which collar has been loosened. The spring perch and height lock can look similar, particularly on compact rear assemblies. A useful photo and a manual reference prevent the common mistake of changing spring preload when the intention was only to change ride height.
Step 5 Lower the height through the designated adjustment collar
Make a small, equal adjustment on both sides of the same axle. Count flats, turns, or measure the thread position rather than guessing. If the manufacturer provides a conversion between collar turns and ride-height change, use that information; otherwise, make a modest change and measure the vehicle again instead of assuming a specific amount.
On a coilover with independent lower-mount adjustment, keep the spring perch at the manufacturer’s specified preload and move the lower mount or height collar. This preserves more of the damper’s usable stroke than winding the spring perch downward. On a design that uses the spring perch for height, follow that kit’s instructions exactly and confirm that the spring remains properly seated at full suspension droop.
After setting the new position, tighten the locking collar against the adjustment collar as specified. Do not leave the collars finger-tight. Do not rotate the shock piston rod or damage its polished surface while trying to turn the threaded body.
Repeat the same measured adjustment on the other side of the axle. If you are aiming for a level car, compare hub-to-fender measurements after the vehicle is back on the ground rather than trying to make both threaded assemblies visually identical.
Step 6 Reinstall the wheels and lower the vehicle gradually
Inspect the assembly once more before installing the wheels. Confirm that the spring is seated, the collars are engaged on clean threads, the brake hose and ABS wire have adequate slack, and no part can contact the tire or wheel through the expected suspension movement.
Install the wheels and hand-tighten the lug nuts. Lower the vehicle until the tires touch the ground, then torque the lug nuts in a star pattern to the vehicle manufacturer’s specification. Remove the jack stands and lower the car fully.
Roll the vehicle forward and backward again, or drive it slowly a short distance on private property, so the suspension settles. Do not judge the final height while the car is still supported or while one side is loaded differently from the other.
Step 7 Measure the settled height and inspect clearances
Repeat the same hub-center-to-fender measurements used at the beginning. Compare the new values with your notes, then compare left and right on each axle. A small difference can result from the surface, tire pressure, fuel level, or normal chassis variation, but a large unexpected difference indicates that the adjustment or spring seating needs investigation.
Turn the steering from lock to lock and inspect the front tires, inner fenders, brake hoses, and suspension arms. Check clearance with the vehicle at rest and, where it can be done safely, with the suspension compressed. Also inspect the rear tires and wheel wells for contact points.
Look underneath for reduced ground clearance at the exhaust, subframes, jacking points, and other low components. A car that clears the driveway while stationary may still scrape during braking, cornering, or when carrying passengers.
Check your result
A successful adjustment leaves the car at the intended measured height, with both springs seated, collars locked, wheels torqued, no tire or brake-line contact, and no new clunks or binding when the steering is operated.
Step 8 Perform a careful low-speed check and arrange an alignment
Start with a slow drive on a smooth, familiar surface. Listen for clunks, rubbing, spring movement, or harsh bottoming. Test the brakes gently and confirm that the steering returns normally.
If the car pulls, the steering wheel is no longer centered, or a tire contacts the body, stop driving and correct the issue.
Lowering changes suspension geometry. Depending on the vehicle, it can alter camber, toe, caster, bump steer, and the available suspension travel. Schedule a four-wheel alignment after the final ride height is chosen, particularly if the car was lowered substantially or any suspension fasteners were loosened.
Ask the alignment shop to record the final settings. Uneven toe can make a vehicle unstable and can wear tires quickly, even when the ride height appears correct. If the vehicle has adjustable control arms or eccentric alignment hardware, the final height and intended use should guide the alignment targets.
Understanding how to lower coilovers also means recognizing the limits of the method.
Why the adjustment method matters
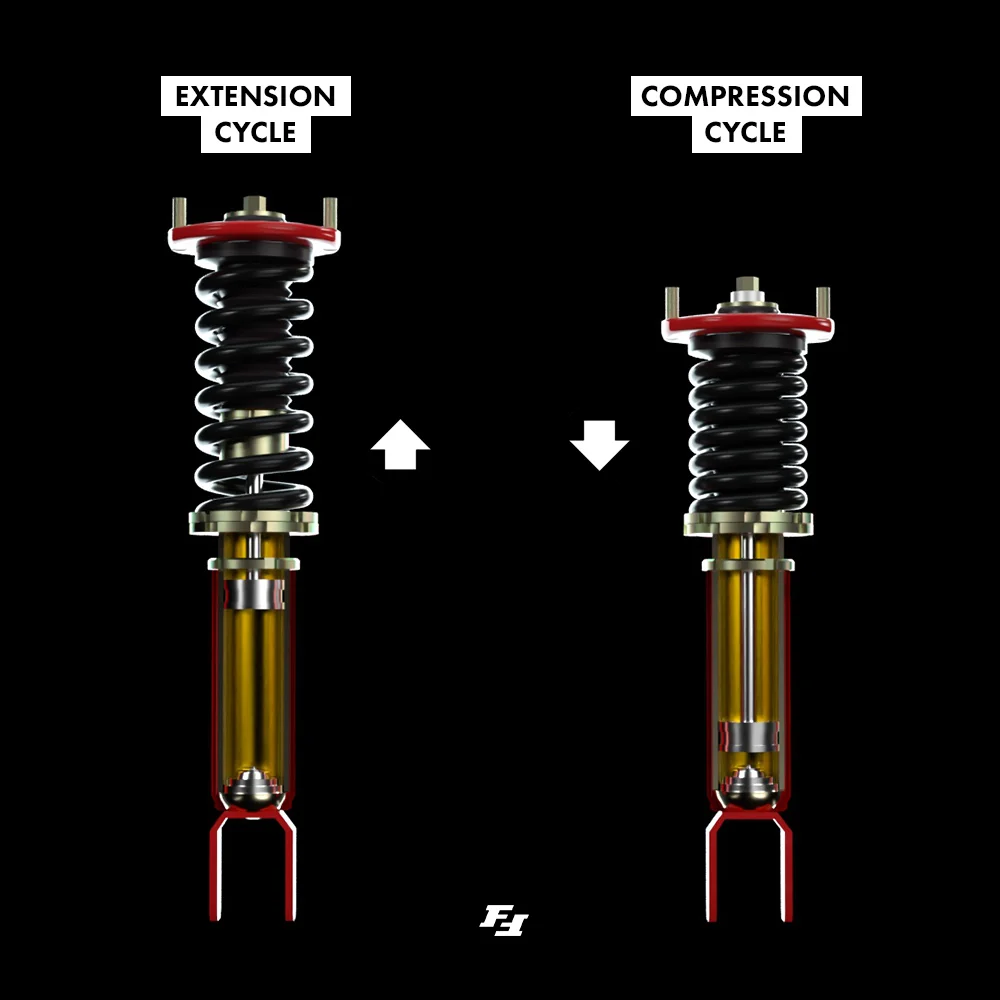
Ride height is the distance between the chassis and the ground, but the way that height is changed affects much more than appearance. A damper has a limited amount of piston travel, and the suspension needs room to move both upward in compression and downward in rebound.
Lowering too far can cause the shock to reach the end of its stroke, the tire to hit the fender, or the chassis to rest on bump stops. These conditions can make the car less controlled on uneven roads. A lower center of gravity does not automatically make a car safer or faster if the suspension can no longer work through bumps.
Spring preload is not the same as ride height
Spring preload is the amount a spring is compressed when the suspension is assembled or unloaded. Ride height is the position of the car under its normal weight. On some coilovers, changing the spring perch changes both; on others, the lower mount allows height changes while leaving spring preload largely unchanged.
Excessive preload can make the spring too stiff in initial movement and may reduce droop travel. Too little preload can allow the spring to become loose when the wheel hangs. The correct setting depends on the coilover design, spring rate, and manufacturer instructions, so do not copy a universal preload measurement from an unrelated kit.
Full-length adjustment and separate-body designs
With a full-length adjustable coilover, the lower mount is often threaded onto the damper body. The mount can be moved to alter overall assembly length while the spring perch remains at its recommended setting. This is generally the preferred approach when the kit is designed for it.
Some coilovers use a simpler threaded body where the spring perch is the main ride-height adjustment. That design may require a different procedure and may have a narrower safe range. If the manual does not clearly identify independent lower-mount adjustment, treat the spring perch as the active adjustment and follow the supplied specifications.
How to verify the car is ready for normal driving
The first inspection should happen immediately after the height change, but a second check after a short drive is worthwhile. Components can settle, collars can reveal poor engagement, and rubbing may appear only when the suspension is loaded in a turn.

- Confirm the final hub-to-fender measurements and write them down.
- Verify that each locking collar is tight to the adjustment collar.
- Check that the springs stay seated when the suspension hangs and when the car rests on its tires.
- Inspect tire sidewalls, inner fenders, brake hoses, ABS wires, and sway-bar end links for contact.
- Confirm wheel-lug torque after the first drive and again according to the vehicle manufacturer’s maintenance guidance.
- Arrange a professional alignment before extended or high-speed driving.
After an alignment, watch for uneven tire wear and changes in steering behavior. A height setting that looks even can still produce different corner weights. If precise handling matters, a shop with corner-weight scales can balance the car with the driver and typical fuel load in place.
Common problems after lowering coilovers
Most problems come from using the wrong collar, making an adjustment without measuring, or lowering beyond the suspension’s usable range. The symptoms below point toward checks rather than guaranteed diagnoses.
| Symptom | First check |
|---|---|
| One side sits higher | Recheck hub-to-fender measurements, spring seating, tire pressure, and collar positions on both sides. |
| Clunk over bumps | Inspect lock collars, mounting hardware, sway-bar links, spring seating, and loose tools or trim. |
| Harsh ride or repeated bottoming | Check remaining suspension travel, bump stops, damper settings, and whether the car was lowered past the permitted range. |
| Tire rubbing | Inspect clearance at steering lock and compression; raise the car or correct wheel, tire, or alignment issues before driving normally. |
| Steering wheel is off-center | Have the alignment checked after confirming that no suspension component is bent or loose. |
When the collar will not move
Do not hammer directly on aluminum collars or force a seized adjustment with an oversized breaker bar. Clean the threads, use the correct spanner, and confirm that the opposite locking collar is fully released. If corrosion or cross-threading is visible, replacement or professional repair may be safer than continuing.
When the spring becomes loose at full droop
A spring that can move or rattle when the suspension hangs may indicate insufficient preload, an incorrect assembly, or a coilover design that uses a helper spring. Do not assume the noise is harmless. Follow the manufacturer’s spring-seating procedure and stop driving if the spring is not positively retained.
When the car is lower but handles worse
Lowering alone does not guarantee better handling. Reduced travel, altered toe, bump steer, poor damping settings, and excessive roll stiffness can all make a car less predictable. Return to a known safe height if needed, then have the suspension and alignment evaluated before making additional changes.
Frequently asked questions
Can I lower coilovers by turning only the spring perch?
Only if the coilover manufacturer specifies the spring perch as the ride-height adjustment. On many full-length kits, the spring perch is intended to set preload while the lower mount changes overall height. Check the manual before turning either collar.
How much should I lower the car at once?
Make a small, measured change and reassess rather than choosing a universal number of turns. The safe amount depends on the coilover’s travel, the vehicle’s geometry, wheel and tire fitment, and the manufacturer’s adjustment range.
Do I need an alignment after lowering coilovers?
Yes, an alignment is strongly recommended after changing ride height. Lowering can change toe and camber, and incorrect toe can affect stability and wear tires quickly. Perform the alignment after the final height is selected.
Why does the car sit higher after I lower it?
The suspension may not have settled, the spring may be binding, the collars may have been adjusted unevenly, or the vehicle may be resting on a bump stop. Roll the car to settle it, remeasure from the same points, and inspect the assembly before making another adjustment.
Is a very low ride height safe for street driving?
Not necessarily. A very low setting can reduce suspension travel, cause tire or underbody contact, and make steering geometry less predictable. Keep enough clearance and travel for the roads, passengers, and loads the vehicle will actually encounter.
Conclusion
Learning how to lower coilovers safely means treating ride height as a suspension setting, not just a visual adjustment. Identify the correct collar, record the original measurements, make equal and controlled changes, and preserve the spring seating, thread engagement, and usable damper travel specified for the kit.
After the car settles, measure it again, inspect every clearance, torque the wheels and collars correctly, and arrange an alignment before normal high-speed driving. If the adjustment mechanism is unclear, a spring is loose, a collar is seized, or the car develops rubbing or instability, return to a safe height and get qualified help rather than forcing the setup.


