
How to Measure for Coilover Shocks: A Complete Fitment Guide
Choosing coilovers is not as simple as matching a shock to the vehicle’s year and model. A replacement unit can have the correct mounting style yet still be too long, too short, incompatible with the spring, or unable to provide enough suspension travel. Measuring first prevents an expensive fitment mistake and helps you preserve usable bump travel, droop, and tire clearance.
The basic answer to how to measure for coilover shocks is to record the shock’s extended and compressed lengths, mounting dimensions, available clearance, and the spring dimensions required by the coilover body. Those measurements must be taken with the suspension safely supported and, ideally, checked at both normal ride height and full suspension movement.
This guide explains a practical way to measure a vehicle before ordering or adapting coilovers. You will learn which dimensions matter, how to account for suspension geometry, how to compare your measurements with a manufacturer’s specifications, and how to check the result without relying on guesswork.
At a glance
- Measure the shock between the centers or faces of its mounting points, not merely the overall body length.
- Record both compressed and extended dimensions because usable shock travel matters as much as ride height.
- Verify spring, mount, thread, and clearance compatibility before placing an order.
How to Measure for Coilover Shocks: The Complete Procedure
Measure the suspension in its actual operating position, then verify the full range of movement. The most useful result is a set of dimensions that describes the shock at ride height, at full compression, and at full extension—not just one static length.
If the vehicle already has serviceable shocks, use them as a starting reference, but do not assume the existing units are correctly sized. A previous owner may have installed the wrong parts, or the original suspension may use a different travel range from the coilovers you plan to install.
Tools you will need
- Floor jack and jack stands rated for the vehicle, used to lift and safely support it
- Tape measure or steel rule for length and clearance measurements
- Calipers for accurate mount-hole, stud, shaft, and spring measurements
- Marker and masking tape for labeling measurements and left/right components
- Optional: telescoping gauge or straightedge for measuring tight spaces
- Optional: digital angle finder for recording unusual shock or mount angles

Step 1 Identify the suspension and coilover configuration
Begin by identifying exactly what you are replacing. Determine whether the vehicle uses a separate spring and shock, a true coilover assembly with the spring around the shock, a MacPherson strut, or a suspension with a remote-reservoir shock. Front and rear units often use different dimensions, and left and right parts may differ on some vehicles.
Record the vehicle’s year, make, model, drivetrain, body style, and suspension modifications. Note whether it has lowering springs, lifted components, aftermarket control arms, air suspension conversion parts, or a different axle. These details affect the available length and mounting hardware.
Look for a manufacturer part number on the existing shock, but treat it as identification rather than proof of correct fitment. Also inspect the mounting points. Common arrangements include an eyelet on both ends, a stud mount, a clevis, a fork mount, or a top plate with multiple studs.
Success at this stage means you can describe each position clearly—for example, “front left MacPherson strut with a three-stud top plate” or “rear eyelet-to-eyelet coilover.” If the mount type is unclear, photograph it and compare it with the replacement manufacturer’s technical drawing before measuring further.
Step 2 Set the vehicle at normal ride height
Park on a level surface, apply the parking brake, and secure the wheels that remain on the ground. Measure on one corner at a time if possible, keeping the vehicle supported in a way that does not put an unsafe load on a jack or an unstable suspension component.
For a vehicle with a separate spring and shock, the spring may hold the suspension at ride height while the shock controls motion. For a true coilover, the shock and spring are one assembly, so the installed assembly length and spring preload both influence the position.
Measure from the center of one shock mounting hole to the center of the other whenever the shock uses eyelets. For a stud or top plate, measure from the centerline of the stud or mounting hole to the center of the lower mounting hole. If the manufacturer specifies measurements from mounting faces instead, record those separately.
Write down the ride-height measurement for every corner you plan to change. Also measure from the wheel center to the fender lip if you need to reproduce the current ride height. This reference is more useful than measuring from the ground because tire size and inflation can change the ground measurement.
A common mistake is measuring the shock while the vehicle is hanging from a jack. That gives a near-extended dimension, not the dimension the shock normally sees while driving. The shock should be measured in its installed position at normal ride height whenever it is safe and physically accessible.
Step 3 Measure the extended shock length
Support the vehicle securely, then allow the suspension to reach full droop—the position where the wheel hangs at the normal limit of downward travel. If a brake hose, driveshaft, wiring harness, control arm, or other component reaches its limit before the shock does, that component may be the actual droop stop.
With the suspension at this position, measure between the shock mounting reference points. Use the center-to-center method for eyelets and centerline-to-centerline for stud or fork arrangements. If the shock is still installed, measure from matching fixed reference points and note exactly where each measurement begins and ends.
Do not force the suspension lower simply to obtain a longer number. The coilover should not be used as the only mechanical limit for suspension droop unless the vehicle and shock manufacturer explicitly designed it that way. A shock that bottoms internally at full droop can suffer damage and can limit wheel movement unexpectedly.
Label this value “extended length” or “full-droop length.” If you cannot safely reach full droop with the spring installed, remove or unload the spring only according to the suspension manufacturer’s procedure. Never disassemble a compressed coilover spring without suitable spring-compression equipment and the correct safety method.
Step 4 Measure the compressed shock length and available bump travel
Next, determine the shortest safe length between the shock mounts. This is the full-compression or bump position. The suspension may reach this point through a bump stop, a control-arm stop, a frame contact point, or tire and wheel interference, so inspect the entire corner rather than concentrating only on the shock.
With the spring safely removed or the suspension compressed using a controlled method, move the suspension through its usable upward range. Measure the shock mounting points again at the position where the suspension reaches its designed compression limit. Keep hands clear of pinch points and never place any part of your body under a vehicle supported only by a jack.
Record the result as the compressed length. Subtract it from the extended length to estimate the shock travel available across that range:
Approximate shock travel = extended mounting length − compressed mounting length.
This calculation is only useful if both numbers were taken using the same reference points. A measurement from a mounting face at one end and a hole center at the other will produce a misleading result.
Check for interference at full compression. Turn the steering from lock to lock on front suspension and inspect the tire, wheel, spring, shock body, brake line, sway-bar link, and control arm. At the rear, check the tire against the inner fender, the coilover against the axle or control arm, and the body or frame around the upper mount.
Important
Stop and seek qualified suspension help if you cannot support the vehicle securely, if a spring remains compressed during disassembly, or if you cannot identify the true bump and droop limits. A coilover spring stores enough energy to cause serious injury when handled incorrectly.
Step 5 Calculate the installed ride-height position and travel split
Compare the ride-height length with the compressed and extended measurements. The difference between ride height and compressed length is the available bump travel. The difference between extended length and ride height is the available droop travel.
For example, if the shock measures 14 inches extended, 10 inches compressed, and 12 inches at ride height, it has about 2 inches of bump travel and 2 inches of droop travel within the measured range. The equal split is not automatically ideal; the correct balance depends on suspension geometry, spring rate, bump stops, tire clearance, and the vehicle’s intended use.
The important point is to avoid choosing a coilover based only on the desired ride height. A shorter shock can lower a vehicle while leaving too little bump travel, causing frequent bottoming. A longer shock can provide more droop but may top out or create interference before the wheel reaches a safe position.
If the suspension uses a motion ratio, the wheel does not move the same distance as the shock. A motion ratio describes how much shock movement results from a given amount of wheel movement. A manufacturer may list shock travel while a suspension design guide may discuss wheel travel, so do not compare those numbers without accounting for the geometry.
Step 6 Measure the mounting hardware and attachment geometry
Length alone does not establish compatibility. Measure the inside width of eyelet mounts, the diameter of the mounting bolt or sleeve, the diameter and length of studs, the width of clevis mounts, and the spacing of holes in any top plate.
For a bushing-style eyelet, identify whether the supplied sleeve passes through the bushing and whether its outside diameter matches the vehicle bolt. Some coilovers use replaceable spherical bearings instead of rubber or polyurethane bushings. A spherical bearing may require spacers to center it in a factory mount.
A useful way to approach how to measure for coilover shocks is to check your progress after each stage.
Record the shock’s mounting angle and orientation. An eyelet can sometimes be rotated, but a body with a fixed reservoir, adjuster, or offset mount may require a specific orientation. Make sure the adjuster can be reached after installation without touching the tire, spring, exhaust, or suspension link.
At a top mount, measure the number and spacing of studs, the center hole diameter, and the available clearance around the mount. On a MacPherson strut, the upper bearing or camber plate also affects steering movement. A plate that fits the bolt pattern may still be unsuitable if it binds during steering or changes alignment beyond the adjustment range.
Step 7 Measure spring and coilover body compatibility
If you are selecting a replacement spring or a complete coilover, measure the spring’s free length, inside diameter, outside diameter, and rate if known. The spring must match the coilover’s spring seat and retaining hardware. A common coilover spring size is described by its inside diameter and free length, but the correct specification comes from the coilover manufacturer.
Measure the threaded body or lower mount if the design uses height adjustment. Note the body diameter, thread diameter, thread pitch, and the amount of available adjustment. Do not assume that two threaded bodies with similar outside diameters use interchangeable collars or lower mounts.
Check whether the spring is captive at full droop. A spring is captive when it remains securely located between its seats as the suspension extends. If it becomes loose, the coilover may need a helper spring, tender spring, different spring length, or a different adjustment position.
This is a setup issue that should be resolved before driving.
Spring rate is separate from spring size. Two springs can share the same dimensions but have very different rates, which changes ride height, handling, and how much the suspension compresses. If the new coilover manufacturer specifies a spring rate, use that specification rather than selecting solely by length.
Step 8 Compare every measurement with the manufacturer’s specifications
Create a simple measurement sheet for each corner. Include extended length, compressed length, ride-height length, mounting type, hole or stud dimensions, spring dimensions, body clearance, and any interference notes.
Compare that sheet with the manufacturer’s technical drawing or fitment chart. Confirm the dimensions are measured from the same reference points. A catalog may list the shock body length, shaft length, or eye-to-eye length; only the dimension that matches your measurement method can be used for a direct comparison.
Check the manufacturer’s specified minimum compressed length and maximum extended length, not just the adjustment range. Also verify whether the listed dimensions assume a particular top mount, lower mount, spring perch, or spacer arrangement. If the part is described as “universal,” treat that as a component description rather than a guarantee of direct fitment.
Contact the manufacturer or a qualified suspension specialist when a dimension is missing, when the technical drawing conflicts with the listing, or when your suspension has significant modifications. Do not guess at a mount that carries suspension load.
Step 9 Install or test-fit the selected coilover safely
Before final tightening, place the coilover in position and confirm that the mounting hardware passes through without forcing the suspension sideways. The spring should sit flat on its seats, the adjustment collars should be accessible, and the shock body should clear nearby components throughout its intended movement.
With the spring safely installed, cycle the suspension through compression and droop as far as the design allows. Watch the brake hose, ABS wire, tire, wheel, sway-bar link, control arm, driveshaft, exhaust, and reservoir. On the front, move the steering through its range while checking clearance.
Set the vehicle on the ground and recheck ride height after the suspension settles according to the manufacturer’s instructions. Measure both sides of the axle and compare them with your original reference. If the vehicle sits unevenly, look for preload differences, a spring that is not seated, a binding mount, or an incorrect adjustment rather than immediately changing alignment.
Torque the mounting hardware to the vehicle or coilover manufacturer’s specification. If the specification requires tightening rubber-bushed mounts at ride height, follow that requirement so the bushing is not permanently twisted. Recheck accessible fasteners after the initial short inspection drive, using the applicable service instructions.
Check your result
Before driving normally, confirm that the spring remains seated at full droop, the shock does not bottom or top out before the suspension’s intended stops, and no component contacts another through steering and suspension movement.
Which Coilover Measurements Matter Most?
The most important dimensions depend on whether you are replacing a direct-fit assembly or building a custom suspension. For a direct replacement, mounting style and compressed and extended lengths usually determine whether the part can physically work. For a custom setup, spring specifications, motion ratio, alignment range, and bump-stop design become equally important.
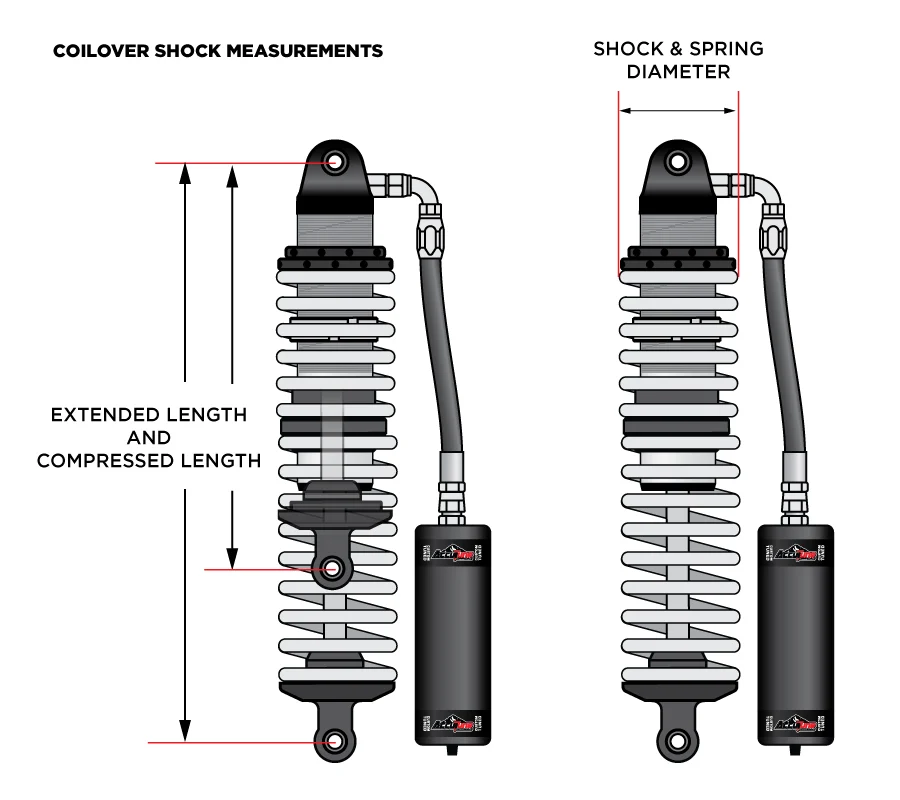
Extended and compressed length
These dimensions define the shock’s usable range. Extended length controls how much droop is available before the shock, brake hose, or suspension joint reaches its limit. Compressed length controls whether the shock can reach full bump without becoming an unintended stop.
The advertised shock travel is the difference between those two lengths, but it is not necessarily the same as usable wheel travel. Suspension angle and linkage geometry can multiply or reduce wheel movement relative to shock movement.
Ride height and adjustment range
Ride height is the installed position, not the shortest possible coilover setting. A height-adjustable coilover may allow the body to be moved independently of spring preload, depending on its design. That distinction matters because using spring preload as the primary height adjustment can reduce droop or make the spring loose at full extension.
Mounting type and dimensions
A coilover with the wrong mount cannot be made safe by adjusting its length. Confirm the attachment style, bolt or stud size, eyelet width, spacer arrangement, and top-plate pattern. A mount that requires force to align is a fitment problem, not a normal installation condition.
Spring dimensions and rate
Spring inner diameter must match the seats, while free length must leave enough adjustment for the intended ride height. Spring rate determines how much the spring compresses under load. It should be selected based on vehicle weight, motion ratio, use, and the manufacturer’s setup guidance—not by appearance alone.
How to Check the Measurements Before Ordering
Use a written comparison rather than memory. Put the current suspension measurements beside the proposed coilover specifications and mark every item as confirmed, different but acceptable, or unknown.

- Extended mounting length matches the required droop range.
- Compressed mounting length leaves room for the suspension’s bump stop and other limits.
- Mounting holes, studs, sleeves, and spacers match without modification.
- Spring inner diameter and seat design are compatible.
- Spring rate and free length suit the vehicle and intended use.
- Threaded adjustment range can reach the intended ride height without losing safe travel.
- Shock body, spring, reservoir, and adjuster clear all nearby parts.
- Top mounts, bearings, and alignment adjustments work with the vehicle’s geometry.
When a listing provides only a vehicle application and no dimensional drawing, ask for the actual measurements before ordering. The exact keyword how to measure for coilover shocks describes a measurement process, but the final fitment decision still depends on verified manufacturer data.
Common Measurement Problems and Their Causes
Most fitment errors come from using one measurement in isolation. The following checks help separate a sizing issue from an installation or suspension-geometry issue.
| Observed problem | Likely cause or check |
|---|---|
| Shock bottoms before the suspension stop | Compressed length is too long, the bump stop is missing or altered, or the shock reference points were measured incorrectly. |
| Spring becomes loose at full droop | Incorrect spring length, excessive ride-height adjustment, missing helper spring, or a non-captive design used outside its intended range. |
| Vehicle sits lower or higher than expected | Different spring rate, preload setting, corner weight, mount height, or an adjustment that changes preload instead of body position. |
| Tire or shock contacts nearby parts | Incorrect offset, spring or body diameter, mount orientation, steering angle, or suspension travel beyond the original clearance. |
| Mounting holes do not align | Wrong application, incorrect mount type, altered suspension geometry, or a measurement taken from mismatched reference points. |
When the current shock is not a reliable reference
A damaged or incorrectly installed shock may already be limiting travel. If the vehicle has worn bushings, bent arms, modified bump stops, or collision damage, measurements from the existing unit may describe a faulty condition. Compare the geometry with factory service information or inspect the suspension before ordering custom parts.
When the vehicle has been lowered or lifted
Modified ride height changes the amount of available bump and droop travel. A lowered vehicle may need a shorter body or revised bump-stop arrangement, while a lifted vehicle may need more extended length and attention to brake-line and driveshaft angles. The original shock application is not automatically appropriate after a major height change.
When a measurement seems inconsistent
Repeat it from the same reference points and write down whether the suspension was loaded, unloaded, or at a mechanical stop. Check that the wheel and tire were not influencing the position and that the shock was not angled in a way that made a straight tape measurement misleading.
Coilover Measurement FAQs
Can I measure only the old shock and order the same length?
No. The old shock provides a reference, but you also need its mounting style, compressed length, extended length, spring compatibility, and clearance. The old part may be worn, incorrectly selected, or installed on a modified suspension.
Should I measure the shock body or the distance between the mounts?
Measure the distance between the shock’s mounting reference points. Body length and shaft length do not reliably describe the installed length because bodies, shafts, collars, and mounts vary between designs.
Is ride height the same as shock length?
No. Ride height is the vehicle’s position relative to the ground or body, while shock length is the distance between its mounting points. Suspension geometry means a small ride-height change may not equal the same change in shock length.
How do I measure a coilover spring?
Measure its free length without load, inside diameter, outside diameter if clearance matters, and identify the spring rate when possible. Confirm the measurement method with the manufacturer because some spring seats and helper-spring systems require specific dimensions.
Do coilovers need equal compressed and extended travel?
No. The appropriate travel split depends on the suspension design, ride height, bump stops, tire clearance, and intended driving. The goal is sufficient usable travel in both directions, not necessarily equal numbers.
Make the Fitment Decision From Measurements, Not Guesswork
Learning how to measure for coilover shocks means documenting the suspension at ride height, full droop, and full bump, then confirming the mounts, spring, adjustment range, and clearance. The most useful measurement is not a single length; it is the complete relationship between the shock and the suspension’s safe range of movement.
Once every dimension is recorded, compare it with a manufacturer’s technical specifications and resolve unknowns before buying. If spring energy, structural mounting, or suspension limits are uncertain, stop and use qualified help. A correctly measured coilover should fit without force, keep the spring captive, avoid premature topping or bottoming, and maintain clearance throughout steering and suspension travel.


