
How to Adjust Front Coilovers: Step-by-Step Setup Guide
Learning **how to adjust front coilovers** is not just about making a car sit lower. A correct adjustment should keep the suspension balanced, leave enough travel for bumps, and give the tires safe clearance. The exact method also depends on the type of coilover installed on your vehicle.
Many street cars in the United States use coilovers that have a threaded lower mounting body. On these units, ride height can often be changed by rotating the shock body in the lower mount. Other systems use the spring perch to change height, while some race and off-road coilovers use preload for a different purpose.
The safest approach is to make small changes and measure often. A few turns can create a noticeable difference at the fender. Large adjustments made without measuring can leave the front of the car uneven or reduce suspension travel.
This guide explains how to adjust front coilovers for ride height, spring preload, and damping. It also covers measurement, common mistakes, alignment, clearance checks, and how to know when the setup needs more work.

How to Adjust Front Coilovers Safely
Before learning **how to adjust front coilovers**, identify the adjustment points on your exact suspension. Do not assume every threaded collar performs the same job. The spring perch, locking collar, lower mount, and damping knob can all control different things.
Start with the car on a hard, level surface. Measure the current front ride height before lifting the vehicle. Write down the left and right measurements so you have a clear starting point.
Lift the front with a suitable floor jack and support the vehicle securely with jack stands at approved lifting points. Never work beneath a vehicle that is supported only by a hydraulic jack. Remove the wheels if access to the coilover collars is limited.
Clean dirt from the coilover threads before turning the collars. Road grit can make collars difficult to move and may damage the threads. A soft brush and suitable cleaner usually make adjustment much easier.

- ✦ Measure first
Record the front ride height on both sides before changing anything.
- ✦ Use jack stands
Support the vehicle correctly before working around the suspension.
- ✦ Clean the threads
Remove dirt and corrosion so the adjustment collars move without damaging the threads.
- ✦ Make small changes
Adjust a few turns at a time instead of making a large height change at once.
Tools You May Need
Most adjustments need only basic tools, but the exact sizes depend on the coilover kit. Keep the coilover manufacturer’s instructions nearby because torque values and adjustment methods can differ.
- ✦ Coilover spanner wrench
Used to loosen and tighten adjustment and locking collars.
- ✦ Floor jack and jack stands
Used to raise and securely support the vehicle.
- ✦ Tape measure
Helps track ride height and left-to-right differences.
- ✦ Torque wrench
Used to tighten wheels and suspension hardware to the correct specification.
Understand What Each Front Coilover Adjustment Does
A key part of understanding **how to adjust front coilovers** is knowing which adjustment controls what. Coilovers may provide ride-height, preload, damping, and sometimes camber adjustment. Changing the wrong part can produce a very different result than you intended.
Many full-body coilovers have separate ride-height and spring-preload adjustments. The lower threaded mount changes the overall length of the coilover. The spring perch sets how much the spring is compressed when the suspension is unloaded.
Some simpler coilovers do not have an adjustable lower mount. In that design, the spring perch may also affect ride height. This is why the instructions supplied with your specific coilover kit should take priority over a universal method.
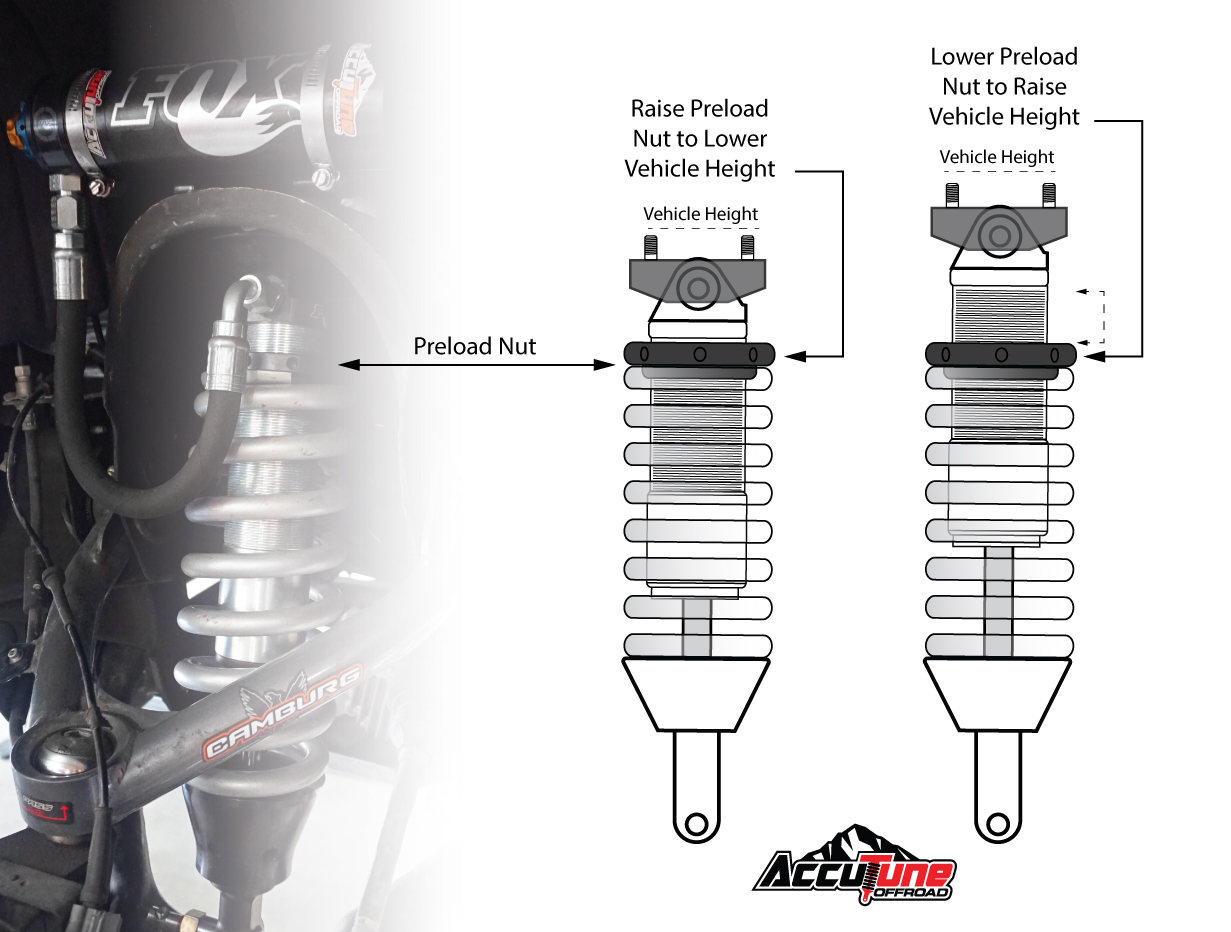
- ✦ Lower mount
On many full-length adjustable coilovers, this changes overall shock length and vehicle ride height.
- ✦ Spring perch
Supports the spring and is commonly used to establish the recommended spring preload.
- ✦ Locking collar
Secures the adjustment so it cannot move during driving.
- ✦ Damping adjuster
Changes how quickly the shock controls suspension movement.
- ✦ Camber plate
On compatible front coilovers, this allows limited adjustment of wheel camber.
Ride Height and Preload Are Not Always the Same Adjustment
One of the most common coilover setup errors is treating preload and ride height as the same thing. On a coilover with independent height adjustment, they serve different jobs. Ride height changes overall coilover length, while preload changes the initial compression of the spring.
Too much preload may reduce available droop and can change how the suspension reacts. Too little preload can allow a spring to become loose when the suspension reaches full extension. Use the coilover maker’s preload specification whenever one is provided.
Measure the Front Ride Height Before Adjustment
Good measurements make **how to adjust front coilovers** much easier. Park on flat pavement and make sure tire pressures are correct. Remove unusual cargo from the vehicle so the car is close to its normal driving weight.
A common method is to measure vertically from the center of the wheel hub to the lower edge of the fender opening. This method reduces the effect of tire size and tire pressure compared with measuring from the ground.
Record the measurement for the front left and front right corners. Do not assume the two sides will be identical. Small differences can come from vehicle weight distribution, road surface, bushings, or the way the suspension settles.

- ✦ Use the same reference points
Measure from the wheel center to the same point on each fender.
- ✦ Record both sides
Write down left and right front measurements before making changes.
- ✦ Check tire pressure
Set tire pressures correctly before assessing the vehicle’s stance.
- ✦ Use level ground
An uneven garage floor or driveway can produce misleading measurements.
Do Not Judge Ride Height Immediately After Lowering the Car
The suspension can bind slightly after the vehicle comes off the jack. Roll the car forward and backward several feet, then let it settle. If practical, take a short, slow drive and return to the same level surface before making the final comparison.
How to Adjust Front Coilovers for Ride Height
For many modern coilovers, the safest way to adjust ride height is through the threaded lower mount. Loosen the lower locking collar first. Then rotate the coilover body according to the manufacturer’s instructions to shorten or lengthen the assembly.
Shortening the assembly usually lowers the vehicle, while lengthening it usually raises the vehicle. This direction can vary with suspension design, so confirm it before making a large change. Count the turns or measure the exposed threads so you can repeat the adjustment on the other side.
When learning **how to adjust front coilovers**, make the first change small. A change of several millimeters at the coilover does not always create the exact same amount of change at the fender because suspension geometry can affect the ratio.
Once the desired position is set, tighten the locking collar securely. Reinstall the wheel and torque the lug nuts to the vehicle manufacturer’s specification. Lower the vehicle, settle the suspension, and measure again.

- ✦ Step 1
Lift and secure the vehicle, then gain safe access to the front coilover.
- ✦ Step 2
Loosen the correct lower locking collar with the proper spanner wrench.
- ✦ Step 3
Rotate the coilover body or lower mount in small, measured increments.
- ✦ Step 4
Repeat a matching adjustment on the opposite front coilover.
- ✦ Step 5
Tighten the locking collars and reinstall the wheels.
- ✦ Step 6
Lower the vehicle, settle the suspension, and measure the final height.
How Much Should You Adjust at One Time?
Small increments are easier to control. If you want a large change, do it through several adjustment cycles. Measure after each cycle instead of assuming the number of collar turns will create an exact ride-height change.
Keep Enough Thread Engagement
Never extend an adjustable lower mount beyond the manufacturer’s safe limit. Too little thread engagement can weaken the connection between the shock body and the lower mount. If the coilover includes a minimum thread-engagement mark or measurement, stay within it.
How to Adjust Front Coilover Spring Preload
Spring preload deserves extra care when figuring out **how to adjust front coilovers**. Preload is the amount the spring is compressed from its free length while the suspension is fully extended. It is not simply a setting for making the suspension harder.
A common starting method on some coilovers is to bring the spring perch upward until the spring no longer moves freely between its seats. The perch is then moved farther by the amount specified by the manufacturer. That specification may be given in millimeters, turns, or spring compression.
Do not copy a preload value from another coilover brand. Spring length, spring rate, shock travel, and internal design vary. The correct preload is the value intended for the specific suspension.

- ✦ Check the spring
With the suspension unloaded, verify whether the spring is properly seated.
- ✦ Find zero preload
If instructed by the manufacturer, bring the perch to the point where free spring movement just disappears.
- ✦ Add specified preload
Turn the perch only by the amount recommended for your coilover.
- ✦ Secure the collar
Lock the spring perch in place once preload is set.
Does More Preload Make Coilovers Stiffer?
With a normal linear-rate spring, adding a small amount of preload does not change the spring’s actual rate. A 400-pound-per-inch spring does not become a higher-rate spring just because it has preload. However, preload can affect when the suspension starts to move, available droop, and the vehicle’s static position.
Progressive springs can behave differently because their effective spring rate changes as different parts of the spring compress. This is another reason to follow the suspension maker’s setup instructions rather than using a universal preload number.
How to Adjust Front Coilover Damping
Some coilovers include adjustable damping in addition to height adjustment. The adjuster may sit at the top of the front strut, at the bottom of the shock body, or on a remote reservoir. Damping controls the speed of suspension movement rather than simply changing spring stiffness.
When learning **how to adjust front coilovers**, start with the damping position recommended by the coilover manufacturer. If no street setting is provided, the middle portion of the available adjustment range is often used as a neutral test point, but the product instructions should still guide the setup.
Change damping one or two clicks at a time. Drive the same test route after each change. A road with smooth pavement, moderate bumps, and a few turns makes comparison easier.
Do not force an adjuster after it reaches its stop. Small damping adjusters can be damaged by excessive torque.

- ✦ Too soft
The front may continue moving after bumps, feel loose during transitions, or take too long to settle.
- ✦ Too firm
The front may feel harsh, skip over rough pavement, or lose grip on uneven roads.
- ✦ Balanced setting
The suspension absorbs a bump and returns to a controlled state without excessive bounce or impact.
Keep Left and Right Damping Settings Equal
For normal street use, set the left and right front dampers to the same number of clicks unless the suspension manufacturer or a qualified setup specialist gives you a reason to do otherwise. Unequal damping can create inconsistent handling during braking and cornering.
Check Front Coilover Clearance and Suspension Travel
Knowing **how to adjust front coilovers** also means knowing when to stop lowering the car. A vehicle can look good while sitting still but rub badly when the wheel turns, the suspension compresses, or the car carries passengers.
Check clearance between the tire and the spring, lower spring perch, fender liner, brake hose, sway bar, and body. Turn the steering from full left to full right while inspecting the front suspension. Look for anything that stretches, touches, or comes dangerously close.
Also consider suspension travel. If the car sits too low, the shock may reach the end of its compression travel during normal bumps. Repeated bottoming can hurt ride quality, reduce grip, and place high loads on suspension parts.
A useful street setup leaves enough bump travel for potholes, driveway entrances, road dips, and highway expansion joints. This matters on U.S. roads where pavement quality can change quickly from one street to another.

- ✦ Tire-to-coilover clearance
Check the inside sidewall at normal height and through steering movement.
- ✦ Fender clearance
Make sure the tire has room to move upward without cutting or rubbing the fender.
- ✦ Brake hose clearance
Confirm brake hoses and ABS wiring do not stretch or rub through the steering range.
- ✦ Bump travel
Leave enough compression travel for real-world road impacts.
- ✦ Ground clearance
Check the front bumper, subframe, exhaust, oil pan, and other low components.
Why Extremely Low Front Ride Height Can Hurt Handling
Lower is not always better. Excessive lowering can alter control-arm angles, steering geometry, roll-center location, and available shock travel. A car that constantly rides on its bump stops may handle worse than the same car at a slightly higher height.
How to Level the Front Coilovers Correctly
After both sides have been adjusted, lower the car and let the suspension settle. Measure from the wheel center to the fender again. If one front corner is noticeably higher, make a small correction and repeat the process.
Do not rely only on counting exposed threads. Manufacturing tolerances, chassis weight distribution, bushing position, and previous suspension work can cause the same thread measurement to produce slightly different fender heights.
At the same time, do not chase a tiny measurement difference endlessly. A few millimeters can come from floor slope, fuel load, or normal chassis variation. What matters most is that the vehicle sits within the intended range and behaves consistently.
For performance setups, true corner balancing uses scales under all four wheels. That is different from simply making the fender gaps match. A professional alignment or race shop can corner-balance adjustable coilovers when that level of setup is needed.
- ✦ Settle the suspension
Roll or drive the car before taking the final measurements.
- ✦ Measure both sides
Use the same wheel-center-to-fender method used before adjustment.
- ✦ Correct gradually
Make small changes rather than repeatedly overshooting the target.
Do Both Front Coilovers Need the Same Number of Turns?
Using the same number of turns is a good starting point, but final ride height should be checked by measurement. The car’s weight may not be perfectly equal from left to right. Use the manufacturer’s setup limits and avoid large side-to-side differences just to make fender gaps match.
Get an Alignment After Adjusting Front Coilovers
Changing ride height can change wheel alignment. This is one of the most important steps after learning **how to adjust front coilovers**. Toe and camber can move as suspension arms change angle.
Incorrect toe can wear tires very quickly and can make the vehicle wander. Excess negative camber may also increase inner tire wear, especially on a street-driven car. The steering wheel may no longer sit centered after a major height change.
Once you are satisfied with the ride height, have the alignment checked by a qualified shop. Tell the technician the car has adjustable coilovers and explain how you use it. A daily commuter, autocross car, and track car may need different alignment targets.
- ✦ Toe
Ride-height changes can alter toe and cause rapid tire wear or unstable steering.
- ✦ Camber
Lowering commonly increases negative camber on many suspension designs.
- ✦ Caster
Caster may also need inspection depending on suspension design and available adjustment.
- ✦ Steering wheel position
A proper alignment should also leave the steering wheel centered.
When Should You Schedule the Alignment?
Finish the ride-height adjustment before paying for an alignment. If you change the height again after the alignment, the settings may move and need another correction. After the final adjustment, inspect fasteners and schedule the alignment before putting many miles on the tires.
Common Mistakes When Adjusting Front Coilovers
Most problems with **how to adjust front coilovers** come from rushing the process. Coilovers are simple in concept, but several adjustments can interact with one another. Keeping notes and making one change at a time makes troubleshooting much easier.
A common professional suspension setup lesson is to establish a repeatable baseline. Record ride height, preload, damping clicks, tire pressure, and alignment values. If a later adjustment makes the car worse, you can return to the known starting point instead of guessing.
- ✦ Using preload to lower the car
On coilovers with independent height adjustment, changing preload unnecessarily can reduce useful suspension travel.
- ✦ Not measuring before adjustment
Without a baseline, it becomes difficult to tell how much each change affected the vehicle.
- ✦ Making huge adjustments
Large changes increase the chance of overshooting the desired ride height or creating clearance problems.
- ✦ Leaving locking collars loose
Loose collars can allow settings to change and may create clunking or other unwanted movement.
- ✦ Ignoring thread limits
Extending threaded mounts beyond their safe range can reduce strength.
- ✦ Skipping the alignment
Ride-height changes can alter toe and camber enough to affect steering and tire wear.
- ✦ Lowering until the suspension bottoms out
A low stance is not useful if the suspension no longer has enough travel for normal road conditions.
Do Not Use an Impact Tool on Adjustment Collars
Adjustment collars are designed to be moved with the correct spanner tool. Hammering on them or using makeshift tools can damage the collar and threaded shock body. If a collar is seized, clean the threads and follow the manufacturer’s method for freeing it.
How to Fine-Tune Front Coilovers for Street Driving
For a street car, the best setup usually balances appearance, comfort, tire clearance, and suspension travel. Start with a moderate ride height instead of dropping the car to its lowest possible setting. Drive it in the conditions you normally face before deciding whether it needs another change.
If the front feels harsh, do not automatically raise the vehicle or change the spring preload. First check tire pressures, bump travel, damping position, and whether the car is hitting the bump stops. A problem that feels like excessive spring stiffness may actually come from too little suspension travel.
If the car feels floaty after bumps, slightly more damping may help on an adjustable system. If the tires seem to skip across rough pavement, the damping may be too firm. Make one adjustment at a time so you know which change improved or hurt the behavior.
- ✦ Start moderate
Leave practical ground clearance and usable suspension travel.
- ✦ Test on familiar roads
Use the same route so changes in ride quality are easier to compare.
- ✦ Change one variable
Do not change ride height, preload, and damping at the same time.
- ✦ Keep a setup log
Record measurements and damping clicks so you can return to a known good setup.
A Useful Baseline Setup Record
Write down the front left and right ride heights, front damping settings, preload measurements, tire pressures, and alignment values. This simple record is useful after tire changes, suspension service, or future ride-height adjustments.
Final Safety Checks After Adjusting Front Coilovers
Before driving at normal speed, inspect your work. Make sure adjustment collars are secure, wheels are torqued correctly, and no brake hose or ABS wire was moved into a dangerous position. Look for tools or loose hardware around the suspension.
Turn the steering wheel from lock to lock while the car is on the ground. Listen and feel for rubbing. Then take a slow test drive and pay attention to clunks, scraping, steering pull, or unusual vibration.
After a short drive, inspect the coilovers again. Some manufacturers also recommend rechecking important fasteners after an initial period of driving. Follow the maintenance schedule supplied with your suspension kit.
- ✦ Locking collars
Verify every adjusted collar is firmly secured.
- ✦ Wheel torque
Torque lug nuts to the vehicle manufacturer’s specification.
- ✦ Full steering movement
Check both steering locks for tire, hose, and wiring clearance.
- ✦ Road test
Begin slowly and listen for rubbing, knocking, or other new noises.
- ✦ Alignment
Have the wheel alignment checked after the final ride height is established.


