
How to Adjust Coilovers Without Spanner Wrench Safely
If you need to know how to adjust coilovers without spanner wrench, the first thing to understand is that the missing wrench is not the main problem. The real challenge is turning the adjustment collar without crushing it, rounding its notches, or damaging the threaded shock body. In many cases, a strap wrench or carefully used soft-jaw tool can provide enough grip.
The safest method depends on your coilover design. Some coilovers change ride height through the lower mount. Others use the spring perch, and some systems use both adjustments for different purposes. Before turning anything, identify which collar controls ride height and which controls spring preload.
I have seen simple suspension jobs become expensive because a stuck collar was attacked with a hammer and screwdriver. That can chip the coating, damage the threads, and make later adjustments much harder. A few minutes spent cleaning the threads and unloading the suspension is usually more useful than adding more force.
This guide explains how to adjust coilovers without spanner wrench, which alternative tools are safer, how to raise or lower the car, how to avoid changing preload by mistake, and when it makes more sense to stop and buy the correct wrench.

How to Adjust Coilovers Without Spanner Wrench
To learn how to adjust coilovers without spanner wrench, start by parking the car on firm, level ground. Measure the current ride height at all four corners. Then loosen the wheel nuts slightly, raise the vehicle at the correct lift points, and support it with quality jack stands.
Removing the wheel gives you much better access. It also lets you inspect the coilover body, collars, brake hose, ABS wire, and nearby suspension parts. Never work under a car that is supported only by a hydraulic floor jack.
Clean the exposed threads before trying to rotate a collar. Road dirt, sand, rust, and dried anti-seize can make an adjustment collar feel locked even when the locking force is low. Use a nylon brush and a suitable cleaner that will not harm the coilover finish.
Next, loosen the locking collar with the safest tool you have. A rubber strap wrench is often the best improvised option because it spreads pressure around the ring. Once the lock ring is loose, adjust the correct collar or lower mount in small steps.
Count turns or measure exposed threads so you can repeat the change on the opposite side. Tighten the locking collar again, reinstall the wheel, lower the car, roll it back and forth, and remeasure the ride height after the suspension settles.

- ✦ Measure first
Record the ride height at every corner before changing the coilovers.
- ✦ Unload the suspension
Raise and safely support the vehicle so the coilover is not carrying normal vehicle weight.
- ✦ Clean the threads
Remove dirt and corrosion before moving the adjustment rings.
- ✦ Loosen the lock ring
Use a tool that grips the ring without crushing, gouging, or deforming it.
- ✦ Make small changes
Use measured turns instead of making a large adjustment at once.
- ✦ Recheck both sides
Keep matching suspension corners consistent unless you are performing a proper corner-weight setup.
Why unloading the suspension makes adjustment easier
Vehicle weight places force on the spring and its adjustment hardware. Removing that load can reduce friction at the collars. It also gives you better control when making small changes.
Do not assume that lifting the car removes all spring tension. Many coilovers still have preload when the wheel hangs freely. Treat the spring as loaded unless the manufacturer’s service procedure says otherwise.
- ✦ Safety rule
Never remove a spring perch or other load-bearing part simply because the vehicle is on jack stands.
Best Tools to Use When You Do Not Have a Spanner Wrench
The correct coilover spanner should always be the first choice. It fits the collar shape and lets you apply force where the manufacturer intended. Still, there are times when the wrench is lost or you need to make a temporary adjustment before a replacement arrives.
For **how to adjust coilovers without spanner wrench**, choose an alternative tool based on how freely the collar moves. A clean collar that is only lightly tightened needs far less force than a corroded collar that has not moved in years.
A rubber strap wrench is one of the better options. It grips a broad section of the adjustment ring and is less likely to leave deep marks. It works best when the collar is accessible and not severely seized.
Soft-jaw adjustable pliers may also work on some larger collars. Use only enough pressure to prevent slipping. Crushing the ring can distort its shape and make the correct spanner wrench difficult to use later.

- ✦ Rubber strap wrench
A good first choice for collars that move with moderate force.
- ✦ Soft-jaw pliers
Useful when access is limited, but pressure must stay low to avoid deforming the ring.
- ✦ Oil-filter strap wrench
Some strap-style filter tools can grip large collars if their size and shape fit correctly.
- ✦ Replacement coilover wrench
The best solution when the collar is tight, seized, or frequently adjusted.
Tools you should avoid
A pipe wrench, locking pliers, punch, chisel, or screwdriver can place extreme force on a small part of the collar. These tools may gouge aluminum rings, damage protective finishes, and create sharp edges.
Hitting a collar with a hammer and screwdriver is especially risky. The impact can damage the adjustment notch and may transfer force into the shock body. If the collar requires that much force, stop and deal with the reason it is stuck.
- ✦ Avoid metal-on-metal damage
Do not use aggressive gripping tools directly on an aluminum adjustment collar unless specifically approved by its manufacturer.
- ✦ Avoid excessive impact
A collar that will not move with reasonable force needs cleaning, lubrication, or the correct tool rather than harder hammer blows.
Know What You Are Adjusting Before Turning the Collar
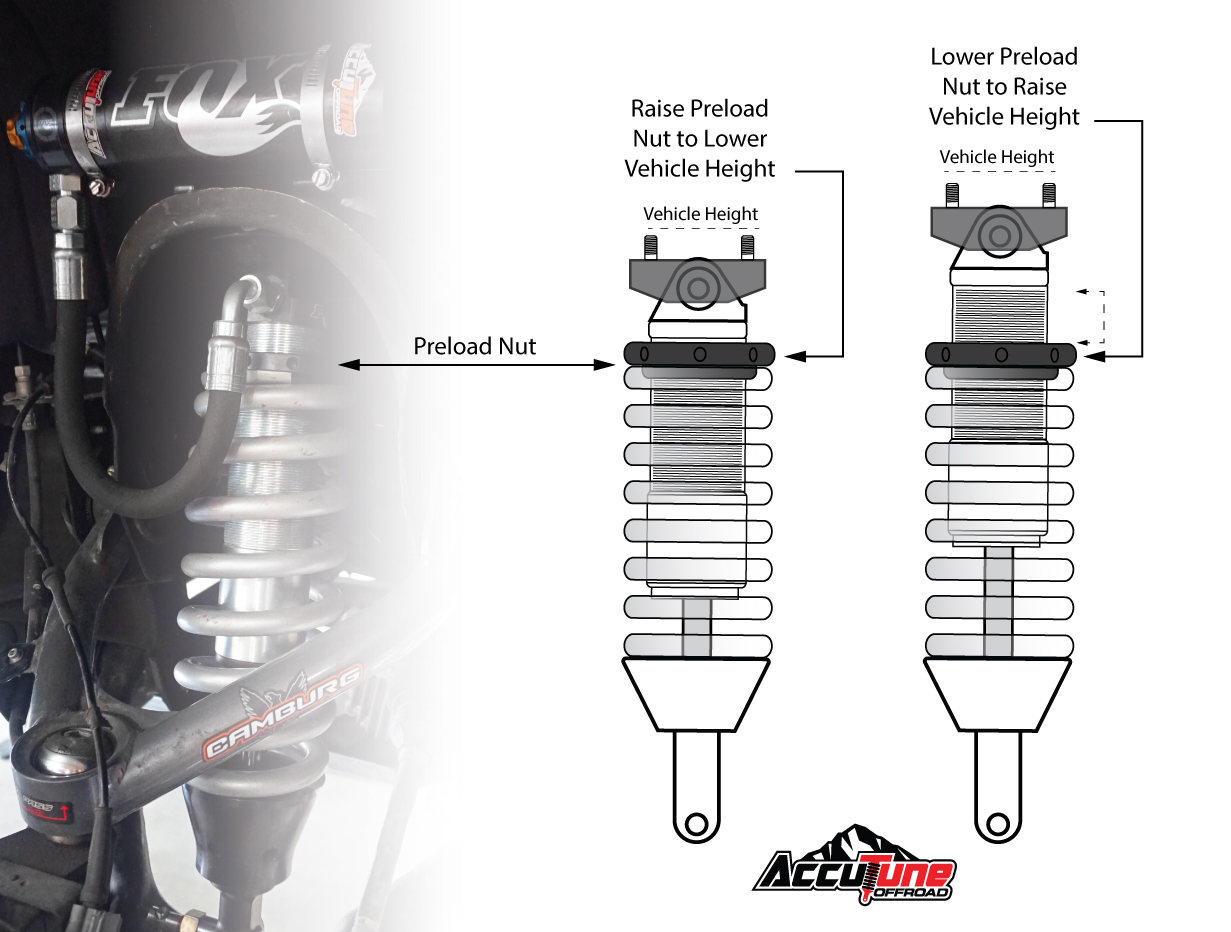
One of the most important parts of learning **how to adjust coilovers without spanner wrench** is knowing what each ring does. Coilovers do not all use the same ride-height system. Turning the wrong collar can change spring preload rather than vehicle height.
Many full-length adjustable coilovers use the lower shock mount to change ride height. The spring perch is then used mainly to set spring preload. This design lets you alter vehicle height without greatly changing spring compression.
Other coilovers use the spring perch itself to control ride height. Moving the spring seat changes where the vehicle rests on the spring. On these systems, height and available suspension travel can interact more directly.
Check the manual for your exact coilover model when possible. If no manual is available, identify the spring perch, lock rings, threaded damper body, and lower mounting section before you start.
- ✦ Spring perch
The ring directly supporting the spring. Its effect depends on coilover design.
- ✦ Spring-perch lock ring
Locks the spring perch in position so vibration cannot easily rotate it.
- ✦ Lower mount
On many full-length adjustable coilovers, the threaded lower mount is used to change overall shock length and ride height.
- ✦ Lower lock ring
Secures the shock body or lower mount after ride-height adjustment.
Ride height and preload are not the same thing
Ride height describes how high the vehicle sits. Spring preload describes how much the spring is compressed when the suspension is extended to its defined setup position.
Changing preload without understanding the coilover design can alter droop travel and spring behavior. That is why you should not simply move the nearest collar until the vehicle looks lower.
- ✦ Key lesson
Identify the ride-height adjustment point before changing any spring perch position.
Step-by-Step Method for Lowering Coilovers Without the Correct Wrench
If your coilovers use a threaded lower mount for height adjustment, lowering the vehicle often means shortening the overall coilover assembly. The exact direction of rotation varies by design, so confirm it before applying force.
Start by measuring from a fixed point on the wheel arch to the wheel center or ground. Using the wheel center can reduce errors caused by tire pressure or tire size. Record the measurement for both sides of the axle.
Raise the vehicle and remove the wheel. Clean the threaded section thoroughly. Loosen the correct lock collar with a strap wrench or another safe alternative.
Rotate the shock body or lower mount in the required direction. Make a small change, such as one or two full turns. Measure the amount of exposed thread or count the turns so you can repeat the adjustment on the opposite side.
Retighten the lock collar. Lower the vehicle and move it a short distance so the suspension can settle. Measure again before deciding whether more adjustment is needed.

- ✦ Work in small steps
Small adjustments make it easier to correct ride height without overshooting.
- ✦ Match both sides
Use the same number of turns as a starting point on the left and right sides.
- ✦ Check tire clearance
Verify clearance around the tire, fender liner, suspension links, brake hose, and body.
- ✦ Check ground clearance
Make sure important parts such as the oil pan, exhaust, and subframe retain usable clearance.
Do not lower the car by removing all spring preload
Some owners loosen the spring perch until the spring becomes loose at full suspension droop. That is not a safe universal method for gaining more drop. A loose spring may move out of position when the suspension extends.
Follow the coilover maker’s preload range. If you have reached the safe adjustment limit and still want the vehicle lower, the coilover may not support your target height.
- ✦ Stay within the adjustment range
Do not force the coilover beyond the thread engagement or preload limits specified for the unit.
How to Raise Coilovers Without a Spanner Wrench
The basic process for raising the car is similar. You first identify the correct height-adjustment point, clean the threads, loosen the locking ring, and extend the adjustable section in the proper direction.
This is another case where knowing **how to adjust coilovers without spanner wrench** does not mean guessing which ring to move. On a full-length adjustable design, raising the vehicle may require lengthening the lower mounting section. On a perch-adjusted design, the process can be different.
Make equal measured changes on both sides. Then tighten all lock rings and lower the vehicle to the ground. Roll the car or drive it a very short distance on level ground before taking the final measurement.
Raising a very low car can improve tire clearance, suspension travel, and daily drivability. For many U.S. drivers, even a small increase can help with steep driveways, parking-lot entrances, speed bumps, and rough city streets.

- ✦ Confirm thread engagement
Do not extend an adjustable mount beyond the manufacturer’s minimum safe thread engagement.
- ✦ Keep measurements consistent
Measure from the same points before and after every change.
- ✦ Inspect wiring and hoses
Verify that brake hoses and wheel-speed sensor wiring are not stretched after the adjustment.
Why equal turns may not produce equal final height
Two equal coilover adjustments do not always give perfectly equal fender measurements. Vehicle weight distribution, bushing preload, fuel load, tire pressure, and the surface beneath the car can all affect the result.
Use equal turns as a starting point. Then verify actual ride height after the suspension settles.
- ✦ Measure the result
The final vehicle measurement matters more than assuming equal thread counts guarantee equal ride height.
What to Do if the Coilover Collar Is Stuck
A seized collar changes the job. If normal hand force with a suitable tool does not move it, do not keep increasing pressure without checking why it is stuck. Dirt and corrosion often build up in the exposed threads.
Brush away loose dirt first. Then use a penetrating product that is compatible with the coilover materials and finish. Give it time to work before trying the collar again.
You can also clean the threads above and below the collar as access allows. The goal is to prevent grit from being dragged through the threads while the ring turns.
If the collar begins to move and then binds, stop. Turn it back slightly and clean the newly exposed threads. Working the ring slowly back and forth can be safer than forcing it through a dirty section.

- ✦ Clean before adding force
A dirty threaded body can make a normal collar feel seized.
- ✦ Use compatible products
Choose cleaners and penetrating products that will not damage seals, coatings, or nearby rubber parts.
- ✦ Stop if the threads gall
Grinding, sticking, or visible metal damage can indicate thread damage that needs professional attention.
- ✦ Buy the proper tool when necessary
A stubborn collar is not the right place to prove that an improvised tool can work.
Why aluminum adjustment collars need extra care
Many coilover collars are aluminum. Aluminum is light and corrosion resistant in many conditions, but its edges can be damaged by hard steel tools.
If a tool slips repeatedly, stop using it. Each slip removes material and makes the next attempt harder.
- ✦ Protect the collar
Use broad, controlled contact instead of sharp metal jaws whenever possible.
How Much Should You Adjust Coilovers at One Time?
There is no single number that works for every coilover. Thread pitch, suspension geometry, motion ratio, and adjustment design all affect how much one turn changes the final ride height.
For that reason, make small changes and measure the result. One full turn is easy to record and repeat. If the change is too small, you can make another measured adjustment.
Large changes can create several problems at once. You may lose tire clearance, change suspension travel, alter alignment, or make the car sit lower than expected.
This careful approach is useful whenever you are learning **how to adjust coilovers without spanner wrench** because improvised tools give you less control than the correct matched wrench.

- ✦ Record each turn
Write down how many turns you make at each corner.
- ✦ Settle the suspension
Move the vehicle after lowering it so the suspension can settle before final measurement.
- ✦ Inspect full steering lock
Turn the steering from side to side and check tire and suspension clearance on the front axle.
A simple measurement method
Park on level ground and measure vertically from the center of the wheel hub to the lower edge of the fender opening. Record all four measurements.
This method reduces the effect of changes in tire sidewall height. Use the same reference points every time.
- ✦ Keep a setup record
Save the measurements and adjustment turns so you can return to an earlier setup later.
Should You Change Spring Preload While Adjusting Ride Height?
Not unless your coilover design requires it. Preload and ride height serve different purposes on many coilover systems. Treating them as the same setting can produce a poor suspension setup.
Spring preload is the amount of compression placed on the spring at a defined extended suspension position. Some systems call for only enough preload to keep the spring securely seated. Others specify a measured amount.
Excess preload may reduce available droop travel or change how the suspension behaves. Too little preload may allow a spring to become loose when the suspension reaches full extension.
If the coilover offers independent lower-mount height adjustment, use that feature according to the manufacturer’s instructions rather than moving the spring perch simply to make the car lower.
- ✦ Do not guess preload
Follow the specification for your exact spring and coilover assembly.
- ✦ Check spring seating
The spring should remain correctly located through the suspension’s intended range of travel.
- ✦ Do not chase appearance alone
A very low stance can reduce usable travel and create tire, chassis, and alignment problems.
Can more preload make the suspension stiffer?
On a normal linear-rate coil spring, preload does not change the spring’s actual rate. A spring rated at a given force per inch remains that rate within its normal working range.
Preload can still change suspension position, available droop, and the force needed before the spring extends from its installed position. That can change how the suspension feels even though the spring rate itself has not changed.
- ✦ Spring rate stays the same
Adding preload to a linear spring does not turn it into a higher-rate spring.
Mistakes to Avoid When Adjusting Coilovers Without the Proper Tool
Knowing **how to adjust coilovers without spanner wrench** is useful, but knowing when not to improvise is even more important. The most common mistakes come from using too much force, turning the wrong ring, or failing to record the original settings.
Do not attack a lock ring with the sharp tip of a screwdriver. Even if it moves, you can destroy the notch that the proper spanner wrench needs later. You can also slip and damage nearby components or injure your hand.
Do not rely only on exposed thread count to judge final vehicle height. Use it as a setup reference, then measure the vehicle after it is back on the ground.
Finally, never assume the alignment remains correct after changing ride height. Suspension geometry changes as the chassis position changes.
- ✦ Turning the wrong collar
Confirm which adjustment controls height and which controls preload.
- ✦ Using excessive force
Stop if an improvised tool begins slipping, crushing, or cutting the collar.
- ✦ Skipping measurements
Record the starting height so you know how much the car actually moved.
- ✦ Uneven side-to-side adjustment
Unplanned differences can affect appearance, handling, and available suspension travel.
- ✦ Ignoring alignment
A significant ride-height change can alter toe, camber, and other suspension geometry.
Why hammer-and-screwdriver adjustment is risky
This old shortcut can move some collars, but it concentrates impact into a tiny area. Soft aluminum lock rings can become badly notched after only a few hits.
It also gives poor control over adjustment. A strap wrench or the correct replacement spanner is a better choice.
- ✦ Better approach
Clean the threads, unload the suspension, and use a broad-grip tool before considering any impact method.
Do You Need an Alignment After Adjusting Coilovers?
A meaningful ride-height change should normally be followed by an alignment check. Raising or lowering a vehicle changes the position of suspension links and can affect wheel alignment.
Toe is especially important because incorrect toe can wear tires quickly and make the car feel unstable. Camber can also change as the suspension moves through its travel.
After adjusting the coilovers, inspect the tires and suspension for contact. Then have the alignment measured if you made a significant height change or if steering behavior changed.
If you only moved a collar slightly for a minor correction, the alignment change may also be small. Still, measuring alignment is the only reliable way to know whether it remains within the desired specification.
- ✦ Check toe
Ride-height changes can alter toe and affect tire life.
- ✦ Check camber
Lowered vehicles often gain negative camber depending on suspension design.
- ✦ Center the steering wheel
A proper alignment should leave the steering wheel centered when the car travels straight.
- ✦ Recheck clearance
Verify tire and fender clearance through steering movement and normal suspension travel.
When alignment should be treated as a priority
Schedule an alignment promptly if you made a large ride-height change, replaced suspension parts, or notice pulling, an off-center steering wheel, or unusual tire wear.
Drivers who use their cars on a track may want a custom alignment based on tire choice and driving goals. A street-driven car usually benefits from a setup that balances handling, stability, and tire life.
- ✦ Street use
Use an alignment suitable for normal road driving unless you have a specific performance setup.
When You Should Stop and Buy the Correct Spanner Wrench
Sometimes the correct answer to **how to adjust coilovers without spanner wrench** is to stop improvising. Replacement coilover spanners are usually much cheaper than replacing a damaged adjustment ring or threaded shock body.
If the collar is heavily corroded, extremely tight, or already damaged, a proper wrench gives you better engagement. Many coilover brands also sell replacement wrench sets separately.
A correct spanner is especially valuable if you plan to change ride height more than once. It reduces the chance of cosmetic and structural damage and makes future adjustments faster.
If even the correct wrench cannot move the ring with reasonable force, the coilover may need to be removed and serviced. Severe corrosion, damaged threads, or seized collars should not be solved by adding unlimited force.
- ✦ Buy the proper wrench if the collar is seized
High-force adjustments need the correct tool and solid engagement.
- ✦ Stop if threads are damaged
Continuing to turn a damaged collar can make the threaded body unusable.
- ✦ Get professional help when needed
A suspension shop can inspect seized or damaged coilovers and determine whether they are safe to service.
How to find the right replacement spanner
Start with the coilover brand and model number. Manufacturers often specify the correct wrench in the installation manual or replacement-parts catalog.
Universal spanner wrenches are also available, but confirm the hook shape and collar diameter before buying. A poor-fitting universal tool may slip almost as easily as an improvised one.
- ✦ Best match
A manufacturer-specific wrench normally provides the best fit for the adjustment collar.
Safety Checks After Adjusting Your Coilovers
Finishing the adjustment does not mean the job is complete. Before normal driving, confirm that all lock rings are secure and that every fastener you loosened has been tightened to the correct specification.
Check tire clearance with the steering turned fully left and fully right. Look at the inside edge of the tire as well as the outer fender because suspension contact can occur where it is difficult to see.
Inspect brake hoses, ABS wiring, sway-bar links, control arms, axles, and other nearby parts. Nothing should be pulled tight or rubbing because of the new suspension position.
Take a short, low-speed test drive. Listen for clunks, rubbing, or unusual noises. Recheck the ride height and visible coilover hardware afterward.
- ✦ Lock rings
Confirm every adjustment ring is secured.
- ✦ Wheel torque
Torque wheel fasteners correctly after reinstalling the wheels.
- ✦ Tire clearance
Check clearance at full steering lock and around the inner wheel well.
- ✦ Suspension clearance
Make sure links, hoses, wiring, and axles do not contact nearby parts.
- ✦ Road test
Start slowly and investigate any new rubbing, vibration, or clunking before normal driving.
Recheck the collars after driving
After the suspension has settled and the car has been driven, inspect the adjustment rings again. Verify that the lock rings have not moved.
Periodic cleaning also helps keep future adjustments easy. Dirt left on exposed coilover threads can eventually make the collars much harder to turn.
- ✦ Prevent future problems
Keep the threaded bodies clean and follow the coilover maker’s maintenance guidance.


