
How to Adjust Coilover Preload: Step-by-Step Setup Guide
Learning how to adjust coilover preload can make suspension setup much easier. The basic job is simple. You unload the suspension, measure the spring, move the spring perch or collar, and set the correct amount of compression.
The part that causes trouble is knowing how much preload to use. More preload is not always better. Too little may let the spring become loose at full droop, while too much can reduce useful droop travel and place the shock too close to topping out.
On many street coilovers sold in the U.S., the manufacturer already gives a preload specification. Some systems need only enough preload to keep the spring seated. Other coilovers use preload as part of ride-height or suspension-travel setup.
In practical suspension work, I treat preload as a measured setting rather than a ride-feel adjustment. I first check the coilover manual, measure the spring carefully, make small changes, and then check ride height and shock travel as separate steps. This approach prevents many common setup problems.

What Is Coilover Preload?
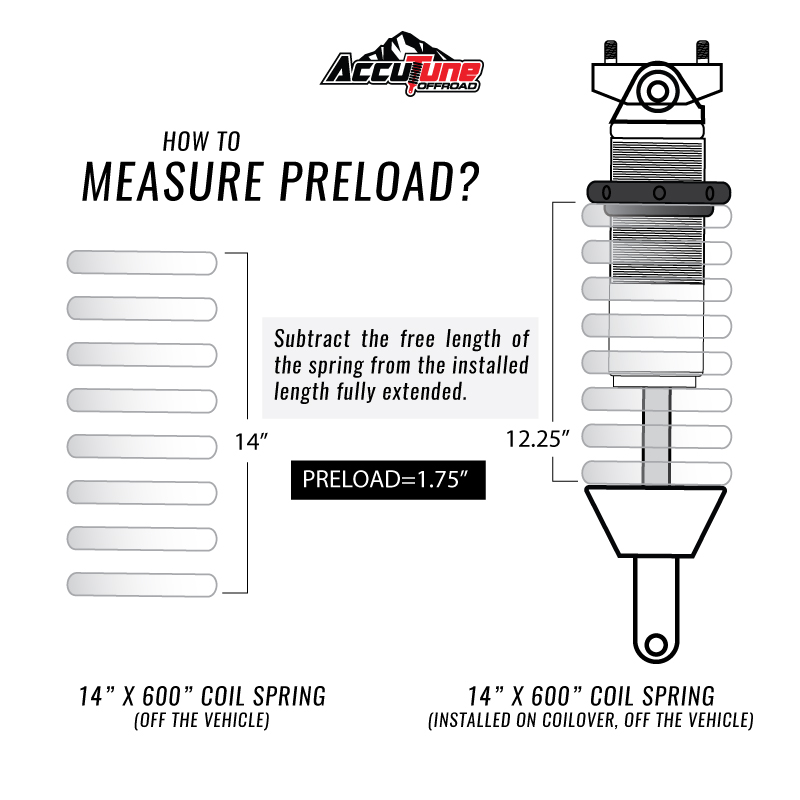
Before learning how to adjust coilover preload, it helps to know what preload means. Preload is the amount the coil spring is compressed while the shock is fully extended and the suspension is unloaded.
For example, suppose a spring has a free length of 8 inches. After installing it and tightening the spring perch, it measures 7.75 inches with the suspension at full droop. The spring has about 0.25 inch of preload.
Preload keeps the spring seated and can change the force needed before the suspension starts moving from full extension. However, it does not automatically change the spring’s rated stiffness. A 500-pound-per-inch linear spring remains a 500-pound-per-inch spring within its normal working range.
The exact effect of preload depends on the suspension design. That is why manufacturer specifications matter more than a universal number.
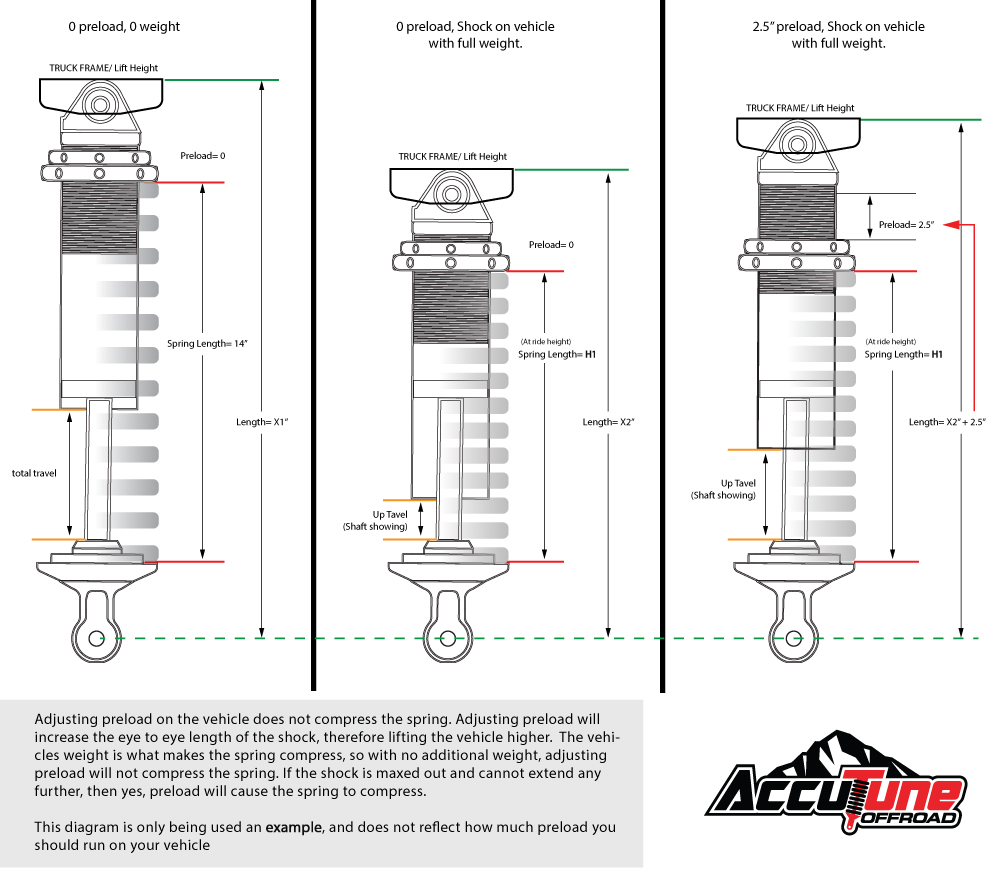
- ✦ Free spring length
The spring length before it is compressed by the adjustment collar.
- ✦ Installed spring length
The spring length after the collar has compressed it with the suspension fully unloaded.
- ✦ Preload amount
The difference between the spring’s free length and its installed unloaded length.
Does Preload Make the Spring Stiffer?
On a normal linear-rate spring, preload does not change the spring’s basic spring rate. If the spring rate is 500 lb/in, compressing it by preload does not turn it into a 600 lb/in spring.
What preload does change is the initial spring force and the suspension’s position within its available travel. That can affect droop, top-out behavior, and how the car feels near full extension.
Progressive springs and multi-spring coilover systems can behave differently. Always follow the setup method for the exact suspension system.
- ✦ Spring rate
The force needed to compress a spring by a given distance.
- ✦ Initial spring force
The force stored in the spring because it has already been compressed.
Why Correct Coilover Preload Matters
Correct preload helps the spring stay seated during full suspension droop. It also helps the shock work within the travel range intended by the manufacturer.
If preload is far too low, the spring may become loose when the wheel hangs down. That can cause noise, poor spring seating, or unwanted movement of the spring hardware.
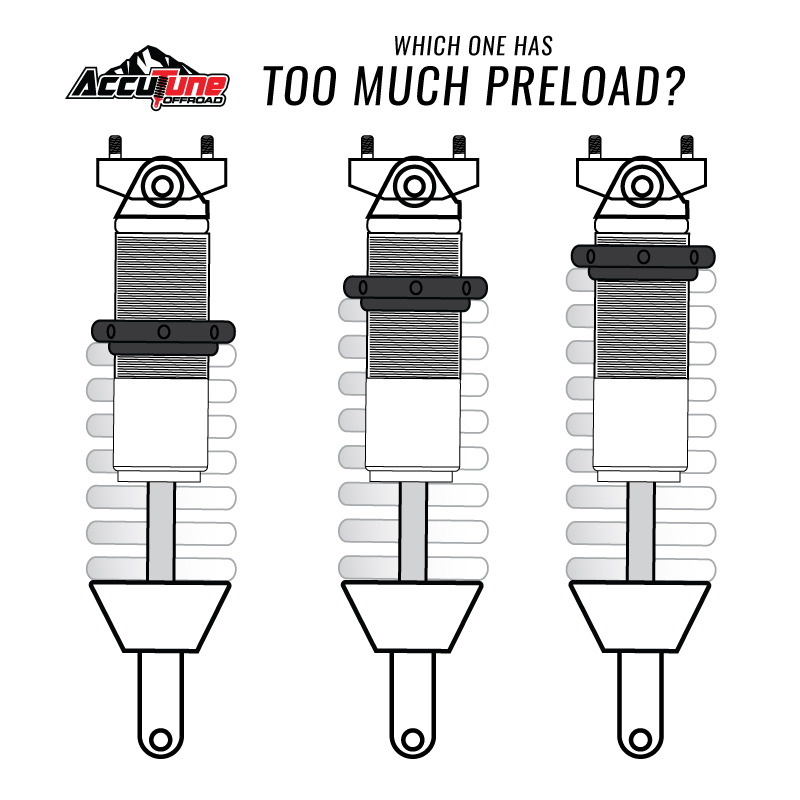
If preload is excessive, the suspension may lose droop travel. The shock can sit too close to full extension at normal ride height. On rough roads, that can make the suspension top out more easily.
For a street car, the goal is usually not maximum preload. The goal is enough preload to meet the coilover maker’s specification while keeping useful bump and droop travel.
- ✦ Keeps the spring seated
Correct preload helps prevent the spring from moving away from its perch during full droop.
- ✦ Preserves suspension travel
A proper setting helps keep enough room for both compression and extension.
- ✦ Supports predictable setup
Measured preload gives you a repeatable baseline for ride-height and damping adjustments.
Too Little Preload vs. Too Much Preload
Too little preload may leave the spring loose at full extension. Too much preload can raise the suspension’s resting position or reduce droop, depending on the coilover design.
Neither condition should be diagnosed only by ride feel. Measure the spring, inspect the coilover at full droop, and compare your setup with the manufacturer’s specification.
- ✦ Possible low-preload sign
The spring can move by hand when the suspension is fully unloaded.
- ✦ Possible high-preload sign
The shock has very little extension travel remaining at normal ride height.
Tools You Need to Adjust Coilover Preload
You do not need many tools to learn how to adjust coilover preload. You do need the correct tools for your coilover system and a safe way to lift the vehicle.
Never work under a vehicle supported only by a floor jack. Use quality jack stands on solid lifting points. If the coilover must be removed, follow the vehicle and coilover manufacturer’s removal procedure.
Clean the adjustment threads before turning the collars. Dirt and corrosion can make collars hard to move and may damage threaded shock bodies.
- ✦ Floor jack
Used to safely raise the vehicle before placing it on jack stands.
- ✦ Jack stands
Support the vehicle while the suspension is unloaded.
- ✦ Coilover spanner wrench
Turns the spring perch and locking collars without damaging them.
- ✦ Tape measure or ruler
Measures spring length and preload accurately.
- ✦ Caliper
Helpful when you want a more precise preload measurement.
- ✦ Penetrating lubricant
May help free dirty or lightly corroded collars when permitted by the manufacturer.
- ✦ Torque wrench
Used for wheels and any suspension hardware that must be tightened to specification.
How to Adjust Coilover Preload Step by Step
The safest way to adjust coilover preload is to work from a known specification. Check the coilover manual first. If the manufacturer specifies a preload amount, use that number instead of a generic setting.
The steps below apply to many single-spring threaded-body coilovers. Some coilovers use separate ride-height mounts, tender springs, helper springs, dual-rate springs, or different adjustment methods. Those systems may need a different procedure.

- ✦ Step 1: Record your current setup
Measure ride height and note the current collar position before making changes. Taking photos can also help you return to the original setting.
- ✦ Step 2: Park on a safe surface
Use level, solid ground. Set the parking brake and secure the wheels that stay on the ground.
- ✦ Step 3: Raise and support the vehicle
Lift the correct end of the car and place it securely on jack stands. The suspension you are adjusting should be unloaded.
- ✦ Step 4: Remove the wheel if needed
Wheel removal usually gives better access to the spring perch, locking collar, and threaded shock body.
- ✦ Step 5: Clean the coilover threads
Remove dirt and road debris before moving the collar. Clean threads reduce the risk of binding or thread damage.
- ✦ Step 6: Loosen the locking collar
Use the correct spanner wrench. Loosen only the collar that locks the spring perch unless your coilover instructions specify another method.
- ✦ Step 7: Find the zero-preload point
Move the spring perch until the spring is just seated between its upper and lower seats with no free movement, but without meaningful compression.
- ✦ Step 8: Measure the spring
Measure the spring at the zero-preload point or confirm its known free length. Use consistent measuring points.
- ✦ Step 9: Add the specified preload
Turn the spring perch upward to compress the spring by the amount listed by the manufacturer.
- ✦ Step 10: Recheck the measurement
Measure the spring again. Free length minus installed unloaded length equals the preload amount.
- ✦ Step 11: Tighten the locking collar
Hold the spring perch in position and secure the lock collar according to the coilover maker’s instructions.
- ✦ Step 12: Match the opposite side
Set the coilover on the other side to the same baseline unless corner balancing or the manufacturer requires a different setting.
- ✦ Step 13: Reinstall the wheels
Install and torque the wheel fasteners to the vehicle manufacturer’s specification.
- ✦ Step 14: Lower and settle the vehicle
Lower the car, roll it a short distance, and gently settle the suspension before taking final ride-height measurements.
How to Find Zero Preload
Zero preload is the point where the spring is seated but not meaningfully compressed. With the suspension fully unloaded, move the lower spring perch toward the spring until vertical free play disappears.
Do not keep tightening once the spring is seated if you are trying to identify zero preload. That point becomes your reference for adding a measured amount of spring compression.
- ✦ Spring seated
The spring touches both seats and cannot move freely up and down.
- ✦ No added compression
The collar has not yet shortened the spring from its free installed length.
How to Measure Preload Correctly
Measure the spring itself, not the number of exposed threads unless the manufacturer tells you to use thread count. Thread pitch and collar design can vary between coilovers.
If an 8-inch spring measures 7.75 inches after adjustment, you have approximately 0.25 inch of preload. Measure at more than one point if the spring or seat shape makes the reading hard to see.
- ✦ Example
8.00-inch free length minus 7.75-inch installed length equals 0.25 inch of preload.
How Much Coilover Preload Should You Use?
There is no single preload number that fits every coilover. The correct amount depends on the coilover design, spring rate, spring length, shock travel, vehicle weight, suspension geometry, and the manufacturer’s setup target.
Some street coilovers need only a small amount of preload to keep the spring secure. Other systems specify a measured compression value. Off-road coilovers may use much more preload because the shock, spring, and suspension travel are designed differently.
This is one of the most important points when learning how to adjust coilover preload. Do not copy another vehicle’s preload measurement just because the coilovers look similar.
Start with the specification supplied with your exact kit. If the manual gives a range, begin near the recommended baseline and make small changes only when you understand how the change affects shock travel.
- ✦ Check the coilover manual
The manufacturer’s specification should be your first reference.
- ✦ Confirm spring length
Replacement springs with a different free length may require a different setup.
- ✦ Check available droop
Make sure the shock still has enough extension travel at normal ride height.
- ✦ Make small changes
Large preload changes can move the suspension far away from its intended operating range.
Is 5 mm of Coilover Preload Enough?
Five millimeters may be correct for one coilover and wrong for another. Some manufacturers use settings in this general range, while other systems require more, less, or simply enough compression to secure the spring.
Treat any generic value as an example rather than a universal rule. The correct preload is the amount specified for your suspension.
Should Both Front Coilovers Have the Same Preload?
For a normal street setup, both coilovers on the same axle usually start with the same preload setting. This gives you a consistent baseline.
A professionally corner-balanced car may use different perch positions from side to side. In that case, the adjustment is part of a full chassis setup and should not be copied to another vehicle.
Coilover Preload vs. Ride Height
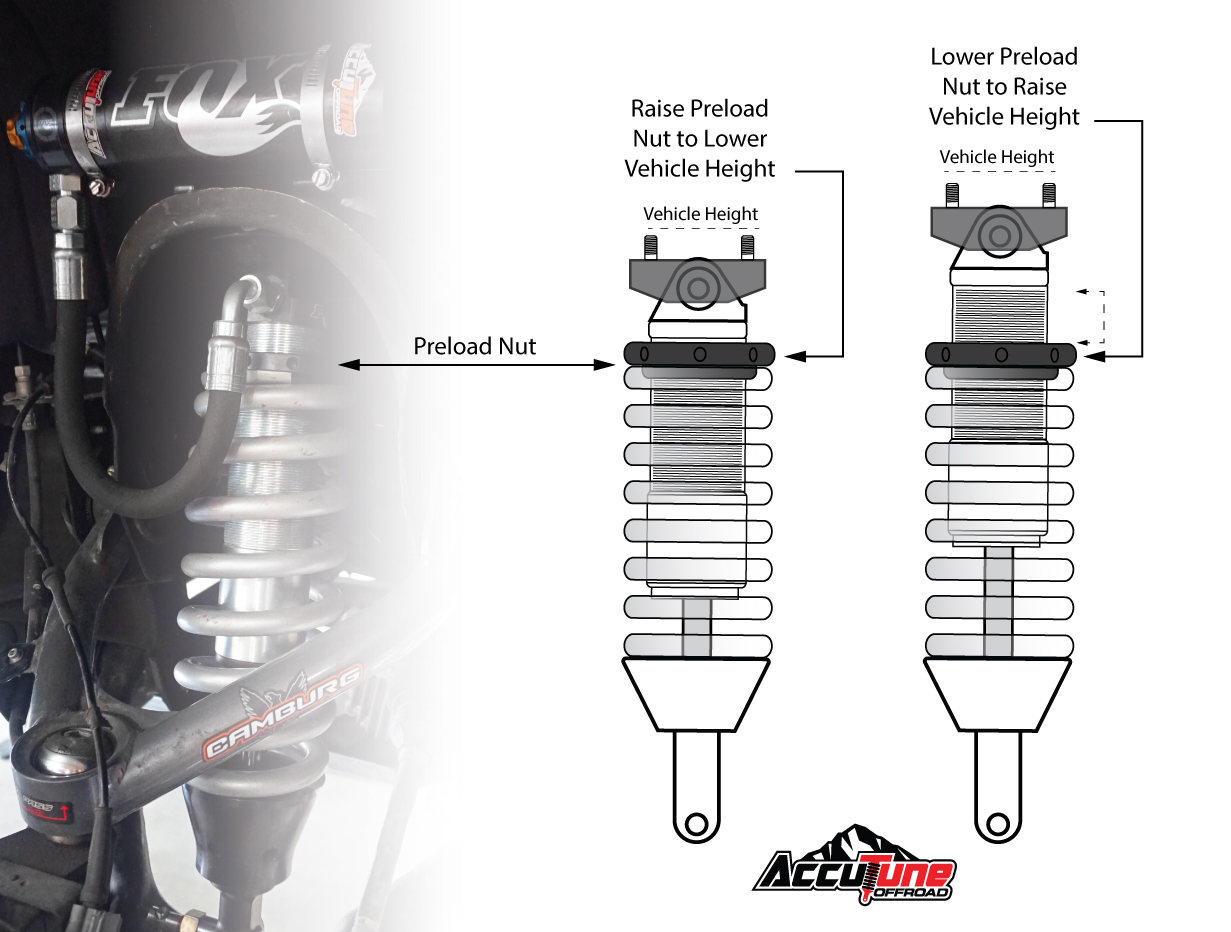
One of the biggest mistakes is using preload as the main ride-height adjustment when the coilover has a separate lower mount. Preload and ride height may affect each other, but they are not always the same adjustment.
On many full-length adjustable coilovers, you set spring preload first. You then change ride height by threading the shock body into or out of the lower mounting bracket.
This design lets you change vehicle height without greatly changing spring preload. It also helps preserve the intended relationship between spring tension and shock travel.
Some coilovers do not have an independent lower body adjustment. On those systems, moving the spring perch may change both preload and ride height. Always identify which design you have before turning any collar.

- ✦ Preload adjustment
Changes how much the spring is compressed at full suspension extension.
- ✦ Ride-height adjustment
Changes how high or low the vehicle sits.
- ✦ Damping adjustment
Changes how quickly the shock controls suspension movement.
Can Increasing Preload Raise Ride Height?
It can on some suspension designs. More preload can increase the force supporting the vehicle and may raise the resting position.
However, this does not mean preload should be used as the preferred ride-height adjustment. If your coilover has a separate body-height adjustment, use the method specified by its manufacturer.
How Preload Affects Suspension Travel
Suspension travel is a major reason to measure preload carefully. A shock needs room to compress over bumps and room to extend when the wheel drops into a dip.
When a coilover has too much preload for its design, the suspension can sit closer to full shock extension at ride height. That leaves less droop travel available.
When the wheel drops suddenly, the shock may reach full extension and top out. You may hear or feel a sharp impact. Repeated top-out events are not a good substitute for proper setup.
At the other extreme, poor ride-height setup can leave too little compression travel. The shock may bottom out over bumps. A good coilover setup balances bump travel, droop travel, spring seating, and vehicle height.

- ✦ Bump travel
The amount the suspension can compress from normal ride height.
- ✦ Droop travel
The amount the suspension can extend from normal ride height.
- ✦ Top-out
The shock reaches the end of its extension travel.
- ✦ Bottom-out
The shock reaches the end of its compression travel.
Why Droop Travel Matters on Street Cars
U.S. roads can include dips, bridge joints, potholes, and uneven pavement. Droop lets the wheel move downward and stay in contact with the road when the chassis rises.
If you remove too much droop through poor coilover setup, the suspension may feel harsh over sharp changes in road level. Tire contact can also become less consistent.
How to Fine-Tune Coilover Preload After the Initial Setup
Once you understand how to adjust coilover preload, resist the urge to change several suspension settings at the same time. Change one thing, record the result, and then test the car.
Start from the manufacturer’s baseline. Measure ride height on level ground. Check that the springs remain seated at full droop and that the shock has useful extension and compression travel.
If you make a preload change, use a small measured amount. Keep notes for the left and right sides. This makes it much easier to undo a change that does not improve the setup.
For a normal street car, large preload changes are rarely the first answer to poor ride quality. Spring rate, damping, tire pressure, bump stops, alignment, ride height, and available suspension travel can all affect how the vehicle feels.
- ✦ Change one setting
Do not change preload, damping, and ride height at the same time if you want to understand the result.
- ✦ Record every adjustment
Write down spring length, collar position, ride height, and any damping settings.
- ✦ Test on familiar roads
A familiar route makes changes in ride quality and suspension behavior easier to notice.
- ✦ Inspect after testing
Recheck collars, spring seating, and visible suspension clearance.
When Professional Corner Balancing Makes Sense
A performance car used for autocross, track days, or competition may benefit from corner balancing. This measures the load carried by each tire and allows precise suspension adjustments.
Corner balancing is more advanced than simply matching preload from side to side. It works best when ride height, tire pressures, driver weight, alignment goals, and fuel load are already defined.
- ✦ Street setup
Matched baseline settings are usually the practical starting point.
- ✦ Performance setup
Corner scales allow more precise chassis balance adjustments.
Common Mistakes When Adjusting Coilover Preload
Most preload problems come from treating the collars as simple height adjusters. A coilover is a system. Spring preload, shock travel, ride height, spring rate, and damping need to work together.
Another common mistake is measuring exposed threads instead of measuring actual spring compression. Thread counts can be useful for matching two identical coilovers, but they are not always an accurate measure of spring preload.
I also avoid making large changes without recording the original setup. If the result gets worse, a written baseline lets you return to the previous setting quickly.
- ✦ Guessing the preload
Measure spring compression instead of choosing a random collar position.
- ✦ Ignoring the manual
Manufacturer instructions take priority over generic online settings.
- ✦ Adjusting under vehicle load
Most preload measurements should be made with the suspension unloaded unless the manufacturer specifies otherwise.
- ✦ Using preload to fix every ride issue
Harshness may come from spring rate, damping, tire pressure, bump stops, or lack of suspension travel.
- ✦ Leaving collars loose
Locking collars must be secured after the adjustment.
- ✦ Creating unequal side-to-side settings
Random differences can cause an inconsistent suspension baseline.
- ✦ Forcing dirty collars
Clean threaded bodies before turning the collars to reduce the risk of thread damage.
Do Not Use a Hammer and Punch Unless Approved
Be careful with makeshift tools. Striking aluminum adjustment collars with a hammer and punch can damage the collar, shock threads, or protective finish.
Use the spanner tool supplied with the coilovers whenever possible. If a collar is seized, clean the threads and follow the manufacturer’s service advice rather than applying uncontrolled force.
How to Check Your Coilovers After Adjusting Preload
The adjustment is not finished when you tighten the collar. Lower the vehicle and check how the suspension sits under normal load.
Roll the car forward and backward a short distance to help the suspension settle. Measure ride height from the same reference points you used before the adjustment.
Inspect the tire-to-fender clearance and check that brake hoses, sway-bar links, control arms, and other parts have safe clearance throughout normal steering and suspension movement.
After a short test drive, inspect the coilovers again. Make sure the spring seats correctly and the collars have not moved.
- ✦ Measure ride height
Compare the new measurement with your original baseline.
- ✦ Listen for top-out or clunking
New impact noises may indicate a spring-seating or suspension-travel problem.
- ✦ Check the lock collars
Make sure the collars remain secure after the first drive.
- ✦ Inspect tire clearance
Verify that the tire does not contact the body or suspension.
- ✦ Consider alignment
If ride height changed, suspension alignment angles may also have changed.
Do You Need an Alignment After Adjusting Coilover Preload?
If the preload change alters vehicle ride height, an alignment check is a good idea. Changes in ride height can affect camber, toe, and sometimes caster.
If preload was corrected without changing the final ride height, alignment may change very little. Still, any major suspension adjustment is a good reason to inspect tire wear and alignment settings.
Troubleshooting Coilover Preload Problems
If the car does not feel right after you adjust the suspension, go back to measurements before making another change. Many symptoms blamed on preload have other causes.
Start with spring seating, preload measurement, ride height, available travel, and damping settings. Then inspect bushings, mounts, sway-bar links, ball joints, tire pressures, and alignment if the problem remains.
The best approach to how to adjust coilover preload is methodical. Use a known baseline, change one variable, and confirm the result.
- ✦ Spring is loose at full droop
Check preload and confirm that the spring is the correct length for the coilover.
- ✦ Car tops out over dips
Check droop travel and determine whether excessive preload or incorrect ride height has placed the shock too close to full extension.
- ✦ Ride feels very harsh
Check travel, damping, spring rate, tire pressure, and bump-stop contact before assuming preload is the only cause.
- ✦ One side sits higher
Compare spring preload, ride-height settings, spring part numbers, and installation positions on both sides.
- ✦ Collar keeps moving
Check that the locking collar is installed and tightened correctly.
When to Stop Adjusting and Ask a Suspension Specialist
Get professional help if the spring cannot stay seated, the shock repeatedly tops or bottoms out, the collars are seized, or the coilover instructions are unclear.
A suspension shop can also measure corner weights and shock travel. That is useful when you are setting up a track car or troubleshooting a modified suspension with several adjustable parts.


