To disassemble a shock absorber, first identify its design, remove it from the vehicle using the correct service procedure, and separate only the parts that the manufacturer allows you to service. Never open a sealed or pressurized shock absorber or loosen a loaded coil spring without the correct equipment.
In the United States, shock absorber service is common on passenger cars, pickup trucks, SUVs, and other road vehicles. A worn shock can cause excess bouncing, fluid leaks, poor tire contact, and reduced control on rough roads. Before taking one apart, determine whether the vehicle uses a separate shock absorber, a coilover assembly, or a MacPherson strut. These parts may look similar, but their removal and disassembly procedures can differ greatly.
Learning how to disassemble a shock absorber starts with a clear distinction between removing the unit from a vehicle and opening the unit itself. Many conventional shocks are sealed and contain pressurized gas or hydraulic fluid. Some suspension assemblies also hold a coil spring under substantial force. Incorrect disassembly can release stored energy, spray fluid, damage parts, or cause severe injury. This guide explains how to prepare, identify the assembly, remove serviceable external parts, inspect components, and decide when replacement or professional service is the right choice.
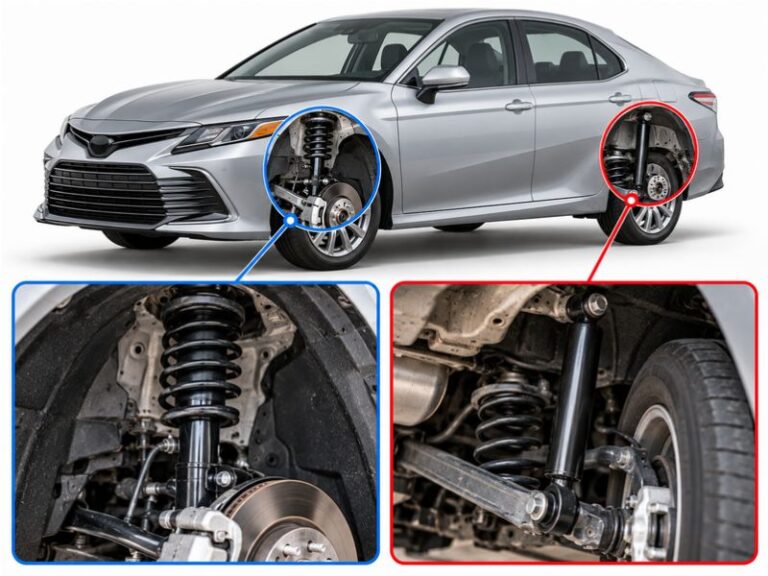
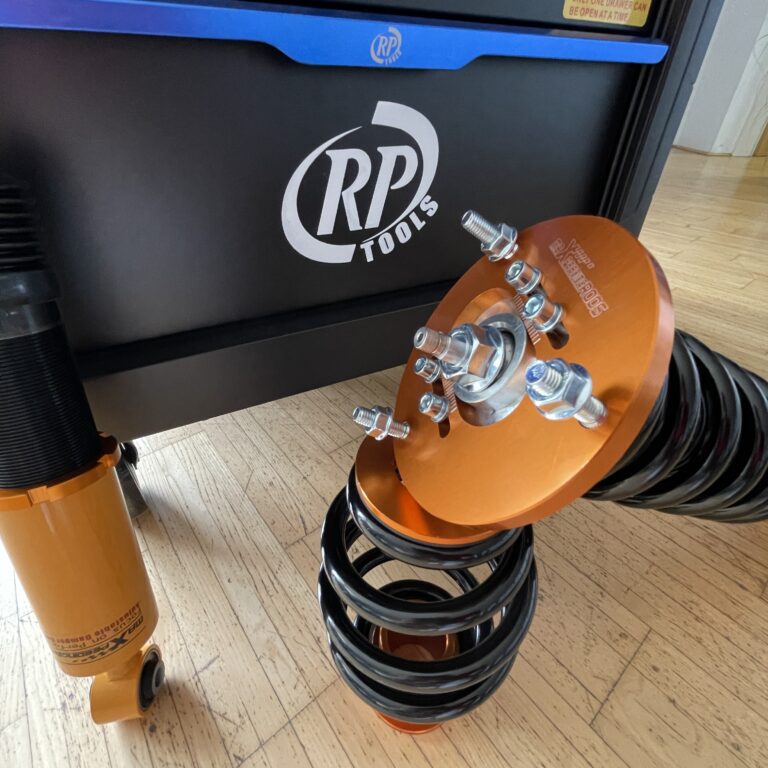
The correct disassembly method depends on the suspension design. A separate shock absorber may attach between the vehicle body and a control arm or axle. A strut often combines a damper with a structural suspension member and may also support a coil spring. A coilover combines a shock and spring in one assembly.
Some units have removable dust covers, bushings, or mounting hardware. Others are sealed and intended to be replaced rather than rebuilt. The presence of a visible nut does not prove that the internal damper is safe or designed to be opened.
Source: newkidscar.com
Conventional hydraulic shock
Uses hydraulic fluid and internal valves to control suspension movement. Many automotive units are sealed and require complete replacement when internal parts fail.
Gas-charged shock
Uses pressurized gas to help limit fluid aeration. Internal pressure may remain even after the unit is removed from the vehicle.
MacPherson strut
Combines damping with a structural suspension component. Many designs use a coil spring around the strut and require specialized spring-compression equipment for spring removal.
Coilover assembly
Combines a spring and damper, sometimes with adjustable spring seats. Service procedures depend on the manufacturer’s design and may require dedicated tools.
Rebuildable performance shock
May have manufacturer-approved service procedures for seals, valves, oil, or other internal components. Rebuilding requires the specified tools, parts, and pressure-handling procedure.
Shock Absorber Versus Strut: Why the Difference Matters
A separate shock absorber generally controls spring movement without serving as the main structural locating member of the suspension. A strut, by contrast, commonly helps locate the wheel and supports suspension loads. Removing a strut may therefore affect wheel alignment and requires additional care when supporting the suspension.
Check the vehicle’s repair manual and parts diagram before starting. Do not assume that every front suspension uses a strut or that every rear suspension uses a separate shock.
Separate shock
Usually has mounting points at both ends and may be removable without taking apart a coil spring assembly.
Spring-loaded strut
May require a spring compressor to separate the spring from the strut safely. The exact procedure varies by vehicle.
Tools and Safety Equipment You Need
Gather the tools before lifting the vehicle. Using the correct equipment reduces the risk of slipping fasteners, damaged mounts, and uncontrolled suspension movement. The exact tool list depends on the vehicle and the type of shock assembly.
Work on a firm, level surface away from traffic. Keep children and bystanders out of the work area. Wear safety glasses and suitable gloves, but remember that protective clothing does not make a pressurized damper or loaded spring safe to open.
Source: fr.pinterest.com
Vehicle support
Use a floor jack with an adequate load rating, correctly rated jack stands, and wheel chocks. Never rely on a hydraulic jack alone to support a vehicle.
Hand tools
Prepare the correct metric or SAE sockets, combination wrenches, breaker bar, and extensions specified for the vehicle.
Torque wrench
Use a suitable torque wrench to tighten fasteners to the exact values listed in the service manual.
Penetrating fluid and cleaning supplies
Use an appropriate penetrating fluid on corroded external fasteners when needed. Clean exposed mounting areas without contaminating friction surfaces or damaging rubber parts.
Specialized tools
Use only a compatible, properly rated spring compressor when the approved procedure requires spring removal. Some assemblies need dedicated holding fixtures or manufacturer-specific tools.
Reference information
Have the vehicle identification details, service manual, assembly diagram, fastener torque specifications, and replacement-part information ready.
Tools You Should Not Substitute
Do not replace a proper spring compressor with ratchet straps, wire, rope, improvised clamps, or other makeshift restraints. A loaded coil spring can release force suddenly and cause life-changing injuries. Do not grip a shock’s polished piston rod with ordinary locking pliers, as this can damage its sealing surface.
Avoid using a torch to free a stuck fastener near a shock, spring, fuel line, brake hose, or pressurized component unless a manufacturer-approved procedure specifically allows the method and the hazards have been addressed. Heating a shock absorber can create serious pressure and fire risks.
Stop if equipment is missing
If the procedure requires a special compressor or holding fixture that you do not have, leave the spring-loaded assembly intact and seek a properly equipped repair facility.
Prepare the Vehicle Before Removing the Shock
Start by confirming the repair and reading the vehicle-specific instructions. A leaking shock, loose mount, damaged bushing, or worn dust boot may call for different work. If the damper itself has failed and is sealed, replacing the complete unit is often more appropriate than attempting internal disassembly.
Park on a hard, level surface, select Park for an automatic transmission or an appropriate gear for a manual transmission, and apply the parking brake when suitable for the repair. Chock the wheels that will remain on the ground. Follow the vehicle manufacturer’s lifting points and support instructions.
Source: club.autodoc.co.uk
Confirm the correct part
Check the year, make, model, trim, drivetrain, and suspension option. Some vehicles use different shocks on different axles or have special suspension packages.
Inspect before removal
Look for fluid leakage, broken mounts, worn bushings, damaged boots, corrosion, and signs of contact with nearby components.
Document the assembly
Photograph the mounting arrangement and note the position of washers, spacers, bushings, and brackets before removing them.
Lift and support correctly
Raise the vehicle at approved lifting points and place jack stands at approved support points. Verify stability before working underneath it.
Remove the wheel if required
Follow the manual’s instructions for wheel removal and safe storage. Keep removed hardware organized and away from dirt.
Relieve Suspension Load Only as Directed
A suspension arm can move when a shock or strut fastener is removed. Depending on the design, the suspension may need to be supported at a specified point to control that movement. Follow the service manual rather than placing a jack at an arbitrary location.
Do not disconnect brake hoses, ABS wiring, steering links, or other parts unless the repair procedure calls for it. If a connection must be removed, protect it and reinstall it according to the manual.
Check nearby components
Make sure brake hoses, electrical wiring, and other flexible lines will not be stretched or pinched as the suspension moves.
How to Remove a Separate Shock Absorber
A separate shock is generally easier to remove than a complete spring-loaded strut, but the vehicle-specific procedure still matters. The steps below describe the general removal process for a conventional externally mounted shock, not a universal procedure for every vehicle.
Before loosening any fastener, confirm how the shock is attached and whether the suspension needs separate support. If the shock is integrated into a spring assembly or carries a structural load, use the appropriate procedure for that design instead.
Source: club.autodoc.de
Step 1: Locate the Upper and Lower Mounts
Find the shock’s upper and lower mounting points. The upper end may attach to the body, frame, or suspension structure, while the lower end may attach to an axle or control arm. Some upper mounts are accessed from inside the trunk, cargo area, or passenger compartment.
Remove access covers only as directed. Clean the area around the mounts so loose dirt does not enter the mounting hardware or surrounding components.
Identify the hardware
Note which fasteners secure the shock and which belong to adjacent suspension parts. Do not loosen unrelated bolts.
Step 2: Support the Suspension if Required
Use the support method specified in the repair manual to prevent the suspension arm or axle from moving unexpectedly. The required support point varies with the suspension layout and whether the vehicle is independent rear suspension, a solid axle, or another design.
Check that the vehicle remains stable on its stands. If a component begins to shift or a fastener appears to be carrying unexpected load, stop and reassess the support arrangement.
Step 3: Loosen and Remove the Mounting Fasteners
Use the correct socket or wrench to loosen the specified fasteners. Depending on the design, it may be useful to loosen one mount while keeping the other secured until the shock is supported. Follow the order in the service manual, since some designs require a particular sequence.
If a nut turns while its stud spins, use only the specified counterholding feature or approved tool. Do not grip the shock’s polished rod with pliers. For severely corroded hardware, use an appropriate method that will not damage nearby parts or expose the assembly to unsafe heat.
Keep the hardware organized
Store bolts, nuts, washers, and spacers together and note their original positions. Replace damaged or single-use fasteners as instructed by the manufacturer.
Step 4: Remove and Inspect the Shock
Once the mounts are free and the unit is controlled, remove the shock from its mounting points without forcing it past brake lines, wiring, or bodywork. Some shocks extend or compress as they are removed, so keep fingers clear of pinch points.
Inspect the unit for oil leakage, dents, severe rust, a bent rod, damaged threads, loose mounts, or a torn dust boot. A small film of residue may need further assessment, but clear fluid leakage or visible damage is a strong reason to investigate replacement or approved professional service.
Check mounting bushings
Look for cracks, separation, deformation, or excessive play. A failed bushing can cause clunks even when the damper itself is not leaking.
Check the mounting points
Inspect the body, frame, axle, and brackets for cracks, corrosion, elongated holes, or damaged threads before installing another unit.
How to Disassemble a Shock and Spring Assembly
A spring-loaded strut or coilover needs a different approach from a separate shock. The spring stores mechanical energy even when the vehicle is lifted, and the force can be released suddenly if its retaining hardware is loosened without proper restraint. Never remove the center shaft nut simply because the strut has been taken off the vehicle.
First determine whether the assembly is designed to be separated. If the manufacturer specifies replacement of the complete assembly, or if the spring compressor and service procedure are unavailable, do not attempt to dismantle it. A qualified suspension shop can handle assemblies that require specialized restraint equipment.
Source: www.youtube.com
Step 1: Identify Whether the Spring Is Under Load
A coil spring can remain compressed between its seats after the assembly has been removed. Its appearance alone does not show how much stored force remains. Treat the spring as loaded unless the manufacturer-approved procedure establishes otherwise.
Look for the spring seats, upper mount, bearing, isolator, dust boot, bump stop, and center shaft nut. Use the parts diagram to confirm the correct arrangement and the parts that may be serviced separately.
Do not loosen the center nut
The center nut may retain the spring-loaded mount. Removing it without safely restraining the spring can cause violent separation.
Step 2: Use the Approved Spring-Restraint Procedure
If spring removal is permitted, use the spring compressor specified for the assembly and follow its instructions exactly. The tool must be compatible with the spring shape and assembly, correctly positioned, and securely engaged before any retaining hardware is loosened.
Spring compressors can slip or fail when used incorrectly. Do not continue if the hooks, jaws, threads, or safety features are damaged, or if the tool cannot sit securely on the spring. If you are unsure whether the spring is fully and safely restrained, stop and have the assembly serviced by a professional.
Inspect the compressor
Check its rated capacity, condition, engagement points, and required setup before use. Follow the tool manufacturer’s operating instructions.
Keep clear of the spring’s path
Never position your face, hands, or body where a released spring or mount could travel. Keep other people away from the work area.
Step 3: Separate Only the Parts the Manual Allows
After the spring has been safely restrained according to the approved procedure, follow the service manual for removing the upper mount and any serviceable external components. The exact order of the mount, bearing, spring seat, isolator, bump stop, and dust boot varies by design.
Keep every part in its original order and orientation. Photograph the assembly before separation, and replace worn or damaged components only with parts specified for the vehicle. Do not assume that every mount or bearing can be reused.
Check the upper mount
Look for cracked rubber, separation, corrosion, binding, or bearing damage. Replace parts that fail the manufacturer’s inspection criteria.
Inspect the spring
Check for cracks, broken ends, deep corrosion, and damaged coating. A damaged spring requires appropriate replacement.
Inspect the boot and bump stop
Look for splits, missing material, or deterioration. These parts help protect the damper rod and limit harsh suspension travel.
Step 4: Leave a Sealed Damper Closed
Separating approved external components does not mean that the shock’s internal pressure chamber is safe to open. Many automotive dampers contain pressurized gas and hydraulic fluid, and some use internal designs that are not intended for field repair.
Do not drill a hole, cut the housing, heat the body, or unscrew a retaining ring without an explicit manufacturer-approved service procedure for that exact model. If internal rebuilding is allowed, use the required pressure-control equipment and specified parts through a qualified service process.
Replace nonserviceable units
If the shock is sealed and internally damaged, use the correct replacement unit rather than attempting an improvised rebuild.
Can You Open the Shock Absorber Itself?
In many cases, no. A conventional automotive shock absorber is a sealed damping unit, and its internal components are not intended for routine home disassembly. Opening one without an approved method can release stored pressure and fluid, damage internal parts, and leave the unit unsafe for road use.
Some specialist performance dampers and selected serviceable units are designed for rebuilding. Their procedures may cover oil replacement, seal replacement, valve inspection, or gas charging. These are model-specific operations, not steps that can be safely applied to every shock absorber.
Source: storage.googleapis.com
How to Tell Whether a Shock Is Rebuildable
Start with the manufacturer’s service documentation and the exact part number. Look for an official rebuild manual, a specified seal kit, approved disassembly tools, and a documented procedure for handling the damper’s internal pressure. External appearance alone cannot confirm serviceability.
A visible cap, ring, or threaded section does not necessarily mean that the housing can be opened safely. If reliable documentation is unavailable, treat the damper as nonserviceable until the manufacturer or a qualified specialist confirms otherwise.
Manufacturer documentation
The strongest starting point is a service procedure that matches the exact shock model and revision.
Approved replacement parts
A documented rebuild process should identify compatible seals and other internal components where applicable.
Required pressure equipment
If rebuilding requires controlled gas charging or pressure release, use the specified equipment and qualified service process.
Why Improvised Internal Repairs Are Risky
A shock absorber controls wheel movement through carefully designed hydraulic passages, valves, seals, and internal components. Incorrect oil, damaged sealing surfaces, unsuitable parts, or incorrect gas pressure can change damping behavior even if the assembly appears to fit together.
A damper that looks intact after an improvised repair may still leak or provide poor control under real driving conditions. For a road vehicle, use an approved rebuild procedure or install the correct replacement.
Avoid drilling or cutting
Do not create an opening to drain fluid or release pressure unless the exact manufacturer procedure expressly specifies the operation and necessary controls.
Do not reuse damaged parts
Bent rods, scored sealing surfaces, damaged threads, and distorted housings can make a unit unsuitable for service.
Inspect the Disassembled Parts
Inspection helps identify the reason for failure and prevents a replacement shock from being fitted to damaged mounting hardware. Clean external parts with a suitable cleaner and inspect them under good lighting. Keep solvents away from rubber components unless the cleaner is confirmed compatible.
Compare the removed parts with the vehicle’s service information. If the manual gives inspection limits, use those limits instead of judging a component by appearance alone. Replace damaged safety-critical parts rather than trying to reshape or repair them without an approved procedure.
Source: ebay.com
Shock body
Check for leakage, deep corrosion, dents, distortion, and damaged mounting points. A bent or leaking sealed damper generally needs replacement or approved specialist service.
Piston rod
Look for bending, corrosion, scratches, or damage to the polished surface. Rod damage can harm seals and cause fluid leakage.
Bushings and isolators
Check for cracks, separation, deformation, and looseness that could allow unwanted movement or noise.
Mounting hardware
Inspect fasteners, threads, brackets, and mounting holes for corrosion, wear, and distortion. Replace hardware when the service manual requires it.
Spring and seats
Check for broken coils, deep rust, damaged coatings, and worn or displaced spring isolators.
Dust boot and bump stop
Check that the protective boot is intact and the bump stop is not badly deteriorated or missing.
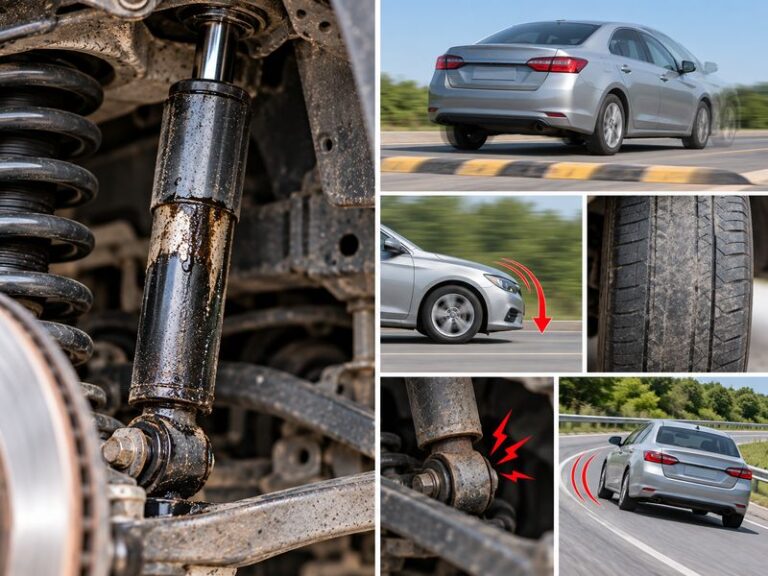
Common Symptoms and What They May Mean
A symptom does not always prove that the shock absorber has failed. Tire condition, wheel alignment, worn suspension joints, loose mounts, and other faults can create similar problems. Inspect the complete suspension before deciding which parts need replacement.
Fluid leaking from the damper
May indicate a failed seal or damaged unit. Confirm the source because fluid from another component can run down the housing.
Clunking over bumps
May result from loose mounting hardware, worn bushings, a damaged mount, or another suspension joint.
Excessive bouncing
May indicate poor damping, but tire pressure, spring condition, and other suspension faults should also be checked.
Uneven tire wear
Can have several causes, including alignment problems and worn suspension parts. A tire inspection and alignment check may be needed.
Broken or sagging spring
Requires a spring and suspension assessment. Do not dismantle a loaded spring assembly without the correct equipment.
Reassemble or Replace the Shock Absorber
Reassembly must follow the service procedure for the exact vehicle and shock model. If you have only removed a separate, non-spring-loaded shock, the work may involve reinstalling the unit and its mounting hardware. If you have separated a spring-loaded assembly, the approved spring installation and restraint procedure is essential.
Do not guess at torque values or assume that every fastener should be tightened with the suspension hanging freely. Some suspension bushings must be tightened at a specified ride-height position to prevent unwanted twisting or premature wear. Follow the manual’s exact requirements.
Source: vida-digna.org
Step 1: Confirm the Parts and Mounting Order
Compare the replacement or serviced parts with the original assembly. Confirm the correct part number, dimensions, mounting style, spring-seat arrangement, bushings, washers, and spacers. Check for any manufacturer instructions about replacing single-use fasteners.
Return reusable external components to their specified positions and orientation. Do not force a part into place or modify a mount to make an incorrect component fit.
Step 2: Install the Shock and Mounting Hardware
Position the shock without stretching brake hoses or pinching wiring. Start the mounting fasteners by hand where possible to reduce the risk of cross-threading. Keep the suspension supported as directed while the unit is aligned with its mounting points.
Tighten the fasteners in the specified order and to the vehicle manufacturer’s torque values. If the procedure calls for final tightening at normal ride height, do not complete that step with the suspension at full droop.
Use verified torque specifications
Get the correct values for the exact vehicle, model year, suspension design, and fastener. Do not substitute a generic torque chart for vehicle-specific instructions.
Step 3: Complete the Vehicle Checks
Reinstall removed wheels, covers, and other components according to the service manual. Tighten wheel fasteners to the specified torque and lower the vehicle using the approved procedure. Confirm that all tools and loose parts have been removed from the work area.
Check the suspension for interference, damaged wiring, loose mounts, or signs that a hose or cable has been stretched. If a strut or other alignment-related component was removed, determine whether a wheel alignment is required by the manufacturer.
Check before driving
Do not drive if fasteners remain loose, the suspension sits incorrectly, a spring is not seated, or a brake or electrical component has been damaged.
Arrange a professional inspection
If installation differs from the service diagram or an unexpected noise or movement remains, have the vehicle inspected before normal use.
Common Mistakes to Avoid During Shock Disassembly
Most serious disassembly mistakes come from treating every shock as the same design. A procedure that works for a simple rear shock may be unsafe for a spring-loaded strut or unsuitable for a sealed gas-charged damper. Verify the design before starting and stop when the next step is not covered by the correct service information.
Source: www.youtube.com > Car Repair
Removing the center nut too early
The nut may retain a compressed spring. Do not remove it until the manufacturer-approved spring-restraint procedure has been completed.
Opening a sealed shock
The unit may contain pressurized gas and hydraulic fluid. Use a documented service procedure or replace the nonserviceable assembly.
Working under a jack-supported vehicle
A jack can lose pressure or shift. Support the vehicle with correctly placed jack stands on a stable surface.
Using the wrong spring compressor
A tool that does not fit the spring or assembly may slip. Use the specified compatible tool and follow its instructions.
Damaging the piston rod
Scratches or marks on the polished rod can damage seals and lead to leakage. Use only approved holding points.
Guessing torque specifications
Incorrect tightening can damage threads, allow movement, or compromise the assembly. Use vehicle-specific values.
Ignoring related suspension faults
A new shock will not fix every clunk, tire-wear issue, or handling problem. Inspect mounts, springs, joints, tires, and alignment as appropriate.
When to Stop and Seek Professional Service
Stop if the spring compressor will not engage securely, the spring shifts unexpectedly, a fastener appears to hold a structural load, or the damper’s serviceability is uncertain. Also stop if the mounting points are cracked, heavily corroded, or damaged.
Professional service is especially appropriate when the assembly requires pressure release, gas charging, internal valve work, specialized spring restraint, or repairs to structural suspension parts. The cost of proper service is preferable to the risk of an uncontrolled spring or an improperly repaired damper.
Emergency warning
If a spring compressor slips or the spring becomes unstable, do not try to catch or restrain it by hand. Move away from its potential path and seek qualified assistance.
How Much Does Shock Absorber Disassembly Cost?
The cost depends on the vehicle, suspension design, labor rates, part availability, and whether the task involves removal, replacement, or an approved rebuild. A separate shock may require less labor than a spring-loaded strut assembly, especially when the latter needs additional suspension components removed.
There is no single price that applies to every vehicle or repair shop. Ask for a quote that separates diagnostic labor, removal and installation, parts, alignment if required, and any specialist rebuilding work. Confirm whether the quote covers one side or a complete axle pair.
Basic removal and replacement
The estimate depends on access, corrosion, mounting hardware, and the time needed for safe removal and installation.
Strut or coilover service
May cost more when spring compression, mount replacement, special tools, or additional suspension work is required.
Specialist rebuild
Can involve seals, oil, internal components, pressure servicing, and testing. Confirm that the manufacturer supports rebuilding the exact unit.
Related repairs
Damaged springs, mounts, bushings, corroded bolts, or alignment needs may add to the final bill.
Should You Rebuild or Replace the Shock?
For a sealed, nonserviceable shock, replacement is usually the appropriate repair when the damper has failed. Rebuilding may be practical for a specifically serviceable performance damper when approved parts and a qualified service provider are available.
Compare the full cost of the rebuild with a suitable replacement, including required seals, labor, pressure servicing, and any verification procedure. A low initial price is not useful if the unit cannot be returned to the manufacturer’s required operating condition.
Choose replacement
When the unit is sealed, damaged beyond approved limits, or not supported by a documented rebuild procedure.
Consider an approved rebuild
When the exact model is designed to be serviced and the correct parts, tools, and procedures are available.
A Practical Checklist Before You Finish
Use this checklist to confirm that the work stayed within the correct service procedure. It is not a substitute for the vehicle manual, but it can help you catch missing steps before returning the vehicle to the road.
Before work
Identify the exact shock type, read the service procedure, gather the correct tools, and support the vehicle safely.
During removal
Control suspension movement, keep hardware organized, protect nearby lines, and avoid loosening spring-retaining hardware without proper restraint.
During inspection
Check for leakage, corrosion, bent rods, damaged mounts, worn bushings, broken springs, and damaged protective components.
During reassembly
Use the correct parts and fasteners, follow the specified sequence, and apply vehicle-specific torque values.
Before driving
Verify the installation, confirm that the spring is seated where applicable, check wheel fasteners, and address any alignment requirements.
Signs the Job Is Complete
A successful job follows the manufacturer’s installation procedure, leaves no loose or misplaced parts, and restores the suspension to its intended configuration. The vehicle should not have an unexplained change in ride height, binding, or contact between the suspension and nearby components.
If a test drive is appropriate after the vehicle has passed all static safety checks, begin cautiously in a safe area. Stop if you hear unusual knocking, notice unstable handling, or detect a warning sign. Do not use a road test to compensate for uncertainty about whether the assembly was installed correctly.
No visible installation faults
Mounts and fasteners are installed as specified, with no obvious damage or interference.
No unresolved safety concerns
Any brake, wiring, spring, structural, or alignment issues found during the repair have been addressed.
Next-Question Gap Map
The following editorial gap map separates inferred reader needs from verified search findings. No live search results, competitor pages, People Also Ask questions, Search Console records, or community discussions were inspected for this article. The questions below are therefore inferred from the steps, risks, and decisions involved in shock absorber disassembly, not claims about measured search demand.
The strongest reader benefit is to clarify when external removal is reasonable and when internal disassembly requires specialist equipment. A separate vehicle-specific repair article would be needed to provide exact fastener locations, lifting points, torque values, or a model-specific spring-compression procedure.
Can I remove a shock without removing the spring?
Reader stage: planning. Basis: inferred next need. Competitor coverage: not checked. Benefit: helps distinguish a separate shock from a spring-loaded strut. Evidence needed: vehicle-specific service manual and suspension diagram. Priority: high. Placement: shock-type and removal sections.
Can I open a gas-charged shock absorber at home?
Reader stage: deciding whether to rebuild. Basis: inferred next need. Competitor coverage: not checked. Benefit: prevents unsafe pressure release and improvised repairs. Evidence needed: exact manufacturer service documentation. Priority: high. Placement: sealed damper section.
How do I know whether a shock is rebuildable?
Reader stage: selecting a repair. Basis: inferred next need. Competitor coverage: not checked. Benefit: helps the reader avoid dismantling a nonserviceable unit. Evidence needed: model-specific service instructions and parts availability. Priority: high. Placement: rebuildability section.
What should I inspect after removing the shock?
Reader stage: inspection. Basis: inferred next need. Competitor coverage: not checked. Benefit: helps identify damaged mounts, springs, bushings, and other causes of suspension symptoms. Evidence needed: service manual inspection limits and component guidance. Priority: high. Placement: inspection section.
Does removing a strut require wheel alignment?
Reader stage: after installation. Basis: inferred next need. Competitor coverage: not checked. Benefit: alerts readers that some suspension repairs change alignment settings. Evidence needed: vehicle-specific manufacturer guidance. Priority: medium. Placement: reassembly section.
Frequently Asked Questions
Q
Can I disassemble a shock absorber at home?
You may be able to remove a separate shock absorber and inspect serviceable external parts at home if you have the correct tools, vehicle-specific instructions, and safe vehicle supports. Opening a sealed damper or dismantling a spring-loaded strut is a different task. Do not attempt work that requires pressure-handling equipment or a spring compressor you do not have.
Q
Can I remove a shock absorber without removing the coil spring?
Often, a separate shock can be removed without taking the coil spring apart. However, some suspension designs integrate the damper and spring into a single assembly. Check the exact vehicle’s service manual to determine whether the spring must be removed or restrained.
Q
Why should I not remove the center nut on a strut?
The center nut may hold the upper mount against a compressed coil spring. If the spring has not been safely restrained using the approved method, removing that nut can allow the spring and mount to separate violently. Never loosen it until the correct service procedure has been followed.
Q
Can a leaking shock absorber be repaired?
Some manufacturer-approved, serviceable dampers can be rebuilt with specified parts and equipment. Many ordinary automotive shocks are sealed and should be replaced when they leak or fail. Confirm the exact model’s serviceability before attempting an internal repair.
Q
Do I need to replace both shock absorbers?
Replacing shocks in axle pairs is often recommended because a new damper and a worn damper may respond differently. The right decision depends on the vehicle manufacturer’s guidance, the condition of the existing parts, and the nature of the failure. Follow the service manual and use compatible components.
Q
How do I know if the shock absorber is bad?
Common warning signs include fluid leakage, excessive bouncing, unusual suspension noise, and reduced stability. These symptoms can also come from worn mounts, springs, tires, or other suspension components. Inspect the complete system and use the manufacturer’s diagnostic procedure before replacing parts.
Q
Do I need a wheel alignment after removing a shock absorber?
It depends on the suspension design and which connections were removed. Removing a strut or disturbing alignment-related fasteners can change wheel alignment, while some separate-shock replacements do not affect it directly. Check the vehicle manufacturer’s instructions and arrange an alignment when specified or when measurements indicate a need.
✦ Wrapping Up
Conclusion
Learning how to disassemble a shock absorber begins with identifying the exact suspension design and understanding which parts are safe to service. A separate shock may be straightforward to remove, while a spring-loaded strut or coilover can require specialized equipment and a precise procedure. Sealed dampers should remain closed unless the manufacturer provides an approved service method for that exact model.
Before starting, review the vehicle’s repair manual, support the vehicle correctly, and gather the required tools. Inspect the removed parts for leakage, corrosion, damaged mounts, worn bushings, and broken springs. If the job involves a loaded coil spring, pressurized internals, or uncertain structural hardware, choose qualified professional service instead of an improvised repair.
💡 Key Takeaway
Identify your vehicle’s shock or strut type, obtain its specific service instructions, and decide whether the work is limited to safe external removal or requires professional spring or damper servicing before loosening any retaining hardware.
Eric
Hi, I’m Eric Bennett, the person behind OffRoadTruckAccessories.com.
I created this blog to share my interest in trucks, off-road driving, automotive accessories, and DIY modifications. I enjoy learning how different truck accessories work, testing their usefulness, and understanding whether they are truly worth buying.
Shock absorbers are located near the wheels as part of the suspension system, usually between the vehicle’s body, frame, or subframe and a suspension component such as a control arm, axle, or wheel assembly. However, the exact answer to where are shock absorbers located on a car depends on the suspension design. Some vehicles have…
You should change shock absorbers when they are worn, leaking, damaged, or no longer controlling suspension movement properly. There is no single replacement interval that applies to every vehicle because shock absorber life depends on road conditions, vehicle weight, driving habits, suspension design, and component quality. If you are wondering when to change shock absorbers,…