
How to Adjust Maxpeedingrods Coilovers Height Practical Guide
Changing coilover height can improve a car’s stance, clearance, and balance, but the adjustment is easy to get wrong if you treat every threaded collar as a ride-height control. On many Maxpeedingrods kits, the lower mount is used to change the shock body’s position while the spring perch maintains spring tension. Some model-specific kits differ, so the instructions supplied with your exact kit remain the final authority.
The safest approach is to measure the current height, confirm which collars your kit uses, adjust both sides in small equal increments, and settle the suspension before measuring again. A level work area, secure jack stands, and properly tightened collars matter more than making a dramatic change in one session.
This guide explains how to adjust maxpeedingrods coilovers height without losing spring seating or creating an unsafe amount of suspension travel. You will learn how to prepare the car, change the threaded mounts, check clearance and handling, and know when an alignment or professional inspection is necessary.
At a glance
- Measure from the wheel center to the fender, not only from the ground.
- Use the lower mount for height when your kit is designed for independent height adjustment.
- After changing height, check spring seating, clearance, fasteners, and alignment.
How to adjust maxpeedingrods coilovers height safely
Most height-adjustable coilovers use threaded shock bodies, collars, or lower mounts to position the car. The exact arrangement varies by vehicle and kit, so compare the hardware on your car with the supplied instructions before turning anything. Do not assume that a collar that looks adjustable is intended to set ride height.
Tools you will need
- Hydraulic floor jack and four suitable jack stands for safely lifting and supporting the vehicle
- Coilover spanner wrenches for loosening and tightening the adjustment collars
- Tape measure or ruler for recording ride-height measurements
- Wheel chocks and a torque wrench for safe positioning and final fastener checks
- Optional: paint marker or masking tape to mark the original collar position
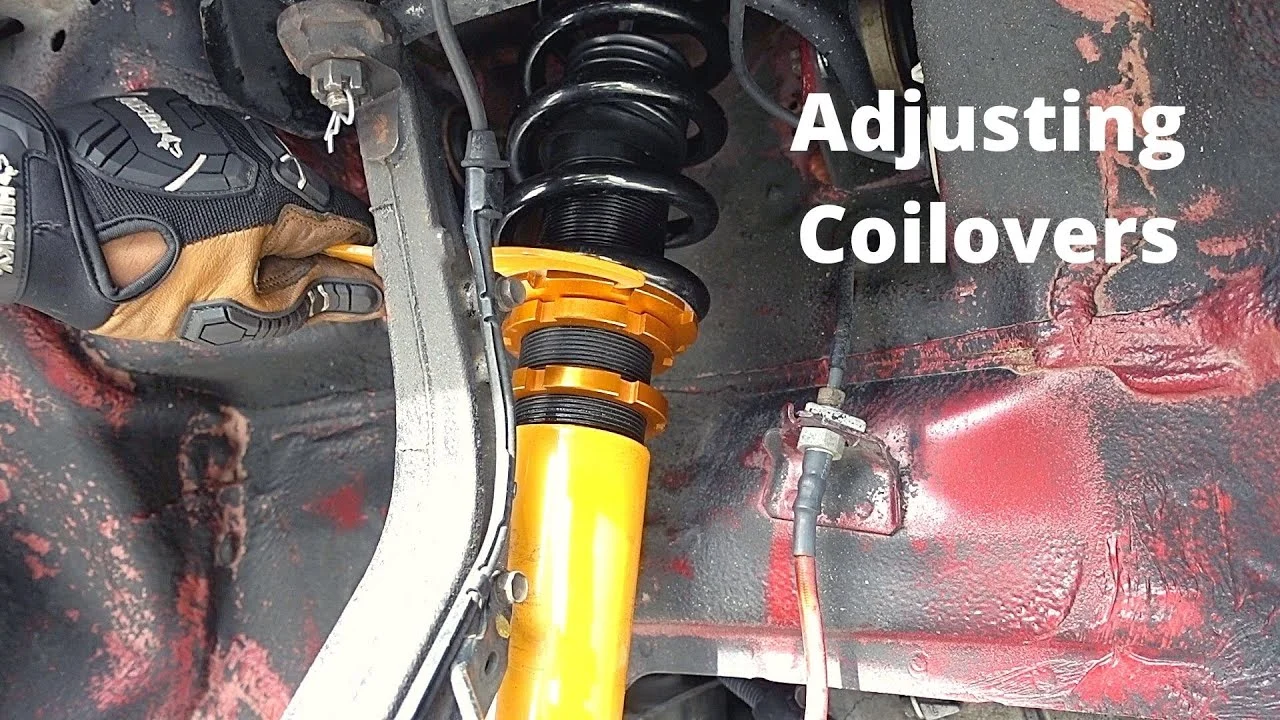
Step 1 Confirm the adjustment method for your exact coilover kit
Park on a flat, solid surface and read the installation instructions before lifting the car. Identify the threaded body, the lower mounting collar, the spring perch, and any separate locking collar. The spring perch is the collar supporting the coil spring; the lower mounting collar or threaded lower mount connects the shock assembly to the vehicle.
On a separately height-adjustable design, you normally loosen the locking collar and turn the lower mount or threaded shock body to raise or lower the vehicle. This lets you change ride height while keeping spring preload close to its intended setting. On a simpler design, the spring perch may be the height adjustment, but moving it also changes preload.
Follow the model-specific instructions rather than applying a universal rule.
Look for minimum-thread-engagement markings or a specified minimum amount of threaded body remaining inside the lower mount. If the instructions are missing, the threads are damaged, or you cannot identify which collar is safe to move, stop and get guidance from the kit supplier or a qualified suspension technician.
Step 2 Record the starting height and collar positions
Before changing anything, measure the car as it sits. Check tire pressures, remove unusual cargo, and make sure the fuel level is reasonably consistent with how the car is normally driven. Measure from the center of each wheel straight upward to a repeatable point on the fender, or use the same point on the body at all four corners.
Write down the front and rear measurements separately. Also count visible threads or measure from a fixed reference point to the collar, then mark the original position with a paint marker. These records give you a reliable way to return to the original setup if the result is poor.
Do not rely only on ground-to-fender measurements. Tire size, tire pressure, floor slope, and fender shape can affect that number. A wheel-center-to-fender measurement tracks the body position more consistently, while a ground measurement is still useful for checking overall clearance.
Step 3 Lift and support the vehicle securely
Chock the wheels that remain on the ground, loosen the wheel lug nuts slightly if needed, and lift the vehicle using the manufacturer’s approved lift points. Place jack stands under strong structural points, then lower the car onto them and gently test its stability before removing the wheels.
Suspension components can move when the wheels hang, so keep your hands clear of pinch points. Never work beneath a car supported only by a hydraulic jack. Remove the wheel if it blocks access to the collars, and keep the wheel and hardware where they cannot create a trip hazard.
Important
Do not loosen a spring perch if the spring is not safely retained or if the coilover instructions require a different procedure. A loaded spring can release force suddenly; stop if the spring is loose, damaged, or no longer seated.
Step 4 Clean the threads and loosen only the required collars
Brush away dirt and corrosion from the exposed threads. If the threads are heavily rusted, do not force the collar with a long pipe or hammer; damaged threads can prevent the collar from locking correctly. Use the supplied spanner wrenches and turn the locking collar in the direction shown by the kit instructions.
For a separate-height-adjustment design, loosen the lock collar that secures the lower mount or threaded body, leaving the spring perch and its lock collar undisturbed. For a design that uses the spring perch to set height, loosen that collar only as directed. Keep track of which collar you moved so you do not accidentally change spring tension.
A common mistake is turning the upper spring perch to lower the car without checking whether the spring remains firmly seated at full droop. Another is loosening two collars at once and losing the original reference. Work on one adjustment point at a time.
Step 5 Make a small, equal adjustment on both sides
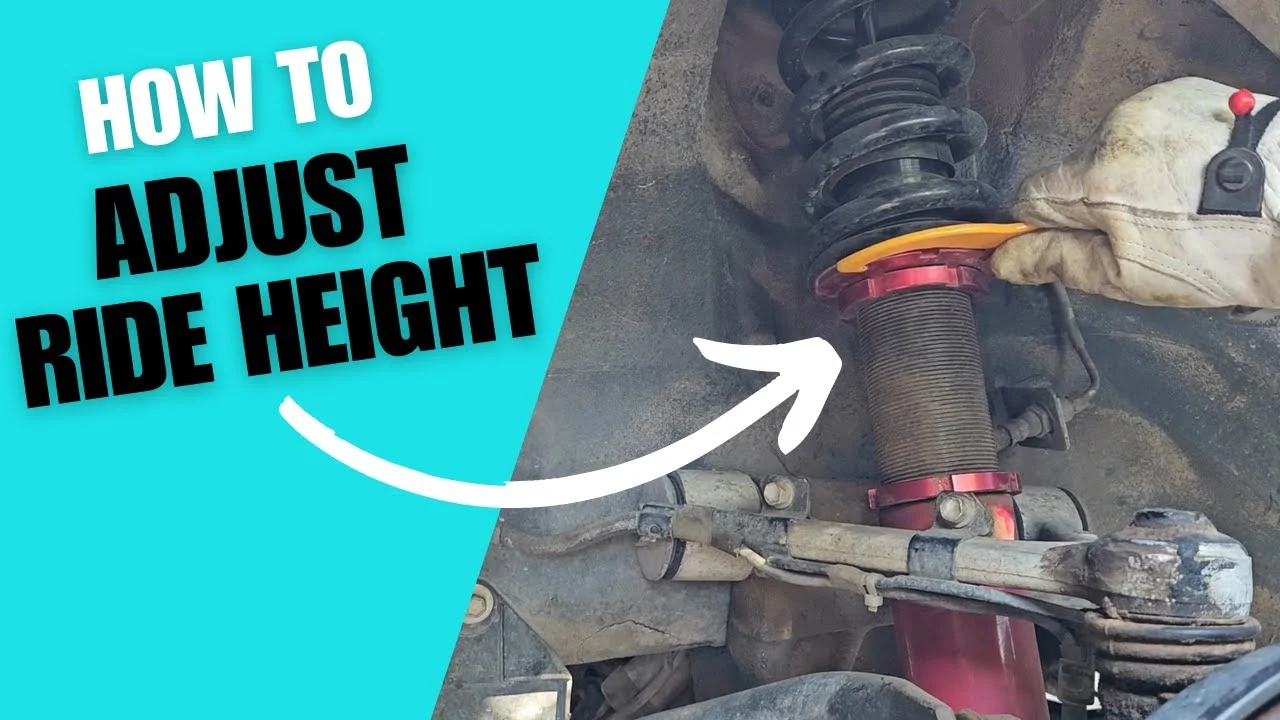
Set the first side to the desired direction: turn the approved adjustment collar or lower mount to raise the car, and turn it the opposite way to lower it. The direction can vary with thread orientation and whether you are viewing the collar from above or below, so confirm the result after a small movement rather than relying on memory. A useful way to approach how to adjust maxpeedingrods coilovers height is to check your progress after each stage.
Make a modest change, such as a few visible thread turns, then repeat the same adjustment on the opposite side. Keep the two sides equal unless you are deliberately correcting a measured corner-weight or chassis difference. Large one-sided changes can create uneven suspension travel, steering pull, or an obvious lean.
Do not lower the car until you have confirmed that the spring is still seated at full droop and that the shock has not reached a mechanical limit. Leave the manufacturer’s required minimum thread engagement and minimum or maximum height range intact. If the car is already near the end of the threaded adjustment, a different spring, mount, or setup may be needed rather than more collar movement.
Step 6 Tighten the collars and reinstall the wheels
Once the adjustment is set, hold the adjustable mount or collar in position and tighten its locking collar against the mating surface. Use the instructions for the specified tightening method and torque where provided. Do not substitute an impact gun for the supplied spanner-wrench procedure unless the manufacturer explicitly allows it.
Inspect each spring for full seating at both ends. Check that brake lines, ABS wires, sway-bar links, and other nearby parts are not twisted, stretched, or rubbing against the threaded body. Reinstall the wheels and tighten the lug nuts by hand before lowering the vehicle.
Lower the car carefully and torque the wheel fasteners to the vehicle manufacturer’s specification with a torque wrench. The coilover collar may need a final check after the car is back on its tires, but do not reach under an unsupported vehicle to make that check.
Step 7 Settle the suspension and measure the new height
Roll the car forward and backward a short distance, or gently bounce each corner while the vehicle is on the ground. This allows the suspension bushings and coilovers to settle instead of holding a false height from the wheels hanging in the air. Keep the steering straight while checking the front axle.
Measure all four corners using the same points and method you used earlier. Compare the left and right sides on each axle, then compare the new numbers with your target and your original record. A small difference can come from the floor or measurement technique, but a clear side-to-side lean calls for investigation before driving normally.
If the height is not where you want it, repeat the adjustment in small, equal increments. This is the practical way to adjust maxpeedingrods coilovers height while preserving control of the setup: change one variable, settle the car, and measure rather than guessing from the collar position alone.
Step 8 Check clearance and suspension travel before driving
Turn the steering from lock to lock and inspect the tire-to-spring, tire-to-strut, and tire-to-fender gaps. Look behind the wheel for contact with brake hoses, wiring, sway-bar links, and inner body panels. The check should be done on both sides because steering and suspension geometry can make the clearances different.
Also check the car at normal ride height and, where safely possible, consider what happens when the suspension compresses. A vehicle that clears the tire while parked can still rub over a bump or during a turn. If the spring becomes loose at full droop, the bump stop is constantly engaged, or the shock has very little usable travel, the adjustment is not acceptable.
Check your result
Before the first road test, the spring should remain seated, the adjustment collars should be locked, the wheels should be torqued, and no tire, hose, wire, or suspension part should contact nearby components through steering movement.
Step 9 Road-test gently and arrange an alignment
Begin with a slow drive in a safe area. Listen for clunks, scraping, spring movement, or unusual tire noise, and notice whether the steering pulls or the car feels unstable. Stop immediately if you hear metal-on-metal contact, feel sudden looseness, or see a warning sign such as a tire rubbing the body.
Changing ride height changes suspension geometry. Depending on the vehicle, it can alter toe, camber, caster, bump-steer behavior, and headlight aim. Have the car inspected and receive a four-wheel alignment after the height is finalized, especially if the change is substantial or the vehicle will be driven at highway speed.
Keep your measurements and collar notes with the vehicle. If the car later develops uneven tire wear or handling changes, those records help an alignment shop understand what was altered. Understanding how to adjust maxpeedingrods coilovers height also means recognizing the limits of the method.
How the collars affect ride height and preload
Understanding the hardware helps prevent a common setup error: lowering the car by removing useful suspension travel. A coilover spring supports the vehicle, while the damper controls the spring’s movement. The threaded body and mounts determine where the damper sits relative to the chassis and wheel hub.
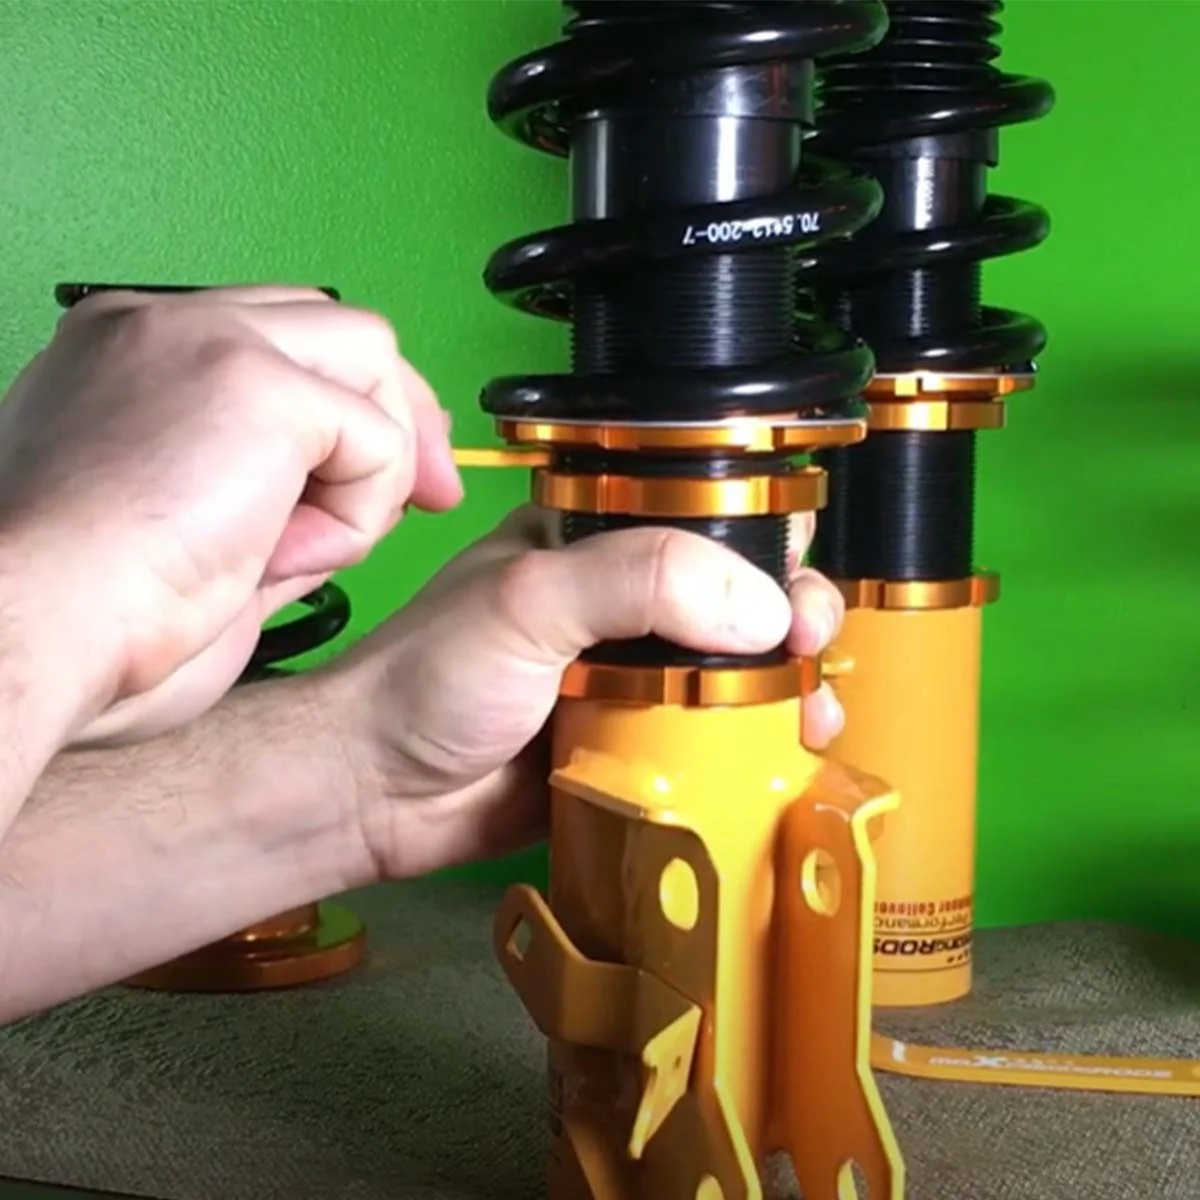
Separate height adjustment versus spring-perch adjustment
On a coilover with independent height adjustment, the spring perch establishes spring preload and the lower mount changes the overall assembly length. Turning the lower mount can reposition the car without substantially compressing or relaxing the spring. That arrangement generally preserves the manufacturer’s intended spring relationship.
When the spring perch is also the ride-height control, raising or lowering it changes preload. Too little preload may allow the spring to become loose when the suspension hangs. Too much preload can reduce available droop travel and make the car harsh or cause the damper to operate near its limit.
Do not infer the design from appearance alone. Maxpeedingrods offers different coilover configurations for different vehicles, and the adjustment procedure can vary. The product instructions, collar layout, and any supplied measurement limits should control the decision.
What “preload” means in this adjustment
Preload is the amount of spring compression that exists before the vehicle’s weight is fully applied. It is not the same as ride height. A spring can have preload while the car remains at a particular height, and changing the wrong collar can alter both at once.
The spring should be secure in its seats through the available suspension movement, but it should not be tightened arbitrarily to force a height target. If you cannot keep the spring seated and maintain the specified adjustment range, the target height may be unsuitable for that coilover configuration.
How to verify the finished setup
A successful adjustment is more than a lower number at the fender. The car should sit evenly, retain useful suspension travel, clear surrounding parts, and drive predictably. Use the following checks after the initial road test and again after the setup has had a chance to settle through normal driving.
- Height: Measure all four corners on the same level surface with consistent tire pressure and cargo.
- Collars: Confirm the locking collars remain tight and the marks you made have not shifted.
- Springs: Confirm each spring is seated at both ends and is not visibly damaged or tilted.
- Clearance: Check steering lock, tire sidewalls, brake lines, ABS wiring, sway-bar links, and inner fenders.
- Travel: Look for signs of constant bump-stop contact or a shock that is close to fully extended.
- Fasteners: Recheck wheel torque and inspect accessible suspension fasteners according to the vehicle and kit instructions.
- Alignment: Schedule a professional alignment once the final ride height is chosen.
If you are adjusting for a visual stance, prioritize tire clearance and suspension travel over a perfectly matching fender gap. Body panels are not always centered over the wheels, so equal-looking gaps do not necessarily mean equal suspension height.
Common problems after a height adjustment
Most problems come from moving the wrong collar, failing to settle the suspension, or making a height change without accounting for geometry. The symptoms below help narrow the likely cause, but any looseness or damaged hardware deserves a physical inspection rather than continued driving.
| Symptom | Likely areas to inspect |
|---|---|
| One side sits higher | Unequal collar turns, spring seating, tire pressure, uneven surface, or worn suspension parts |
| Clunking or rattling | Loose locking collar, loose wheel hardware, spring movement, top mount, sway-bar link, or insufficient clearance |
| Tire rubbing | Steering-lock clearance, compressed suspension clearance, wheel offset, tire size, or excessive lowering |
| Harsh ride or bouncing | Insufficient travel, bump-stop contact, incorrect damper setting, excessive preload, or unsuitable height |
| Vehicle pulls or tires wear unevenly | Changed toe or camber, unequal height, tire pressure, or an alignment problem |
When to stop and seek qualified help
Stop the project if a collar will not move without excessive force, the threads are damaged, the spring is loose, the shock body leaks, or you cannot confirm the required thread engagement. Also stop if the vehicle cannot be supported securely or if a suspension fastener is damaged or missing.
A qualified technician should inspect the car when the adjustment is outside the kit’s stated range, when corner balancing is desired, or when the vehicle is used for competition. A professional can also identify bent components, worn bushings, and alignment changes that are not visible during a driveway check.
Frequently asked questions
Can I adjust the coilover height with the wheels on?
Usually, access is much better with the wheel removed, and some designs require it. The vehicle must be safely supported before you reach the collars. Do not turn a collar through a narrow opening if you cannot see the threads, spring seating, or locking surface clearly.
Should I adjust the spring perch or the lower mount?
Use the adjustment specified for your exact kit. If the coilover has independent height adjustment, the lower mount or threaded body commonly sets ride height while the spring perch maintains spring tension. If not, the spring perch may control both height and preload.
How much should I lower the car at one time?
Make small, equal changes on both sides and measure after settling the suspension. The safe limit is defined by the kit’s adjustment range, minimum thread engagement, spring seating, and available suspension travel—not by a universal number.
Do I need an alignment after adjusting coilover height?
Yes, an alignment is strongly recommended after the final height is set because ride height can change toe and camber. Even a small change can affect tire wear and straight-line stability on some vehicles.
Why does the measured height change after I lower the car?
The suspension may not have settled, the bushings may be holding tension, or the car may be on an uneven surface. Roll the vehicle a short distance, use the same measurement points, and check tire pressure before making another adjustment.
Can I drive immediately after changing the height?
Perform a slow, careful check first. Confirm the collars, wheel fasteners, spring seating, steering clearance, and tire clearance before normal driving, then arrange an alignment once the ride height is final.
Finish the adjustment with measurements, not guesswork
The safest way to adjust maxpeedingrods coilovers height is to identify the correct adjustment collar, record the original setup, work in small equal changes, and verify the result with the car on the ground. Keep the spring seated, preserve minimum thread engagement and suspension travel, and never overlook clearance around the tires, brake lines, and wiring.
After the final setting, perform a cautious road test and schedule a four-wheel alignment. If the collars, threads, spring seating, or suspension behavior are uncertain, stop driving and have the setup inspected before making the car’s new ride height permanent. For a reliable result, approach how to adjust maxpeedingrods coilovers height as a sequence of manageable actions and checks.


