
How to Adjust KW Coilover Height Safely and Check Ride Height
Changing coilover height can make a car look lower or restore clearance, but the adjustment is more than turning a collar until the wheel sits where you want it. A small change can affect suspension travel, bump-stop clearance, alignment, spring preload, and the way the vehicle behaves over uneven pavement. The safest result comes from treating ride height as a measured suspension setting rather than a visual detail.
This guide explains how to adjust KW coilover height on a typical height-adjustable KW kit while accounting for the differences between models and applications. You will learn which parts normally move, how to measure the car before and after the adjustment, how to keep the spring correctly seated, and when an alignment or professional setup is necessary.
The exact permitted range, tool shape, and adjustment direction come from the installation manual for your specific KW part number. If the manual conflicts with a general instruction here, follow the manual. With the car safely supported and the suspension adjusted evenly, the attainable outcome is a repeatable ride height with enough travel and no obvious interference.
At a glance
- Measure all four corners before changing anything, using the same reference points each time.
- On many KW kits, height is changed at the threaded lower mount rather than by altering spring preload.
- Recheck clearances and arrange a wheel alignment after a meaningful ride-height change.
How to adjust kw coilover height without losing suspension travel
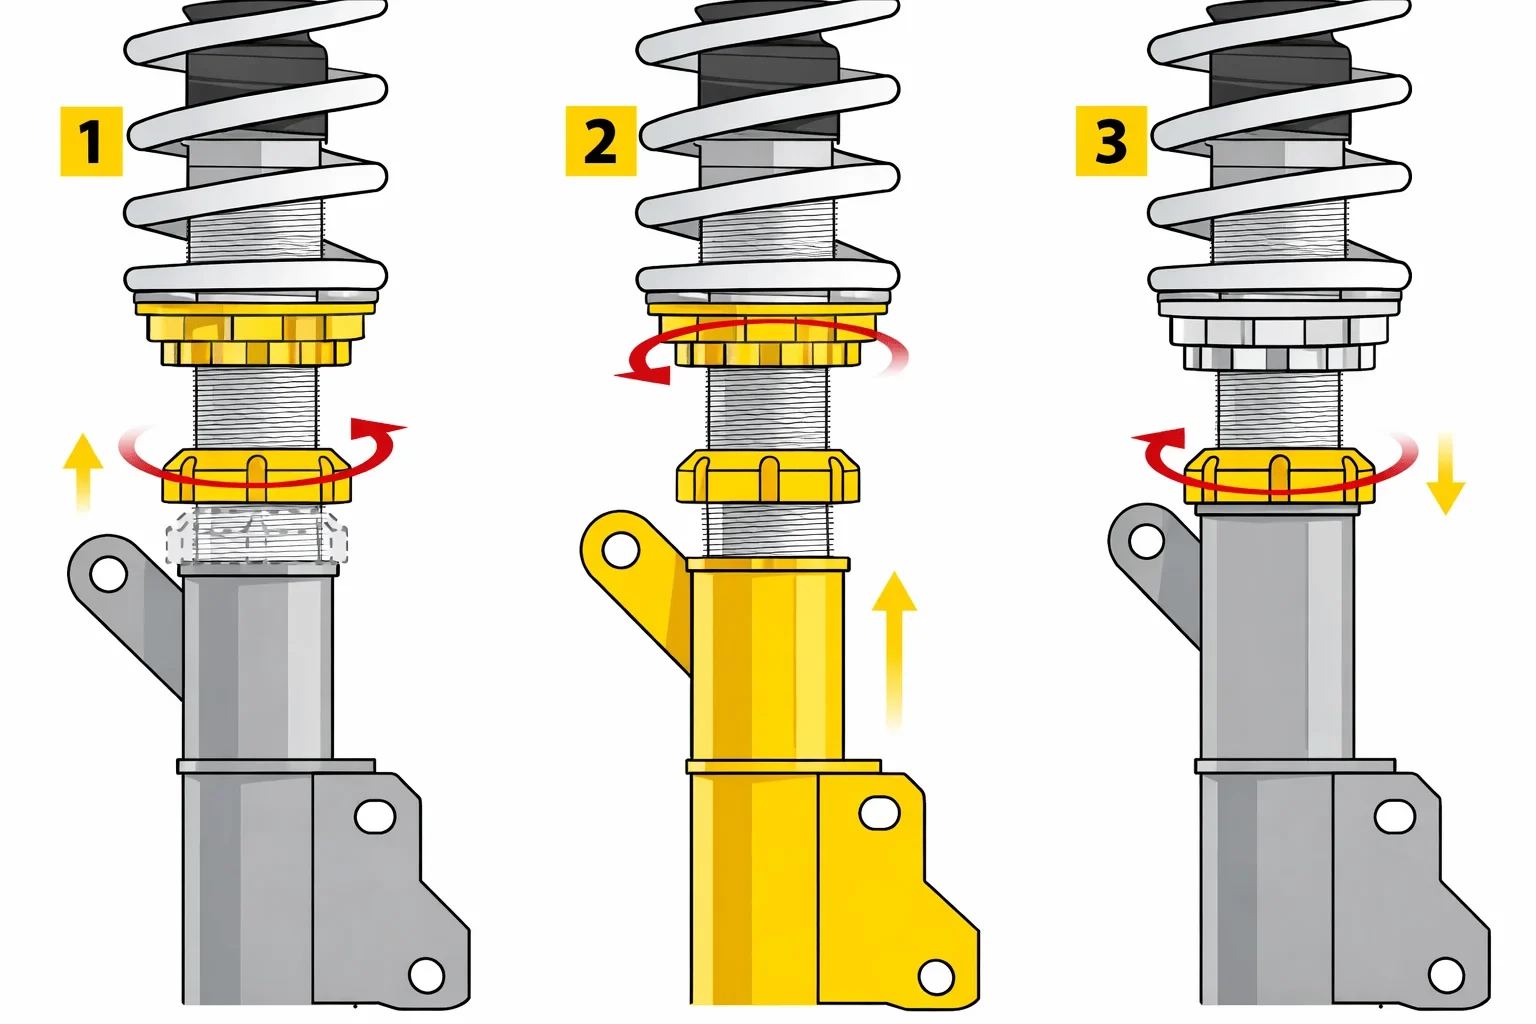
KW makes several coilover families, and the adjustment design is not identical on every vehicle. Many kits use a threaded shock body and a separate lower mounting piece: loosening the lock collar and rotating the lower mount changes the installed length while allowing the spring perch to remain in its intended position. Other applications may use a different arrangement, so identify your hardware before turning anything.
Do not use the spring perch as a general-purpose height adjuster unless the KW instructions specifically say to. Moving the spring perch can change spring preload and available droop travel, while moving the lower mount on a compatible KW design changes ride height with less effect on the spring’s installed preload. Never exceed KW’s approved adjustment range or allow the threaded engagement to fall below the specified minimum.
Tools you will need
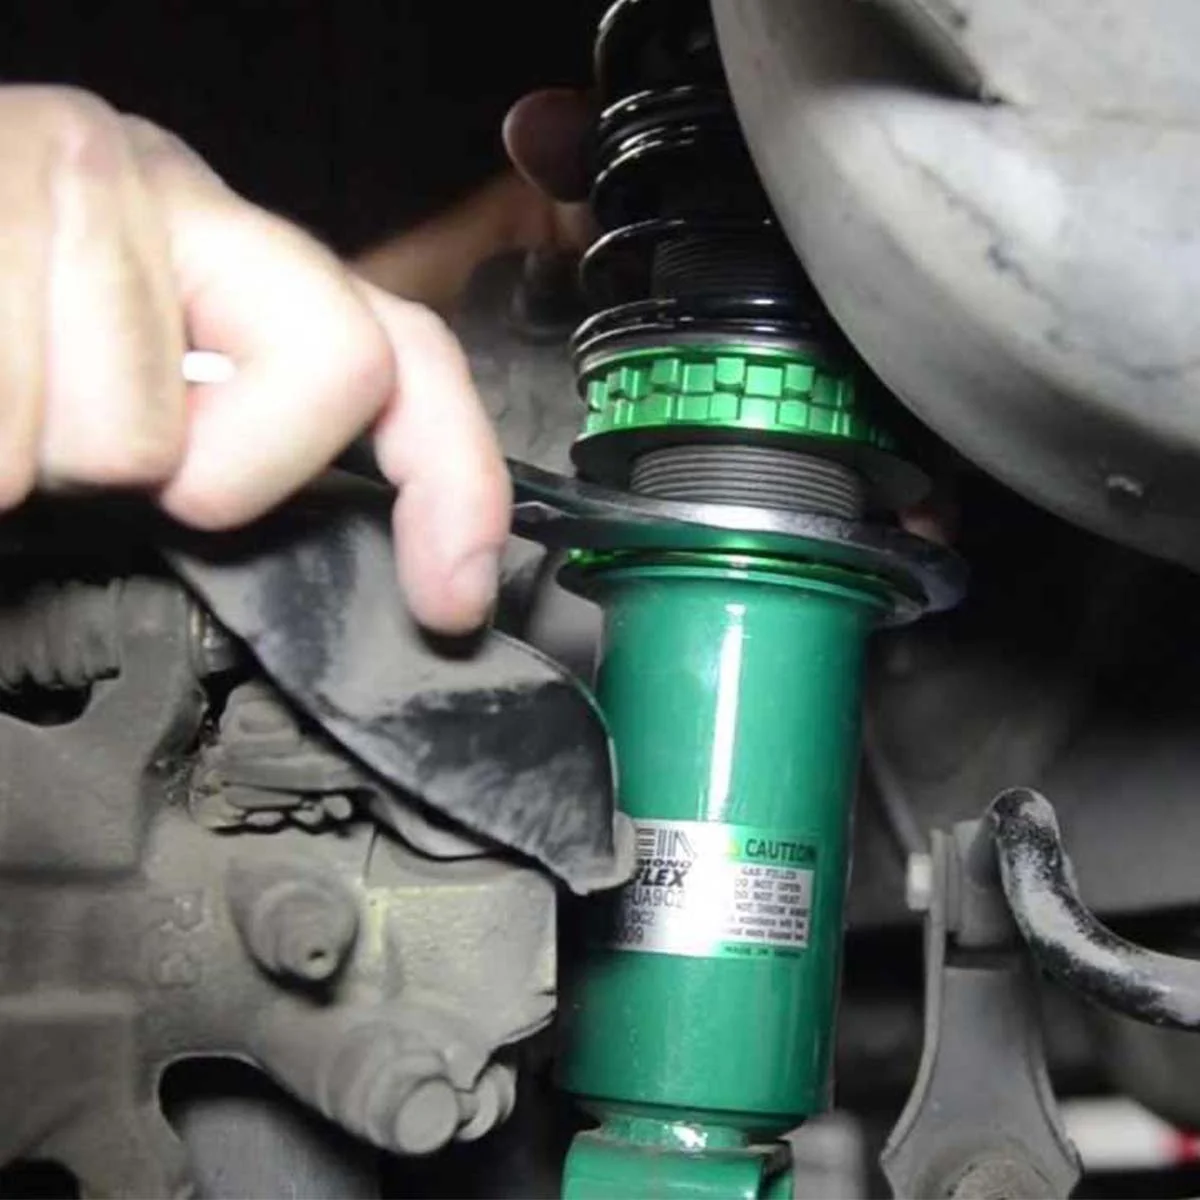
- KW adjustment spanner or hook wrench for the lock collars and lower mount
- Floor jack and correctly rated jack stands for safely lifting and supporting the vehicle
- Tape measure or steel ruler for recording ride-height measurements
- Paint marker or masking tape for marking the starting position
- Torque wrench and the vehicle’s service information for fastener reassembly
- Optional: digital caliper or thread-counting reference for comparing left and right adjustments
Step 1 Confirm the KW kit and read its adjustment limits
Find the KW part number, vehicle application, and installation instructions before lifting the car. The part number may be printed on the packaging, paperwork, damper label, or a registration document. The manual identifies whether your kit uses lower-mount adjustment, a threaded spring seat, or another arrangement, and it states the permitted height range and minimum thread engagement.
Look at the installed coilover without moving it. Identify the spring, spring perch, perch lock ring, threaded body or sleeve, lower mount, and lower-mount lock collar. If the lower mount is seized, the threads are damaged, the spring is not seated, or you cannot determine which collar is the lock collar, stop rather than forcing the assembly.
Important
Never loosen a suspension collar while the spring is carrying uncontrolled load, and never work under a car supported only by a jack. Use solid jack stands on appropriate support points, chock the wheels that remain on the ground, and keep hands clear while loosening any loaded component.
Step 2 Prepare the car and establish a repeatable baseline
Park on a level, hard surface and set the tire pressures to the normal cold pressures listed for the vehicle. Remove unusually heavy cargo, keep the fuel level reasonably consistent, and make sure the same occupants or ballast are used for later comparisons. A different load can change the measured height enough to confuse the adjustment.
Before lifting the vehicle, roll it forward and backward or drive it a short distance so the suspension settles naturally. Do not measure immediately after raising one end with a jack. Record the height at all four corners, preferably from the center of the wheel hub vertically to the fender edge.
This method reduces errors caused by tire diameter and wheel design.
You can also record the distance from the ground to the fender edge, but hub-to-fender measurements are usually more useful when comparing changes. Write down the location and value for each corner, such as left front and right rear, and photograph the exposed threads and collar positions. Marking a reference point on the collar is helpful, but the measurement is the meaningful baseline.
Step 3 Lift and support the vehicle with the suspension unloaded
Chock the wheels that stay on the ground, loosen the wheel fasteners slightly if necessary, and lift the vehicle using the manufacturer’s approved jacking points. Support it with jack stands at strong structural support points, then give the car a careful stability check before removing the wheels.
Lift the complete axle when practical. If one wheel hangs while the other side remains loaded, the anti-roll bar can place unwanted load through the suspension and make collar adjustment difficult. Follow the vehicle service procedure if a brake hose, sensor wire, or other component limits how far the suspension can droop.
Remove the wheel only after the vehicle is securely supported. Clean loose dirt from the accessible threads with a soft brush. Avoid aggressive wire brushing that could damage protective coatings, and do not spray lubricant onto a surface where it could reach the brake disc or pads.
Step 4 Free the correct lock collar and mark the starting position
Use the KW spanner to loosen the lock collar specified by the manual. Hold the adjacent component so force is not transferred through the damper rod or through a thin spring perch. A small amount of penetrating fluid may help with an externally dirty thread, but it is not a substitute for the correct wrench or a safe disassembly method.
Mark the starting position of the lower mount, lock collar, and a fixed point on the threaded body. Also note the exposed thread length or count the visible turns if the manual permits that as a reference. These marks do not replace the manufacturer’s minimum-engagement requirement, but they make it easier to return to the original setting.
If the collar will not move with reasonable hand-tool force, stop. Hammering directly on aluminum collars can deform them, and using an impact wrench can damage the threads or spin internal components. A seized or damaged coilover is a repair issue, not a sign that more force is appropriate.
Step 5 Adjust the lower mount in small, equal increments
On a KW design that uses lower-mount height adjustment, rotate the lower mount on the threaded body in the direction identified by the manual. Make a small change at one corner, then make the same change on the opposite corner of that axle. Counting turns or measuring exposed thread helps keep the pair consistent.
The amount of height change at the wheel is not always identical to the amount the mount moves because suspension geometry creates a motion ratio. For that reason, do not assume one full turn equals a particular number of millimeters at the fender. Adjust, reassemble enough to settle the car, and measure the actual result.
Keep the spring seated in its upper and lower isolators throughout the adjustment. The spring should not be loose when the suspension is fully extended unless the KW instructions explicitly allow that condition. If the spring becomes unseated, the mount reaches the end of its range, or the available thread engagement looks inadequate, return the assembly to a safe position and consult KW or a qualified suspension technician.
Helpful tip
For a mild correction, change both sides of the same axle by the same number of turns first. If the original measurements were unequal, do not automatically “fix” the difference by guessing; determine whether it came from setup, loading, worn parts, or normal vehicle variation.
Step 6 Lock the adjustment and reinstall the wheels
Once the mount is at the intended preliminary setting, tighten the correct lock collar against the mating surface. Use the torque values and tightening method in the KW and vehicle instructions. Some collars are secured by contact between two threaded pieces, while other hardware may use a separate fastener; do not substitute a generic tightening method.
Inspect both sides of the axle before reinstalling the wheels. Confirm that the left and right settings are comparable, the springs are centered, no brake line or ABS wire is stretched, and the damper body is not contacting a control arm, knuckle, or driveshaft. Check that the tires will clear the spring, collar, and inner wheel area through the available steering range.
Install the wheels and tighten the wheel fasteners by hand. Lower the car carefully until the tires touch the ground, then torque the wheel fasteners in the vehicle manufacturer’s specified sequence and value. Do not use the wheel fastener torque as a substitute for the coilover collar torque.
A useful way to approach how to adjust kw coilover height is to check your progress after each stage.
Step 7 Settle the suspension and measure the new height
Roll the car forward and backward several feet, or drive slowly over a smooth private surface, so the suspension can settle. Avoid hard braking, cornering, or uneven ground during this check. Measure from the same hub center to fender points used for the baseline, with the same tire pressures and load.
Compare the new numbers by corner and by axle. If the car moved less or more than expected, use the measurement rather than relying on visual judgment. A level-looking fender gap does not prove that the chassis is at the intended height, because body panels, tire sizes, and factory corner weights can differ.
If the adjustment is not correct, raise and support the car again before changing anything. Do not try to rotate an accessible collar with the vehicle’s weight on the suspension unless the specific KW instructions explicitly approve that method. Repeat small, matched adjustments and settle the car after each meaningful change.
Step 8 Inspect travel, clearance, and fasteners before driving normally
Turn the steering from lock to lock while observing the front tires and coilovers. Check for contact between the tire, spring, damper, brake hose, ABS wiring, sway-bar link, and nearby bodywork. At the rear, inspect clearance around the tire, spring, damper, and inner fender.
Look underneath for reduced ground clearance and confirm that the exhaust, underbody panels, jacking points, and other low components remain usable. A lower ride height can also change the angle of suspension links and driveshafts. If the vehicle uses height-sensitive electronic systems, headlights, or driver-assistance sensors, follow the vehicle-specific recalibration requirements.
Finally, check that all wheel fasteners, coilover lock collars, and any removed brackets are secure. Take a short, slow test drive on a familiar road, listening for clunks or rubbing. Return immediately if the car pulls sharply, a tire contacts the body, the steering feels abnormal, or a warning light appears.
What the adjustment changes on a KW coilover
A coilover combines a coil spring and damper in one suspension assembly. The spring supports the vehicle’s weight, while the damper controls how quickly the suspension compresses and extends. Ride height is the vehicle’s settled body height, not simply the visible distance between the tire and fender.
On many KW applications, the threaded lower mount changes the effective length of the coilover. This is why the answer to how to adjust kw coilover height often involves the lower mount rather than turning the spring perch. The exact construction still matters, so the model-specific manual remains the controlling reference.
Height adjustment versus spring preload
Spring preload is the amount a spring is compressed in the installed, unloaded assembly before the vehicle’s weight is applied. Changing preload can alter how much the spring remains compressed at full droop and can affect available travel. It may be part of a setup procedure on some kits, but it is not automatically the correct way to change ride height.
With a lower-mount-adjustable system, the spring perch is generally kept in the position specified by KW while the lower mount is moved. This preserves the intended relationship between spring seating and damper travel more effectively than randomly winding the perch up or down.
Why suspension travel matters
Lowering the car reduces the distance available before a bump stop or another component limits compression. Raising it too far can reduce droop travel or move the vehicle outside the intended geometry. The visual result may be acceptable while the suspension repeatedly hits its stops on ordinary roads.
Watch for symptoms such as harsh impacts over small bumps, a wheel lifting over uneven corners, rubbing during compression, or a damper reaching the end of its stroke. These signs require more than another collar adjustment. Recheck the approved height range, bump-stop condition, spring seating, and damper travel before continuing.
When an alignment or corner balance is needed
Changing ride height changes suspension geometry, including camber and toe. Even a modest adjustment can affect tire wear and steering stability, especially on a vehicle with limited factory adjustment. Have the alignment checked after the final ride height is established rather than aligning the car and then changing its height again.
A four-wheel alignment corrects wheel angles; it does not necessarily equalize the weight carried at each corner. If the goal is balanced handling for track use, a specialist can perform a corner balance with the driver and intended fuel load. That procedure may change individual corner heights, so it should be completed before the final alignment.
How to verify the finished setup
A successful adjustment is measurable and mechanically sound. The car should settle consistently, the left and right settings should be intentional, and no component should contact another through normal steering and suspension movement.
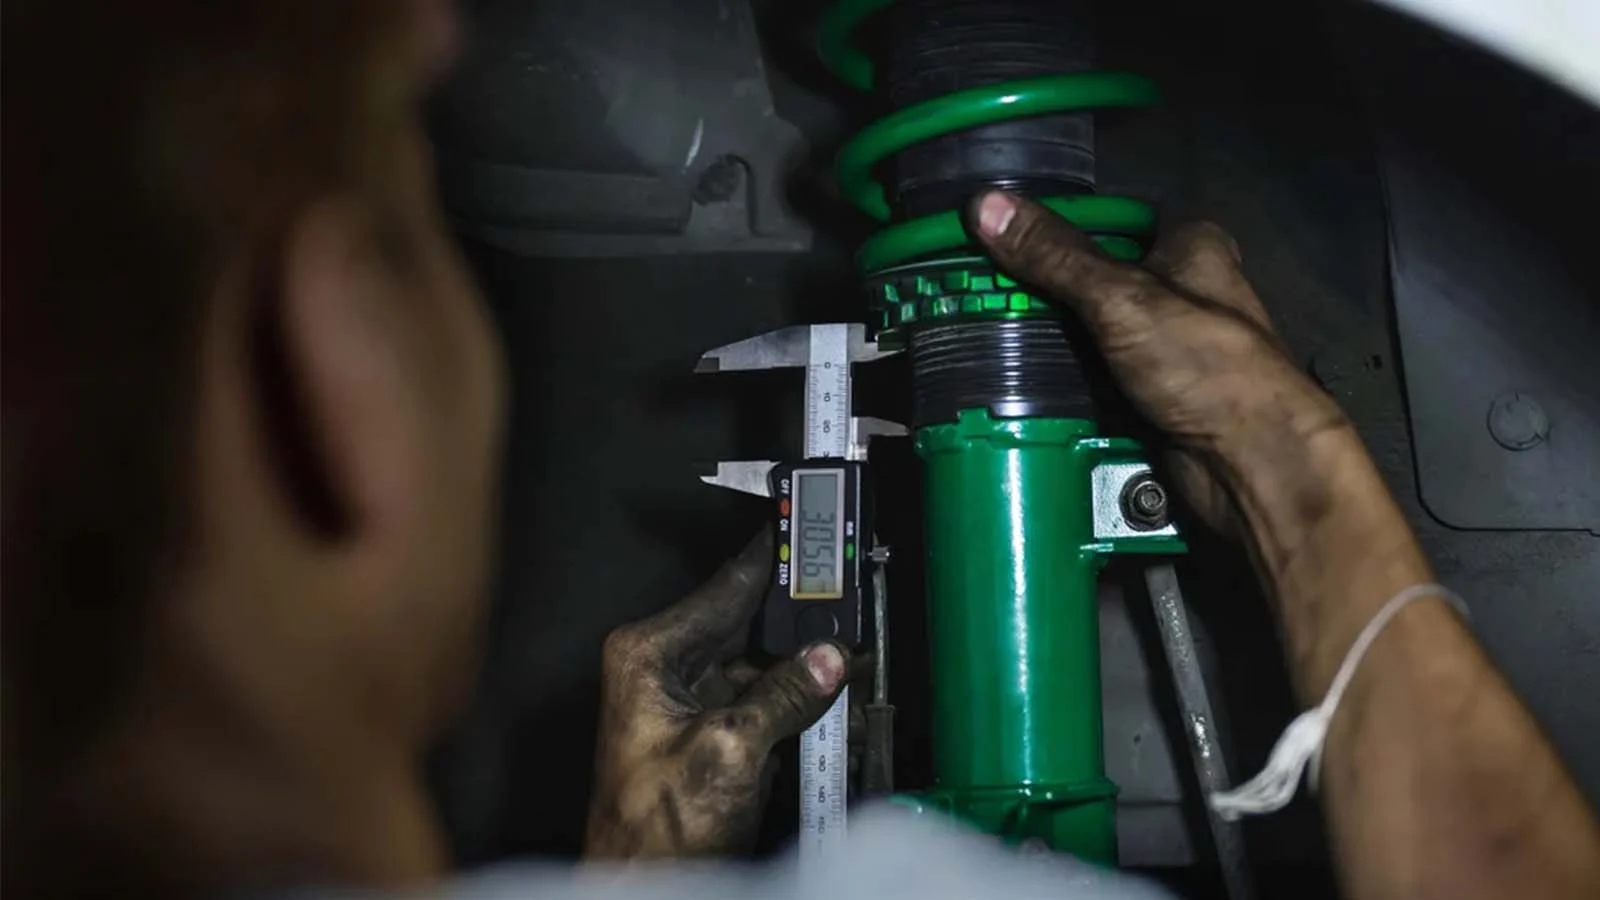
- Compare hub-to-fender measurements with the original notes and the target range in the KW instructions.
- Confirm the spring remains correctly seated at full droop and normal ride height.
- Check that the lower mount has adequate thread engagement and has not passed a marked limit.
- Inspect tire, wheel, brake line, ABS wire, sway-bar, and body clearance.
- Listen for rubbing, clunks, or repeated bottoming during a cautious test drive.
- Schedule a four-wheel alignment after the height is final.
- Recheck the adjustment and wheel fasteners after the initial drive and again during routine maintenance.
Check your result
The adjustment is ready for normal use when the measured height is repeatable, all hardware is secure, the tires clear throughout steering and suspension movement, and the vehicle tracks and rides without new interference or impact noises.
Common problems when adjusting KW coilovers
Most difficulties come from confusing the spring perch with the height-adjustment mechanism, measuring on an unsettled car, or forcing a dirty threaded component. Use the symptoms below as a starting point, but defer to the KW manual whenever the hardware differs from the description.
| What you observe | What to check |
|---|---|
| The car sits unevenly after equal turns | Settle the suspension again, verify measurements, and check for different loads or worn components before making unequal corrections. |
| The collar will not move | Clean the threads and verify the correct collar is loose. Stop if the aluminum is deforming, the thread is damaged, or force is increasing. |
| The spring becomes loose at full droop | Return to the approved range and inspect spring seating, preload, and damper travel against the KW instructions. |
| The ride becomes harsh or the car bangs over bumps | Check bump-stop engagement, available travel, excessive lowering, and possible component contact. |
| The steering wheel is no longer centered | Arrange an alignment check; do not correct the steering wheel position by guessing at coilover adjustments. |
| A tire rubs after lowering | Stop driving normally until clearance is restored. Check wheel offset, tire size, alignment, and compression clearance. |
Can the collars be adjusted with the wheels installed?
Sometimes the hardware is accessible, but access does not mean the method is approved. The suspension may be loaded, the wrench may not engage fully, and turning one side without a matching reference can produce an inaccurate setup. Removing the wheel and supporting the vehicle as directed is the safer general method.
What if the left and right ride heights were different before adjustment?
First repeat the baseline measurement on level ground with consistent tire pressure and load. Small differences can result from corner weight, fuel-tank placement, the driver’s position, or body variation. Larger differences may indicate a bent component, worn bushing, damaged spring, or an incorrect previous adjustment, so do not correct them by guessing.
When should a professional take over?
Seek qualified help if you cannot identify the adjustment parts, cannot verify the minimum thread engagement, find damaged or seized threads, see a loose spring, or discover contact with a brake or steering component. Also use a specialist for corner balancing, motorsport setup, or any job requiring damper disassembly.
KW coilover height adjustment FAQs
These answers cover common beginner questions, but the instructions supplied with the exact KW kit take priority over general coilover practice.
How much can I lower my car on KW coilovers?
Only lower it within the approved range for the exact KW application. The usable range depends on the vehicle, kit design, wheel and tire combination, and available suspension travel; the lowest visually possible setting is not automatically a safe or functional setting.
Do I adjust the spring collar or the lower mount?
On many height-adjustable KW kits, the lower mount is the primary ride-height adjustment and the spring perch is left at its specified setting. Confirm this in the model-specific KW manual before loosening any collar, because construction varies by application.
Do I need an alignment after changing coilover height?
Yes, an alignment check is strongly recommended, and a full alignment is appropriate after a meaningful change. Ride height affects camber and toe, which can influence tire wear, straight-line tracking, and steering feel.
Can I measure ride height from the ground to the fender?
You can, but measure from the same point every time and keep tire pressure and vehicle load consistent. Measuring from the wheel hub center to the fender edge usually gives a better comparison because it is less affected by tire size and wheel changes.
Why does my car sit higher after I lower the coilovers?
The suspension may not have settled, the adjustment may have been made in the wrong direction, or the spring and isolators may be binding. Roll the car to settle it, remeasure, and inspect the installation; do not keep turning collars until the cause is understood.
Finish the adjustment with measurements, not guesswork
Learning how to adjust kw coilover height is mainly an exercise in identifying the correct adjustment point, preserving spring seating and suspension travel, and verifying the result at all four corners. Record a baseline, make small matched changes within KW’s limits, settle the vehicle, and inspect every clearance before normal driving.
Once the ride height is final, arrange an alignment and consider corner balancing if handling balance matters. If any collar is seized, the spring is loose, thread engagement is uncertain, or a suspension component contacts the tire or body, stop and have the setup inspected by a qualified technician rather than forcing the adjustment.


