
How to Adjust Coilover Height: Step-by-Step Ride Height Guide
Learning how to adjust coilover height is one of the most useful skills for anyone running adjustable suspension. The job is not hard, but the details matter. A few turns of a collar can change how the car looks, clears bumps, handles corners, and wears its tires.
On many street cars in the U.S., owners install coilovers because they want a lower stance without giving up all control over ride height. The safest approach is to make small changes, keep clear notes, and work from actual measurements rather than guessing by eye.
One lesson that matters on almost every coilover setup is this: ride height and spring preload are not always the same adjustment. Some coilovers change height through the lower shock body. Others use the spring perch. Knowing which design you have prevents poor suspension travel, loose springs, or a harsh ride.
This guide explains how to adjust coilover height step by step. It also covers measuring ride height, preload, collar direction, front-to-rear balance, common mistakes, alignment, and what to check before driving.

How to Adjust Coilover Height: Understand the Adjustment System First
Before turning any collars, identify how your coilover controls ride height. This is the most important first step when learning **how to adjust coilover height**. Coilovers may look similar, but their adjustment systems can work in different ways.
A full-length adjustable coilover often has a threaded shock body that screws into the lower mount. Turning that body changes the overall length of the assembly. This lets you raise or lower the car without making a large change to spring preload.
Other coilovers use the lower spring perch to set ride height. Moving the perch changes the position of the spring on the shock body. On this type, ride height and spring setup are more closely linked.
Always check the instructions for your exact coilover kit before making a large adjustment. Manufacturers often specify minimum thread engagement, preload limits, torque values, and safe adjustment ranges.

- ✦ Full-length adjustment
The threaded shock body moves in or out of the lower mount to change overall coilover length.
- ✦ Spring-perch adjustment
The lower spring seat moves on the threaded body and changes the spring position.
- ✦ Rear separate spring setup
Some cars use a rear spring and shock in separate locations. Ride height may be changed with an adjustable spring perch instead of the shock.
Ride Height Adjustment vs. Spring Preload
**Ride height** is how high the vehicle sits from the ground. **Spring preload** is the amount the spring is compressed when the suspension is unloaded.
On a full-length adjustable coilover, you usually want to set the spring preload first and then adjust height with the lower mount. Using extra preload only to raise the car can reduce droop travel and change how the suspension works.
On a spring-perch-only coilover, moving the perch may affect both height and preload. That is why you should follow the manufacturer’s method instead of applying one universal rule to every kit.
- ✦ Height controls stance
Ride height determines how far the body sits above the road.
- ✦ Preload controls spring seating
Preload keeps the spring seated and may affect available suspension travel depending on the design.
Tools You Need to Adjust Coilover Height
You do not need a large tool collection to adjust most coilovers. You do need safe lifting equipment, the correct coilover wrench, and a reliable way to measure the car.
Never work beneath a vehicle held only by a hydraulic floor jack. Lift the car on firm, level ground and support it with properly rated jack stands at approved lifting points.
A tape measure is enough for basic ride-height work. A ruler with millimeter markings can make smaller changes easier to track.
- ✦ Floor jack
Use a jack rated for the weight of the vehicle.
- ✦ Jack stands
Support the vehicle securely before working near the suspension.
- ✦ Coilover spanner wrench
Use the wrench supplied with the coilovers or one that fits the adjustment collars correctly.
- ✦ Tape measure or ruler
Measure the ride height before and after each adjustment.
- ✦ Torque wrench
Retighten wheels and suspension fasteners to the correct specification.
- ✦ Penetrating lubricant
A small amount can help free dirty or lightly corroded adjustment collars.
- ✦ Brush and clean cloth
Clean exposed threads before turning the collars.
Measure the Current Ride Height Before Making Changes
Good coilover adjustment starts with measurements. Do not rely only on how the car looks. Park on a flat surface and make sure the tires have normal pressure.
For repeatable results, measure from the center of the wheel hub to the bottom edge of the fender opening. This method reduces the effect of tire size and tire pressure on your reading.
Write down all four measurements. Label them left front, right front, left rear, and right rear. These numbers give you a baseline and make it easier to keep the vehicle level.
If you are trying to change the whole car by about half an inch, do not assume half an inch of threaded-body movement will always equal half an inch at the fender. Suspension geometry can change the final result.

- ✦ Left front
Record the hub-center-to-fender measurement.
- ✦ Right front
Compare it with the left front before changing anything.
- ✦ Left rear
Measure at the same point on the wheel and fender.
- ✦ Right rear
Record the final baseline measurement.
Why Hub-to-Fender Measurement Works Well
Ground-to-fender measurements can change with tire pressure, tire wear, and tire size. Measuring from the wheel hub center removes much of that variation.
It is also useful when you change wheels or tires later. Your suspension measurement stays easier to compare.
Step-by-Step: How to Adjust Coilover Height
The exact procedure varies by coilover design, but the basic workflow is similar. Work on one axle at a time and make controlled changes.
If this is your first time learning **how to adjust coilover height**, take a photo of the collar positions before you start. You can also count exposed threads or measure the threaded section so you have a reference.

- ✦ Step 1: Park on level ground
Set the parking brake and place the vehicle on a solid, flat surface.
- ✦ Step 2: Measure the current height
Record hub-to-fender measurements at all four corners.
- ✦ Step 3: Loosen the wheel nuts slightly
Break them loose before raising the vehicle if wheel removal is needed.
- ✦ Step 4: Raise and support the vehicle
Lift the car safely and place it on rated jack stands.
- ✦ Step 5: Clean the coilover threads
Remove dirt and grit so they do not damage the threads while the collars turn.
- ✦ Step 6: Loosen the locking collar
Use the correct spanner wrench to release the collar that locks the adjustment in place.
- ✦ Step 7: Make a small height adjustment
Turn the threaded body or spring perch according to the coilover design.
- ✦ Step 8: Match the opposite side
Adjust the other coilover on the same axle by the same measured amount as a starting point.
- ✦ Step 9: Tighten the locking collars
Secure the adjustment using the method and torque guidance from the coilover manufacturer.
- ✦ Step 10: Reinstall the wheels
Install and torque the wheel nuts correctly.
- ✦ Step 11: Lower the vehicle
Set the car back on the ground carefully.
- ✦ Step 12: Settle the suspension
Roll the vehicle back and forth or take a short drive before measuring again.
- ✦ Step 13: Measure again
Compare the new hub-to-fender readings with your target height.
How Much Should You Adjust at One Time?
Make small changes. A few millimeters or a few turns at a time is much easier to control than a large adjustment.
Small steps also reduce the chance of lowering the car too far. It is common to need two or three adjustment cycles before the stance is where you want it.
- ✦ Small changes are easier to reverse
You can correct the setup without losing your original reference.
- ✦ Measure after every cycle
The final vehicle movement may not exactly match the amount moved on the threaded body.
How to Lower Coilovers Correctly
To lower a full-length adjustable coilover, the shock body is usually threaded farther into the lower mount. This shortens the complete coilover assembly and lets the chassis sit lower.
Loosen the lower locking collar first. Then rotate the shock body or lower mount using the method specified by the manufacturer. Keep track of the amount moved so you can match the other side.
If your coilovers use a spring-perch height system, lowering the perch may lower the car. However, it can also change spring preload or available shock travel.
Do not lower the car until the tire nearly touches the fender and assume the job is done. You need clearance for bumps, steering, body roll, passengers, and suspension compression.

- ✦ Keep tire clearance
Check the tire against the fender liner, fender lip, suspension, and brake components.
- ✦ Protect suspension travel
Leave enough compression travel so the suspension can absorb normal road bumps.
- ✦ Watch ground clearance
Oil pans, exhaust parts, subframes, and front splitters can become vulnerable when the car is very low.
How Low Is Too Low?
A coilover can sometimes physically adjust lower than the vehicle should safely be driven. The usable limit depends on tire size, suspension geometry, roads, alignment range, and vehicle design.
For a street car, the best height is usually one that leaves useful suspension travel and enough clearance for driveways, potholes, speed bumps, and full steering lock.
How to Raise Coilover Height Correctly
Raising a full-length adjustable coilover normally means threading the body farther out of the lower mount. This increases the overall coilover length and raises the vehicle.
Do not keep unscrewing the body without checking thread engagement. The lower mount needs enough threaded contact to safely support the suspension loads.
Many coilover makers specify a maximum extension or minimum amount of thread that must remain inside the lower mount. Stay within that limit.
If you are raising the car because the suspension bottoms out, also check bump-stop condition, spring rate, shock travel, and preload. Height alone may not solve the actual problem.
- ✦ Check thread engagement
Never extend an adjustable body beyond the manufacturer’s safe limit.
- ✦ Raise both sides evenly
Use matching measurements as your first setting on the same axle.
- ✦ Recheck brake and ABS lines
Make sure hoses and wires do not become tight at full suspension droop.
How Coilover Preload Affects Height and Suspension Travel
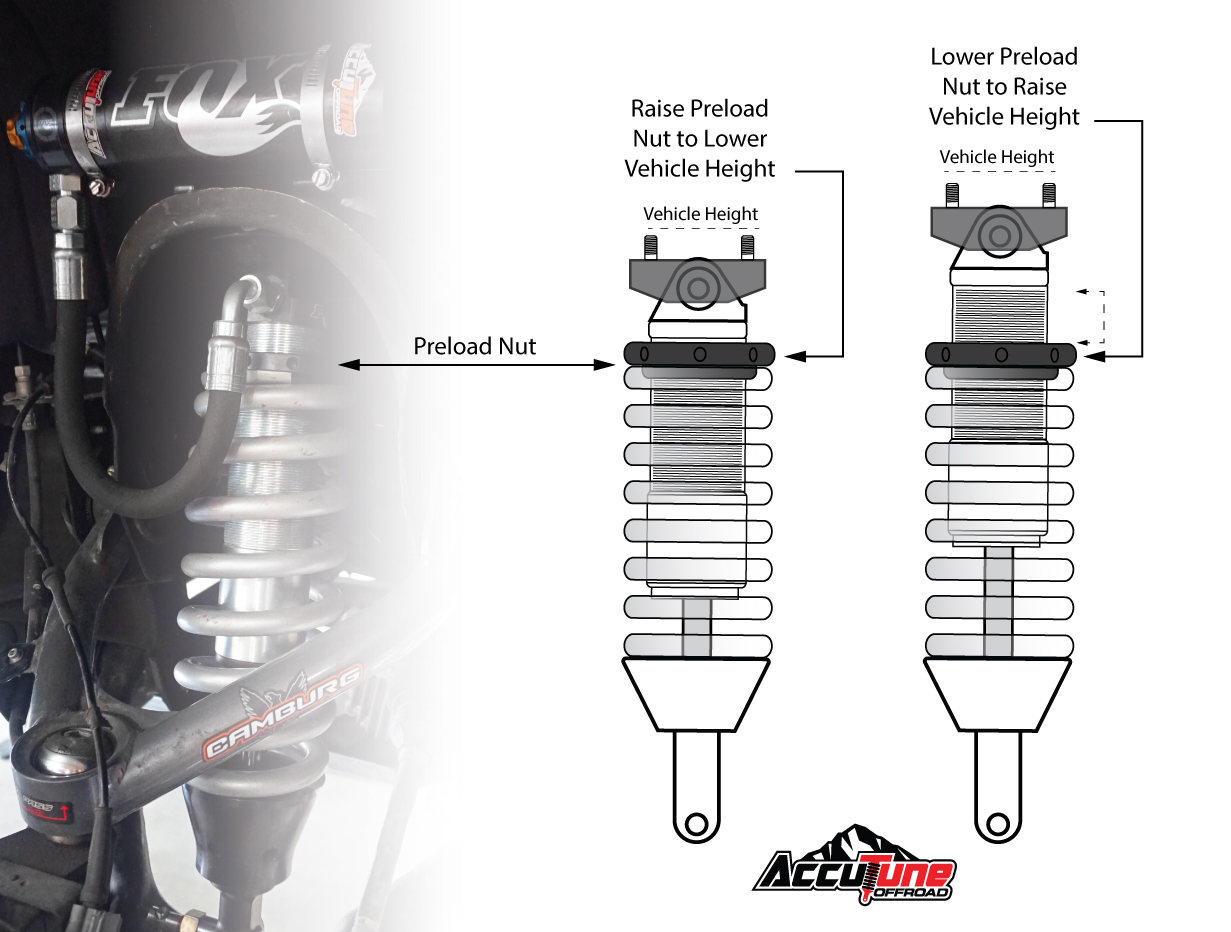
Preload is one of the most misunderstood parts of coilover setup. It is the amount of spring compression present when the shock is fully extended.
Some coilovers need only enough preload to keep the spring seated. Others specify a set preload measurement. Off-road and performance coilovers may use different preload strategies than typical street coilovers.
Increasing preload can raise ride height on some designs. It can also reduce droop travel. That is why adding preload should not automatically be treated as the correct way to raise the car.
When learning **how to adjust coilover height**, separate the ideas of height, preload, and damping. They influence the suspension in different ways.
- ✦ Too little preload
The spring may become loose when the suspension reaches full droop if the system is not designed for zero preload.
- ✦ Too much preload
Excess preload may reduce droop travel and can move the suspension away from its intended operating range.
- ✦ Correct preload
Use the value or method specified by the coilover manufacturer.
Does More Preload Make the Spring Stiffer?
On a standard linear-rate spring, preload does not change the spring’s actual rate. A 400-pound-per-inch linear spring remains the same basic spring rate.
Preload changes the force required before the spring extends farther from its preloaded position. It may also change ride height and available travel depending on the suspension design.
Which Direction Do You Turn Coilovers to Raise or Lower Them?
There is no safe universal answer based only on clockwise or counterclockwise rotation. The direction depends on the coilover design, which collar you are turning, and which side of the vehicle you are viewing.
Instead of memorizing a direction, watch what the threaded component actually does. If the shock body moves farther into the lower mount, the assembly normally becomes shorter. If it moves outward, the assembly becomes longer.
For a spring perch, watch whether the perch moves up or down the shock body. Marking the starting point with a paint marker can make this much easier.
This simple approach is more reliable than following a generic clockwise rule that may not apply to your coilovers.
- ✦ Watch the body length
A shorter full-length coilover usually lowers the vehicle.
- ✦ Watch the perch position
On perch-adjusted systems, note whether the spring seat moves up or down.
- ✦ Mark your starting point
A small paint mark helps you count turns and return to the original setting if needed.
How to Keep Left and Right Coilover Height Even
The safest starting point is to make equal mechanical changes to the left and right coilovers on the same axle. If you turn the left side five turns, begin with five turns on the right side as well.
However, equal thread positions do not always produce exactly equal fender measurements. Vehicle weight is not perfectly balanced from side to side. Fuel level, battery location, driver weight, and chassis differences can affect the final stance.
Measure the vehicle after it is on the ground and the suspension has settled. Then make small corrections if needed.
Do not chase a tiny visual difference without understanding why it exists. A professional corner balance may intentionally result in slightly different perch positions to improve weight distribution.
- ✦ Start equal
Use matching thread movement on both sides of the axle.
- ✦ Measure on the ground
Final ride-height readings should be taken with the vehicle resting normally.
- ✦ Adjust in small steps
Fine-tune one side only after you confirm the difference with repeatable measurements.
Should All Four Coilovers Have the Same Thread Count?
Not necessarily. Front and rear suspension geometry, spring lengths, mounting points, and vehicle weight are different.
Even left and right positions may differ slightly after a professional corner balance. What matters is that the setup stays within safe adjustment limits and meets the intended ride-height and handling goals.
Front vs. Rear Coilover Height Adjustment
The front and rear suspension do not always use the same adjustment method. Many cars have a true coilover at the front but use a separate spring and shock at the rear.
On a rear divorced setup, the spring sits in an adjustable perch on the control arm or chassis. Turning that perch changes spring position and ride height. The rear shock may then need to be adjusted separately if it has an adjustable length.
Always confirm that the shock has enough compression and extension travel at the new ride height. A poorly matched rear shock length can cause bottoming or top-out.
When learning **how to adjust coilover height**, treat the front and rear as separate systems unless your kit clearly uses the same design at all four corners.
- ✦ Front true coilover
The spring and damper are usually part of one adjustable assembly.
- ✦ Rear divorced setup
The spring height adjuster and shock may be separate components.
- ✦ Check rear shock travel
Make sure the shock is not too long or too short for the new rear ride height.
How to Set Coilover Height for Daily Driving
A street car needs more than a good stance. It needs enough ground clearance and suspension travel for real roads.
In many parts of the U.S., that means dealing with steep driveways, broken pavement, parking-lot entrances, expansion joints, potholes, and speed bumps. A car that looks perfect in a garage may be frustrating if it scrapes during normal use.
Set the car low enough to meet your goal without placing major parts at constant risk. Check the front bumper, engine undertray, oil pan, exhaust, frame rails, and side skirts.
You should also test the car with normal passengers or cargo if those loads are common. Extra weight can reduce clearance more than expected.
- ✦ Leave useful bump travel
The suspension needs room to move upward without constantly hitting the bump stops.
- ✦ Check full steering lock
Turn the front wheels fully left and right to confirm tire clearance.
- ✦ Plan for passengers
The vehicle will sit lower when carrying people, luggage, or other cargo.
- ✦ Test driveway clearance
Make sure normal entrances do not cause repeated scraping.
How to Set Coilover Height for Performance Driving
For performance use, the lowest possible setting is not automatically the fastest setting. Suspension geometry and available travel matter more than appearance.
Lowering changes control-arm angles, tie-rod angles, roll center, bump steer, camber, and toe. Large changes can move the suspension outside the range the chassis was designed to use.
A track setup should keep enough travel for braking, cornering, and surface changes. Bottoming the suspension in a corner can reduce grip even if the vehicle has stiff springs.
Serious performance setups often use corner balancing after ride height is set. This adjusts individual spring perches to manage cross weight with the driver and typical operating load in the car.
- ✦ Prioritize travel
Do not sacrifice all compression travel just to lower the center of gravity.
- ✦ Check alignment range
Make sure camber and toe can still be set correctly.
- ✦ Consider corner balancing
A performance shop can balance diagonal wheel loads after the basic ride height is established.
What Is Corner Balancing?
Corner balancing measures how much weight rests on each tire. The technician then adjusts individual spring perches to change diagonal weight distribution.
The goal is not always identical fender height at every corner. The goal is more predictable chassis balance under acceleration, braking, and cornering.
Common Mistakes When Adjusting Coilover Height
Most coilover problems come from skipping measurements, mixing up preload and ride height, or lowering the car past a useful range. These mistakes are easy to avoid when you work slowly.
Another common issue is forcing dirty adjustment collars. Road grit can pack into the threads. Forcing a collar through that dirt can damage the threads and make future adjustment difficult.
A third mistake is driving immediately after a large adjustment without checking alignment or clearance. Height changes can alter toe and camber enough to affect tire wear and handling.

- ✦ Using preload only to change height
This can reduce suspension travel on coilovers that have independent height adjustment.
- ✦ Adjusting one side by eye
Measure both sides instead of guessing from body lines or tire gaps.
- ✦ Ignoring minimum thread engagement
Extending a lower mount too far can create a serious structural risk.
- ✦ Leaving collars loose
Loose locking collars can let the setup move or create noise.
- ✦ Lowering until the tire rubs
Static clearance does not guarantee clearance during bumps or steering.
- ✦ Skipping alignment
Ride-height changes can alter toe and camber.
- ✦ Turning seized collars with excessive force
Clean and lubricate the threads rather than damaging the collar or shock body.
Do You Need an Alignment After Adjusting Coilover Height?
Yes, an alignment is strongly recommended after a meaningful ride-height change. Lowering or raising the vehicle can change suspension geometry and alter toe, camber, and sometimes caster.
Toe is especially important for tire wear. A car can look straight and still have enough toe error to wear the tires quickly.
If you are still experimenting with the height, finish your main adjustments before paying for a final alignment. There is little value in aligning the car and then changing its ride height again the next day.
For a street car, tell the alignment shop how you use the vehicle. A daily driver usually needs a different setup from a car built mainly for autocross or track days.
- ✦ Set ride height first
Finish the major height changes before the final alignment.
- ✦ Set tire pressure
Use normal tire pressure before the alignment.
- ✦ Settle the suspension
Drive the car briefly so the suspension reaches its normal resting position.
- ✦ Align for the intended use
Street, autocross, and track setups may use different camber and toe targets.
What to Check After You Adjust Coilover Height
Your work is not finished when the car reaches the desired height. A careful inspection after adjustment helps catch problems before they damage tires or suspension parts.
Drive slowly at first. Listen for rubbing, clunks, spring noise, or contact over bumps. Pay attention to steering feel and whether the car pulls to one side.
After a short drive, measure the ride height again. Springs, bushings, and tires can settle slightly after the car moves.
Recheck accessible locking collars and fasteners according to the coilover maker’s instructions. If any collar has moved, stop and correct the issue before normal driving.
- ✦ Tire-to-fender clearance
Check at normal height, full steering lock, and during suspension compression.
- ✦ Brake hose clearance
Confirm brake hoses are not stretched, pinched, or rubbing.
- ✦ ABS wire clearance
Make sure sensor wiring has enough movement.
- ✦ Locking collars
Confirm each adjustment collar is secure.
- ✦ Suspension travel
Check for signs of bottoming or topping out.
- ✦ Wheel alignment
Arrange an alignment after the final ride height is established.
Why Coilover Height May Change After Driving
The vehicle may settle slightly after it is lowered from jack stands. Tire bind and bushing tension can hold the suspension above its natural resting position at first.
Rolling the car or taking a short drive allows the suspension to settle. Measure only after this happens if you want a useful final reading.
Troubleshooting Coilover Height Problems
If the car does not sit as expected after adjustment, do not immediately keep turning collars. First find out why the measurement is different.
Uneven ground, tire pressure, spring seating, worn suspension bushings, or different left-to-right loads can all affect ride height.
The adjustment itself may also be the problem. One side may have moved farther than the other, or a locking collar may not be seated against the correct collar.
- ✦ Car sits uneven
Check the surface, tire pressures, measurements, spring seating, and left-to-right settings.
- ✦ Coilover collar will not turn
Clean the threads and use penetrating lubricant if allowed by the manufacturer. Avoid hammering the collar aggressively.
- ✦ Car still bottoms out
Check ride height, bump stops, spring rate, damper travel, and suspension condition.
- ✦ Spring is loose at full droop
Verify preload and spring seating before driving.
- ✦ Car pulls after adjustment
Check tire pressure and arrange a wheel alignment.
- ✦ Tire rubs only during turns
Check clearance at full steering lock and under suspension compression.
What If the Adjustment Collars Are Seized?
Do not force a seized collar until the threads are clean. Brush away dirt and corrosion first.
A suitable penetrating lubricant may help if the coilover maker allows it. Severe corrosion may require removing the coilover so it can be serviced without damaging the threaded body.
How Often Should You Recheck Coilover Height?
Check the ride height again after the first few drives following an installation or major adjustment. New springs and mounting hardware may settle slightly.
After that, you do not need to measure the car every week. A check during tire rotations, seasonal maintenance, or suspension inspections is usually practical for a street vehicle.
If you notice new tire rubbing, uneven tire wear, a change in stance, or new suspension noise, inspect the coilovers sooner.
Cars driven through winter road salt need extra care. Keeping the threaded bodies clean helps prevent the adjustment collars from seizing.
- ✦ After initial adjustment
Recheck once the suspension has settled.
- ✦ During routine maintenance
Inspect collar tightness, threads, leaks, and spring condition.
- ✦ Before seasonal height changes
Clean the threads before raising or lowering the vehicle.
Can You Adjust Coilover Height With the Wheels On?
Sometimes, but removing the wheels is often safer and easier. Wheel removal gives you better access to the collars and makes it easier to clean and inspect the threaded body.
You should also remove suspension load from the coilover before forcing a heavily loaded adjustment collar. The exact method depends on the suspension design.
Some rear height adjusters can be reached with the wheels installed. That does not mean every coilover should be adjusted while the vehicle is sitting on the ground.
If access is poor, raise and support the vehicle properly instead of trying to work around the tire with limited tool movement.
A Practical Coilover Height Adjustment Example
Suppose the front of your car measures 14.5 inches from the wheel hub center to the fender on both sides. You want to lower it modestly while keeping enough room for daily driving.
Instead of making a large change, adjust each front coilover by the same small amount. Tighten the collars, lower the car, roll it several feet, and measure again.
If the new measurement is 14.2 inches, you lowered the body by about 0.3 inch at the fender. You can then decide whether that is enough or whether another small adjustment is needed.
This measure-adjust-measure process is slower than guessing, but it is far more reliable. It is the method I recommend whenever someone asks **how to adjust coilover height** without ending up too low on the first attempt.
- ✦ Start
14.5 inches hub center to fender.
- ✦ Make a small equal adjustment
Change both front coilovers by the same amount.
- ✦ Settle the suspension
Lower the car and roll it before measuring.
- ✦ New measurement
14.2 inches hub center to fender.
- ✦ Result
The front ride height dropped about 0.3 inch.
Coilover Height Adjustment Safety Tips
Suspension parts carry large loads, so safety matters more than speed. Use stable lifting equipment and keep your hands clear of loaded springs and moving suspension parts.
Never loosen a spring perch in a way that could release spring tension unexpectedly. Some coilover service procedures require spring compressors or removal of the complete assembly.
Also avoid modifying coilovers beyond their intended range. Cutting springs, removing locking collars, or running too little thread engagement can create serious safety problems.
If the instructions for your specific kit are unclear, contact the manufacturer or a qualified suspension shop before making a major adjustment.
- ✦ Use jack stands
Never depend on a hydraulic jack alone.
- ✦ Follow manufacturer limits
Stay within the approved ride-height and thread-engagement range.
- ✦ Do not release spring tension carelessly
A compressed spring stores significant energy.
- ✦ Torque critical hardware
Use the specified torque for wheels and suspension fasteners.
- ✦ Stop if something feels wrong
A seized or damaged component should be inspected rather than forced.
Best Practices for Learning How to Adjust Coilover Height
The best way to learn **how to adjust coilover height** is to treat it as a measured setup process rather than a simple lowering job. Record your starting point and make one controlled change at a time.
Keep preload within the correct range. Use the dedicated height adjustment when your coilovers provide one. Make sure both sides of an axle start with equal changes.
Then settle the suspension, measure again, and check clearance. Once the height is final, get the alignment corrected.
That process takes a little longer, but it gives you a better chance of keeping the vehicle comfortable, predictable, and safe.
- ✦ Measure first
Record all four ride-height measurements.
- ✦ Understand the design
Know whether your coilovers use body-length, perch, or separate rear adjustments.
- ✦ Adjust gradually
Small changes are easier to control and reverse.
- ✦ Verify clearance
Check tires, brake hoses, wiring, and underbody parts.
- ✦ Align last
Perform the final alignment after you are satisfied with the ride height.


