Yes, coilover preload can affect ride height, but the amount depends on the suspension design. On many conventional coilovers, preload changes spring tension at full extension more than it changes the final height of a car under its own weight. The correct adjustment depends on the coilover design and the manufacturer’s instructions.
Across the United States, drivers use coilovers to change how their cars sit, handle, and respond to bumps. A driver may want more ground clearance for rough roads or a lower stance for a track car. Understanding spring preload helps prevent a common mistake: using spring tension as a substitute for a proper ride height adjustment.
A coilover combines a coil spring and a shock absorber in one assembly. Some designs use a threaded spring seat to adjust preload, while others have a separate threaded body or lower mount to adjust ride height. These systems can look alike, but their adjustments serve different purposes.
Before turning an adjustment collar, check the instructions for the exact coilover model. Spring length, spring rate, suspension layout, and available travel all affect the result. A setup that works on one vehicle may not work on another, so safe adjustment starts with the design rather than a universal number.
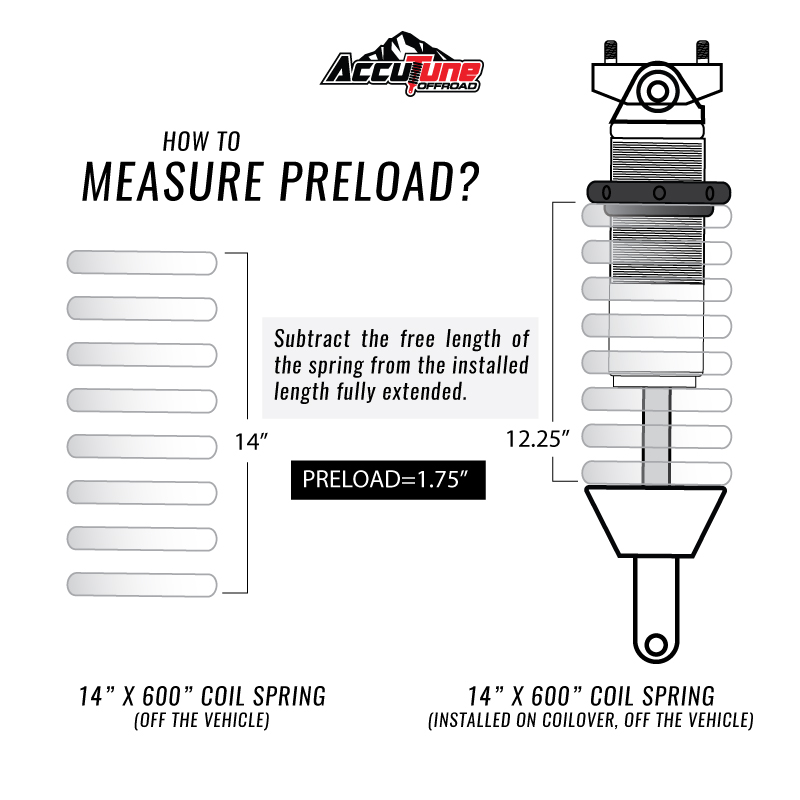
Coilover preload is the compression applied to a spring when it is fitted between its spring seats. The spring may already be compressed before the vehicle’s weight acts on it. This initial compression helps keep the spring seated and establishes the starting conditions for the suspension.
A coil spring resists compression as it deflects. The amount of force it adds for each unit of compression is called the spring rate. For a linear spring, the relationship between force and deflection is approximately constant within its intended operating range.
Preload is not the same as spring rate. Adjusting the spring seat on a linear spring usually changes the initial spring force and the suspension’s operating position, but it does not change the spring’s basic rate. Progressive springs and linked or dual-rate systems can behave differently as their active coils and spring arrangement change.
The term preload can also refer to different setup methods across suspension brands. Some manufacturers specify a measured spring compression, while others specify a collar position or a prescribed amount of spring-seat contact. These instructions should not be treated as interchangeable.
Source: cdn.shopify.com
Spring rate
The force needed to compress a spring by a given distance. A higher spring rate generally means more force is needed for the same additional compression.
Spring preload
The initial spring compression or force established during assembly before the vehicle reaches its normal loaded position.
Ride height
The vehicle’s standing height under a defined load, usually measured from the ground to a specified body or chassis reference point.
Damping
The resistance the shock absorber provides as the suspension moves. Damping adjustment is separate from spring preload on most adjustable coilovers.
How Preload Works on a Coilover
When a spring is installed and compressed by its seats, it pushes outward against both seats. The spring’s initial force depends on its rate and how far it is compressed. For a linear spring, the basic relationship is force equals spring rate multiplied by compression.
For example, a hypothetical linear spring with a rate of 200 pounds per inch that is compressed by 0.25 inch produces about 50 pounds of spring force. This simple calculation describes the spring itself, not the exact change in vehicle height. Suspension motion ratios, load distribution, and the coilover mounting arrangement affect the result at the wheel.
Initial spring force
Preload creates force before the vehicle’s normal load is applied to the suspension.
Suspension position
The effect on the standing position depends on how the spring, shock, and suspension links interact.
Does Coilover Preload Affect Ride Height?
Yes, but the result depends on the coilover’s design. In a simple spring and shock arrangement, changing the spring seat can affect the spring’s installed length and the suspension’s position under load. In other designs, the spring seat primarily establishes preload while a separate threaded body or lower mount controls the standing height.
The key question is whether the adjustment changes the effective length of the assembled coilover or changes the spring’s position within an assembly whose mounting length stays fixed. If the shock body and mounting points remain fixed, the suspension must settle into a position where the spring and other suspension forces balance the vehicle’s load. Changing preload can alter that balance, but the amount of height change is not universal.
On a common height-adjustable coilover with a separate lower mount, ride height is usually changed by altering the distance between the lower mounting point and the shock body. The spring seat can then be adjusted according to the manufacturer’s procedure to maintain the correct preload. This design helps separate height adjustment from spring setup.
A vehicle may also have little or no measurable ride height change after a small preload adjustment. That does not necessarily mean the collar is ineffective. The change may mainly affect spring retention at full extension, available droop travel, or the position at which the suspension reaches full extension.
Source: cdn.shopify.com
Fixed-length coilover assembly
Preload can influence the loaded suspension position, depending on the spring arrangement and suspension geometry.
Separate height-adjustable design
A threaded lower mount or body adjustment commonly sets ride height, while the spring collar establishes the specified preload.
Factory-style replacement coilover
A replacement unit with limited adjustment may have a prescribed spring seat position rather than a broad height adjustment range.
Special spring arrangements
Dual-rate springs, tender springs, and linked spring systems may respond differently from a simple linear spring.
Why More Preload Does Not Always Mean a Higher Car
A spring seat can increase initial spring force without directly changing the distance between the coilover’s mounting points. If the assembly’s geometry constrains its length and the suspension reaches a position governed by the vehicle load, the resulting height change may be small or design-dependent.
On a system where spring-seat movement changes the loaded operating position, added preload can raise the vehicle. However, using that effect to achieve a large height increase may reduce suspension droop or move the shock closer to full extension. The manufacturer’s allowed adjustment range is the limit, not the point at which the vehicle looks right.
Check the adjustment design
Find out whether the collar is intended to change spring preload, ride height, or both.
Check available travel
Confirm that the shock retains the required compression and extension travel after adjustment.
Preload vs. Ride Height Adjustment
Preload and ride height adjustment are related, but they are not the same setting. Preload sets the spring’s initial compression according to the suspension design. Ride height adjustment changes the vehicle’s standing position by altering the coilover’s effective mounting length or another designated height-setting mechanism.
Confusing the two settings can lead to poor suspension travel, uneven handling, or a spring that is not correctly retained at full droop. The right approach is to use the specified preload setting first, then adjust ride height using the mechanism intended for that purpose, where the design permits both adjustments.
Source: shiftmaxx.com
Preload collar
Sets the spring seat position and initial compression. Its effect on ride height depends on the coilover design.
Threaded lower mount
Often changes the effective mounting length of a height-adjustable coilover, allowing the vehicle to sit higher or lower.
Shock damping adjuster
Changes resistance to suspension movement on compatible dampers. It is not a substitute for a ride height adjustment.
Spring rate
Determines the spring’s force response to additional compression. A preload adjustment does not normally change the rate of a linear spring.
Which Adjustment Should You Use?
If your car sits too low or too high, first identify the manufacturer’s intended ride height adjustment. Do not turn the spring collar at random to change the stance. On many height-adjustable designs, the lower mount is the correct control for the standing height.
If your goal is to correct spring seating, follow the preload procedure for the exact kit. If the suspension feels too firm, do not assume that reducing preload will solve the problem. Spring rate, bump stops, damping, tire pressure, and available travel may all contribute to the ride.
To change standing height
Use the designated ride height adjustment and keep the coilover within its approved range.
To set spring preload
Use the specified spring compression, collar position, or contact procedure in the manufacturer’s manual.
To change damping
Adjust the damper only as directed by the manufacturer and evaluate the change under safe conditions.
How Spring Rate and Suspension Geometry Change the Result
Spring rate and suspension geometry help determine how a preload adjustment affects ride height. Two coilovers with the same spring rate may produce different wheel-height changes because the spring may act through different mounting points or suspension linkages.
The motion ratio describes the relationship between wheel movement and spring movement. In many suspension layouts, the spring does not move the same distance as the wheel. This means a change measured at the spring cannot be converted directly into the same change at the fender.
Vehicle weight also matters. A heavier vehicle or a suspension carrying more load may compress its springs farther than a lighter setup. Cargo, passengers, fuel, aftermarket bumpers, and other added parts can affect the standing position, especially on trucks and off-road vehicles.
A progressive spring may have a changing rate as it compresses. Dual-rate systems can also shift between operating stages. As a result, the same collar movement may not produce the same response at different points in the suspension’s travel.
Source: i.ytimg.com
Spring rate
A higher rate requires more force for the same additional compression, but it does not by itself determine the correct preload or ride height.
Motion ratio
Changes how spring movement and force relate to wheel movement and force.
Vehicle load
Added weight can compress the suspension and change measured ride height.
Progressive and dual-rate springs
May have a changing force response or a staged spring response, so the effect of adjustment may differ from that of a linear spring.
A Simple Preload Calculation
Consider a hypothetical linear spring with a rate of 250 pounds per inch. If its installed compression increases by 0.2 inch, the spring’s initial force increases by about 50 pounds, assuming the same spring rate and a valid linear operating range.
That 50-pound force change does not mean the car will rise by 0.2 inch. The wheel’s motion ratio, the number and placement of springs, the vehicle’s load, and the coilover mounting geometry all affect the final result. Use spring calculations to understand the mechanism, not to predict an exact fender-height change without the suspension data.
Calculation
Change in spring force equals spring rate multiplied by the change in spring compression.
Limit
The calculation alone cannot predict the exact ride height change at the wheel.
How to Check and Adjust Coilover Preload Safely
Before changing preload, identify the coilover brand and model and obtain its installation or adjustment manual. Check whether the manufacturer specifies spring compression, a spring-seat position, or another method. If the manual is unavailable or the assembly differs from the documented design, have a suspension shop identify the correct procedure before making changes.
Work on a level, stable surface and use the lifting and support points specified for your vehicle. Never rely on a jack alone to support a vehicle. Coil springs can store substantial energy, so do not loosen a spring seat or dismantle a loaded coilover unless you have the correct tools, training, and instructions.
Record the original settings before making any permitted adjustment. Measure the standing height at consistent reference points, note the collar positions, and keep the vehicle load and tire pressures consistent. These records make it easier to tell whether a change helped and to return to the original setup if needed.
Source: accutuneoffroad.com
Required information
The exact coilover manual, the specified preload method, the approved adjustment range, and any required torque values.
Useful tools
Suitable measuring tools, the correct adjustment spanner, approved vehicle lifting equipment, and secure support stands where applicable.
Stop conditions
Stop if the spring is not securely seated, the coilover is damaged, a lock ring is stuck, or the correct procedure is unclear.
Step 1: Identify the Correct Adjustment Collar
Locate the spring seat and any separate lower mount or height adjustment collar. Check the manufacturer’s diagram to identify each part. Some systems use multiple threaded rings, and turning the wrong ring can change the wrong setting or loosen a locking mechanism.
Do not assume that all threaded rings are designed to change preload. Some are lock rings that secure a setting, while others position the spring seat or lower mount.
Verify the part
Compare the actual assembly with the exact model’s instructions before turning any collar.
Step 2: Record the Starting Measurements
Park on level ground, use the manufacturer’s prescribed measurement points, and record the height at each corner. Fender-to-ground measurements are useful for tracking changes, but they can be affected by tire size, tire pressure, and body shape. If the manufacturer specifies a chassis reference point, use that instead.
If the vehicle has recently been lifted, lowered, or had suspension parts replaced, follow the manufacturer’s settling procedure before treating the measurements as final. Keep fuel, cargo, and passenger load as consistent as practical.
Record all corners
Measure left and right sides and compare front with rear where the vehicle’s setup requires it.
Step 3: Follow the Specified Preload Procedure
Use the specified spring compression or collar setting rather than choosing an arbitrary number of turns. A turn count alone is not a reliable universal preload measurement because thread pitch, spring arrangement, and starting position vary between coilovers.
If adjustment requires unloading, removing, or dismantling the coilover, use the approved workshop procedure and proper spring-compression equipment. Do not loosen a spring seat while the spring is carrying an uncontrolled load.
Stay within the approved range
Never exceed the stated preload limit or use spring-seat adjustment to compensate for an unsuitable spring.
Step 4: Set Ride Height Separately When Required
If the coilover has an independent height adjustment, use that mechanism to reach the desired standing height within the approved range. Then verify that preload remains within specification. Some kits require a particular order of adjustment, so follow the exact manual rather than a generic sequence.
Make sure the spring remains correctly seated and that the shock has adequate compression and extension travel. A car that looks level while parked can still have a suspension setup that reaches a travel limit too soon.
Check the full assembly
Verify that the spring seats, lock rings, mounting hardware, and other components are secured as instructed.
Step 5: Recheck the Vehicle on Level Ground
Lower the vehicle using the approved procedure and let the suspension settle as directed by the manufacturer. Roll the vehicle a short distance if appropriate, then return it to level ground and repeat the same measurements. Compare the results with the original readings.
Inspect for spring movement, unusual noises, visible damage, or signs that the shock is near a travel limit. If the height is uneven or the suspension behaves differently than expected, do not keep adjusting collars at random. Recheck the installation and seek qualified help if the cause is unclear.
Success signs
The spring remains seated, measurements are consistent with the intended setup, the suspension retains the required travel, and all locking hardware is secure.
How Much Preload Should You Run?
There is no single preload measurement that suits every coilover. The correct setting depends on the spring, shock design, intended vehicle use, and the manufacturer’s instructions. A measurement that is suitable for one off-road coilover may be wrong for a street or track setup.
Some coilovers require a small amount of spring-seat pressure to keep the spring retained at full extension. Others specify a measured amount of compression or a defined spring-seat position. Some systems have tender springs or dual-rate arrangements that need a more detailed setup procedure.
Do not add preload simply because the vehicle sits lower than expected. First check whether the spring rate is appropriate, the spring is installed correctly, the shock length matches the application, and the vehicle is carrying the expected load. A damaged or incorrectly assembled suspension needs repair, not a collar adjustment.
Source: accutuneoffroad.com
Street driving
Use the kit’s prescribed setup and retain enough travel for ordinary roads, driveways, and bumps.
Track use
Follow the coilover manufacturer’s setup guidance and the vehicle’s approved suspension specifications. Check handling balance and travel rather than tuning for appearance alone.
Off-road use
Account for wheel droop, bump travel, vehicle accessories, and loaded weight. Added preload should not be used to hide an unsuitable spring or incorrect shock length.
Heavy vehicles
Confirm that the springs and dampers are rated for the actual axle loads and intended use.
Can You Use Preload to Level a Vehicle?
Preload may affect standing height on some suspension systems, but it should not be used as a universal leveling method. Before changing the settings, determine whether the difference comes from unequal load, spring sag, worn components, incorrect installation, or a design feature.
On a vehicle with independent height adjustment, use the approved method to set the left and right heights. If the manufacturer specifies different settings for each side to account for a known design condition, follow those instructions. Otherwise, do not assume that unequal preload is the correct fix for an uneven stance.
Check load and condition
Inspect cargo, accessories, spring condition, mounts, and any signs of damage before making a correction.
Verify after adjustment
Measure on level ground and obtain a wheel alignment when the adjustment affects alignment geometry or the manufacturer’s instructions require it.
Common Preload Mistakes and Their Effects
The most common preload mistakes come from treating every coilover as if it uses the same adjustment system. An incorrect setting can affect spring retention, available suspension travel, and the way the vehicle responds to bumps. The fix depends on the actual symptom and the coilover design.
A harsh ride does not automatically mean there is too much preload. High spring rate, excessive damping, bottoming against a bump stop, low tire compliance, and insufficient travel can all contribute. Diagnose the system before changing the spring seat.
Source: cdn.shopify.com
Adding preload to gain substantial height
This may reduce droop travel or move the suspension toward full extension. Use the designated height adjustment if the kit provides one.
Assuming preload changes spring rate
Preload does not normally change the basic rate of a linear spring. Choose a suitable spring rate if the spring’s force response is wrong for the application.
Ignoring spring retention
A spring that becomes loose or unseated at full droop may indicate an incorrect setup, incompatible parts, or a design-specific issue that requires inspection.
Adjusting one side without checking the other
Unequal measurements can come from load, worn parts, installation differences, or suspension geometry. Measure both sides and investigate the cause.
Skipping alignment checks
Changing ride height can change camber, toe, and other alignment settings. Follow the vehicle and coilover manufacturer’s alignment guidance.
Troubleshooting Uneven or Unexpected Ride Height
If the vehicle sits higher after a preload change, confirm whether the coilover design allows the spring seat to change the loaded position. Then compare the measured collar positions, spring installation, and vehicle load with the original setup.
If the vehicle does not change height, check whether the collar controls preload rather than ride height. Confirm that the vehicle has settled and that the measurements use the same reference points. Avoid repeated collar changes without understanding the mechanism.
If one corner sits lower, inspect for a broken or sagging spring, loose mounting hardware, incorrect spring seating, damage, or uneven loading. Do not crawl under an unsupported vehicle or attempt to release a loaded spring without proper equipment.
Unexpected height change
Check the coilover design, adjustment position, vehicle load, and settling procedure.
Harsh or bouncy ride
Check spring rate, damping, bump stops, tire pressure, and available travel instead of assuming preload is the only cause.
Clunks or spring movement
Stop driving if the spring is loose, a mount is damaged, or a component may be unsafe. Have the assembly inspected.
How to Measure Ride Height Correctly
A reliable ride height comparison requires the same conditions before and after an adjustment. Park on a level surface, keep the vehicle load consistent, and use the same measurement points. Small differences in ground slope, tire pressure, or cargo can make a suspension adjustment appear larger or smaller than it is.
Fender-to-ground height is easy to measure, but it is not always the best measure of suspension position. Tire diameter and pressure can change the reading even when the suspension itself has not changed. A chassis or hub-based reference may provide a clearer comparison when specified by the manufacturer.
After changing ride height, check the alignment and any clearance limits that apply to the vehicle. Verify that brake hoses, wiring, and other connected parts are not stretched or pinched throughout the suspension’s approved movement. A professional inspection is appropriate when travel, clearance, or alignment cannot be verified safely.
Source: accutuneoffroad.com
Use the same reference points
Choose the specified chassis, hub, or body reference and repeat the measurement at each corner.
Keep the load consistent
Use similar fuel, cargo, and passenger conditions when comparing measurements.
Let the suspension settle
Follow the manufacturer’s settling procedure before recording final measurements.
Check alignment and clearance
Confirm that the adjustment has not created an alignment issue or a suspension, tire, or hose clearance problem.
What to Record Before and After Adjustment
Create a simple record with the date, vehicle load, tire pressure, measurement points, left and right height readings, and each collar’s position. Record the preload measurement in the unit and method specified by the manufacturer. This makes later troubleshooting more reliable.
If the ride height changes unevenly or the spring setting differs from the manufacturer’s specification, stop and determine why before driving normally. The objective is a correct and safe suspension setup, not just a particular measurement.
Height measurements
Record the same reference points at all relevant corners.
Adjustment settings
Record the actual specified preload and ride height settings separately.
Inspection notes
Record unusual noises, visible damage, spring seating, and any alignment or clearance concerns.
Frequently Asked Questions
Q
Does adding preload make a car sit higher?
It can, depending on the coilover design. On some systems, increasing spring preload changes the loaded suspension position. On many height-adjustable coilovers with separate spring and lower-mount adjustments, the lower mount is intended to control ride height. Check the exact manufacturer’s instructions before changing either setting.
Q
Does more coilover preload make the ride stiffer?
More preload does not normally change the basic spring rate of a linear spring. However, it can change the suspension’s starting position, available travel, and behavior around bump stops or spring transitions. Those changes may make the ride feel different, even though the spring rate itself has not changed.
Q
Can too much preload damage coilovers?
An adjustment beyond the manufacturer’s allowed range can compromise spring retention, reduce useful suspension travel, or cause the shock to operate outside its intended range. The risk depends on the design and the amount of adjustment. Never exceed the specified setting, and have a qualified suspension technician inspect a setup that cannot maintain proper spring seating or travel.
Q
Should preload be equal on both sides of a car?
Use the manufacturer’s specified settings for both sides. Equal settings are common when the suspension design and vehicle setup call for them, but some applications have documented side-to-side differences. Do not use unequal preload to correct an unexplained height difference without checking vehicle load, spring condition, installation, and suspension geometry.
Q
Should I adjust preload or ride height first?
Follow the adjustment order in the exact coilover manual. Many systems require preload to be set to a specified value, followed by ride height adjustment through a separate threaded mount. Other designs use a different procedure, so a universal sequence may be wrong for your kit.
Q
Does coilover preload affect wheel alignment?
Preload can affect alignment indirectly if it changes the vehicle’s standing height. Ride height changes can alter suspension geometry and wheel alignment, including camber and toe. After a significant height adjustment, check the manufacturer’s alignment requirements and obtain a professional alignment when needed.
Q
Can I adjust coilover preload without removing the coilover?
Some coilovers allow an external adjustment while installed, but others require the suspension to be unloaded or the assembly to be removed. The correct method depends on the model and its access points. Never loosen a spring seat while it is carrying an uncontrolled spring load, and use proper support and tools.
✦ Wrapping Up
Conclusion
Coilover preload can affect ride height, but the effect depends on the suspension’s design. On some systems, changing spring-seat compression changes the loaded position of the vehicle. On many height-adjustable designs, a separate threaded body or lower mount controls ride height while the spring collar sets preload.
The safest way to get the desired stance is to identify the adjustment mechanism, follow the exact coilover instructions, and measure the vehicle under consistent conditions. Spring rate, vehicle load, suspension geometry, and available travel all matter. A higher or lower stance is not a good result if the suspension no longer works within its intended range.
💡 Key Takeaway
Check your coilover manual first. Record the current ride height and preload setting, use the correct adjustment for your goal, and verify spring retention, suspension travel, alignment, and hardware security before returning the vehicle to normal use.
Eric
Hi, I’m Eric Bennett, the person behind OffRoadTruckAccessories.com.
I created this blog to share my interest in trucks, off-road driving, automotive accessories, and DIY modifications. I enjoy learning how different truck accessories work, testing their usefulness, and understanding whether they are truly worth buying.
Will G37 coilovers fit G35? Learn which model years may share fitment, what changes with coupe, sedan, and AWD setups, and how to verify compatibility.