
How to Protect Coilovers in Winter: Step-by-Step Instructions
Winter can turn a well-kept coilover suspension into a difficult repair project. Road salt, brine, slush, and trapped moisture work into the threaded shock body and spring perches, where corrosion can make ride-height adjustments seize. Dirt packed around the threads can cause the same trouble even when the metal still looks sound.
The good news is that how to protect coilovers in winter is mostly a matter of reducing contamination and checking the parts before a small problem becomes an expensive one. You do not need to disassemble the suspension or coat every component with a random lubricant. You need a safe wash routine, compatible corrosion protection, and a way to inspect the areas that are easy to miss.
This guide explains how to prepare coilovers before winter, clean them after salty driving, protect threaded adjusters, and verify that everything still moves correctly. It also covers when not to force a seized collar, which products can cause trouble, and how to decide whether a coilover setup should be removed from winter duty altogether.
At a glance
- Rinse road salt from the shock bodies, threads, spring perches, and lower mounts regularly.
- Use a product approved by the coilover manufacturer, keeping lubricants away from seals, brakes, and friction surfaces.
- Never force a seized adjustment collar; stop and have corroded or damaged parts evaluated.
How to Protect Coilovers in Winter: A Safe Maintenance Routine
The safest approach combines prevention, gentle cleaning, drying, and regular inspection. Perform the work with the vehicle parked on a level surface, the suspension cool, and enough access to see the threaded sections clearly. The exact coating or lubricant depends on the coilover manufacturer, so the product instructions take priority over general advice here.
Tools you will need
- Hose or low-pressure rinse nozzle for removing salt without forcing debris past seals
- Soft nylon brush for cleaning threads and spring perches
- Microfiber towels for drying exposed metal
- Manufacturer-approved corrosion protectant or lubricant for threaded adjusters
- Optional: jack and properly rated jack stands if wheel removal is necessary for access
- Optional: thread-cleaning tool supplied or recommended by the coilover manufacturer
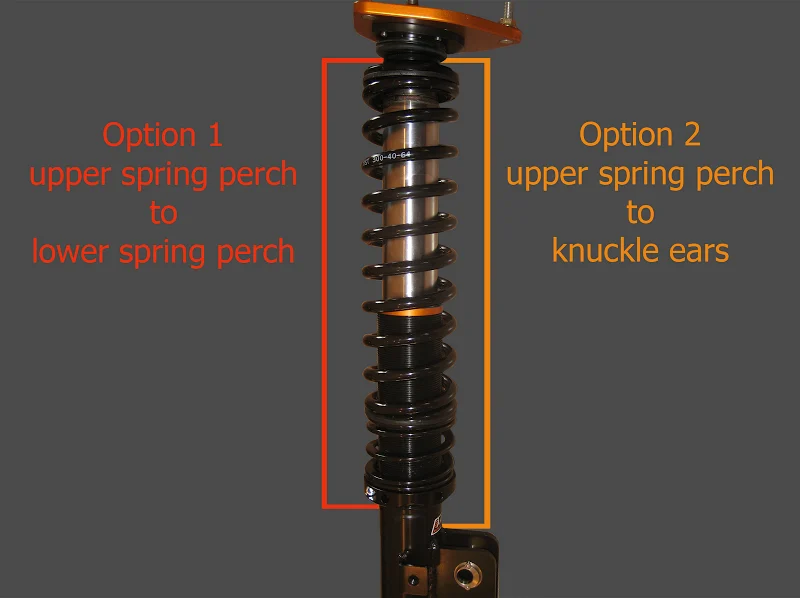
Step 1 Read the coilover manufacturer’s care instructions
Before applying anything, identify the coilover brand and model and check its maintenance instructions. Some manufacturers recommend a specific protectant, dry lubricant, or anti-seize compound; others warn against petroleum products, copper-based anti-seize, or sprays that can affect seals and bushings.
Look for instructions covering the threaded shock body, locking collars, spherical bearings, rubber dust boots, and adjustment knobs. If the manufacturer specifies that a collar must remain dry or requires a particular grease, follow that direction rather than treating all coilovers alike.
Success at this stage means you know which surfaces may be cleaned, which product is compatible, and whether the suspension needs periodic re-lubrication. If you cannot identify the model or find reliable instructions, use water, mild soap, and careful drying as the baseline, then ask the manufacturer or a qualified suspension shop before applying a chemical protectant.
Step 2 Inspect the suspension before winter driving
With the car safely parked, inspect each coilover with a flashlight. Look at the threaded shock body, spring perch, lock collar, lower mounting bracket, adjustment knob, damper shaft, and any exposed helper spring or tender spring. Check both the front and rear suspension because road spray often reaches them differently.
Surface discoloration is not automatically structural damage, but heavy flaking, deep pitting, a split dust boot, bent hardware, leaking damper fluid, or a collar that no longer has clean threads deserves attention before winter use. Also look for packed mud or salt that could hide corrosion.
Do not lift the vehicle by a component unless the vehicle and coilover manufacturer specifically allows it. If you need to remove a wheel, use approved lifting points and jack stands on solid, level ground. A jack alone is not a safe support method.
Important
Stop and seek qualified help if a damper is leaking, a threaded body is deeply pitted, a spring is cracked, a mount is bent, or an adjustment collar is seized. Do not hammer, heat, or apply extreme force to suspension hardware while it is installed on the vehicle.
Step 3 Remove loose salt and grit with a gentle rinse
Rinse the coilovers with clean water, beginning above the suspension and working downward so loosened salt does not settle back onto areas you have already cleaned. A garden hose with moderate flow is usually sufficient. The goal is to dissolve and carry away salt, not to blast water into seals or bearings.
Avoid holding a pressure-washer nozzle close to the damper shaft, adjustment knobs, spherical bearings, or rubber boots. High-pressure water can drive grit past seals and can remove protective grease from places where it is needed. If a pressure washer is the only practical option, use its widest spray pattern from a generous distance and do not aim directly at seals.
Pay particular attention to the underside of the threaded section and the area where the lower mount meets the knuckle or control arm. These horizontal and sheltered surfaces commonly retain salty slurry. A successful rinse leaves no visible white salt crust or gritty film, although a light wash may not remove embedded dirt by itself.
Step 4 Clean the threads and spring perches without forcing them
After rinsing, use a soft nylon brush and mild car-wash soap diluted according to the soap instructions. Work around the exposed threads, the spring perch, and the locking collar. Brush in the direction of the threads where possible, using light pressure to loosen dirt rather than trying to make a corroded collar turn.
Use a separate clean brush for the coilover if the old brush has metal bristles or abrasive debris in it. A wire brush can damage protective coatings and leave scratches that become corrosion starting points. Do not scrape the damper shaft with a screwdriver, pick, or other sharp tool.
Rinse the soap away and inspect the thread valleys. Clean threads should show a consistent profile rather than packed grit, flaky rust, or a thick ridge of old product. If the collar still will not move by hand after the threads are clean and dry, stop there; forcing it can damage the threads or alter the suspension height suddenly.
Step 5 Dry the coilovers completely
Dry the cleaned areas with microfiber towels, then let the suspension air-dry before applying protection. Turn the steering as needed, where safe, to see behind the front components. For the rear suspension, check the inner side of the coilover where spray from the tires may collect.
Compressed air can help remove water from thread valleys, but use low pressure and keep the nozzle away from seals and bearings. Do not use a heat gun or open flame. Excessive heat can damage rubber components, paint, protective coatings, and nearby brake or electrical parts.
Drying is complete when there is no visible water beading in the threads, around the collars, or at the lower mount. This matters because applying a protectant over trapped salty water can preserve the contaminant against the metal instead of preventing corrosion.
Step 6 Apply only compatible protection to exposed threaded areas
Apply the manufacturer-approved protectant sparingly to the exposed threaded shock body and the adjustment collars, if the instructions allow it. A thin, even film is generally more useful than a heavy coating that collects grit. Work the product into the thread area without spraying blindly toward the damper shaft, brake rotor, brake pad, tire, or rubber boot.
Some owners use a corrosion-inhibiting spray, a dry-film lubricant, or a recommended anti-seize compound. These products are not interchangeable. A product that helps a steel fastener may be unsuitable for an adjustable coilover, especially if it attacks a coating, attracts abrasive dirt, or migrates onto a friction surface.
If you use a spray, put it on a cloth or small brush first when possible. This gives you better control around the suspension. Wipe away excess from the outside of the collar and any area where it could drip.
Protection is successful when the threads have a light, uniform film and surrounding components remain clean and dry.
Step 7 Confirm adjustment function without changing ride height
Once the coilover is clean and protected, check that the locking collar and spring perch are not visibly jammed. Do not change ride height simply to test the assembly. If an adjustment is necessary, measure the existing setup first and use the manufacturer’s adjustment procedure so the spring preload and vehicle height are not altered accidentally.
A useful way to approach how to protect coilovers in winter is to check your progress after each stage.
Use the correct hook spanner or adjustment tool if the manufacturer specifies one. Keep the tool fully engaged in the collar before applying gentle force. A collar that turns smoothly and predictably is different from one that breaks loose with a sudden snap or requires excessive force.
After any legitimate adjustment, confirm that the lock collar is secured as specified and that the height is equal side to side where the suspension design calls for it. Record measurements so you can detect movement later. Never rely on matching visible thread counts alone; suspension geometry and installed height can differ between sides.
Step 8 Repeat the rinse and inspection after salty drives
Winter protection is not a one-time coating. After driving on salted or brined roads, rinse the underside and coilover areas when practical, especially after a storm or a long trip through treated roads. Letting salt remain until the next warm day allows moisture to react with exposed metal and can make the residue harder to remove.
When temperatures are below freezing, avoid leaving water trapped in areas where it can freeze around moving hardware. Use a moderate rinse when conditions allow, dry the accessible parts, and do not park immediately in a way that leaves a large amount of water packed around the suspension.
Inspect the coilovers periodically for new rust, damaged boots, loose collars, or a change in ride height. A simple written note or photograph of each adjustment area can make changes easier to identify. The practical result of knowing how to protect coilovers in winter is consistent small maintenance rather than a desperate attempt to free a corroded collar in spring.
What Winter Does to Coilovers
Coilovers combine a damper with a height-adjustable spring platform. The height adjustment usually relies on threaded sections and collars, and those threads are the part most vulnerable to road salt, grit, and moisture. Once corrosion begins in the thread valleys, the collar can bind even when the visible outer surface looks acceptable.
Road salt does not need to be visibly wet to remain a problem. Salt residue attracts moisture from the air and can stay active in a thin film on the suspension. Brine used before or during a storm can reach places that ordinary slush does not, including the inner side of the shock body and the top of the lower mount.
Which parts need the most attention?
The threaded shock body and spring perch deserve the most frequent inspection because they control adjustment and have exposed metal surfaces. The lower mounting hardware, lock collars, and adjustment knobs also collect contamination. Damper shafts need cleanliness, but they should not be coated with a sticky product that can carry grit past the shaft seal.
Rubber dust boots should be checked for splits or displacement. Their job is to reduce contamination at the damper shaft, but a boot is not a substitute for cleaning the surrounding suspension. A torn boot may require replacement or damper service, depending on the design.
Why a thick coating can make things worse
A heavy layer of grease or oil may appear protective, but it can hold sand and road grit against the threads. That abrasive mixture can wear the finish and make later adjustments rough. Excess product can also migrate onto brake components or the tire, creating a serious safety problem.
For that reason, use the least amount of a compatible product that meets the manufacturer’s instructions. If the coilover maker recommends a dry coating, do not substitute a wet grease simply because it feels more durable. Compatibility and cleanliness matter more than how oily the part looks.
When winter storage is the better option
If the vehicle is a summer car, removing the coilovers from regular exposure may be the most effective protection. Storage should be clean and dry, with the suspension supported in a way that does not damage shafts, threads, or mounts. Follow the manufacturer’s storage instructions, particularly if dampers are removed from the vehicle.
Storage does not eliminate inspection. Before reinstalling the parts, check for corrosion, leaking fluid, damaged threads, and deteriorated rubber. A stored component that was put away wet or salty can corrode just as readily as one left on a driven car.
How to Check the Result
A proper winter-care routine should leave the suspension visibly cleaner without changing its setup. Verification is more than looking at the outside of the spring: inspect the thread valleys, the underside of the collars, and the areas facing the tire. Use a light and compare the parts with photographs taken before winter if available.

- The threaded sections are free of loose salt, packed mud, and gritty residue.
- The spring perches and lock collars show no new deep pitting, cracks, or heavy flaking.
- The damper shafts are clean and free of oil leakage or scoring.
- Rubber dust boots are intact and positioned correctly.
- No protectant has reached the brake rotor, brake pad, tire, or belt-like moving surfaces.
- Ride height has not changed unintentionally.
- Any collar that was tested moved only with the correct tool and reasonable force.
Check your result
After the first drive following maintenance, park on a level surface and listen for new clunks or scraping. Recheck ride height and look for fresh fluid around the dampers. Cleaning should not create a new noise, leak, or handling change.
Common Winter Coilover Problems
Most problems become easier to solve when you separate contamination from mechanical damage. A dirty thread may respond to careful cleaning, while deep corrosion, a bent collar, or a leaking damper requires repair or replacement. The table below helps identify the safest next decision without encouraging forceful experimentation.
| What you observe | Safer response |
|---|---|
| White residue or light surface rust | Rinse, clean gently, dry completely, and apply only approved protection. |
| Collar will not turn after cleaning | Stop forcing it; ask the manufacturer or a suspension specialist about the correct freeing procedure. |
| Deep pitting or flaking on threads | Do not adjust the damaged section; have the component inspected for thread integrity. |
| Oil around the damper shaft or body | Treat it as a possible damper leak and arrange professional evaluation. |
| New clunk, uneven height, or changed handling | Stop aggressive driving and inspect mounts, collars, springs, and hardware before continuing. |
Can penetrating oil free a seized collar?
Not automatically. A penetrating oil may be compatible with some hardware but harmful to a particular coilover’s coating, seals, or recommended lubricant. It can also carry loosened grit deeper into the threads.
Use it only if the coilover manufacturer approves it and you understand how to keep it away from brakes, tires, and seals.
Never use a torch near a damper, spring, rubber boot, brake line, fuel component, or tire. Heat can create a dangerous failure even if it frees the collar. A shop with the correct tools can determine whether the part can be saved without damaging the suspension.
Should the threads be adjusted before or after washing?
Clean and dry the threads before making an adjustment. Dirt changes how the collar feels and can score the thread surface. If the suspension must be adjusted, record its original measurement, use the correct tool, and recheck the final ride height and lock-collar position.
What if the coilovers are already rusty?
Light surface rust can sometimes be cleaned and monitored, but rust that has removed material, distorted threads, or caused flaking is not just a cosmetic issue. Do not assume a coating will restore the strength or accuracy of a damaged threaded body. Have the component assessed before relying on it for normal driving.
Beginner FAQs About Winter Coilover Care
Can I use WD-40 on coilovers?
Do not assume a general-purpose water-displacing spray is the correct long-term protectant. It may not provide the protection your coilover manufacturer specifies and can migrate onto brakes or collect dirt. Check the manufacturer’s instructions and use a compatible product sparingly.
How often should I rinse coilovers in winter?
Rinse them whenever they have been exposed to substantial road salt or brine, particularly after a storm or a long trip on treated roads. Frequency depends on local conditions, driving distance, and whether the vehicle is stored indoors. Inspecting the suspension matters more than following a fixed calendar interval.
Do I need to remove the wheels to clean coilovers?
Not always. You can often rinse and inspect much of the suspension through the wheel opening. Remove a wheel only when necessary for safe access, and support the vehicle with properly rated jack stands.
Never place yourself under a vehicle supported only by a jack.
Can I pressure-wash adjustable suspension?
You can use water carefully, but avoid directing high-pressure spray at damper seals, adjustment knobs, spherical bearings, rubber boots, and electrical components. A regular hose is usually safer for loosening salt. Keep the nozzle back and use a broad spray if higher pressure is unavoidable.
Will winter driving ruin coilovers?
Winter exposure does not automatically ruin them, but neglected salt and moisture can shorten the life of threaded adjusters, mounts, bearings, and damper components. Regular rinsing, compatible protection, and prompt attention to leaks or corrosion reduce the risk. Some specialized or uncoated setups are better kept off salted roads.
Keep Salt From Becoming a Suspension Repair
The most reliable way to protect coilovers in winter is to remove salt before it dries into the threads, clean without forcing grit into seals, dry the suspension fully, and apply only a manufacturer-approved protectant. A thin, controlled film is preferable to a thick layer that traps dirt or reaches the brakes.
Inspect the coilovers before winter, check them after salty drives, and record any ride-height or adjustment changes. If a collar seizes, a damper leaks, or the threaded body is deeply corroded, stop rather than forcing the hardware. A careful inspection or professional repair is safer and usually less costly than turning a maintenance problem into a suspension failure.
For a reliable result, approach how to protect coilovers in winter as a sequence of manageable actions and checks.


